- Microservice Architecture - Home
- Introduction
- Microservice Architecture - Scaling
- Microservice Architecture - Blueprint
- Different Elements
- Composition Patterns
- Hands-On SOA
- Hands-On MSA
Microservice Architecture - Hands-On MSA
In this chapter, we will build one microservice application that will consume different available services. We all know that microservice is not a cost-effective way to build an application as each and every service we build will be full stack in nature. Building a microservice in the local environment would need high-end system configuration, as you need to have four instances of a server to keep running such that it can be consumed at a point of time. To build our first ever microservice, we will use some of the available SOA endpoints and we will consume the same in our application.
System Configuration and Setup
Before going further to the build phase, prepare your system accordingly. You would need some public web services. You can easily google for this. If you want to consume SOAP web service, then you will get one WSDL file and from there you need to consume the specific web service. For REST service, you will need only one link to consume the same. In this example, you will jam three different web services SOAP, REST, and custom in one application.
Application Architecture
You will create a Java application using microservice implementation plan. You will create a custom service and the output of this service will work as an input for other services.
Following are the steps to follow to develop a microservice application.
Step 1: Client creation for SOAP service − There are many free web APIs available to learn a web service. For the purpose of this tutorial, use the GeoIP service of http://www.webservicex.net/. The WSDL file is provided in the following link on their website webservicex.net. To generate the client out of this WSDL file, all you need to do is run the following command in your terminal.
wsimport http://www.webservicex.net/geoipservice.asmx?WSDL
This command will generate all the required client files under one folder named SEI, which is named after service end point interface.
Step 2: Create your custom web service − Follow the same process mentioned at an earlier stage in this tutorial and build a Maven-based REST api named CustomRest. Once complete, you will find a class named MyResource.java. Go ahead and update this class using the following code.
package com.tutorialspoint.customrest;

import javax.ws.rs.GET;
import javax.ws.rs.Path;
import javax.ws.rs.Produces;
import javax.ws.rs.core.MediaType;

@Path("myresource")
public class MyResource {
   @GET
   @Produces(MediaType.TEXT_PLAIN)

   public String getIt() {
      return "IND|INDIA|27.7.65.215";
   }
}
Once everything is complete, go ahead and run this application on the server. You should get the following output in the browser.

This is the web server, which returns one string object once it is called. This is the input service that provides inputs that can be consumed by other application to generate records.
Step 3: Configure another Rest API − In this step, consume another web service available at services.groupkt.com. This will return a JSON object when invoked.
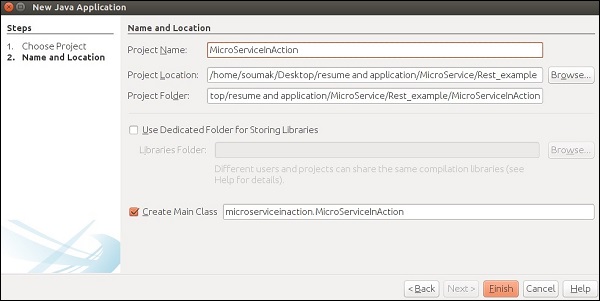
Step 4: Create JAVA application − Create one normal Java application by selecting New Project -> JAVA project and hit Finish as shown in the following screenshot.
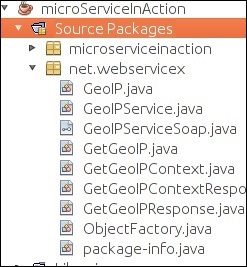
Step 5: Add the SOAP client − In step 1, you have created the client file for the SOAP web service. Go ahead and add these client files to your current project. After successful addition of the client files, your application directory will be look the following.
Step 6: Create your main app − Create your main class where you will consume all of these three web services. Right-click on the source project and create a new class named MicroServiceInAction.java. Next task is to call different web services from this.
Step 7: Call your custom web service − For this, go ahead and add the following set of codes to implement calling your own service.
try {
   url = new URL("http://localhost:8080/CustomRest/webapi/myresource");
   conn = (HttpURLConnection) url.openConnection();
   conn.setRequestMethod("GET");
   conn.setRequestProperty("Accept", "application/json");

   if (conn.getResponseCode() != 200) {
      throw new RuntimeException("Failed : HTTP error code : " + conn.getResponseCode());
   }

   BufferedReader br = new BufferedReader(new InputStreamReader(
      (conn.getInputStream())));
   while ((output = br.readLine()) != null) {
      inputToOtherService = output;
   }
   conn.disconnect();

} catch (MalformedURLException e) {
   e.printStackTrace();
} catch (IOException e) {
   e.printStackTrace();
}
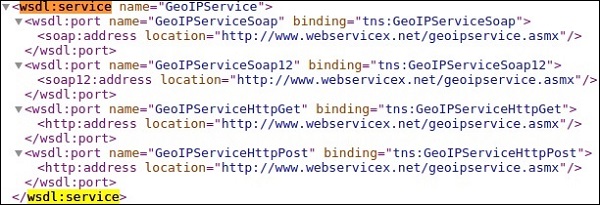
Step 8: Consume SOAP Services − You have generated your client file but you don't know which method should be called in that entire package? For this, you need to refer to the WSDL again, which you used to generate your client files. Every WSDL file should have one wsdl:service tag search for this tag. It should be your entry point of that web service. Following is the service endpoint of this application.
Now you need to implement this service in your application. Following is the set of Java code you need to implement your SOAP web service.
GeoIPService newGeoIPService = new GeoIPService();
GeoIPServiceSoap newGeoIPServiceSoap = newGeoIPService.getGeoIPServiceSoap();
GeoIP newGeoIP = newGeoIPServiceSoap.getGeoIP(Ipaddress);
// Ipaddress is output of our own web service.

System.out.println("Country Name from SOAP Webserivce ---"+newGeoIP.getCountryName());
Step 9: Consume REST web service − Two of the services have been consumed till now. In this step, another REST web service with customized URL will be consumed with the help of your custom web service. Use the following set of code to do so.
String url1="http://services.groupkt.com/country/get/iso3code/";//customizing the Url
url1 = url1.concat(countryCode);

try {
   URL url = new URL(url1);
   HttpURLConnection conn = (HttpURLConnection) url.openConnection();
   conn.setRequestMethod("GET");
   conn.setRequestProperty("Accept", "application/json");

   if (conn.getResponseCode() != 200) {
      throw new RuntimeException("Failed : HTTP error code : " + conn.getResponseCode());
   }

   BufferedReader br = new BufferedReader(new InputStreamReader(
      (conn.getInputStream())));
   while ((output = br.readLine()) != null) {
      System.out.println(output);
   }
   conn.disconnect();

} catch (MalformedURLException e) {
   e.printStackTrace();
} catch (IOException e) {
   e.printStackTrace();
}
Step 10: Consume all services − Considering your CustomRest web service is running and you are connected to Internet, if everything is completed successfully then following should be your consolidated main class.
package microserviceinaction;

import java.io.BufferedReader;
import java.io.IOException;
import java.io.InputStreamReader;
import java.net.HttpURLConnection;
import java.net.MalformedURLException;
import java.net.URL;
import java.util.StringTokenizer;

import net.webservicex.GeoIP;
import net.webservicex.GeoIPService;
import net.webservicex.GeoIPServiceSoap;

public class MicroServiceInAction {
   static URL url;
   static HttpURLConnection conn;
   static String output;
   static String inputToOtherService;
   static String countryCode;
   static String ipAddress;
   static String CountryName;
   public static void main(String[] args) {
      //consuming of your own web service
      try {
         url = new URL("http://localhost:8080/CustomRest/webapi/myresource");
         conn = (HttpURLConnection) url.openConnection();
         conn.setRequestMethod("GET");
         conn.setRequestProperty("Accept", "application/json");

         if (conn.getResponseCode() != 200) {
            throw new RuntimeException("Failed : HTTP error code : " + conn.getResponseCode());
         }

         BufferedReader br = new BufferedReader(new InputStreamReader(
            (conn.getInputStream())));
         while ((output = br.readLine()) != null) {
            inputToOtherService = output;
         }
         conn.disconnect();

      } catch (MalformedURLException e) {
         e.printStackTrace();
      } catch (IOException e) {
         e.printStackTrace();
      }

      //Fetching IP address from the String and other information
      StringTokenizer st = new StringTokenizer(inputToOtherService);
      countryCode = st.nextToken("|");
      CountryName = st.nextToken("|");
      ipAddress = st.nextToken("|");

      // Call to SOAP web service with output of your web service---
      // getting the location of our given IP address
      String Ipaddress = ipAddress;
      GeoIPService newGeoIPService = new GeoIPService();
      GeoIPServiceSoap newGeoIPServiceSoap = newGeoIPService.getGeoIPServiceSoap();
      GeoIP newGeoIP = newGeoIPServiceSoap.getGeoIP(Ipaddress);
      System.out.println("Country Name from SOAP Webservice ---"+newGeoIP.getCountryName());

      // Call to REST API --to get all the details of our country
      String url1 = "http://services.groupkt.com/country/get/iso3code/"; //customizing the Url
      url1 = url1.concat(countryCode);

      try {
         URL url = new URL(url1);
         HttpURLConnection conn = (HttpURLConnection) url.openConnection();
         conn.setRequestMethod("GET");
         conn.setRequestProperty("Accept", "application/json");

         if (conn.getResponseCode() != 200) {
            throw new RuntimeException("Failed : HTTP error code : " + conn.getResponseCode());
         }

         BufferedReader br = new BufferedReader(new InputStreamReader(
            (conn.getInputStream())));
         while ((output = br.readLine()) != null) {
            System.out.println(output);
         }

         conn.disconnect();
      } catch (MalformedURLException e) {
         e.printStackTrace();
      } catch (IOException e) {
         e.printStackTrace();
      }
   }
}
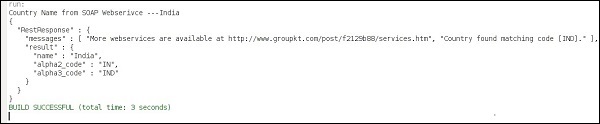
Once you run this file, you will see the following output in the console. You have successfully developed your first microservice application.