
Article Categories
- All Categories
-
 Data Structure
-
 Networking
-
 RDBMS
RDBMS
-
 Operating System
-
 Java
Java
-
 MS Excel
-
 iOS
iOS
-
 HTML
HTML
-
 CSS
CSS
-
 Android
-
 Python
-
 C Programming
-
 C++
C++
-
 C#
C#
-
 MongoDB
-
 MySQL
MySQL
-
 Javascript
-
 PHP
PHP
-
 Economics & Finance
Map a 10-bit number to 8-bit in Arduino
Mappings often have to be performed in Arduino for a variety of reasons. One example would be mapping the 10-bit ADC output to 8-bit to save on storage. A 10-bit number would occupy 2-bytes for storage, whereas an 8-bit number would occupy just one byte and still preserve most of the information of the 10-bit number.
Arduino has a readymade map() function for achieving this.
Syntax
map(value, fromLow, fromHigh, toLow, toHigh)
where, value is the value to be mapped; fromLow and fromHigh are the bounds of the range of the current value; toHigh and toLow are the bounds of the range of the new value.
Thus, if I need to map a 10-bit number to 8-bit number,
Syntax
map(value, 0, 1023, 0, 255)
This is because a 10-bit number’s minimum value is 0, and maximum is 1023. For an 8-bit number, the min and max values are 0 and 255 respectively.
What you can notice from the syntax is that you can use this function to map a number from any range to any new range. You need not restrict yourself to powers of 2.
Example
The following example illustrates the use of this function −
void setup() {
   // put your setup code here, to run once:
   Serial.begin(9600);
   Serial.println();

   int a = 200;
   Serial.println(map(a,0,500,0,1000));
   Serial.println(map(a,0,1023,0,255));
}

void loop() {
   // put your main code here, to run repeatedly:
}
Output
The Serial Monitor output is −
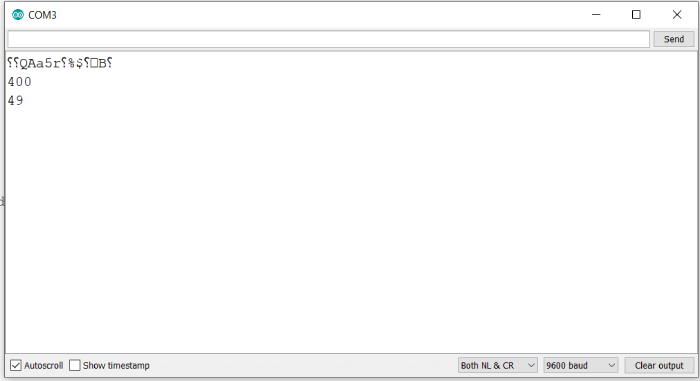
As you can see, this function can be used for both up-scaling and down-scaling a given number. First, we upscaled the number 200 from the (0,500) range to (0,1000) range. As expected, the function returned 400. In the second case, we down-scaled 200 from (0,1023) range to (0,255) range. The function returned 49, which matches the integer part of 200*255/1023 (=49.85).
You can refer to Arduino’s documentation for more information related to this function: − https://www.arduino.cc/reference/en/language/functions/math/map/

2K+ Views
