JPA - Persistence Operations
- JPA - Entity Managers
- JPA - Create Employee Example
- JPA - Update Employee Example
- JPA - Find Employee Example
- JPA - Delete Employee Example
- JPA - Criteria API
JPA - JPQL
- JPA - JPQL
- JPA - Scalar Function
- JPA - Aggregate Function
- JPA - Between Keyword
- JPA - Like Keyword
- JPA - Order By Clause
- JPA - Named Query
JPA - Advanced Mappings
- JPA - Advanced Mappings
- JPA - Single Table Strategy
- JPA - Joined Table Strategy
- JPA - Table per Class Strategy
JPA - Entity Relationships
- JPA - Entity Relationships
- JPA - @ManyToOne Relationships
- JPA - @OneToMany Relationships
- JPA - @OneToOne Relationships
- JPA - @ManyToMany Relationships
JPA - Useful Resources
JPA - @ManyToMany Relationships
Overview
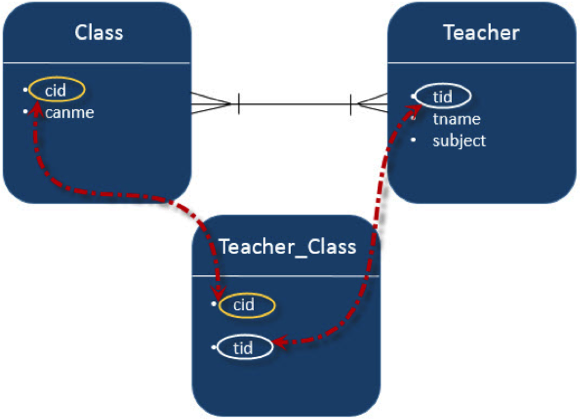
Many-To-Many relationship is where one or more rows from one entity are associated with more than one row in other entity.
Let us consider an example of relation between Class and Teacher entities. In bidirectional manner, both Class and Teacher have Many-To-One relation. That means each record of Class is referred by Teacher set (teacher ids), which should be primary keys in Teacher table and stored in Teacher_Class table and vice versa. Here, Teachers_Class table contains both foreign Key fields.
Creating Entities
Follow the above given diagram for creating entities. Create a package named com.tutorialspoin.eclipselink.entity under src package. Create a class named Clas.java under given package. The class Clas entity is shown as follows:
Clas.java
package com.tutorialspoint.eclipselink.entity;

import java.util.Set;

import jakarta.persistence.Entity;
import jakarta.persistence.GeneratedValue;
import jakarta.persistence.GenerationType;
import jakarta.persistence.Id;
import jakarta.persistence.ManyToMany;

@Entity
public class Clas {

   @Id
   @GeneratedValue( strategy = GenerationType.AUTO )

   private int cid;
   private String cname;

   @ManyToMany(targetEntity=Teacher.class)
   private Set teacherSet;

   public Clas(){
      super();
   }

   public Clas(int cid, String cname, Set teacherSet) {
      super();
      this.cid = cid;
      this.cname = cname;
      this.teacherSet = teacherSet;
   }

   public int getCid(){
      return cid;
   }

   public void setCid(int cid) {
      this.cid = cid;
   }

   public String getCname() {
      return cname;
   }

   public void setCname(String cname) {
      this.cname = cname;
   }

   public Set getTeacherSet() {
      return teacherSet;
   }

   public void setTeacherSet(Set teacherSet) {
      this.teacherSet = teacherSet;
   }
}
Create the second entity in this relation Teacher entity class, named Teacher.java under com.tutorialspoint.eclipselink.entity package. The Teacher entity class is shown as follows:
Teacher.java
package com.tutorialspoint.eclipselink.entity;

import java.util.Set;

import jakarta.persistence.Entity;
import jakarta.persistence.GeneratedValue;
import jakarta.persistence.GenerationType;
import jakarta.persistence.Id;
import jakarta.persistence.ManyToMany;

@Entity
public class Teacher {

   @Id
   @GeneratedValue( strategy = GenerationType.AUTO )
   private int tid;
   private String tname;
   private String subject;

   @ManyToMany(targetEntity = Clas.class)
   private Set clasSet;

   public Teacher(){
      super();
   }

   public Teacher(int tid, String tname, String subject, Set clasSet) {
      super();
      this.tid = tid;
      this.tname = tname;
      this.subject = subject;
      this.clasSet = clasSet;
   }

   public int getTid() {
      return tid;
   }

   public void setTid(int tid) {
      this.tid = tid;
   }

   public String getTname() {
      return tname;
   }

   public void setTname(String tname) {
      this.tname = tname;
   }

   public String getSubject() {
      return subject;
   }

   public void setSubject(String subject) {
      this.subject = subject;
   }

   public Set getClasSet() {
      return clasSet;
   }

   public void setClasSet(Set clasSet) {
      this.clasSet = clasSet;
   }
}
Persistence.xml
Persistence.xml will be created by the eclipse IDE while creating a JPA Project. The configuration details are user specifications. The persistence.xml file is shown as follows:
<?xml version="1.0" encoding="UTF-8"?>
<persistence version="3.0" xmlns="https://jakarta.ee/xml/ns/persistence" xmlns:xsi="http://www.w3.org/2001/XMLSchema-instance" xsi:schemaLocation="https://jakarta.ee/xml/ns/persistence https://jakarta.ee/xml/ns/persistence/persistence_3_0.xsd">
	<persistence-unit name="Eclipselink_JPA" transaction-type="RESOURCE_LOCAL">
	<provider>org.eclipse.persistence.jpa.PersistenceProvider</provider>
	<class>com.tutorialspoint.eclipselink.entity.Clas</class>
	<class>com.tutorialspoint.eclipselink.entity.Teacher</class>
      <properties>
         <property name="jakarta.persistence.jdbc.url" value="jdbc:mysql://localhost:3306/jpadb"/>
         <property name="jakarta.persistence.jdbc.user" value="guest"/>
         <property name="jakarta.persistence.jdbc.password" value="guest123"/>
         <property name="jakarta.persistence.jdbc.driver" value="com.mysql.cj.jdbc.Driver"/>
         <property name="eclipselink.logging.level" value="FINE"/>
         <property name="eclipselink.ddl-generation" value="create-tables"/>
      </properties>
	</persistence-unit>
</persistence>
Service Classes
This module contains the service classes, which implements the relational part using the attribute initialization. Create a package under src package named com.tutorialspoint.eclipselink.service. The DAO class named ManyToMany.java is created under given package. The DAO class is shown as follows:
ManyToMany.java
package com.tutorialspoint.eclipselink.service;

import java.util.HashSet;
import java.util.Set;

import jakarta.persistence.EntityManager;
import jakarta.persistence.EntityManagerFactory;
import jakarta.persistence.Persistence;

import com.tutorialspoint.eclipselink.entity.Clas;
import com.tutorialspoint.eclipselink.entity.Teacher;

public class ManyToMany {
   public static void main(String[] args) {

   EntityManagerFactory emfactory = Persistence.createEntityManagerFactory( "Eclipselink_JPA" );
   EntityManager entitymanager = emfactory.createEntityManager( );
   entitymanager.getTransaction( ).begin( );

   //Create Clas Entity
   Clas clas1 = new Clas(0, "1st", null);
   Clas clas2 = new Clas(0, "2nd", null);
   Clas clas3 = new Clas(0, "3rd", null);

   //Store Clas
   entitymanager.persist(clas1);
   entitymanager.persist(clas2);
   entitymanager.persist(clas3);

   //Create Clas Set1
   Set<Clas> classSet1 = new HashSet();
   classSet1.add(clas1);
   classSet1.add(clas2);
   classSet1.add(clas3);

   //Create Clas Set2
   Set<Clas> classSet2 = new HashSet();
   classSet2.add(clas3);
   classSet2.add(clas1);
   classSet2.add(clas2);

   //Create Clas Set3
   Set<Clas> classSet3 = new HashSet();
   classSet3.add(clas2);
   classSet3.add(clas3);
   classSet3.add(clas1);

   //Create Teacher Entity
   Teacher teacher1 = new Teacher(0, "Satish","Java",classSet1);
   Teacher teacher2 = new Teacher(0, "Krishna","Adv Java",classSet2);
   Teacher teacher3 = new Teacher(0, "Masthanvali","DB2",classSet3);

   //Store Teacher
   entitymanager.persist(teacher1);
   entitymanager.persist(teacher2);
   entitymanager.persist(teacher3);


   entitymanager.getTransaction( ).commit( );
   entitymanager.close( );
   emfactory.close( );
   }
}
Output
After compilation and execution of the above program you will get notifications in the console panel of Eclipse IDE. For output, check MySQL workbench as follows. In this example project, three tables are created.
Pass the following query in MySQL interface and the result of teacher_clas table in a tabular format is shown as follows in the query.
Select * form teacher_clas;

Teacher _tid	Classet_cid
354	        351
355	        351
356	        351
354	        352
355	        352
356	        352
354	        353
355	        353
356	        353
In the above table teacher_tid is the foreign key from teacher table, and classet_cid is the foreign key from class table. Therefore different teachers are allotted to different class.
Pass the following query in MySQL interface and the result of teacher table in a tabular format is shown as follows in the query:
Select * from teacher;

Tid	Subject	    Tname
354	Java	    Satish
355	Adv Java    Krishna
356	DB2         Masthanvali
Pass the following query in MySQL interface and the result of clas table in a tabular format is shown as follows in the query:
Select * from clas;

cid	Cname
351	1st
352	2nd
353	3rd
