
Article Categories
- All Categories
-
 Data Structure
-
 Networking
-
 RDBMS
RDBMS
-
 Operating System
-
 Java
Java
-
 MS Excel
-
 iOS
iOS
-
 HTML
HTML
-
 CSS
CSS
-
 Android
-
 Python
-
 C Programming
-
 C++
C++
-
 C#
C#
-
 MongoDB
-
 MySQL
MySQL
-
 Javascript
-
 PHP
PHP
Java program to print Swastika by taking input from user
Swastika is a religious symbol of Hinduism, Buddhism, and Jainism. In this article, we will learn to print Swastika by taking user input. Here, are three different approaches for making this design using Java. In all the approaches, the size of the Swastika is decided by the user. The user provides the input for the table or frame size. The Swastika is often used as an example to learn rows, columns, and tabular layout concepts using different languages including Java.
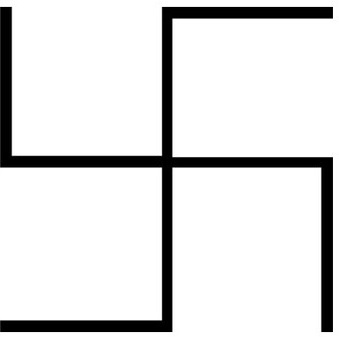
Making Swastika using Java.
Here, three different approaches are used to make this design using Java ?
Approach 1: By using two "for loops"
Column and row numbers would be entered by the user. The pattern for Swastika will be put in a square-shaped area. The "." character from the keyboard is used to make the pattern. The mid of the width and the mid of the height of the square shape are calculated. The vertical and horizontal lines of dots are printed with appropriate gaps using two 'for loops'. The limitation of this approach is that the lines are not continuous.
Steps by using two "for loops"
Following are the steps to print Swastika by using two "for loops" ?
-
Step 1 ? Import the required libraries.
-
Step 2 ? Decide the size of the figure to be drawn.
-
Step 3 ? Set the table rows and columns.
-
Step 4 ? Draw the Swastika pattern using "." Character.
-
Step 5 ? Show the result.
Example
Below is the Java program to print the Swastik using "for loops" ?
import java.util.Scanner;
public class swastika{
   public static void main (String[] args){
      int n;
      Scanner sc=new Scanner(System.in);
      System.out.print("Enter the row and col value <Select a number between 10 to 50 > :- ");
      n=sc.nextInt();
      sc.close();
      int row = n, col = n;
      for (int i = 0; i < row; i++) {
         for (int j = 0; j < col; j++){
            if (i < row / 2){
               if (j < col / 2){
                  if (j == 0)
                  System.out.print(".");
                  else
                  System.out.print(" "+ " ");
               }
               else if (j == col / 2)
                  System.out.print(" .");
               else{
                  if (i == 0)
                  System.out.print(" .");
               }
            }
            else if (i == row / 2)
               System.out.print(". ");
            else{
               if (j == col / 2 || j == col - 1)
                  System.out.print(". ");
               else if (i == row - 1){
                  if (j <= col / 2 || j == col - 1)
                     System.out.print(". ");
                  else
                  System.out.print(" "+ " ");
               }
               else
               System.out.print(" "+" ");
            }
         }
         System.out.print("\n");
      }
   };
}
Explanation
-
import java.util.Scanner ? To get the user input, here the Scanner class is imported. It is part of the java.util package.
-
Scanner sc=new Scanner(System.in) ? sc is an object of Scanner Class. System.in is used to take the input from user via keyboard.
-
sc.close() ? It is used to close the scanner object after its work is done.
-
System.out.print() ? It is used to print the output.
Output

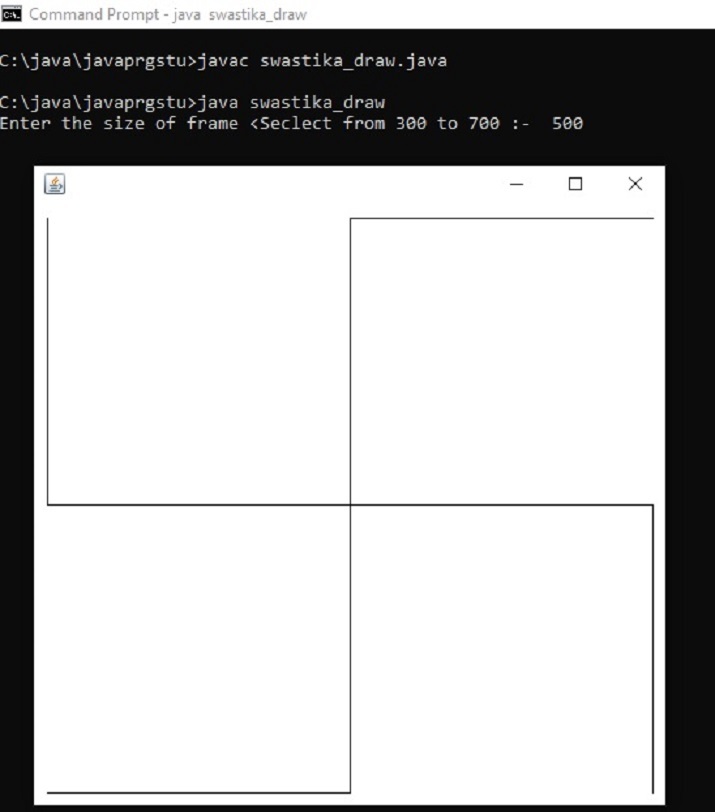
Approach 2 : By using drawLine() Method
Set the frame size and design for Swastika is made using the drawLine function. Six lines are drawn to make the Swastika design.java.awt.Graphics and java.awt.Graphics2D is used for making the drawing from AWT graphic class. The benefit of this approach is that the lines are continuous.
Steps to print Swastika using drawLine() Method
Following are the steps to print Swastika by using drawLine() Method ?
-
Step 1 ? Import the required java.awt.Graphics2D libraries.
-
Step 2 ? Decide the size of the figure. The figure size can also be entered as input.
-
Step 3 ? Set the frame size for the Symbol drawing.
-
Step 4 ? Draw the Swastika symbol. Draw continuous lines from one point to another.
-
Step 5 ? Show the result.
Example
Below is the Java program to print the Swastik using drawLine() Method ?
import java.awt.Component;
import java.awt.Frame;
import java.awt.Graphics;
import java.awt.Graphics2D;
import java.util.Scanner;
public class swastika_draw {
   public static void main(String[] args) {
      int n;
      Scanner sc=new Scanner(System.in);
      System.out.print("Enter the size of frame <Seclect from 300 to 700> :- ");
      n=sc.nextInt();
      sc.close();
      Frame frame = new Frame();
      frame.add(new CustomPaintComponent());
      int frameWidth = n;
      int frameHeight = n;
      frame.setSize(frameWidth, frameHeight);
      frame.setVisible(true);
   }
   static class CustomPaintComponent extends Component {
      public void paint(Graphics g) {
         Graphics2D g2d = (Graphics2D)g;
         int x1 = 10;
         int y1 = 10;
         int x2 = x1;
         int y2 = getSize().height/2;
         int x3 = getSize().width - 10;
         int y3 = y2;
         int x4= x3;
         int y4= getSize().height -10;
         int x5 = x3;
         int x6 = getSize().width/2;
         int y5= y1;
         int y6=y1;
         int x7=x6;
         int y7=y4;
         int x8=x1;
         int y8=y7;
         g2d.drawLine(x1, y1, x2, y2);
         g2d.drawLine(x2, y2, x3, y3);
         g2d.drawLine(x3, y3, x4, y4);
         g2d.drawLine(x5, y5, x6, y6);
         g2d.drawLine(x6, y6, x7, y7);
         g2d.drawLine(x7, y7, x8, y8);
      }
   }
}
Output
Explanation
-
import java.util.Scanner ? A component is an object that can be shown on the screen and a user can interact with it. For example, buttons.
-
java.awt.Graphics2D ? sThis is the class that is needed for 2D drawing in Java. This class extends the original Graphics class and provides additional features and controls.
-
drawLine() ? drawLine(int x1, int y1, int x2, int y2) is used to specify two points (x1, y1) and (x2, y2) which are joined to make a line.
-
Note ? Press control+C in command promt to close the display frame window.
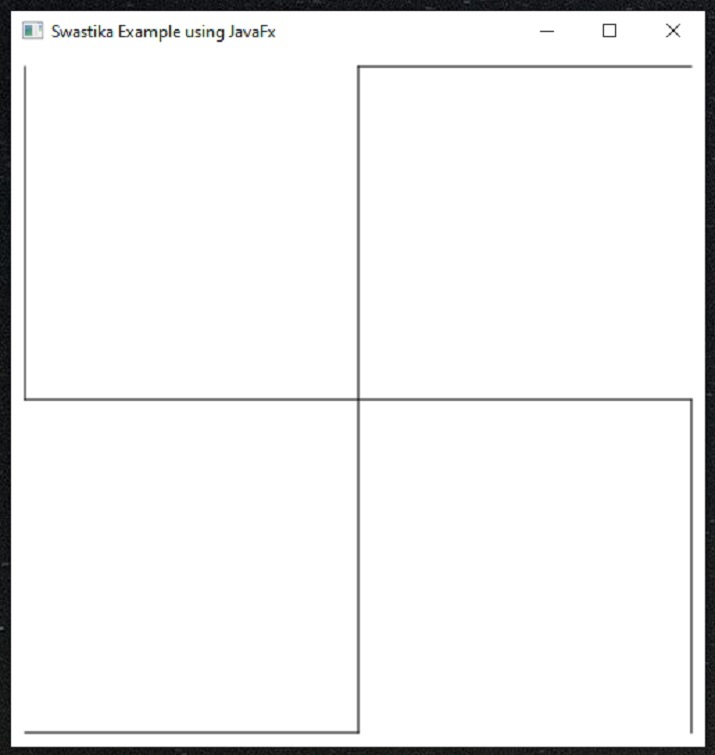
Approach 3 : By using JavaFX library
Install the JavaFX . javafx.scene.shape.Line and javafx.scene. Groups are used for making the drawing. Set the size of the Scene. The design for Swastika is made using the Line function. Six lines are drawn into the Scene to make the Swastika design. The benefit of this approach is that the lines are continuous.
Steps to print Swastika using JavaFX library
Following are the steps to print Swastika by using JavaFX library ?
-
Step 1 ? Import the required Javafx libraries.
-
Step 2 ? Decide the Scene?s size.
-
Step 3 ? Set the canvas size for the Scene.
-
Step 4 ? Draw the Swastika symbol. Draw continuous lines from one point to another. Add all lines to the Group. Put the group in the scene.
-
Step 5 ? Show the result.
Example
Below is the Java program to print the Swastik using the JavaFX library ?
import javafx.application.Application;
import javafx.scene.Group;
import javafx.scene.Scene;
import javafx.scene.shape.Line;
import javafx.stage.Stage;
public class swastika_draw1 extends Application{

   //swastika app starts here..
   @Override
   public void start(Stage stg1) {
      int x1 = 10;
      int y1 = 10;
      int x2 = x1;
      int y2 = 500/2;
      int x3 = 500 - 10;
      int y3 = y2;
      int x4= x3;
      int y4= 500 -10;
      int x5 = x3;
      int x6 = 500/2;
      int y5= y1;
      int y6=y1;
      int x7=x6;
      int y7=y4;
      int x8=x1;
      int y8=y7;

      //Creating swastika now....
      Line ln1= new Line(x1, y1, x2, y2);
      Line ln2= new Line(x2, y2, x3, y3);
      Line ln3= new Line(x3, y3, x4, y4);
      Line ln4= new Line(x5, y5, x6, y6);
      Line ln5= new Line(x6, y6, x7, y7);
      Line ln6= new Line(x7, y7, x8, y8);
      Group grp1 = new Group();
      adding all lines to grp1
      grp1.getChildren().add(ln1);
      grp1.getChildren().add(ln2);
      grp1.getChildren().add(ln3);
      grp1.getChildren().add(ln4);
      grp1.getChildren().add(ln5);
      grp1.getChildren().add(ln6);

      //Creating a Scene canvas
      Scene swastika_canvas = new Scene(grp1, 500, 500);

      //Set the title of the scene canvas
      stg1.setTitle("Swastika Example using JavaFx");

      //Adding the swastika_canvas to the stg
      stg1.setScene(swastika_canvas);

      //Displaying Swastika now...
      stg1.show();
   }
   //main method starts ...
   public static void main(String args[]){
      launch(args);
   }
}
How to run the program using JavaFX? (Method Explained)
C:\java\javaprgstu>run.bat swastika_draw1
C:\java\javaprgstu>javac --module-path "C:\Program Files\Java\javafx-sdk-19.0.2.1\lib" --add-modules javafx.controls,javafx.fxml swastika_draw1.java
C:\java\javaprgstu>java --module-path "C:\Program Files\Java\javafx-sdk-19.0.2.1\lib" --add-modules javafx.controls,javafx.fxml swastika_draw1
Output
Explanation
-
Line() ? Line(int x1, int y1, int x2, int y2) is used to specify two points (x1, y1) and (x2, y2) which are joined to make a line.
-
Note ? For using javafx, this is installed in a separated directory and run.bat is made.
-
Contents of run.bat file ?
javac --module-path "C:\Program Files\Java\javafx-sdk-19.0.2.1\lib" --add-modules javafx.controls,javafx.fxml %1.java
java --module-path "C:\Program Files\Java\javafx-sdk-19.0.2.1\lib" --add-modules javafx.controls,javafx.fxml %1
Conclusion
In this article, the three approaches are used to make the figure of Swastika using Java language. The first approach prints the figure as dots spreadout in tabular format. Another approach uses the drawing form for painting the Swastika using continuous lines using java.awt.Graphics2D libraries. The third approach used the javafx libraries for lines drawing into the Scene.

2K+ Views
