- JasmineJS - Home
- JasmineJS - Overview
- JasmineJS - Environment Setup
- JasmineJS - Writing Text & Execution
- JasmineJS - BDD Architecture
- JasmineJS - Building Blocks of Test
- JasmineJS - Matchers
- JasmineJS - Skip Block
- JasmineJS - Equality Check
- JasmineJS - Boolean Check
- JasmineJS - Sequential Check
- JasmineJS - Null Check
- JasmineJS - Inequality Check
- JasmineJS - Not a Number Check
- JasmineJS - Exception Check
- JasmineJS - beforeEach()
- JasmineJS - afterEach()
- JasmineJS - Spies
JasmineJS - Writing Text & Execution
In this chapter, we will create a hello world app which will test our helloworld.js file. Before developing the hello world app, go back to the previous chapter and make sure that your environment is ready to be tested using Jasmine.
Step 1 − Create a Web application in your IDE
Here we are using NetBeans 8.1 to develop our hello world app in Jasmine. In NetBeans, go to File → New Project → Html5/JS application and create a project. After creating the project, the project directory should look like the following screenshot. We named our project as Jasmine_Demo.

Step 2 − Include the Jasmine lib file into the application
After creating the demo project all you need to do is include the unzip folder of Jasmine library in the Unit Tests folder of the created application. After adding all the library files to our application folder, the structure of our project will look like as shown in the following screenshot.
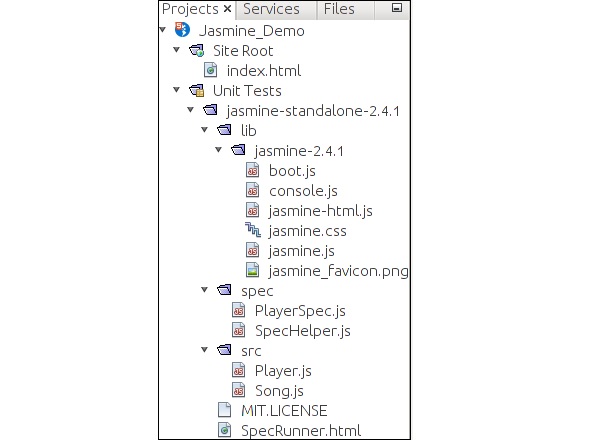
Files given under spec and src folders are demo files provided by the Jasmine team. Delete these files as we are going to create our own test file and test case. While deleting those JavaScript file, we need to delete the reference of those files inside our output html file that is SpecRunner.html.
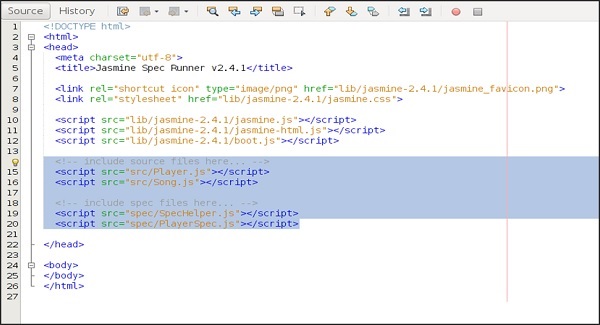
Following is the screenshot of SpecRunner.html file where the reference of different JavaScript files inside spec and src will be deleted.
Step 3 − Create a JavaScript file
In this step, we will create a JavaScript file named helloworld.js under src folder. This is the file which we will test through Jasmine. After creating a JavaScript file append the following set of code inside the file.
/*
* This is the JavaScript file that need to be tested through jasmine
* Below is the helloworld function that will return 'Hello World'
*
*/

var helloworld = function() {
   return 'Hello World';
};
Step 4 − Create a test case
In this step, we will create another JavaScript file which will contain the test case for the above-mentioned JavaScript file. Go ahead and create a JavaScript file under Spec folder and name it as HelloWorldsSpec.js. Add the following line of code into this js file.
/*
* This is the file which will call our java script file that need to be tested.
* Each describe block is equivalent to one test case
*
*/

describe("Hello World", function() {

   it("should Return Hello world",function() {
      expect(helloworld()).toEqual('Hello World');
   });

});
Step 5 − Add reference to the output file
We successfully created our own file to be tested and the corresponding test case. We kept it under two different folders. In this step, we will modify SpecRunner.html to include the reference of these two newly created file.
<!DOCTYPE html>

<html>
   <head>
      <meta charset = "utf-8">

      <title>Jasmine Spec Runner v2.4.1</title>

      <link rel = "shortcut icon" type = "image/png" href =
      "lib/jasmine2.4.1/jasmine_favicon.png">
      <link rel = "stylesheet" href = "lib/jasmine-2.4.1/jasmine.css">

      <script src = "lib/jasmine-2.4.1/jasmine.js"></script>
      <script src = "lib/jasmine-2.4.1/jasmine-html.js"></script>
      <script src = "lib/jasmine-2.4.1/boot.js"></script>

      <!--Lines to be deleted
      <script src = "src/Player.js"></script>
      <script src = "src/Song.js"></script>
      <script src = "spec/SpecHelper.js"></script>
      <script src = "spec/PlayerSpec.js"></script> -->

      <!--adding the reference of our newly created file --->

      <script src = "src/helloworld.js"></script>
      <script src = "spec/HelloWorldsSpec.js"></script>
   </head>

   <body>
   </body>

</html>
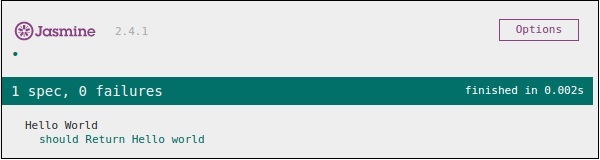
Step 6 − Execute by running SpecRunner.html
This is the final step of our application development. Run SpecRunner.html in any of your favorite browser. The following screenshot will appear as a result. The green screen indicates success, whereas red indicates failure in test case.
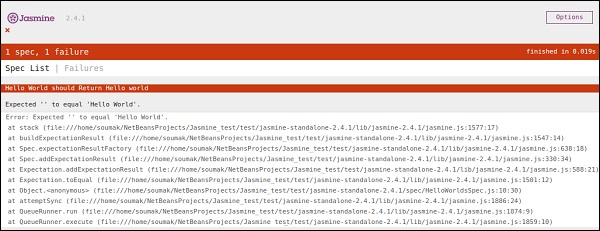
Step 7 − Understand the failure case
Till now we have seen the success test case of the hello world application. Now let us see what if something goes wrong and the test fails. To implement a failure case we need to write a failure test case. To do the same, we are going to modify the helloworld.js file using the following code.
var helloworld = function () {
   return '';
};

// we are not returning any string whereas in the spec file
//we are expecting a // string as Hello World
The above code is definitely going to fail because our spec file is not getting the expected string as an output of the helloworld(). The following screenshot of the specRunner.html file depicts that there is an error with its red indicator.