- iOS Development - Home
- iOS Development - Xcode IDE
- iOS Development - First Application
- Making the App Interactive
- iOS Development - Swift Playground
- Making Applications with Swift
- iOS Development - Advanced iOS
- iOS Development - Integrating Maps
- iOS Development - Auto Layouts
- iOS Development - Animations
- Accessing Web Services
- Concurrency Control
- Interview Questions
iOS Development with Swift 2 - Quick Guide
iOS Development with Swift 2 - Xcode IDE
To develop iOS applications, you need to have an Apple device like MacBook Pro, Mac Mini, or any Apple device with OS X operating system, and the following −
Xcode − It can be downloaded from https://developer.apple.com/xcode/ You need an Apple developer account, which is free of cost.
Simulator − This is your virtual iPhone/iPad (iOS Device), installed on your Computer, so you do not need to install this separately.
About Xcode
Xcode is the default IDE (Integrated Development Environment) provided by apple for iOS/OS X Application Development. It is an IDE that includes everything you need for developing iOS, OS X, Watch OS, TV OS Applications, etc.
To Run Xcode, you must have −
- A Mac Device Running OS X, i.e., Apples official Operating System.
- Apple ID (Free of Cost): To download the IDE.
Installation
To install Xcode in your device, follow the subsequent steps. Skip if you have already installed.
Go to the App Store, Login if you have not already, search for Xcode. Click on Get and Install.
Once Downloaded, go to Applications or Launchpad and Run your application.
On the First Run, it might ask for some additional Downloads, let it download everything, enter password if it asks for.
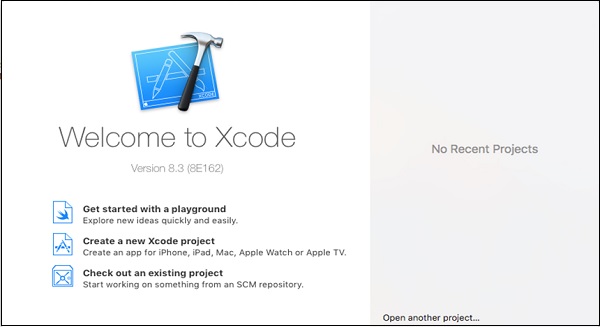
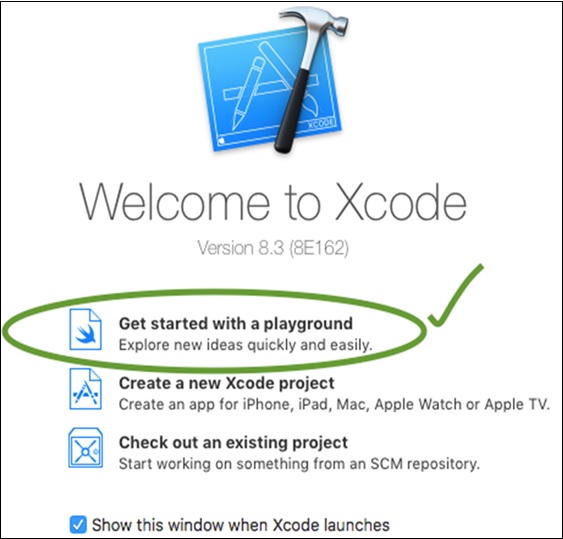
Once all this is done, the Welcome Screen will appear as shown below.
iOS Development Swift 2 - First Application
In this tutorial, we will be learning some of the elementary concepts of our iOS development, which include −
- Making a New Project
- Features of our IDE
- Navigating through the IDE
- Adding a Label to your View
- Running the application
- Adjusting the simulator according to your comfort
If you are a beginner, then this tutorial is going to be of immense help.
Creating a New Xcode Project
To create a new Xcode Project, we should follow the steps given below.
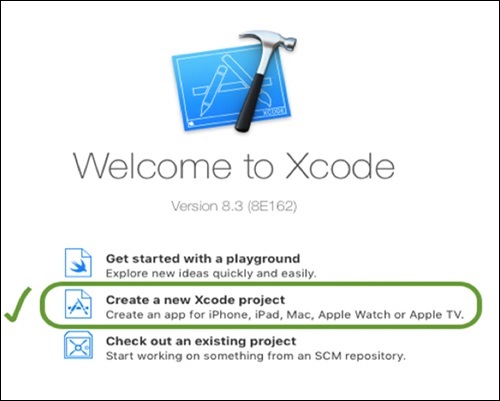
Step 1 − Click on the Xcode icon in your Launchpad, then select Create a new Xcode project.
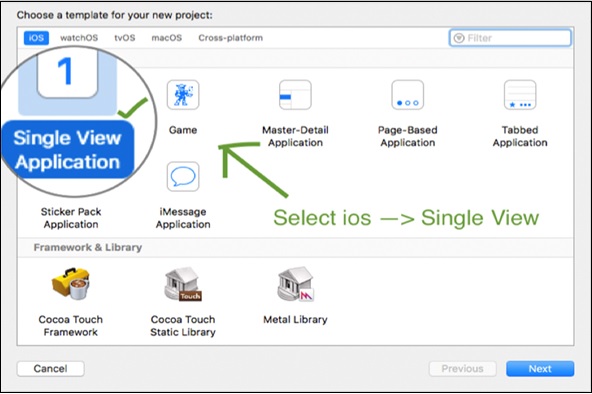
Step 2 − Select iOS and then select Single View Application, click on Next.
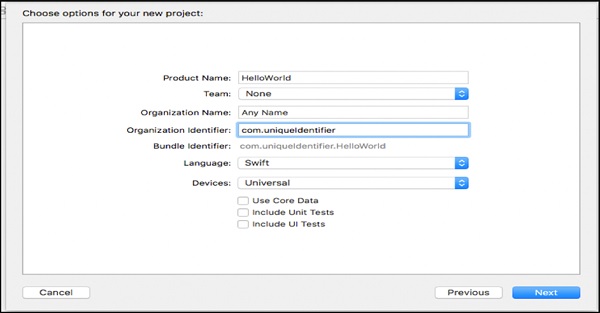
Step 3 − The subsequent screen that comes up will have a few fields to fill. The following points explain how to fill each of these fields.
Enter the Project Name − it can be a name resembling your project.
The Team Field can be left empty for now. It is used when we make an application in the team.
The organization name is the name of your organization or if it is your personal project, you can name it anything. It does not matter until you want to publish your app on the app store.
Identifier is generally a unique identifier for your application, which must not match any other app on the app store (only when you choose to upload your app on app store).
Language will be Swift, device will be universal, and all other options will be unchecked for now.
Once all the details are filled, click the Next button.
Step 4 − Select the location where you want to store the project. Let Create Git Repository checkbox be unchecked for now, as we do not need it right now. Click on Create.
Congratulations! Your project has been created.
Navigation through Xcode Environment
Click on the Main.storyboard option inside your navigator panel. This will bring up the main view, which will appear when the application runs.
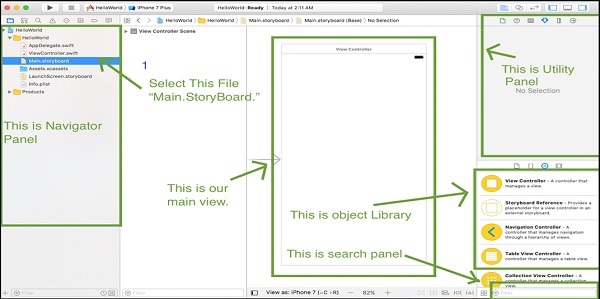
Adding Labels
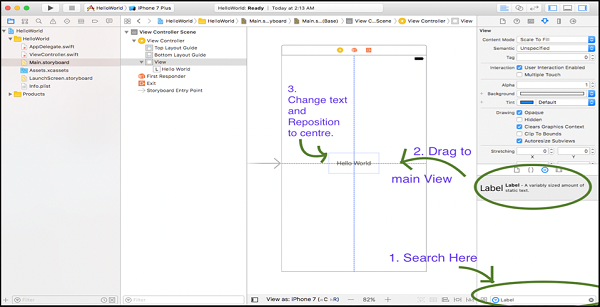
In the right bottom corner of your screen there is a search bar. Type label in that search bar and press return.
After searching the Label drag and drop the Label to your main view. Double click on the label text and Type Hello World.
Drag the label to the center of the view, when the label is exactly in the center, two lines intersecting at the center will appear.
Now your view should look like the following screenshot.
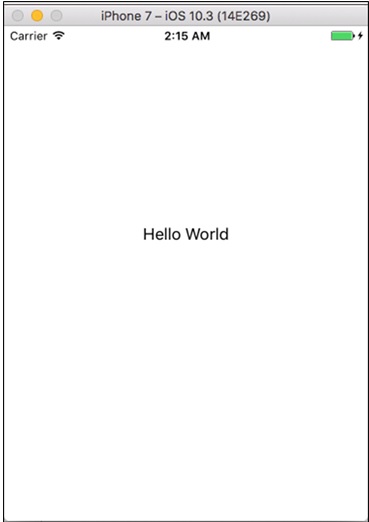
Running the Application
Select your device, click on the Play button at the top right corner.

This is our final application, running on the iPhone 7 simulator.
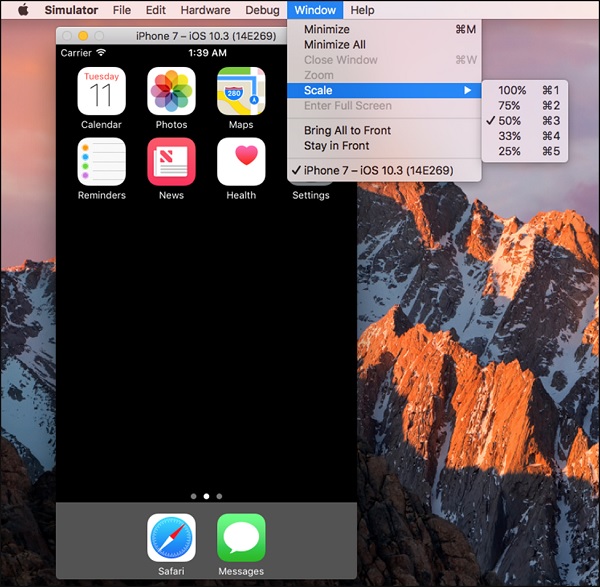
Adjusting Simulator Properties
When we run our application for the first time, the screen of your simulator might not be fit for your desktop or laptop screen. So, while your simulator is running in the foreground, click on Window → Scale, and choose a Simulator Screen size percentage that will suit your display.
We will continue discussing about the simulator features, as and when we use them in this tutorial.
Well done, this was the First Application, which you completed successfully. Cheers!
Making the App Interactive
In this chapter, we will introduce some new things and UI features that iOS provides for interaction with the user. We will be adding −
- Text Fields
- Labels
- Buttons and their actions
Additionally, we will be writing the code in swift for a Dynamic Label, which will show the calculated result of the input entered by the user.
By the title Making our app interactive, we mean making our application interact with the user. Therefore, here we give user the power to interact and control the application.
Adding Text Fields
Here, we will again make a new project. It should be easily manageable, as we have already discussed how to create a new project in Xcode.
Okay, so we will now create a New Project Called My Dogs Age. After creating this project, we will click on our Main.storyboard File and follow the steps given below.
In the utility Panes Search bar (located in the bottom right corner of Xcode), search for Label. Click and Drag that Label to your main.storyboard / (View). Then, double click on the label and rename it as − My Dogs Age.
Search for text field, click and drag that text field to your View. While this text field is selected, go to attribute inspector and change the keyboard type to Number pad, so that only number can be entered as shown in the screenshot below.

Adding Buttons to our View
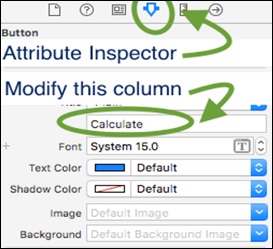
Now search for a Button in the search bar. Drag that to your view, double click on it and rename as Calculate.
Adding Label to View
Search for label and add it below the button, to show the age output. Double click and make the label empty and stretch it a little bit, so that the complete output is visible.
Tip − If you are not able to rename by double clicking, then select the item and in the utility pane − Attribute inspector, there is the title of that item, modify there and press Return as shown in the following screenshot.
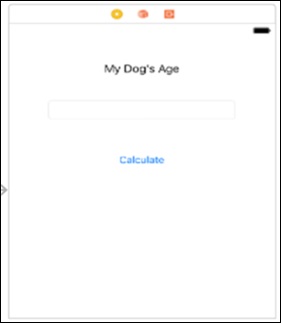
Now, your Main.storyboard should look like the following screenshot.
We do not stop here, now we will be discussing how to add images to the main.storyboard.
Adding Images to Our View
To begin with, we should first search for an image, which we want to add in the project. You can download the image given below −

Copy this image into your project, or drag this image to your project, then you will see the following window.
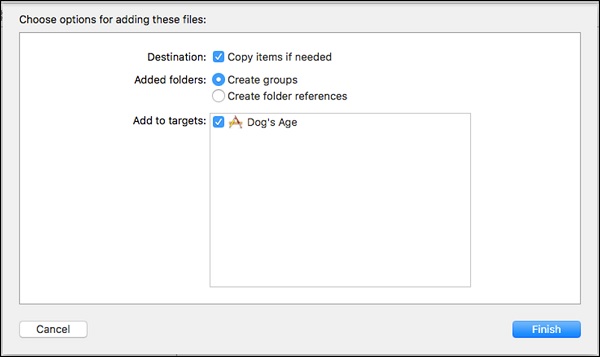
Make sure you select, copy items if needed and create groups. Click on the Finish button.
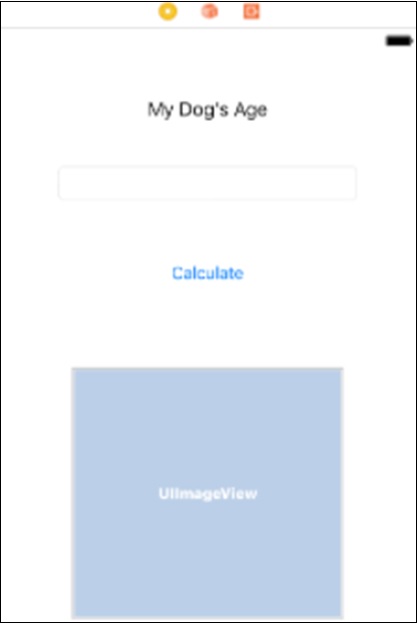
Now, go to Utility Pane → Object Library and search for Image views. Drag the image view to your view. Now your view should look like the screenshot given below.
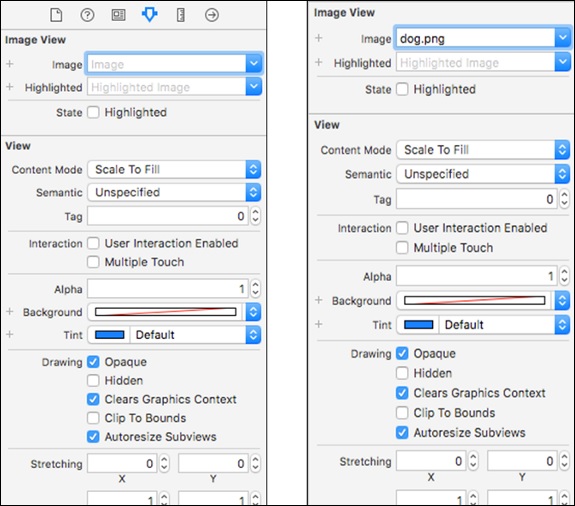
Now, click on this Image View, you just dragged in your view and then you will see that in the utility area there is an option named Image to select the image. Click on that arrow and you will see all the images available. Make sure you have selected this newly added image view.
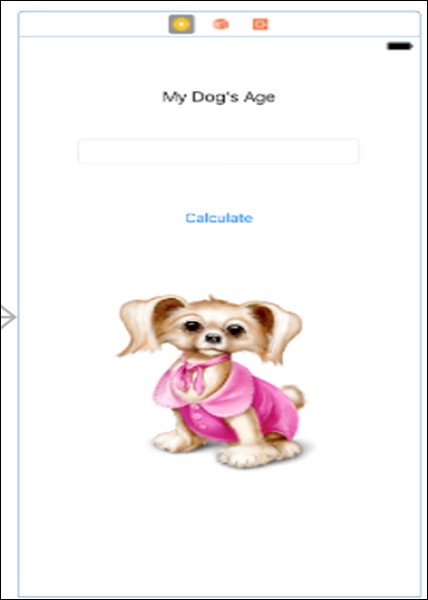
Now that you have selected the image for your image view, your final view should look like the following screenshot. This is the only thing that we will do with our main.storyboard, for this application.
This is our view now after adding all the UI elements.
After this, we have a logical implementation of our code that we will continue if you have completed until this step.
Now, select your view controller and open assistant editor by clicking the assistant editor button in the top right corner (as shown in the screenshot below).
Now, our view should look like the following screenshot.
Adding Functionality to Our Application
Until now, our application is just a Static Application, which does not respond to anything and does not change on the user interaction.
Now comes the main part of connecting our UI Elements to our Code and the UI will change according to users Input. The ViewController.swift file is our main file in which we will be writing code for our Current view.
Note − Currently we are working with single views, later when we discuss about multiple views. We will discuss how different files control different Views.
Click on the text field, press control and drag your cursor to Second part of screen, i.e. viewcontroller.swift file. You will see a blue line connecting our view and swift file. When you release the mouse, you will see a popup, asking for input.
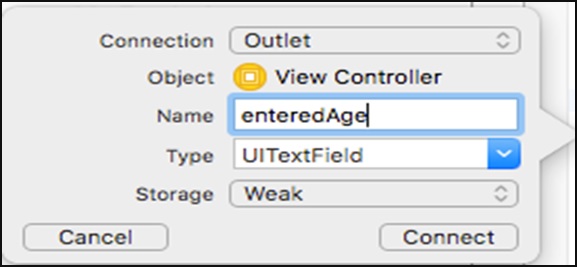
TIP − Fill the Name field with any Name that resembles to your Input field. One important point is that the name cannot have a space, so you can write it like shown in the earlier image, i.e. if the name has multiple words, then the first word should be written in small case, then the first alphabet of every next word will be capital.
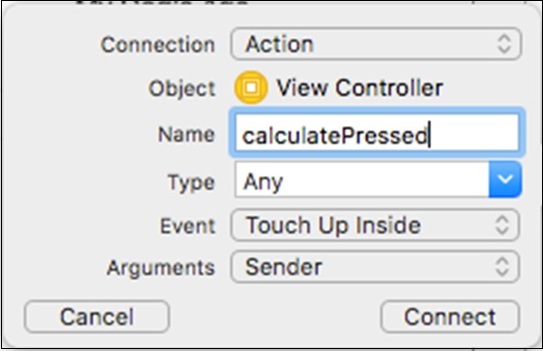
Follow the same procedure and connect the rest of the Elements. Remember that for a text field and a label, the type is Outlet. However, while adding a button, the type must be action as shown in the screenshot below.
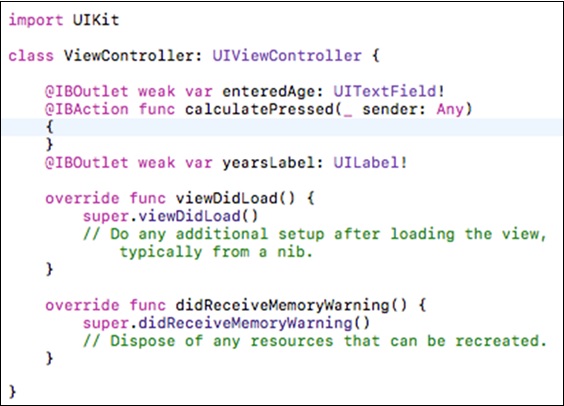
At this stage, our viewcontroller.swift will look like −
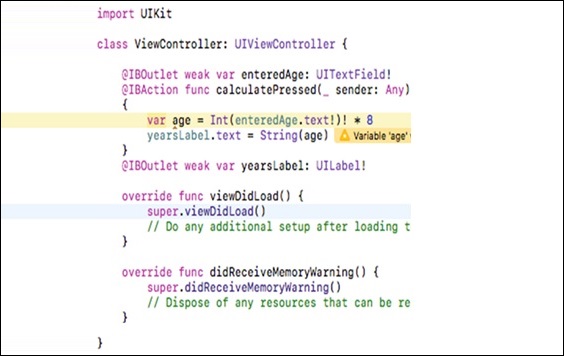
Now, inside your button action, add the following lines −
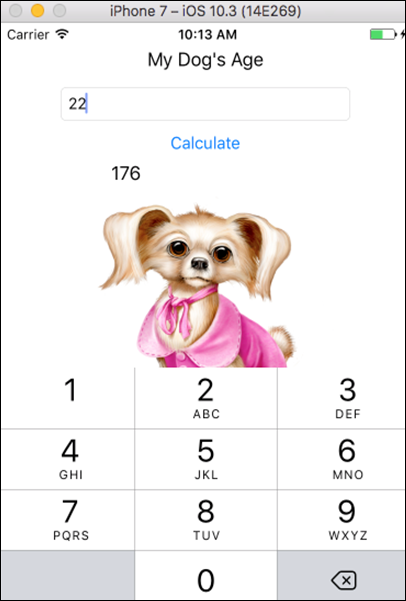
var age = Int(enteredAge.text!)! * 8
yearsLabel.text = String(age);
Tip − We do not need to add a semicolon to end a line in swift, but even if we put a semicolon, the compiler would not report any error.
In the above code, the first line declares a variable age, which we will discuss in the next chapter. Then we assign the value entered by the user, by converting it into an Integer, and multiplying it by 8.
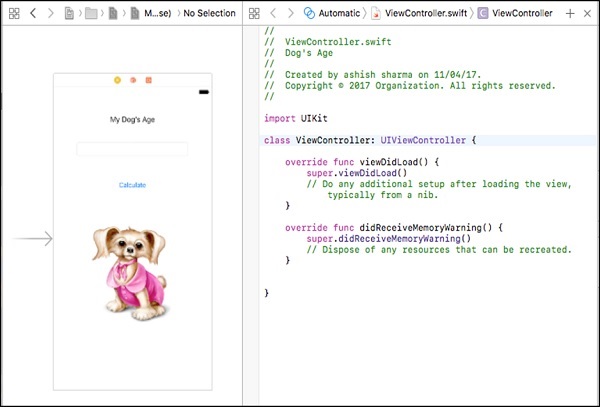
In the second line, we assign the value of age to our output label. At this stage, our view controller will look as follows −
Now, we will run our application and this is how it will appear.
Tip − If your keyboard does not appear on the first run, open your simulator, click on hardware, go to keyboard and click on Toggle Software Keyboard.
In the next chapter, we will discuss about a new tool called Playground. We will also learn some more swift concepts like Variables, Dictionaries, Arrays Loops, Classes and objects.
iOS Development with Swift 2 - Playground
In this chapter, we will introduce a new environment where we can write and execute a swift code. We will also cover the following aspects of the swift playground −
- Variables
- Dictionaries
- Arrays
- Loops
- Classes & Objects
Note − We will look only through those basic concepts, which we will be using in this tutorial, if you want to learn swift deeply, you can check our Swift Tutorial.
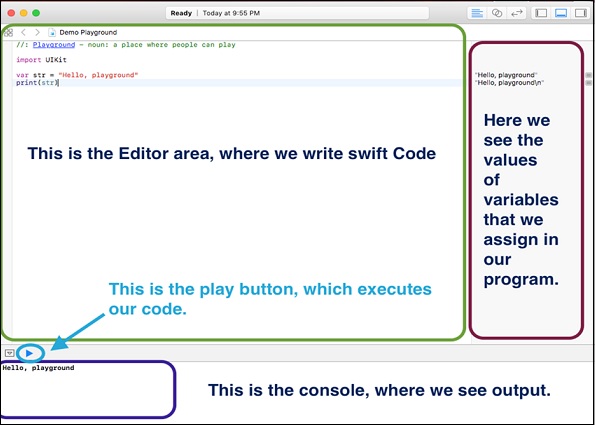
Playground is a tool provided with Xcode for executing the swift code. We will start by creating a new playground.
Starting Swift Playground
To create a swift playground, click on Xcode icon, and choose the first option, get started with a swift playground.
Give the name to your playground and select Platform as iOS. Let us name our playground as the Demo Playground. Click on Next.
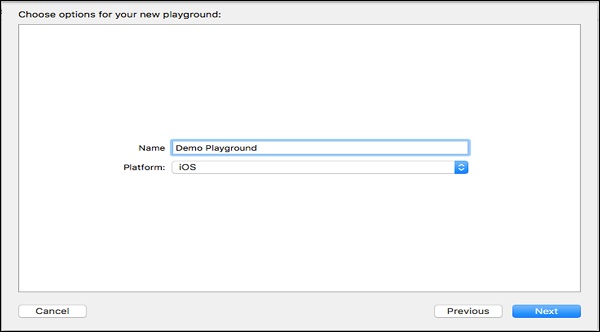
These are the only steps you need to follow to make a Playground. The following screenshot shows the Playground.
| Sr.No | Basic Concepts & Description |
|---|---|
| 1 | Variables
A variable is a memory / storage that our program can use to store and manipulate data. Each variable has a specific data type, which determines the size that a variable will occupy in memory. |
| 2 | Dictionaries
A dictionary is a collection that stores values in a key value pair, i.e. the data stored in a dictionary is stored in a method where each value is related to a key. Here, every key is unique and cannot appear twice in the same dictionary. |
| 3 | Arrays
Arrays are the data types that store the same type of data in an ordered list. The same value can appear at multiple indexes/Places in an array. |
| 4 | Loops (Control Flow)
Swift provides a variety of Control Flow Statements. Loops are generally used to iterate over a condition or statement multiple times, until a Condition / Programmers need from that loop is satisfied. |
| 5 | Classes and Objects
Classes are the general-purpose flexible constructs that are the building blocks of your programs code. Object is the term that is generally used to refer to instance of a class, so we can call it instance instead of objects. |
Making Applications with Swift
In this chapter, we will create two new Applications using Swift.
First Application "Guess the Number"
In this section, we will create an Application called "Guess the number". To make this application, create a new iOS Single View Application and name it whatever you want.
Click on the main.storyboard and select your main view.
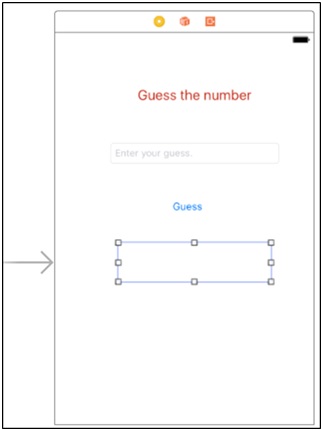
Add a text label → Change the text to Guess the number. Change the color, size properties and make it as per your requirement.
Add an Input field, stretch to full view.
Add a button and name it Guess.
Add one more label, stretch it, and clear the text box.
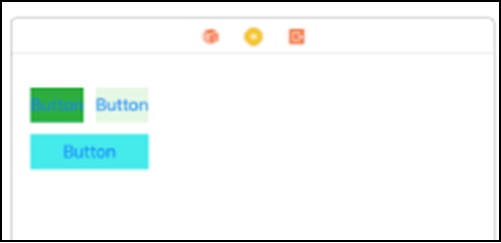
This is how your view should look like after adding all the elements.
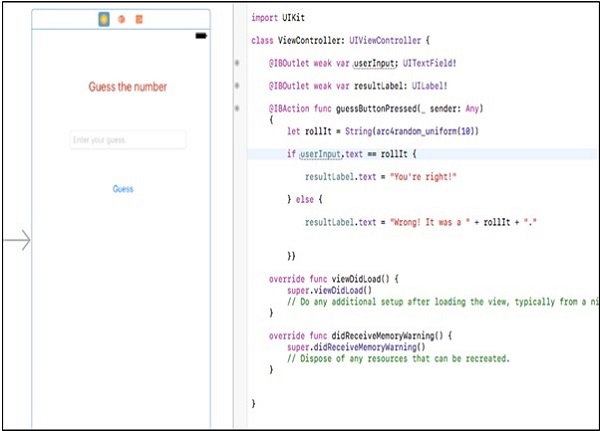
Now Switch to assistant editor and Click on drag from your UI element to view controller file, then connect the text field as an outlet and name it userInput. Similarly,
- Connect empty label as outlet and name it as resultLabel.
- Connect Guess button as action and name it as guessButtonPressed.
What is the logic?
The logic is simple, we will generate random numbers between 0-9 and see if that is equal to the number the user entered, or not. If it is equal, we will show "you are right", else we will show "you are wrong!".
Applying the logic
To generate a random number between 0-9, we will use the following command.
let rollIt = String(arc4random_uniform(10))
Then we will use the following logic to check whether it is same as the user input or not.
if userInput.text == rollIt {
   resultLabel.text = "You're right!"
} else {
   resultLabel.text = "Wrong! It was a " + rollIt + "."
}
This is how your final logic in button action function will look like.
@IBAction func guessButtonPressed(_ sender: Any) {
   let rollIt = String(arc4random_uniform(10))
   if userInput.text == rollIt {
      resultLabel.text = "You're right!"
   } else {
      resultLabel.text = "Wrong! It was a " + rollIt + "."
   }
}
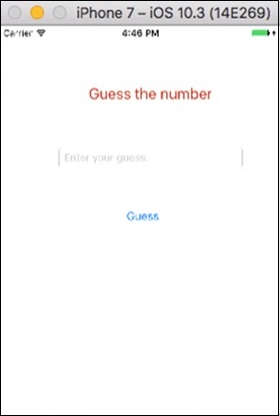
Your final application should look like this now.
Let us now run our Application and check its output. The opening screen should look as follows −
Next, feed a number in the input area.
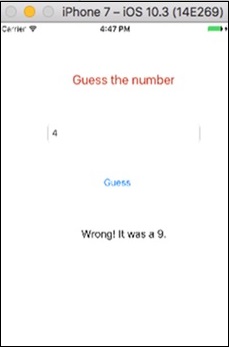
Lets feed another number and check its output −
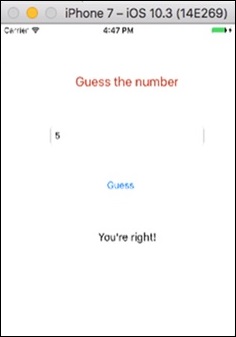
We have completed one more Application. Try to run this application, and enter different inputs.
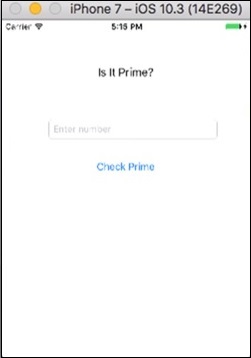
Second Application "Is It Prime"
In this application, we will be taking an input from the user and we will check whether that number is prime or not −
Layout − Similar to the previous application, we need an input, a button and an output label.
Challenges − Create the UI and connect the elements to code. Also, try if you can create the complete project yourself. If you managed to create it by yourself, then it is great and you are doing excellent with iOS Development.
If you could not manage, do not worry. Look at the following image and try to do the same.

Try to create a view like this, if you are not able to do it yet, please read the previous section where we have developed a Guess Game.
What is the Logic?
Prime numbers are the numbers that cannot be divided by any other number except 1 and the number itself.
Example − 7 is a prime number as any other number except 1 and 7 cannot divide it.
How to Implement?
Try to write a code for checking prime numbers. Then take the user input and see if that is a prime or not. If yes, then show prime; otherwise show not prime in your result label.
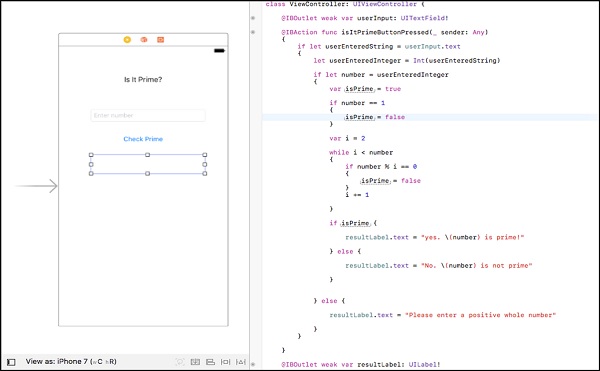
Here is the code to check whether a supplied number is "prime" or not −
@IBAction func isItPrimeButtonPressed(_ sender: Any) {
   if let userEnteredString = userInput.text {
      let userEnteredInteger = Int(userEnteredString)
      if let number = userEnteredInteger {
         var isPrime = true
         if number == 1 {
            isPrime = false
         }
         var i = 2
         while i < number {
            if number % i == 0 {
               isPrime = false
            }
            i += 1
         }

         if isPrime {
            resultLabel.text = "yes. \(number) is prime!"
         } else {
            resultLabel.text = "No. \(number) is not prime"
         }
      } else {
         resultLabel.text = "Please enter a positive whole number"
      }
   }
}
This is how your button action should look like. Following is the image of the final code and view −
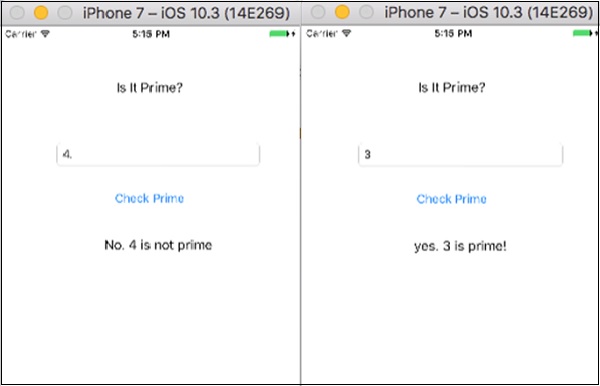
This is how your running application should look like if you followed the procedure.
Now, let us test our Application by supplying input values −
iOS Development with Swift2 - Advanced iOS
In this chapter, we will cover some advance features like Creating Multiple Views on our Application, Adding Navigation Bars, Adding Table Views, Storing Data in the Application, Making Web Applications, etc.
Please go through every section carefully, as this chapter contains most of the things, which we need while developing applications.
Multiple View Controller
In our previous applications, we only gave a single view / view controller. However, we can have multiple views in our application and we can perform on any of those independently.
Therefore, we will start by creating a new project; the name of this project has multiple views. As every other project, this project also has a View Controller and a Swift File for that controller. (This you can see by selecting view & seeing its properties in the Identity Inspector.)
The following screenshot shows how our current view looks like −
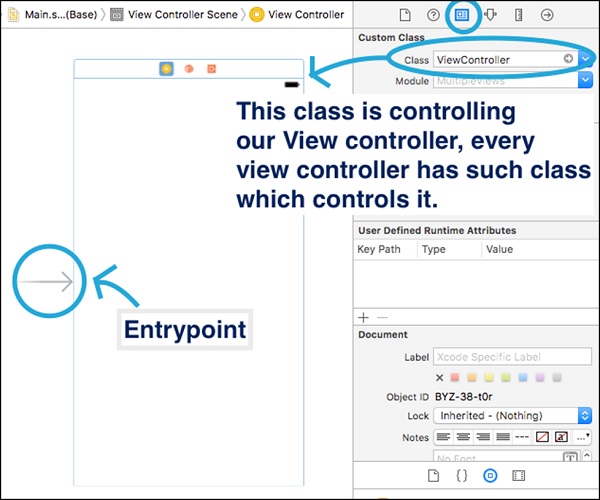
On the right-hand side (Identity inspector), we can see the class that is related to our view controller. This arrow on the left is the entry point. This is the first view of our application that will show after the application starts running.
Adding Second Multiple View Controller
To add other view controllers to our application, we will search view controller in our object library. Once we find it, we will drag the view controller to our main.stroryboard, just outside any other views.
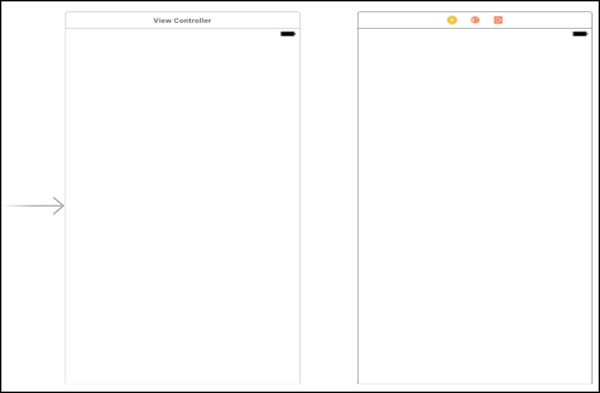
This is how your application should look like. Now, we have added a view controller, but now we will also need to create a view controller class for our newly added view.
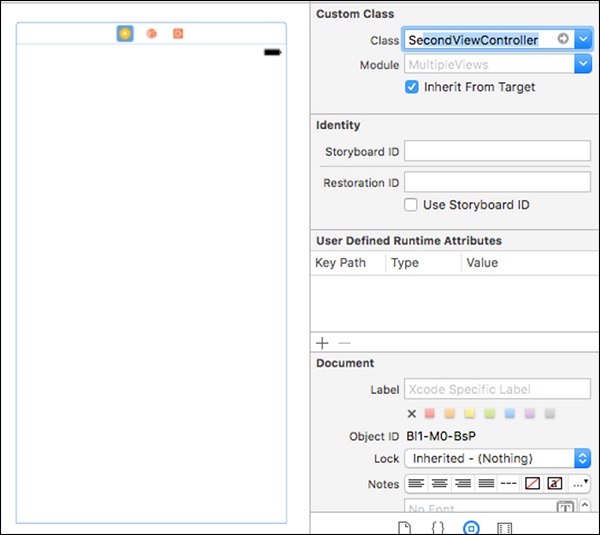
Right click on your project → new File → cocoa Touch Class → Name it anything you want to, we will name it SecondViewController.
This is how you create a class file for your view controller. Now, go back to your main.storyboard, click on your second view controller and see its Identity Inspector.
The class field must be empty right now, so click on that field and start typing your class name that you added in last step. If it appears, click enter.
We have now created a multiple view controller and added the controller class file for that View. However, if you run the application, it will not show your second view still. Why?
Because we have not added a function, which will take us to that view. In short, we have not yet added Navigation to our Application. Do not worry; we will cover it in the following section.
Adding Navigation to the Application
The process of transition from one view to another is called Segueing, i.e. done by creating segue between the two views. To do this, add a button in the first view controller, and control drag from it to your second view. When you release the button, you will see some options as shown in the screenshot below.
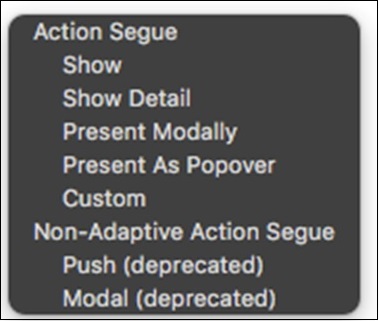
Select the Show option from the Action Segue. Now run your application, you will see that on the click of a button, you second view appears (To see more clearly add something in your second view, so that you can identify).
However, now you cannot go back to your first view. For that, we have Navigation controllers.
Adding a Navigation Controller
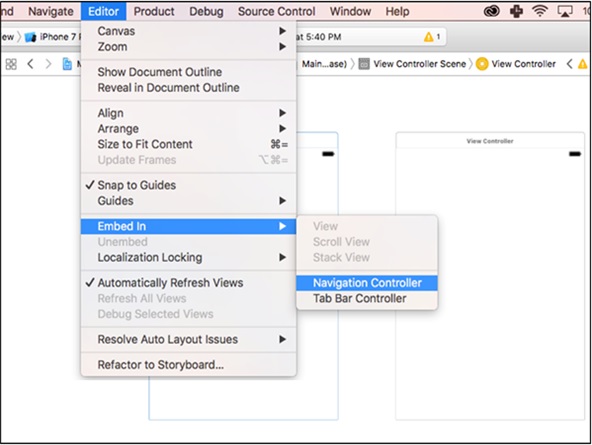
Select your first view controller and in the top bar, click Editor → Embed in → Navigation controller.
Now, our application should look like the following screenshot.
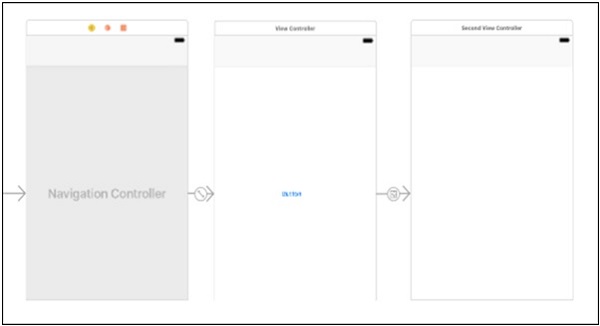
We should see to it that, there is a little light grey row on top of the view. Now, when we Run the application, we can see that there is a navigation bar on top of the view. When we click on the button, we will go to second view, where we will see a back button in that navigation bar. Click on this and we will come back to the Initial View.
Adding Title & Back Button to the Navigation Bar
To add a title to your navigation bar, click on the navigation bar, and see its attribute inspector. There we will see −

Title − This will be the title of Navigation bar, which appears in center.
Prompt − This appears on top of title bar, in center.
Back Button − Here you can modify the Text that appears in back button.
Currently the button that is passing the view is located on our view, which might not suit if we want something else to appear on the screen. Therefore, we will add a Bar Button item in the navigation bar, which will take us to our second view. However, for this we should first delete the last button we added.
Adding a Bar Button Item
Search for bar button item in the object library and drag drop to the right hand side of the navigation bar. Name it as Next >, control drag from it to the second view, select Show as we did with the last button we added.
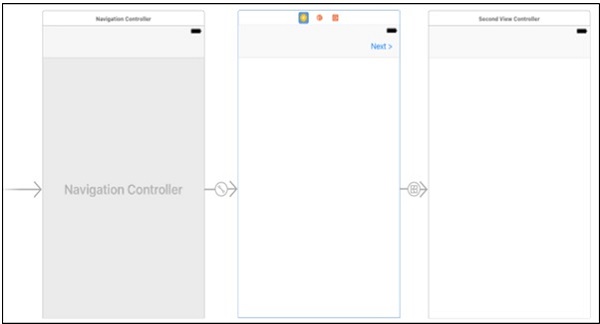
Now run the application, it will look cleaner and better. This is all we will do with Navigation right now. In the subsequent chapters, we will modify the navigation bar using the Swift Code, when required.
Table Views
A table presents data as a single column list containing multiple rows, which can be further divided into sections. Tables should be used to present data in a clean and efficient way.
In this section, we will understand how to add table views, adding prototype cells, adding data source and delegates for a table view, changing properties of a table and setting dynamic data for table view cells.
Adding a Table View
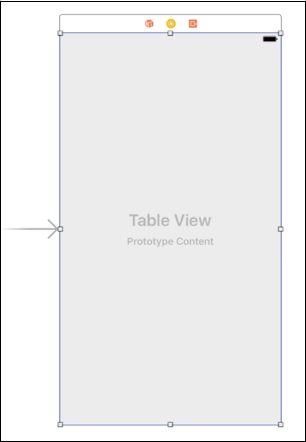
To add a table view, we will first create a new project and name it as tableView. Then, go to the object library and search for Table View, we will see the table view, the table view controller and many other options. However, we should select table view, drag it and add to the default view Controller.
Adding a Prototype Cell
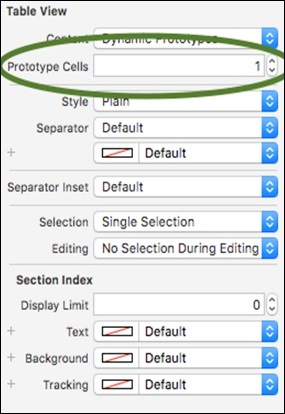
Stretch the table view so that it covers the complete view, while your table view is highlighted. Check its attribute inspector, there is a field called Prototype cells, which is currently 0. We should change its value to 1, now your view should look as follows −
Changing Cell Identifier
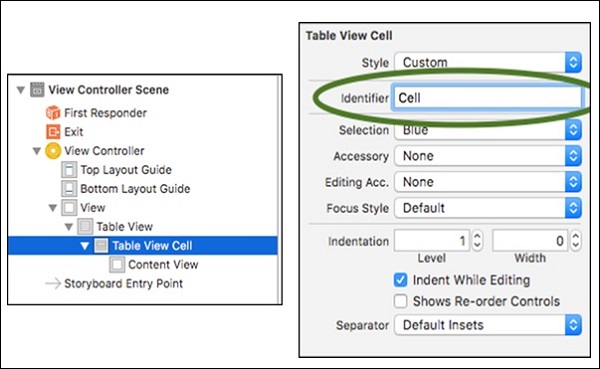
Now, inside your view, click on your prototype cell (which is a little tricky). So, in your Document outline, click on View controller → View → Table View → Table View Cell, and now in its attribute inspector there is a column called Identifier, click on that and name it as Cell. See the following screenshots to understand the above steps.
Adding Delegate & Data Source
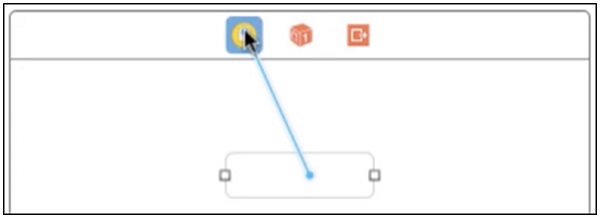
To make our table views dynamic, we need them to load dynamic data. Therefore, we need a delegate and a data source for that. To make delegate and data source of your table, control drag from table view to your view controller or the yellow button on top of the view controller as shown in the screenshot below.
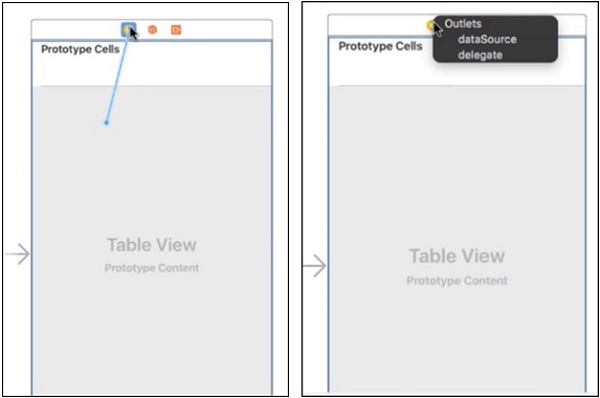
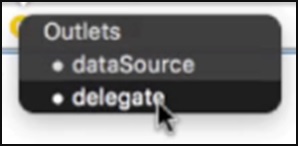
When we release the cursor, we will see two options there, dataSource and delegate, select them one by one (when you select any one option, the pop up will hide, you will need to repeat the above step to add a second option). Now it should look like −
This is all we will do with our UI / Main.Storyboard, right now. Now switch to ViewController.swift file. Add UITableViewDelegate, UITableViewDataSource, to your viewController.swift as shown below −

However, now Xcode will show an error in this line.

This is because there are a couple of methods where we need to use UITableView
To see these methods, Command + click on the UITableViewDataSouce, and copy the first two methods, having numberOfRowsInSection, cellForRowAtIndex Arguments and paste them in the ViewController.swift, before our viewDidLoad().
Remove this line @available(iOS 2.0, *), from both the methods and add the opening and closing braces {}. Now, the view will look as follows −
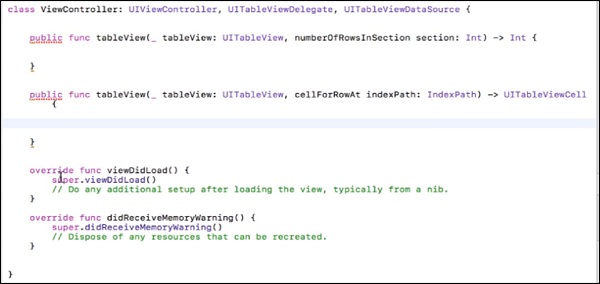
Xcode must be showing error in both the functions. However, do not worry as this is because we have not added a return type of those functions.
numberOfRowsInSection − This function defines the number of rows our section will contain. So right now add this line to your method.
return 1 //This will return only one row.
cellForRowAt − This method returns the content for every cell, indexPath contains the index of every cell. We will create a cell and then we will assign some Value to that Cell and finally return the cell.
Now, your functions should look as follows −
internal func tableView(_ tableView: UITableView, numberOfRowsInSection section: Int) -> Int {
   return 1;
}
internal func tableView(_ tableView: UITableView,
   cellForRowAt indexPath: IndexPath) -> UITableViewCell {
   let cell = UITableViewCell(style:
   UITableViewCellStyle.default, reuseIdentifier: "Cell")
   cell.textLabel?.text = "First Row"
   return cell
}
In the first line, we are creating a cell with default style, and reuseIdentifier is the name of the prototype cell we made.
Cell.textLable?.text − This defines the text that should appear as title of that cell.
Finally, we return a cell from there. Try running your Application now, it should look as follows −
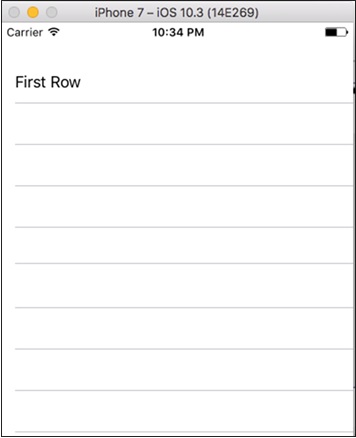
Time Table Application
In this application, we will continue our last project, and we will make an application where we print the table of 2 (2 10. 20).
So, to make this application, just change the projects view controller file.
Change the functions as shown below −
internal func tableView(_ tableView: UITableView, numberOfRowsInSection section: Int) -> Int {
   return 10;
}
internal func tableView(_ tableView: UITableView,
   cellForRowAt indexPath: IndexPath) -> UITableViewCell {
   let cell = UITableViewCell(style: UITableViewCellStyle.default, reuseIdentifier: "Cell")
}
Now, run your application. It should look as shown below.
Now, as we have completed the table views and made an application, so here is a quick challenge for us to solve.
Challenge
Make an application, where we print the counting table of whichever number the user inputs.
Hint − Take input, add a button, which when pressed will load the table with counting of that number. Here we will also need the following function, which will reload the table data.
tableView.reloadData()
This is a challenge for you as we have covered all topics about this application, so we will not provide solution for this.
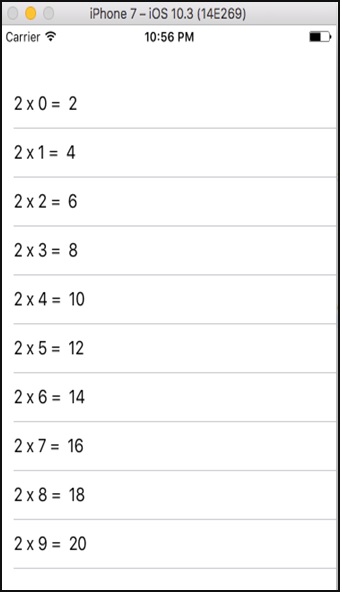
Egg Timer Application
In this application, We will use the concept of Timer() and Class Constructor, which manages time. We will provide you the concept and the coding. You have to make the UI yourself as we have already discussed every UI Element many times in our previous chapters. (Though we will provide hints for everything that looks quite new).
Your final app layout should look like this −
What happens in this application?
The title label has a starting value 210.
On click of play button, value should decrease by one every second.
On click of pause, value should stop there only.
On click of -10, value should be reduced by 10, and decrement should continue.
On click of +10, value should be increased by 10, and decrement should continue.
On click of Reset, value should become 210.
Value should never go below 0.
Concept
We will use a variable of class Timer() → var timer = Timer().
We will set a value to this timer variable we just created.
timer = Timer.scheduledTimer(timeInterval: 1, target: self, selector: #selector(ViewController.processTimer), userInfo: nil, repeats: true)
timeInterval -> is the time interval which we want to use,
target -> is the view controller which should be effected,
selector -> is the function name which will use this timer,
userInfo -> null and repeats, yes we want to repeat so Itll be true.
Invalidating Timer
To stop a timer through programming, we will add timer.invalidate() function.
Elements we have used −
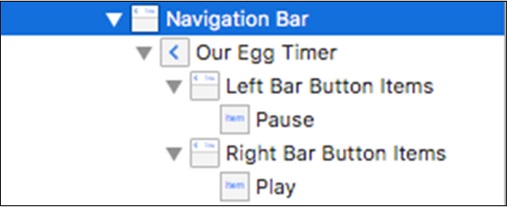
Navigation bar − In the navigation bar, we have added three items.
- Bar Button Item, one on left and one on right.
- Title named as Our Egg Timer.
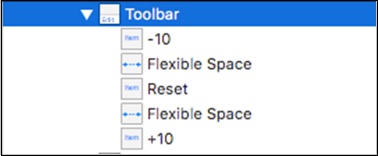
Toolbar − A toolbar appears at the bottom of an app screen and contains buttons for performing actions relevant to the current view or content within it.
Toolbars are translucent and may have a background tint. They often hide when people are unlikely to need them.
We have added a toolbar at the bottom of our UI, which has 5 items.
- Three Bar button items, named -10, Reset and +10.
- Two flexible Space : Flexible space between bar button items −
How to add an icon to bar button item?
Select your bar button item. Click on your bar button item, go to attribute inspector, click on Select Item and choose the item from the Dropdown that appears.
Similarly, select items for all other buttons and create a UI as given above. Add a label to the center of the View and connect it as an outlet, name it as − timeLeftLabel.
Action for Start Timer
Following is the program for the start timer.
@IBAction func startTimerButton(_ sender: Any) {
   if !timerActive {
      timerActive = true
      eggTimer = Timer.scheduledTimer(timeInterval: 1, target: self, selector:
      #selector(ViewController.processTimer), userInfo: nil, repeats: true)
   }
}
Create the following function −
func stopTimer() {
   timerActive = false
   eggTimer.invalidate()
}
Action for Stop Function
Following is the program for the stop function.
@IBAction func pauseTimerButton(_ sender: Any) {
   stopTimer()
}
Action for Subtracting Time
Following is the program for subtracting time.
@IBAction func subtractTime(_ sender: Any) {
   if timeLeft > 10 {
      timeLeft = timeLeft - 10
      timeLeftLabel.text = String(timeLeft)
   }
}
Action for Resetting Time
Following is the program for resetting the time.
@IBAction func resetTimer(_ sender: Any) {
   timeLeft = 210
   timeLeftLabel.text = String(timeLeft)
}
Action for addTime
Following is the program for adding time.
@IBAction func addTime(_ sender: Any) {
   timeLeft = timeLeft + 10
   timeLeftLabel.text = String(timeLeft)
}
Now, the viewController.swift should look like −
import UIKit
class ViewController: UIViewController {
   @IBOutlet weak var timeLeftLabel: UILabel!
   var eggTimer = Timer()  // Initialize the Timer class.
   var timerActive = false // Prevents multiple timers from firing.
   var timeLeft = 210
   func stopTimer() {
      timerActive = false
      eggTimer.invalidate()
   }

   func processTimer() {
      if timeLeft <= 0 {
         stopTimer()
         return
      }
      timeLeft = timeLeft - 1;
      timeLeftLabel.text = String(timeLeft)
   }

   @IBAction func startTimerButton(_ sender: Any) {
      if !timerActive {
         timerActive = true
         eggTimer = Timer.scheduledTimer(timeInterval: 1, target: self, selector:
         #selector(ViewController.processTimer), userInfo: nil, repeats: true)
      }
   }

   @IBAction func pauseTimerButton(_ sender: Any) {
      stopTimer()
   }

   @IBAction func subtractTime(_ sender: Any) {
      if timeLeft > 10 {
         timeLeft = timeLeft - 10
         timeLeftLabel.text = String(timeLeft)
      }
   }

   @IBAction func resetTimer(_ sender: Any) {
      timeLeft = 210
      timeLeftLabel.text = String(timeLeft)
   }

   @IBAction func addTime(_ sender: Any) {
      timeLeft = timeLeft + 10
      timeLeftLabel.text = String(timeLeft)
   }

   override func viewDidLoad() {
      super.viewDidLoad()
      // Do any additional setup after loading the view, typically from a nib.
   }
   override func didReceiveMemoryWarning() {
      super.didReceiveMemoryWarning()
      // Dispose of any resources that can be recreated
   }
}
This is all we will do in our application, try to run the application, it should run fine.
Storing Data on Local Storage
Storing data on local storage means to use the local devices storage to store data related to application on the device. We have two ways to store the data on a local storage namely NSUserDefault and CoreData.
Let us understand them in detail.
NSUserDefaults
NSUserDefaults are meant to store small pieces of data such as preferences, settings or individual values. To use UserDefaults in our application, we just need to create a reference to the nsuserDefaults through our code as shown below.
let defaultValues = NSUserDefaults.standardUserDefaults()
To set values to data in UserDefaults we can use the following code −
defaultValues.setObject("Simplified iOS", forKey: "nameKey")
func setDouble(value: Double, forKey defaultName: String)
func setBool(value: Bool, forKey defaultName: String)
func setObject(value: AnyObject?, forKey defaultName: String)
func setURL(url: NSURL?, forKey defaultName: String)
func setInteger(value: Int, forKey defaultName: String)
func setFloat(value: Float, forKey defaultName: String)
To get values from NSUserDefaults, we can use the following code.
func boolForKey(defaultName: String) -> Bool
func integerForKey(defaultName: String) -> Int
func floatForKey(defaultName: String) -> Float
func doubleForKey(defaultName: String) -> Double
func objectForKey(defaultName: String) -> AnyObject?
func URLForKey(defaultName: String) -> NSURL?
CoreData
CoreData is a persistent framework, which supports large data transactions. CoreData allows you to build relational entityattribute model for storing user data. CoreData is a framework and can use SQLite, binary formats to store data.
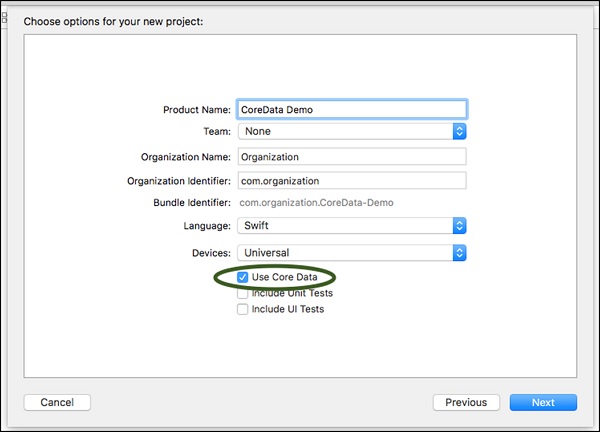
To use CoreData in our application, we will start with a new project and make sure you check Use Core Data, while creating the project.
Login Using core Data − Create a new project, select use CoreData as shown in the following screenshot.
Continue until the project is open, now we see that the project has more files than our previous projects.
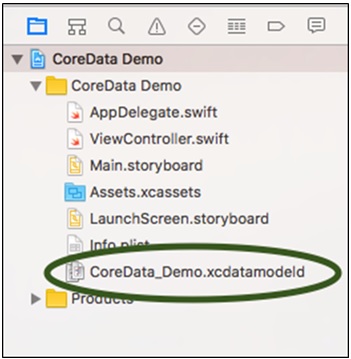
This file CoreData_demo.xcdatamodeld is our database in which we will be making our user table and storing data.
Concept − The thing about CoreData is, even if we close the app, and open it after months, it will still have the data we stored, which we will see in the next application we make.
Now we will see how to add core data and retrieve core data.
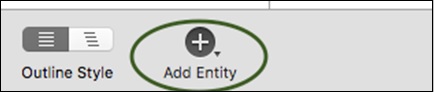
Adding Core Data − To add CoreData, click on the file CoreData_demo.xcdatamodeld and then we will see that the entities are empty. Click on add Entity button, it will add an entity, now double click on the entity name and rename it anything you like.
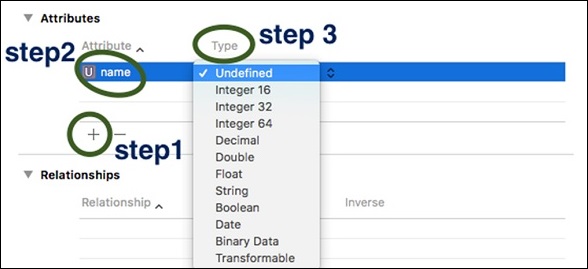
Now click on the entity and we can see that the attributes field is empty. Click on the plus symbol and rename the entity. Select the type of the entity from the next field.
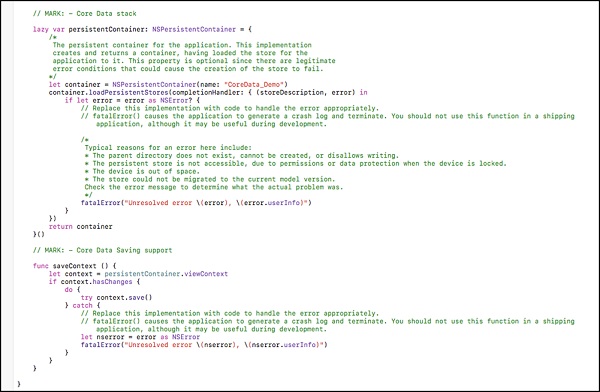
We have added an Entity and one Attribute in it. Now, if we go to the AppDelegate.swift, we can see that two new functions have been added because we selected CoreData. The two functions added are −
Note − Import CoreData in your file before proceeding.
Saving data to Core Data − To save some data in CoreData, we need to make an object of AppDelegate Class.
let appDelegate = UIApplication.shared.delegate as! AppDelegate
And, a context object
let context = appDelegate.persistentContainer.viewContext
Then, we need to create an entity object, which will call our entity −
let newValue = NSEntityDescription.insertNewObject(forEntityName: "Users", into: context)
We will now set the value of that attribute we created.
newValue.setValue(textField.text, forKey: "name")
We will save the data using
context.save();
Fetching from core data − While fetching, the above two steps (creating appDelegate and context) will be the same. Then, we will create a fetch request.
let request = NSFetchRequest<NSFetchRequestResult>(entityName: "Users")
We will create an object to store the result.
let results = try context.fetch(request)
Then we will go through the results as per our requirement. We will see more of CoreData with the next application we create.
Challenge − Try to create an application, where the user enters the name, then clicks on login and closes the application. When the next time the user opens the application, he should be still logged in. Then add a button logout, and if he clicks on that, the application will ask for the username again.
Login/Logout using CoreData
Create a single view project called Login, select use of CoreData. Click on CoreData_demo.xcdatamodeld and add an entity called Users. Inside that, add an attribute called name.
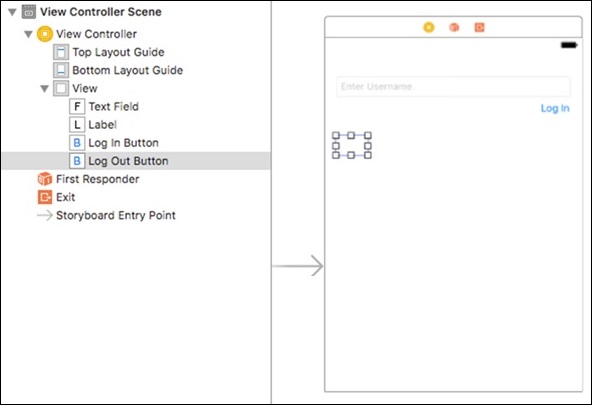
Go to the main.storyboard, Add a text field and a login button. Below that, add a label, double click on it and remove its content. Then, add a logout button, go to its attribute inspector and make alpha equal to 0. Now, our view should look as follows −
Now, go to your view controller file, open assistant editor and create connections between the UI Elements and your controller file.
Note − We will also create outlets for both the buttons, because we need to modify the look of those buttons. For example − When a user is logged in, we will hide the login button, if the user is not logged in we will show login and hide the logout button.
As we have already discussed about adding and fetching data from CoreData, we will put the code here.
Try-Catch − You will notice that we have used try-catch block many times in the code. It is because if we do not use the try-catch blocks and there is some exception or error in our program, the execution will stop. Whereas, if we are using the try catch blocks and if some error occurs, then the catch block handles the error. Read more about it in our Swift Tutorial
Code for Login/Logout Application
Let us understand the different components and the code that is used for a login/logout application.
Login Button Action − The following code explains how to add a login button action.
var isLoggedIn = false
@IBAction func logIn(_ sender: AnyObject) {
   let appDelegate = UIApplication.shared.delegate as! AppDelegate
   let context = appDelegate.persistentContainer.viewContext
   if isLoggedIn {
      let request = NSFetchRequest<NSFetchRequestResult>(entityName: "Users")
      do {
         let results = try context.fetch(request)
         if results.count > 0 {
            for result in results as! [NSManagedObject] {
               result.setValue(textField.text, forKey: "name")
               do {
                  try context.save()
               }
               catch {
                  print("Update username failed")
               }
            }
            label.text = "Hi " + textField.text! + "!"
         }
      }
      catch {
         print("Update failed")
      }
   } else {
      let newValue = NSEntityDescription.insertNewObject(forEntityName: "Users", into: context)
      newValue.setValue(textField.text, forKey: "name")
      do {
         try context.save()
         logInButton.setTitle("Update username", for: [])
         label.alpha = 1
         label.text = "Hi " + textField.text! + "!"
         isLoggedIn = true
         logOutButton.alpha = 1
      }
      catch {
         print("Failed to save")
      }
   }
}
Logout Button Action − The following code explains how to add a logout button action.
@IBAction func logOut(_ sender: AnyObject) {
   let appDelegate = UIApplication.shared.delegate as! AppDelegate
   let context = appDelegate.persistentContainer.viewContext
   let request = NSFetchRequest<NSFetchRequestResult>(entityName: "Users")
   do {
      let results = try context.fetch(request)
      if results.count > 0 {
         for result in results as! [NSManagedObject] {
            context.delete(result)
            do {
               try context.save()
            } catch {
               print("Individual delete failed")
            }
         }
         label.alpha = 0
         logOutButton.alpha = 0
         logInButton.setTitle("Login", for: [])
         isLoggedIn = false
         textField.alpha = 1
      }
   } catch {
      print("Delete failed")
   }
}
ViewDidLoad() − The following code explains how to use the ViewDidLoad() function.
override func viewDidLoad() {
   super.viewDidLoad()
   // Do any additional setup after loading the view, typically from a nib.
   let appDelegate = UIApplication.shared.delegate as! AppDelegate
   let context = appDelegate.persistentContainer.viewContext
   let request = NSFetchRequest<NSFetchRequestResult>(entityName: "Users")
   request.returnsObjectsAsFaults = false
   do {
      let results = try context.fetch(request)
      for result in results as! [NSManagedObject] {
         if let username = result.value(forKey: "name") as? String {
            logInButton.setTitle("Update username", for: [])
            logOutButton.alpha = 1
            label.alpha = 1
            label.text = "Hi there " + username + "!"
         }
      }

   } catch {
      print("Request failed")
   }
}
Remember you had to create an outlet and an action, for both the buttons.
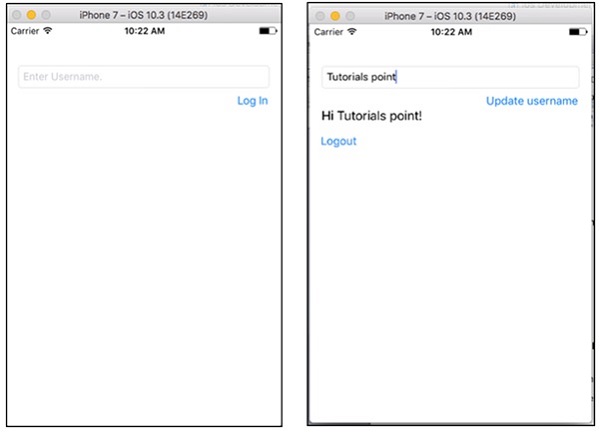
Now, save and run the application. Login, close the application and run it again. It should look as follows.
That is all we will do with CoreData. Using the same concepts, we can build many CoreData applications.
Controlling the Keyboard
In this section, we will learn to control the keyboard behavior. For example When we click outside a text field after entering some text, the keyboard does not close. Here, we will understand how to control the keyboard.
Keyboard should disappear on clicking outside the input field
This is a simple task, to do this just paste the following code into your viewController file, before the closing the curly braces.
override func touchesBegan(_ touches: Set<UITouch>, with event: UIEvent?) {
   self.view.endEditing(true)
}
By doing this, it will make the keyboard disappear on clicking outside the input field.
Keyboard should disappear on return key tap
To make the keyboard disappear, we should add a new Type for our view Controller. We will also add a text field and create its outlet called textField. Lastly, we will add the UITextFieldDelegate.
We will also control + drag from our input field to the view controller and select delegate from the options that appear.
Then, we will add the following function.
func textFieldShouldReturn(_ textField: UITextField) -> Bool {
   textField.resignFirstResponder()
   return true
}
The final View Controller file should look as follows −
import UIKit
class ViewController: UIViewController, UITextFieldDelegate {
   override func viewDidLoad() {
      super.viewDidLoad()
      // Do any additional setup after loading the view, typically from a nib.
   }
   override func didReceiveMemoryWarning() {
      super.didReceiveMemoryWarning()
      // Dispose of any resources that can be recreated.
   }
   override func touchesBegan(_ touches: Set<UITouch>, with event: UIEvent?) {
      self.view.endEditing(true)
   }
   func textFieldShouldReturn(_ textField: UITextField) -> Bool {
      textField.resignFirstResponder()
      return true
   }
}
Downloading Web Content − Opening Facebook/Google
In this section, we will learn about making an application, which will open Facebook and Google, when each button is pressed respectively. We will also learn the concept of Web Views and App transport layer Security. After this, you will be able to make a browser of your own.
Note − We need an Internet Connection in this application.
Making a Web Application
We will make a new single view application, iOS project. In the Search bar of the object library, we will search for web view, drag it and add it to our View controller in the main.Storyboard.
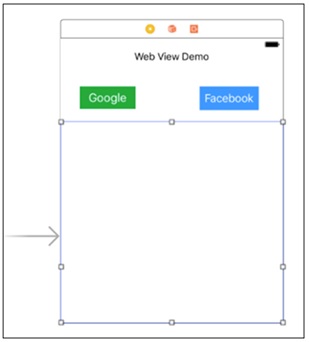
After adding the web view, we will stretch it to all the corners. The Application UI should look like as follows −
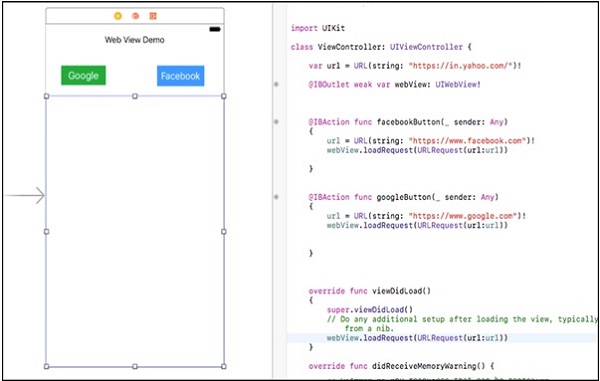
We will open our main.storyboard and view controller by clicking on the assistant editor. We will create an outlet for our webView and action for both the buttons. On load, the application will load yahoo in webView. On clicking google, it should load Google, and on clicking the Facebook button, it should load the Facebook page.
The final view should look as follows −
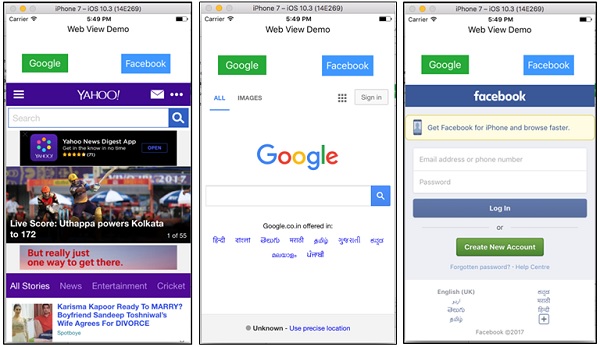
The following screenshots show how the different screens of our application should look like. If you try to open a web service that is not https, it will show an error and we will have to add an App Transport Layer Security exception in your info.plist file.
iOS Development Swift 2 - Integrating Maps
Maps have become a part of everyones daily life. They have become so useful when we travel to places or search for some place.
Integrating Maps and Locating India Gate
We will make maps in our application, which will be showing us the India Gate in the center. We will learn maps by implementing in a project. So, create a single view iOS application and name it whatever you want.
Adding Map Kit View
Go to the object library and search for map kit view, click drag and bring it to your view, stretch it so that it fills the complete view.
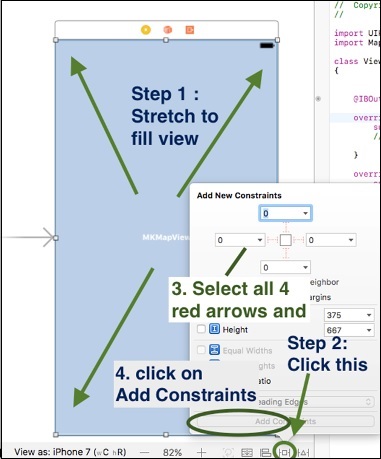
Adding Constraints
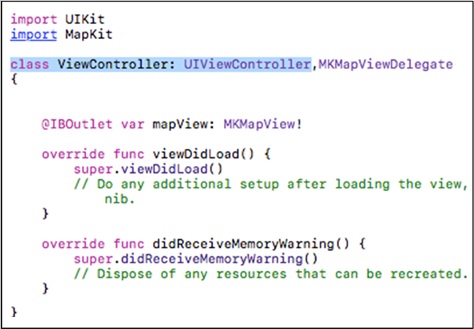
Create an outlet for mapViewKit by control + drag to view the controller.swift file. It might show an error right now, but we will handle it. On top of the file, below the import UIKIT, add import MapKit, this will remove the error.
After that, add MKMapViewDelegate after class ViewController: UIViewController. Now, the file should look like as follows −
Now, we will create Latitude and Longitude, Delta, Span, Location and Region for our Map. Before that, we will tell you how to get latitude and longitude of a place.
Go to maps.google.com and search for some location. On the top, we will see its latitude and longitude in the URL. For example: Let us search for India Gate.

Setting Latitude and Longitude
After getting the latitude and longitude, we will make variables for them.
let latitude: CLLocationDegrees = 28.610
let longitude: CLLocationDegrees = 77.230
Setting Delta for Latitude and Longitude
After adding latitude and longitude, we will add delta for them, which is the value that can verify our latitude and longitude. They should be kept minimum for more locations that are exact.
let latDelta: CLLocationDegrees = 0.04
let lonDelta: CLLocationDegrees = 0.04
Setting Span, Location and Region for Map
Then we will create a Span, Location and Region for our map.
let span: MKCoordinateSpan = MKCoordinateSpan(latitudeDelta: latDelta,
longitudeDelta: lonDelta)
let location: CLLocationCoordinate2D = CLLocationCoordinate2D(latitude:
latitude, longitude: longitude)
let region: MKCoordinateRegion = MKCoordinateRegion(center: location, span: span)
Setting the Map
We will set the map with the following command.
mapView.setRegion(region, animated: true)
Our final Application should look like the screenshot shown below.
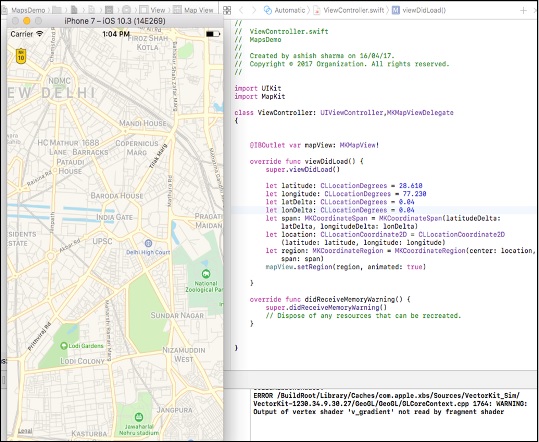
We should take care that our location set is exactly in the center of our application. This is all we will do with maps right now.
iOS Development with Swift 2 - Auto Layouts
When we make iOS applications and we add UI Elements in that application, they might seem perfect on one device. Nevertheless, now we should try the same application on some other device. We will certainly see drastic changes in the UI and some elements might not appear as well.
Auto layout is the technique that we will use to resolve this issue. In this chapter, we will understand how to make Auto Layout, Apply Constraints and Stack View to make your application look perfect and best on every Device.
We will start by making a new single view application.
Adding Elements
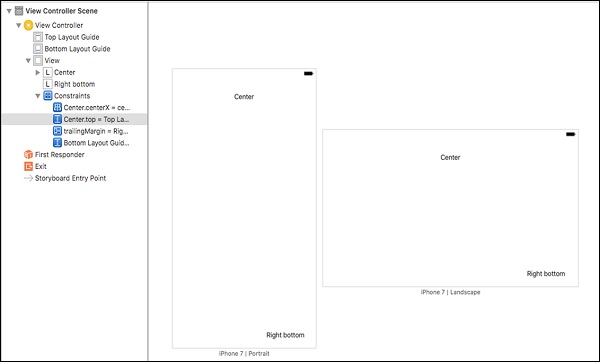
Add a label in the top center of the view and one in the bottom right of the view as shown below −
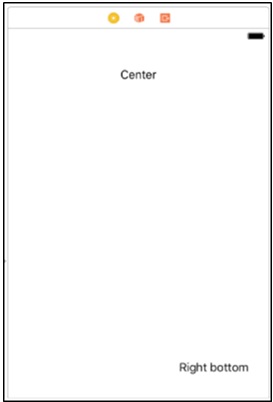
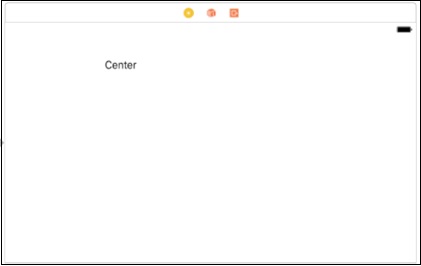
Now, try to change the orientation and we will see that the right bottom does not appear, while the Center is not in the center.
(Tip − You do not need to run the simulator to see layouts, just click on View as − iPhone x, in the bottom of the screen as shown in the following screenshot.)
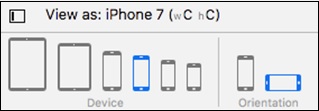
Select the iPhone version and the orientation. We will see that the UI elements are not arranged properly. Therefore, when we change our orientation, device, or both, the right bottom label will disappear and the center will not be in the center.
This happens because we have not specified the fixed position for elements. To solve this, we will use Constraints.
Applying Constraints to UI Elements
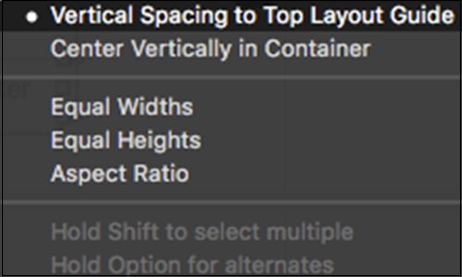
Click on the Center Label, press control and drag anywhere inside the view, release. Now you must be seeing −
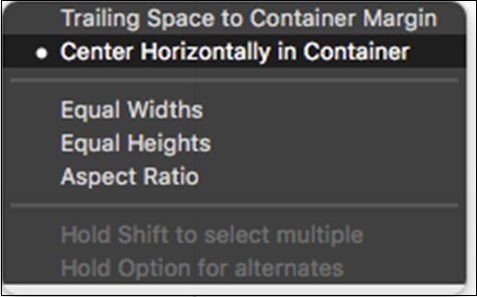
Select Center Horizontally in Container. Again, repeat the above step and choose, Vertical Spacing to Top Layout Guide.
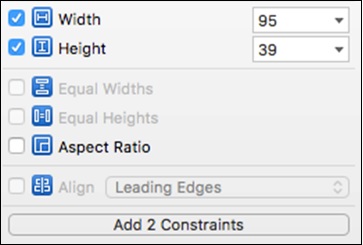
Now, click on Add new constraint button and select height and width, and click Add 2 Constraints.
Click on the Right bottom label, control drag from label to anywhere inside the view, and choose Trailing space to container Margin. Similarly choose, Vertical spacing to Bottom layout Guide.
(Tip − To select multiple options at once, press shift and choose the options. Ensure that you do not release shift until you have selected everything.)
After applying all the constraints, the view should look as follows −
Stack View
Stack view works by arranging elements in stacks. After arranging, we define the constraints only once, and all the elements are arranged accordingly. To start with stack view, create the following view, which will not look better in other devices. However, we will make it suitable for other devices in this section.
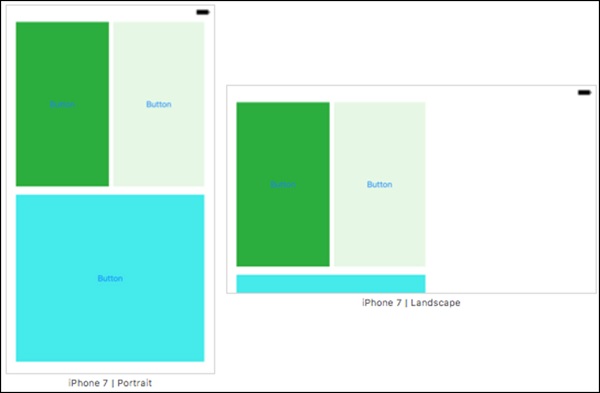
Now, select the top two buttons select one button, press command and then select the second one. To embed them in a stack view, go to editor → embed In → stack view.
OR
At the bottom right-hand corner, there is an option  Select this option and this will embed the views into the stack view.
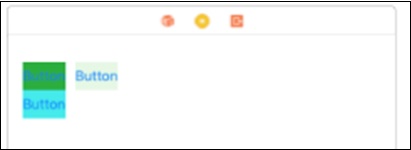
Horizontal Stack View
The Horizontal Stack View would look as shown in the following screenshot.
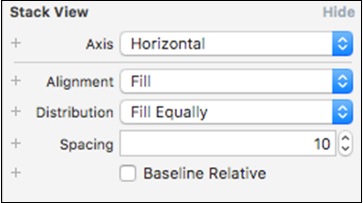
While this stack view is selected, go to attribute inspector. Change Distribution to Fill Equally and Spacing to 10.
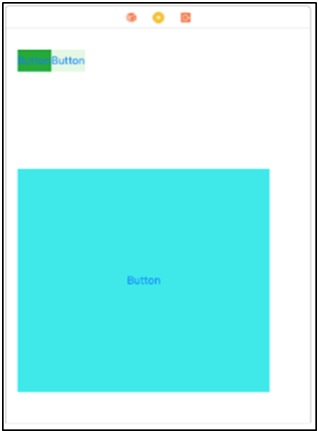
Now, select this stack view and the bottom button and again embed into the stack view. This time the stack view axis will be vertical, while in the previous stack view, it was horizontal.
Vertical Stack Views
Now your view will look like −
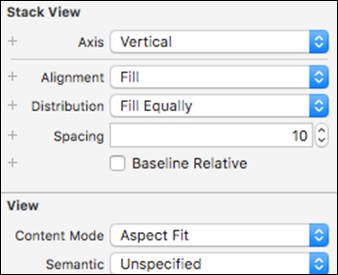
While this stack view is selected, go to its attribute inspector and make sure it matches the screenshot below.
Now, your view should look as follows −
The last step is to make constraints for this stack view.
Select the stack view → Click on add new constraint button.

This will open a new window in which we have to follow the steps shown in the next screenshot.
Adding Constraints to Stack View
The following screenshot will describe how to add constraints to a stack view.

That is all we will do with auto layouts. In the next chapter, we will discuss about Animations.
That is all we will do with auto layouts. In the next chapter, we will discuss about Animations.
iOS Development with Swift 2 - Animations
Animation is an important part of any Application as it draws user attention to the application. Animation is just a collection of images that repeat at a fast rate. It also makes your application stand different from others.
Making an Animation Project − Kitty Animation
This will be a simple project, wherein we will run an animation when a button is clicked. We will use multiple images to create a GIF, so download any GIF and convert it to images, which will give you multiple frames of that GIF.
In this section, we will use the following images.

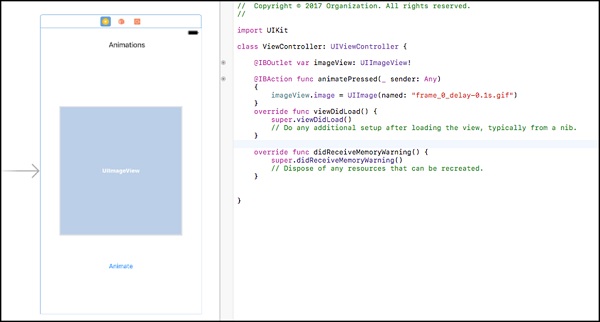
These images, when played together, create an animation. Therefore, we will make a single view application. We will then drag an image view option, a label and a button inside the main view controller. Once this is done, we will connect the image view and the button to our swift file.
(If you do not want to use these images, search for any gif and convert it to image online by using some gif to image converter.)
Inside the button action, we will insert the following command to show the image when a button is pressed.
imageView.image = UIImage(named: "frame_0_delay-0.1s.gif")
// frame_0_delay-0.1s.gif, is the name of image
This is how we programmatically assign image to an Image View. The view should now look as follows −
The first view will appear when we run the application. When we click on the Animate Button, the image will appear.
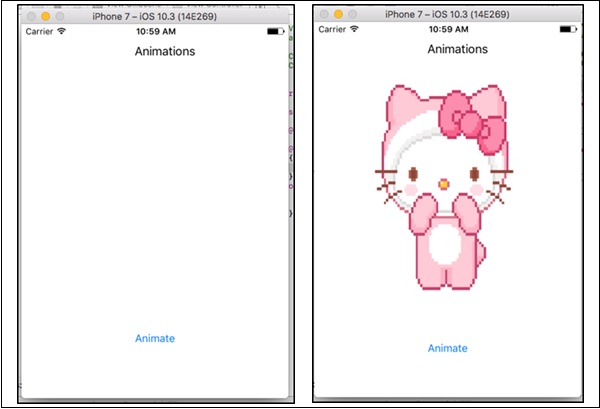
This is not an animation, but just an image. We will create the animation now −
Add a variable below the image outlet: var counter = 1.
See that our images have a common name and only one character is different. Change your animate buttons code as shown below −
@IBAction func animatePressed(_ sender: Any) {
   imageView.image = UIImage(named: "frame_\(counter)_delay-0.1s.gif")
   counter += 1
   if counter == 9 {
      counter = 0
   }
}
Now, when you press the animate button, the image changes every time. The next step is to create the following −
Create a variable − isAnimating and assign False to it.
Create a timer variable and assign a Timer() function to it.
Once the above two steps are done, then create a function animate and paste the following code.
func animate() {
   imageView.image = UIImage(named: "frame_\(counter)_delay-s.gif")
   counter += 1
   if counter == 9 {
      counter = 0
   }
}
Where, counter is our counter variable we made in the previous file. Now, inside the animate button function, add the following code −
if isAnimating {
   timer.invalidate()
   isAnimating = false
} else {
   timer = Timer.scheduledTimer(timeInterval: 0.1, target: self, selector:
   #selector(ViewController.animate), userInfo: nil, repeats: true)
   isAnimating = true
}
Try to run the application and we will see that an animation is being run on your device.
Challenge − Add a stop button that will stop the animation.
Accessing Web Services
In our application, we might need to connect to API and retrieve data from that API and use in our application.
Firstly, we need the URL, which will provide us the data.
api.openweathermap.org/data/2.5/forecast?id=524901&APPID=1111111111
After that, we need to add transport layer security exception to allow our application to communicate to the web service, if the service is not https. We will make these changes in the info.plist file.
Finally, we will create an URLSession to create a network request.
let urlString = URL(string: "your URL")  // Making the URL
if let url = urlString {
   let task = URLSession.shared.dataTask(with: url) {
      (data, response, error) in // Creating the URL Session.
      if error != nil {
         // Checking if error exist.
         print(error)
      } else {
         if let usableData = data {
            // Checking if data exist.
            print(usableData)
            // printing Data.
         }
      }
   }
}
task.resume()
This is how you can Use Web services in your application using URL sessions.
Alamofire
Alamofire is a HTTP networking library written in swift. It can be used to make URL Requests, Post Data, Receive Data, Upload File, Data, Authentication, Validation, etc.
To install Aalmofire, you can go to Alamofire officially on GitHub, and read their installation guide
Making a Request in Alamofire
For making a request in Alamofire, we should use the following command.
Import Alamofire
Alamofire.request("url");
Response Handling
The following command is used for response handling.
Alamofire.request("url").responseJSON {
   response in
   print(response.request)
   // original URL request
   print(response.response)
   // HTTP URL response
   print(response.data)
   // server data
   print(response.result)
   // result of response serialization
   if let JSON = response.result.value {
      print("JSON: \(JSON)")
   }
}
Response Validation
The following command is used for response handling.
Alamofire.request("https://httpbin.org/get").validate().responseJSON {
   response in
   switch response.result {
      case .success:
      print("Validation Successful")
      case .failure(let error):
      print(error)
   }
}
These are the basics of making URL request, using URL Sessions and Alamofire. For more advanced Alamofire, please visit Alamofire Documentation, and you can read about it in detail.
Concurrency Control
Concurrency is a way to execute more than one thing at the same time. In an application, Concurrency refers to multiple tasks running at the same time/concurrently.
Concurrency can make your application faster, cleaner and gives a better experience to the user. Use of multithreading seems difficult to many developers, but APIs like NSOperation and Dispatch Queues makes it easy to use concurrency and multi-threading in the application.
Grand Central Dispatch
GCD is the most commonly used API to manage concurrent code and execute operations asynchronously at the system level. GCD provides and uses queues of task. These Queues are the data structure that use FIFO terminology, i.e. the task at first place in a queue will be executed first and the task in last of a queue will be executed at last.
For example − Suppose a movie ticket booking line, if you are the last person, you will get ticket last, and if someone comes after you, he will get a ticket after you.
Dispatch Queue
Dispatch queue are an easy way to perform a task asynchronously and concurrently in your application. There are two types of queues −
Serial Queues − They store tasks in a series manner and execute one task at a time.
Concurrent Queues − They store tasks in a series manner and execute one task at a time.
Some of the functions that are used to create or get queues are −
dispatch_queue_create
// create a serial or concurrent queue
dispatch_queue_get_label
// get the label of a given queue
dispatch_get_main_queue
// get the one and only main queue
dispatch_get_global_queue
// get one of the global concurrent queues
Adding Tasks to the Queues
There are two types of functions, which help in adding tasks to the queues. They are −
Synchronous Functions −
dispatch_once − will submit the task only once it is over the application lifetime.
dispatch_sync − will submit a task to the queue and return only when the task is completed.
Asynchronous Functions −
Dispatch_async − will submit a task and return.
Dispatch_after − returns immediately but delays for a specific time.
Dispatch_async − returns immediately but the task is submitted multiple times.
Example Code
Following is the example code for adding tasks to the queue.
dispatch_async(dispatch_get_main_queue(), update_block);
// add update_block to main queue

dispatch_apply(i, some_queue, work_block)
// add work_block to some_queue i times

dispatch_sync(background_queue, blocking_block)
// add blocking block to background queue and wait for completion
General Example of using a Queue
The following code is an example of using a queue.
dispatch_async(background_queue, ^ {
   // Perform code that takes long time, here.
   Dispatch_async(dispatch_get_main_queue(), ^ {
      //Some other task, generally UI.
   });
});
This is all we will do with concurrency control, as it is enough information until you become an intermediate iOS Developer.
Keep practicing the concepts you have learnt and try to modify and integrate them according to your requirement.
