
Article Categories
- All Categories
-
 Data Structure
-
 Networking
-
 RDBMS
RDBMS
-
 Operating System
-
 Java
Java
-
 MS Excel
-
 iOS
iOS
-
 HTML
HTML
-
 CSS
CSS
-
 Android
-
 Python
-
 C Programming
-
 C++
C++
-
 C#
C#
-
 MongoDB
-
 MySQL
MySQL
-
 Javascript
-
 PHP
PHP
-
 Economics & Finance
How to work with form elements in typescript?
Forms are an essential part of web development, enabling users to input and submit data. TypeScript, with its static typing and enhanced tooling, provides a robust environment for building form-driven applications. In this tutorial, we will explore various scenarios for working with form elements in TypeScript. We'll cover form submission, input validation, handling events, and accessing form values.
Creating a Basic Form
To get started, let's create a basic HTML form and enhance it with TypeScript. We'll capture user input and display it on submission.
Syntax
The syntax to create a form in HTML ?
<form>
   <!-- Form elements go here -->
</form>
The syntax to handle form submission in TypeScript ?
const form = document.querySelector('form') as HTMLFormElement;
form.addEventListener('submit', (event) => {
   event.preventDefault();
   // Handle form submission
});
Example 1
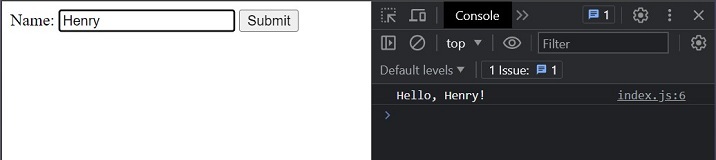
We select the form element using its ID and add a submit event listener. We prevent the default form submission behavior within the event listener using event.preventDefault(). We access the value of the name input element by selecting it using its ID. Finally, we display the user's name in the console.
<form id="myForm">
   <label for="name">Name:</label>
   <input type="text" id="name" />

   <button type="submit">Submit</button>
</form>
Now, let's handle the form submission in TypeScript ?
const form = document.querySelector('#myForm') as HTMLFormElement;
form.addEventListener('submit', (event) => {
   event.preventDefault();

   const nameInput = document.querySelector('#name') as HTMLInputElement;
   const name = nameInput.value;

   console.log(`Hello, ${name}!`);
});
Output

Example 2
Let?s now use the FormData API to access data from the previous form. In this example, we use the FormData API to access form data conveniently. We create a new FormData object, passing the form element as an argument. We use the get() method on the FormData object to retrieve the value of the name input.
const form = document.querySelector('#myForm') as HTMLFormElement;
form.addEventListener('submit', (event) => {
   event.preventDefault();

   const formData = new FormData(form);
   const name = formData.get('name');

   console.log(`Hello, ${name}!`);
});
Output
Form Input Validation
Input validation is crucial to ensure the correctness and integrity of data. Let's explore how to validate form inputs using TypeScript.
Syntax
const input = document.querySelector('#inputId') as HTMLInputElement;
input.addEventListener('input', () => {
   // Validate input value
});
Example 1
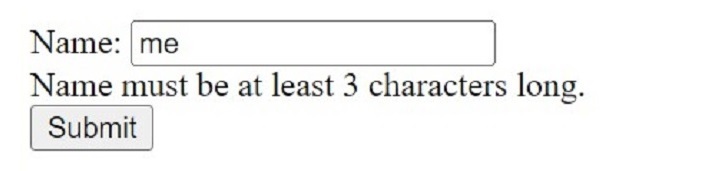
We select the name input element and an error container element. We attach an input event listener to the name input element, which fires whenever the user types or modifies the input. Inside the event listener, we retrieve the value of the name input and check if it's less than 3 characters. If the condition is true, we update the error container's text content with an error message. Otherwise, if the input is valid, we clear the error message.
<form>
   <label for="name">Name:</label>
   <input type="text" id="name" />
   <div id="nameError" class="error"></div>

   <button type="submit">Submit</button>
</form>
Here is the TypeScript code to handle the form ?
const nameInput = document.querySelector('#name') as HTMLInputElement;
const errorContainer = document.querySelector('#nameError') as HTMLDivElement;

nameInput.addEventListener('input', () => {
   const name = nameInput.value;
   if (name.length < 3) {
      errorContainer.textContent = 'Name must be at least 3 characters long.';
   } else {
      errorContainer.textContent = '';
   }
});
Output
Example 2
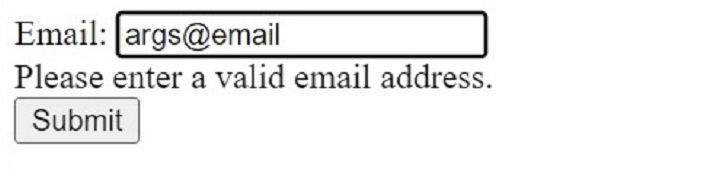
In this example, we validate an email input using a regular expression (emailRegex). We attach an input event listener to the email input element. We retrieve the email input value inside the event listener and test it against the regular expression. If the email is not in the correct format, we display an error message; otherwise, we clear the error.
<form>
   <label for="email">Email:</label>
   <input type="email" id="email" />
   <div id="emailError" class="error"></div>
   <button type="submit">Submit</button>
</form>
Here is the TypeScript code to handle the form ?
const emailInput = document.querySelector('#email') as HTMLInputElement;
const errorContainer = document.querySelector('#emailError') as HTMLDivElement;
const emailRegex = /^[^\s@]+@[^\s@]+\.[^\s@]+$/;

emailInput.addEventListener('input', () => {
   const email = emailInput.value;
   if (!emailRegex.test(email)) {
      errorContainer.textContent = 'Please enter a valid email address.';
   } else {
      errorContainer.textContent = '';
   }
});
Output
Handling Form Events
Forms often require additional event handling, such as triggering actions on button clicks or responding to input changes. Let's see how to handle these events in TypeScript.
Syntax
const button = document.querySelector('#buttonId') as HTMLButtonElement;
button.addEventListener('click', () => {
   // Handle button click
});
Example 1
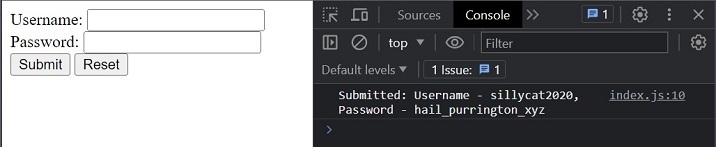
We select the form element, username input, password input, and reset button using their respective IDs. We attach a submit event listener to the form element to handle the form submission. Inside the event listener, we prevent the default form submission behavior using event.preventDefault(). We retrieve the values of the username and password inputs using their value properties.
In this example, we log the submitted values in the console. You can perform other actions, such as sending the form data to a server or updating the UI. After form submission, we reset the form fields using the reset() method on the form element. Additionally, we attach a click event listener to the reset button, which calls the reset() method to reset the form fields when the button is clicked.
<form>
   <label for="username">Username:</label>
   <input type="text" id="username" />
   <br />
   <label for="password">Password:</label>
   <input type="password" id="password" />
   <br />
   <button type="submit">Submit</button>
   <button type="button" id="resetButton">Reset</button>
</form>
Here is the TypeScript code to handle the above form
const form = document.querySelector('form') as HTMLFormElement;
const usernameInput = document.querySelector('#username') as HTMLInputElement;
const passwordInput = document.querySelector('#password') as HTMLInputElement;
const resetButton = document.querySelector('#resetButton') as HTMLButtonElement;

form.addEventListener('submit', (event) => {
   event.preventDefault();

   const username = usernameInput.value;
   const password = passwordInput.value;

   // Perform form submission or other actions
   console.log(`Submitted: Username - ${username}, Password - ${password}`);

   // Reset form fields
   form.reset();
});

resetButton.addEventListener('click', () => {
   form.reset();
});
Output
Example 2
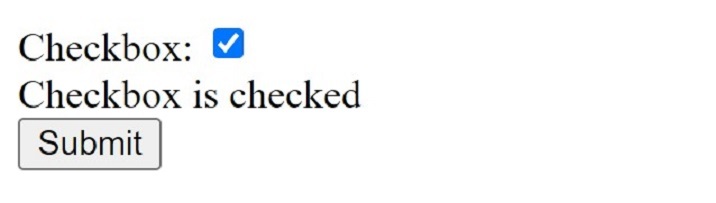
In this example, we handle the change event on a checkbox input. Inside the event listener, we update the text content of a message element based on whether the checkbox is checked or unchecked.
<form>
   <label for="checkbox">Checkbox:</label>
   <input type="checkbox" id="checkbox" />

   <div id="message"></div>

   <button type="submit">Submit</button>
</form>
Here is the TypeScript code to handle the above form ?
const checkbox = document.querySelector('#checkbox') as HTMLInputElement;
const message = document.querySelector('#message') as HTMLDivElement;

checkbox.addEventListener('change', () => {
   message.textContent = checkbox.checked ? 'Checkbox is checked' : 'Checkbox is unchecked';
});
Output
Conclusion
In this tutorial, we've covered the fundamental aspects of working with form elements in TypeScript. We explored creating forms, handling form submissions, validating inputs, and responding to form events. Understanding these concepts allows you to build powerful and interactive forms in your TypeScript projects. Remember to leverage the static typing capabilities of TypeScript to enhance form handling and improve code quality.

3K+ Views
