
 Data Structure
 Networking
 RDBMS
RDBMS Operating System
 Java
Java MS Excel
 iOS
iOS HTML
HTML CSS
CSS Android
 Python
 C Programming
 C++
C++ C#
C# MongoDB
 MySQL
MySQL Javascript
 PHP
PHP
- Selected Reading
- UPSC IAS Exams Notes
- Developer's Best Practices
- Questions and Answers
- Effective Resume Writing
- HR Interview Questions
- Computer Glossary
- Who is Who
How to use SQLite database with an Android application?
This example demonstrates how do I use the SQLite database with an android application.
Step 1 − Create a new project in Android Studio, go to File ⇒ New Project and fill all required details to create a new project.
Step 2 − Add the following code to res/layout/activity_main.xml.
<?xml version="1.0" encoding="utf-8"?>
<RelativeLayout xmlns:android="http://schemas.android.com/apk/res/android"
xmlns:tools="http://schemas.android.com/tools"
   android:layout_width="match_parent"
   android:layout_height="match_parent"
   android:padding="8dp"
   tools:context=".MainActivity">
   <ListView
      android:id="@+id/listView"
      android:layout_width="match_parent"
      android:layout_height="wrap_content"
      android:dividerHeight="1dp"
      android:padding="10dp" >
   </ListView>
   <TextView
      android:id="@+id/textView"
      android:layout_width="wrap_content"
      android:layout_height="wrap_content"
      android:layout_centerInParent="true"
      android:text="" />
</RelativeLayout>
Step 3 − Create a new Java class (DataBaseManager) and add the following code −
import android.content.ContentValues;
import android.content.Context;
import android.database.Cursor;
import android.database.SQLException;
import android.database.sqlite.SQLiteDatabase;
public class DataBaseManager {
private DatabaseHelper databaseHelper;
private Context context;
private SQLiteDatabase database;
DataBaseManager(Context c) {
   context = c;
   }
   DataBaseManager open() throws SQLException {
      databaseHelper = new DatabaseHelper(context);
      database = databaseHelper.getWritableDatabase();
      return this;
   }
   public void close() {
      databaseHelper.close();
   }
   void insert(String name, String desc) {
      ContentValues contentValue = new ContentValues();
      contentValue.put(DatabaseHelper.SUBJECT, name);
      contentValue.put(DatabaseHelper.DESCRIPTION, desc);
      database.insert(DatabaseHelper.TABLE_NAME, null, contentValue);
   }
   Cursor fetch() {
      String[] columns = new String[] { DatabaseHelper._ID, DatabaseHelper.SUBJECT, DatabaseHelper.DESCRIPTION };
      Cursor cursor = database.query(DatabaseHelper.TABLE_NAME, columns, null, null, null, null, null);
   if (cursor != null) {
      cursor.moveToFirst();
   }
   return cursor;
}
public int update(long _id, String name, String desc) {
   ContentValues contentValues = new ContentValues();
   contentValues.put(DatabaseHelper.SUBJECT, name);
   contentValues.put(DatabaseHelper.DESCRIPTION, desc);
   return database.update(DatabaseHelper.TABLE_NAME, contentValues, DatabaseHelper._ID + " = " + _id, null);
}
public void delete(long _id) {
   database.delete(DatabaseHelper.TABLE_NAME, DatabaseHelper._ID + "=" + _id, null);
}
Step 4 − Create a new Java class (DataBaseHelper) and add the following code
import android.content.Context;
import android.database.sqlite.SQLiteDatabase;
import android.database.sqlite.SQLiteOpenHelper;
class DatabaseHelper extends SQLiteOpenHelper {
   static final String TABLE_NAME = "FOOTBALLPLAYERS";
   static final String _ID = "_id";
   static final String SUBJECT = "subject";
   static final String DESCRIPTION = "description";
   private static final String DB_NAME = "PLAYER_COUNTRIES.DB";
   private static final int DB_VERSION = 1;
   private static final String CREATE_TABLE = "create table " + TABLE_NAME + "("
      + _ID + " INTEGER PRIMARY KEY AUTOINCREMENT, "
      + SUBJECT + " TEXT NOT NULL, " + DESCRIPTION + " TEXT);";
   DatabaseHelper(Context context) {
      super(context, DB_NAME, null, DB_VERSION);
   }
   @Override
   public void onCreate(SQLiteDatabase db) {
      db.execSQL(CREATE_TABLE);
   }
   @Override
   public void onUpgrade(SQLiteDatabase db, int oldVersion, int newVersion) {
      db.execSQL("DROP TABLE IF EXISTS " + TABLE_NAME);
      onCreate(db);
   }
}
Step 5 − Add the following code to src/MainActivity.java
import android.content.Intent;
import android.database.Cursor;
import android.os.Bundle;
import android.view.Menu;
import android.view.MenuItem;
import android.view.View;
import android.widget.AdapterView;
import android.widget.ListView;
import android.widget.SimpleCursorAdapter;
import android.widget.TextView;
import androidx.appcompat.app.AppCompatActivity;
public class MainActivity extends AppCompatActivity {
   DataBaseManager dataBaseManager;
   ListView listView;
   SimpleCursorAdapter adapter;
   final String[] from = new String[]{DatabaseHelper._ID, DatabaseHelper.SUBJECT, DatabaseHelper.DESCRIPTION};
   final int[] to = new int[]{R.id.id, R.id.title, R.id.desc};
   @Override
   protected void onCreate(Bundle savedInstanceState) {
      super.onCreate(savedInstanceState);
      setContentView(R.layout.activity_main);
      dataBaseManager = new DataBaseManager(this);
      dataBaseManager.open();
      Cursor cursor = dataBaseManager.fetch();
      listView = findViewById(R.id.listView);
      listView.setEmptyView(findViewById(R.id.textView));
      adapter = new SimpleCursorAdapter(this, R.layout.activity_view_record, cursor, from, to, 0);
      adapter.notifyDataSetChanged();
      listView.setAdapter(adapter);
      listView.setOnItemClickListener(new AdapterView.OnItemClickListener() {
         @Override
         public void onItemClick(AdapterView<?> parent, View view, int position, long viewId) {
            TextView idTextView = view.findViewById(R.id.id);
            TextView titleTextView = view.findViewById(R.id.title);
            TextView descTextView = view.findViewById(R.id.desc);
            String id = idTextView.getText().toString();
            String title = titleTextView.getText().toString();
            String desc = descTextView.getText().toString();
            Intent modifyIntent = new Intent(getApplicationContext(), ModifyPlayerActivity.class);
            modifyIntent.putExtra("title", title);
            modifyIntent.putExtra("desc", desc);
            modifyIntent.putExtra("id", id);
            startActivity(modifyIntent);
         }
      });
   }
   @Override
   public boolean onCreateOptionsMenu(Menu menu) {
      getMenuInflater().inflate(R.menu.main, menu);
      return true;
   }
   @Override
   public boolean onOptionsItemSelected(MenuItem item) {
      int id = item.getItemId();
      if (id == R.id.addRecord) {
         Intent addPlayer = new Intent(this, AddPlayerActivity.class);
         startActivity(addPlayer);
      }
      return super.onOptionsItemSelected(item);
   }
}
Step 6 − Create Two Activities (AddPlayerActivity & ModifyPlayerActivity) and add the following code −
AddPlayerActivity.java −
import android.content.Intent;
import android.os.Bundle;
import android.view.View;
import android.widget.Button;
import android.widget.EditText;
import androidx.appcompat.app.AppCompatActivity;
public class AddPlayerActivity extends AppCompatActivity implements
View.OnClickListener {
   Button btnAdd;
   private EditText editSubject;
   private EditText editDescription;
   private DataBaseManager dataBaseManager;
   @Override
   protected void onCreate(Bundle savedInstanceState) {
      super.onCreate(savedInstanceState);
      setTitle("Add Record");
      setContentView(R.layout.activity_addplayer);
      editSubject = findViewById(R.id.editTextSubject);
      editDescription = findViewById(R.id.editTextDescription);
      btnAdd = findViewById(R.id.add_record);
      dataBaseManager = new DataBaseManager(this);
      dataBaseManager.open();
      btnAdd.setOnClickListener(this);
   }
   @Override
   public void onClick(View v) {
      if (v.getId() == R.id.add_record) {
         final String name = editSubject.getText().toString();
         final String desc = editDescription.getText().toString();
         dataBaseManager.insert(name, desc);
         Intent main = new Intent(AddPlayerActivity.this,
         MainActivity.class).setFlags(Intent.FLAG_ACTIVITY_CLEAR_TOP);
         startActivity(main);
      }
   }
}
activity_addplayer.xml −
<?xml version="1.0" encoding="utf-8"?>
<LinearLayout xmlns:android="http://schemas.android.com/apk/res/android"
   android:orientation="vertical" android:layout_width="match_parent"
   android:layout_height="match_parent"
   android:padding="4dp">
   <EditText
      android:id="@+id/editTextSubject"
      android:layout_width="match_parent"
      android:layout_height="wrap_content"
      android:ems="10"
      android:hint="Enter Name" >
      <requestFocus />
   </EditText>
   <EditText
      android:id="@+id/editTextDescription"
      android:layout_width="match_parent"
      android:layout_height="wrap_content"
      android:hint="Enter Country"
      android:inputType="textMultiLine">
   </EditText>
   <Button
      android:id="@+id/add_record"
      android:layout_width="wrap_content"
      android:layout_height="wrap_content"
      android:layout_gravity="center"
      android:text="Add Record" />
</LinearLayout>
ModifyPlayerActivity −
import androidx.appcompat.app.AppCompatActivity;
import android.content.Intent;
import android.os.Bundle;
import android.view.View;
import android.widget.Button;
import android.widget.EditText;
public class ModifyPlayerActivity extends AppCompatActivity implements
View.OnClickListener {
   EditText editTextSub;
   Button updateBtn, deleteBtn;
   EditText editTextDesc;
   private long _id;
   DataBaseManager dataBaseManager;
   @Override
   protected void onCreate(Bundle savedInstanceState) {
      super.onCreate(savedInstanceState);
      setTitle("Modify Record");
      setContentView(R.layout.activity_modify_player);
      dataBaseManager = new DataBaseManager(this);
      dataBaseManager.open();
      editTextSub = findViewById(R.id.editTextSub);
      editTextDesc = findViewById(R.id.editTextDesc);
      updateBtn = findViewById(R.id.btnUpdate);
      deleteBtn = findViewById(R.id.btnDelete);
      Intent intent = getIntent();
      String id = intent.getStringExtra("id");
      String name = intent.getStringExtra("title");
      String desc = intent.getStringExtra("desc");
      _id = Long.parseLong(id);
      editTextSub.setText(name);
      editTextDesc.setText(desc);
      updateBtn.setOnClickListener(this);
      deleteBtn.setOnClickListener(this);
   }
   @Override
   public void onClick(View v) {
      switch (v.getId()) {
         case R.id.btnUpdate:
         String title = editTextSub.getText().toString();
         String desc = editTextDesc.getText().toString();
         dataBaseManager.update(_id, title, desc);
         this.returnHome();
         break;
         case R.id.btnDelete:
         dataBaseManager.delete(_id);
         this.returnHome();
         break;
      }
   }
   public void returnHome() {
      Intent home_intent = new Intent(getApplicationContext(),
      MainActivity.class).setFlags(Intent.FLAG_ACTIVITY_CLEAR_TOP);
      startActivity(home_intent);
   }
}
activity_modify_player.xml −
<?xml version="1.0" encoding="utf-8"?>
<LinearLayout xmlns:android="http://schemas.android.com/apk/res/android"
   android:layout_width="match_parent"
   android:layout_height="match_parent"
   android:orientation="vertical"
   android:padding="10dp" >
   <EditText
      android:id="@+id/editTextSub"
      android:layout_width="match_parent"
      android:layout_height="wrap_content"
      android:layout_marginBottom="10dp"
      android:ems="10"
      android:hint="Enter Name" />
   <EditText
      android:id="@+id/editTextDesc"
      android:layout_width="match_parent"
      android:layout_height="wrap_content"
      android:hint="Enter Country">
   </EditText>
   <LinearLayout
      android:layout_width="match_parent"
      android:layout_height="wrap_content"
      android:weightSum="2"
      android:gravity="center_horizontal"
      android:orientation="horizontal">
   <Button
      android:id="@+id/btnUpdate"
      android:layout_width="wrap_content"
      android:layout_height="wrap_content"
      android:layout_weight="1"
      android:text="Update" />
   <Button
      android:id="@+id/btnDelete"
      android:layout_width="wrap_content"
      android:layout_height="wrap_content"
      android:layout_weight="1"
      android:text="Delete" />
   </LinearLayout>
</LinearLayout>
Step 7 − Create a layout resource file (action_view_record.xml) and add the following code −
<?xml version="1.0" encoding="utf-8"?>
<RelativeLayout xmlns:android="http://schemas.android.com/apk/res/android"
   android:orientation="vertical" android:layout_width="match_parent"
   android:layout_height="match_parent"
   android:padding="4dp">
   <TextView
      android:id="@+id/id"
      android:layout_width="25dp"
      android:layout_height="wrap_content"
      android:layout_alignParentStart="true"
      android:layout_alignParentTop="true"
      android:layout_marginEnd="6dp"
      android:padding="3dp"
      android:visibility="visible" />
   <TextView
      android:id="@+id/title"
      android:layout_width="match_parent"
      android:layout_height="wrap_content"
      android:layout_marginStart="10dp"
      android:layout_toEndOf="@id/id"
      android:maxLines="1"
      android:padding="3dp"
      android:textSize="17sp"
      android:textStyle="bold" />
   <TextView
      android:id="@+id/desc"
      android:layout_width="match_parent"
      android:layout_height="wrap_content"
      android:layout_below="@id/title"
      android:layout_marginStart="10dp"
      android:layout_toEndOf="@id/id"
      android:ellipsize="end"
      android:maxLines="2"
      android:padding="3dp"
      android:visibility="visible" />
</RelativeLayout>
Step 8 − Add the following code to androidManifest.xml
<?xml version="1.0" encoding="utf-8"?>
<manifest xmlns:android="http://schemas.android.com/apk/res/android"
   package="app.com.sample">
   <application
      android:allowBackup="true"
      android:icon="@mipmap/ic_launcher"
      android:label="@string/app_name"
      android:roundIcon="@mipmap/ic_launcher_round"
      android:supportsRtl="true"
      android:theme="@style/AppTheme">
      <activity android:name=".ModifyPlayerActivity"></activity>
         <activity android:name=".MainActivity">
            <intent-filter>
               <action android:name="android.intent.action.MAIN" />
               <category android:name="android.intent.category.LAUNCHER" />
            </intent-filter>
         </activity>
      <activity android:name=".AddPlayerActivity" />
   </application>
</manifest>
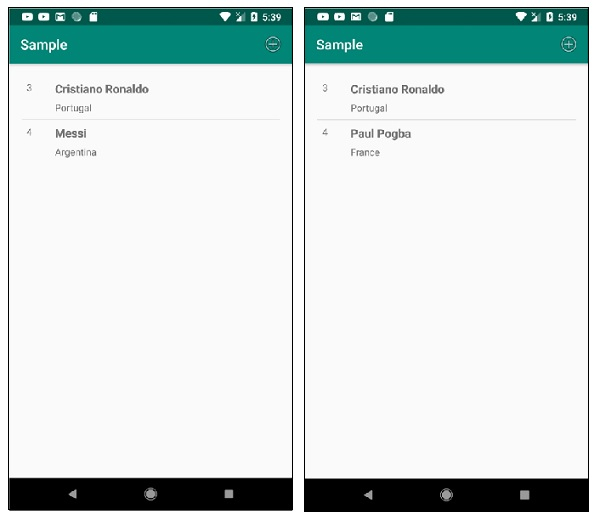
Let's try to run your application. I assume you have connected your actual Android Mobile device with your computer. To run the app from the android studio, open one of your project's activity files and click Run ![]() icon from the toolbar. Select your mobile device as an option and then check your mobile device which will display your default screen −
icon from the toolbar. Select your mobile device as an option and then check your mobile device which will display your default screen −

Click here to download the project code.

1K+ Views
