
Article Categories
- All Categories
-
 Data Structure
-
 Networking
-
 RDBMS
RDBMS
-
 Operating System
-
 Java
Java
-
 MS Excel
-
 iOS
iOS
-
 HTML
HTML
-
 CSS
CSS
-
 Android
-
 Python
-
 C Programming
-
 C++
C++
-
 C#
C#
-
 MongoDB
-
 MySQL
MySQL
-
 Javascript
-
 PHP
PHP
-
 Economics & Finance
How to set back button text in Swift?
By default, a view controller shows the text "Back" with an arrow on the back button in iOS. But you can set a custom title and icon for the back button item. Let's see an example of how to set custom back button text in Swift.
In this example, we will set up two different view controllers to see the default behavior of the back button and how to set the custom back button text.
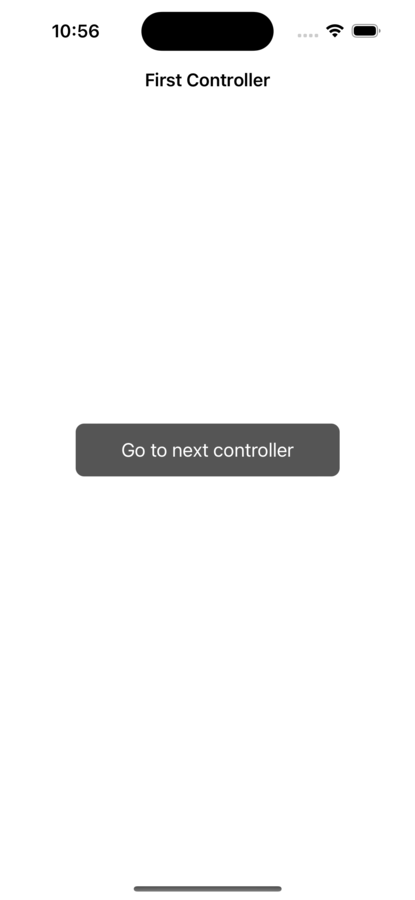
First View Controller Setup
In this step, we will set up the first view controller to push the second view controller. Here is the code for the first view controller.
Example
import UIKit
class FirstViewController: UIViewController {
   private let clickButton = UIButton()

   override func viewDidLoad() {
      super.viewDidLoad()
      initialSetup()
   }

   private func initialSetup() {

      // basic setup
      view.backgroundColor = .white
      navigationItem.title = "First Controller"

      // button customization
      clickButton.backgroundColor = .darkGray
      clickButton.setTitle("Go to next controller", for: .normal)
      clickButton.setTitleColor(.white, for: .normal)
      clickButton.layer.cornerRadius = 8
      clickButton.addTarget(self, action: #selector(handleClickButtonTapped), for: .touchUpInside)

      // adding the constraints to button
      view.addSubview(clickButton)
      clickButton.translatesAutoresizingMaskIntoConstraints = false
      clickButton.heightAnchor.constraint(equalToConstant: 50).isActive = true
      clickButton.widthAnchor.constraint(equalToConstant: 250).isActive = true
      clickButton.centerXAnchor.constraint(equalTo: view.centerXAnchor).isActive = true
      clickButton.centerYAnchor.constraint(equalTo: view.centerYAnchor).isActive = true
   }

   @objc private func handleClickButtonTapped() {
      let secondController = SecondViewController()
      self.navigationController?.pushViewController(secondController, animated: true)
   }
}
Output
Second view controller setup
In this step, we will set up the second view controller. First, we will see the default behavior of the back button. Here is the code to set up the second view controller.
Example
import UIKit
class SecondViewController: UIViewController {
   override func viewDidLoad() {
      super.viewDidLoad()
      initialSetup()
   }

   private func initialSetup() {

      // basic setup
      view.backgroundColor = .white
      navigationItem.title = "Second Controller"
   }
}
Output
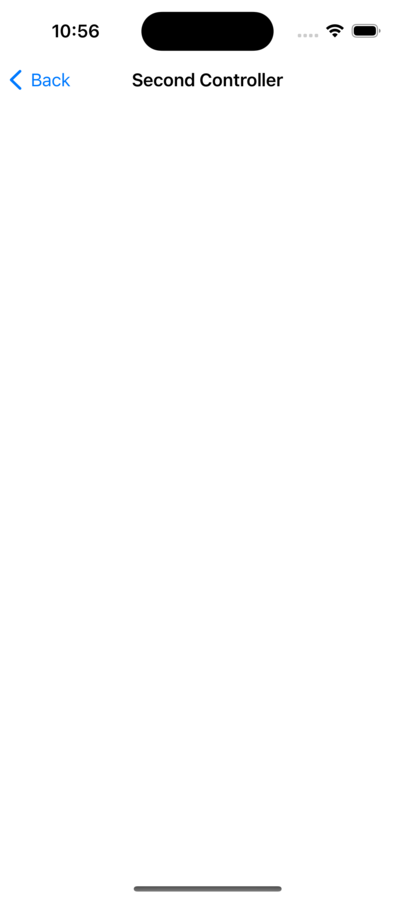
In the above output, you can see the default style of the back button. In order to change the back button text, you can follow the next step.
Set the Back Button Text
In this step, we will set the custom back button text. To change the back button text, you can create a custom UIButton with basic customization according to your requirements. After that, you can use the UIBarButtonItem(customView:) class to assign a custom back button. Here is the code to use this method.
Example
import UIKit
class SecondViewController: UIViewController {
   private let backButton = UIButton(type: .system)
   override func viewDidLoad() {
      super.viewDidLoad()
      initialSetup()
   }
   private func initialSetup() {

      // basic setup
      view.backgroundColor = .white
      navigationItem.title = "Second Controller"

      // button customization
      backButton.setImage(UIImage(systemName: "chevron.backward"), for: .normal)
      backButton.setTitle("Return", for: .normal)
      backButton.titleLabel?.font = UIFont.systemFont(ofSize: 17, weight: .medium)
      backButton.addTarget(self, action: #selector(handleBackButtonTapped), for: .touchUpInside)
      let backButtonItem = UIBarButtonItem(customView: backButton)
      self.navigationItem.leftBarButtonItem = backButtonItem
   }
   @objc private func handleBackButtonTapped() {
      self.navigationController?.popViewController(animated: true)
   }
}
Output
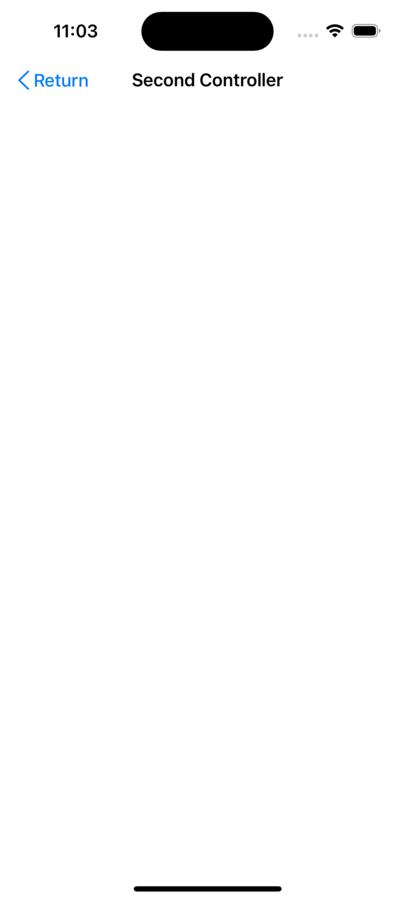
In the above example, you can see how we set the custom back button text. It is also possible to customize the back button with a custom button type.
Using the backBarButtonItem Property
Using this property, you can change the default back button text for all the view controllers pushed onto the navigation stack from the initial view controller. You can follow the below steps to change the default back button text.
Step 1 ? Implement the viewWillAppear method of the view controller.
Step 2 ? Create a UIBarButtonItem object with custom text and assign it to the backBarButtonItem property.
Step 3 ? Assign the backBarButtonItem property to the navigationItem property of the view controller class.
Here is an example
override func viewWillAppear(_ animated: Bool) {
   super.viewWillAppear(animated)
   self.navigationItem.backBarButtonItem = UIBarButtonItem(title: "Return", style: .plain, target: nil, action: nil)
}
The viewWillAppear method of the UIViewController is overridden in this example, and the backBarButtonItem property of the navigationItem property is set to create a UIBarButtonItem with the appropriate text. The text of the back button that shows in the navigation bar whenever this view controller is moved into the navigation stack is changed by setting the backBarButtonItem attribute in this manner.
All UIViewControllers that are pushed into a navigation stack by a UINavigationController are compatible with this approach. You'll need to use a different technique to change the back button text if you're using a different sort of navigation, like a tab bar.
Conclusion
You can assign a custom button with text to the back button by using the UIBarButtonItem(customView:) class. This class returns a bar button item and assigns it to the navigationItem property of the view controller.
You can also set custom text for the back button using the navigationItem.backBarButtonItem property of the view controller class.

2K+ Views
