
Article Categories
- All Categories
-
 Data Structure
-
 Networking
-
 RDBMS
RDBMS
-
 Operating System
-
 Java
Java
-
 MS Excel
-
 iOS
iOS
-
 HTML
HTML
-
 CSS
CSS
-
 Android
-
 Python
-
 C Programming
-
 C++
C++
-
 C#
C#
-
 MongoDB
-
 MySQL
MySQL
-
 Javascript
-
 PHP
PHP
-
 Economics & Finance
How to send Email on Android using JavaMail API?
This example demonstrates how to send Email on Android using JavaMail API.
Step 1 − Create a new project in Android Studio, go to File ⇒ New Project and fill all required details to create a new project.
Step 2 − Add the following code to res/layout/activity_main.xml.
Step 3 − Add the following code to src/MainActivity.java
package com.app.sample;
import androidx.appcompat.app.AppCompatActivity;
import android.view.View;
import android.widget.Button;
import android.widget.EditText;
import java.util.Properties;
import javax.mail.PasswordAuthentication;
import javax.mail.Session;
import android.os.Bundle;
public class MainActivity extends AppCompatActivity implements View.OnClickListener {
   private EditText editTextEmail;
   private EditText editTextSubject;
   private EditText editTextMessage;
   private Button buttonSend;
   @Override
   protected void onCreate(Bundle savedInstanceState) {
      super.onCreate(savedInstanceState);
      setContentView(R.layout.activity_main);
      editTextEmail = (EditText) findViewById(R.id.editTextEmail);
      editTextSubject = (EditText) findViewById(R.id.editTextSubject);
      editTextMessage = (EditText) findViewById(R.id.editTextMessage);
      buttonSend = (Button) findViewById(R.id.buttonSend);
      buttonSend.setOnClickListener(this);
   }
   private void sendEmail() {
      String email = editTextEmail.getText().toString().trim();
      String subject = editTextSubject.getText().toString().trim();
      String message = editTextMessage.getText().toString().trim();
      SendMail sm = new SendMail(this, email, subject, message);
      sm.execute();
   }
   @Override
   public void onClick(View v) {
      sendEmail();
   }
}
Step 4 − Add the following code to src/Config.java
package com.app.sample;
public class Config {
   public static final String EMAIL ="your-gmail-username";
   public static final String PASSWORD ="your-gmail-password";
}
Step 5 − Add the following code to src/SendMail.java
package com.app.sample;
import android.app.ProgressDialog;
import android.content.Context;
import android.os.AsyncTask;
import android.widget.Toast;
import java.util.Properties;
import javax.mail.Message;
import javax.mail.MessagingException;
import javax.mail.PasswordAuthentication;
import javax.mail.Session;
import javax.mail.Transport;
import javax.mail.internet.InternetAddress;
import javax.mail.internet.MimeMessage;
public class SendMail extends AsyncTask{
   private Context context;
   private Session session;
   private String email;
   private String subject;
   private String message;
   private ProgressDialog progressDialog;
   public SendMail(Context context, String email, String subject, String message){
      this.context = context;
      this.email = email;
      this.subject = subject;
      this.message = message;
   }
   @Override
   protected void onPreExecute() {
      super.onPreExecute();
      progressDialog = ProgressDialog.show(context,"Sending message","Please wait...",false,false);
   }
   @Override
   protected void onPostExecute(Void aVoid) {
      super.onPostExecute(aVoid);
      progressDialog.dismiss();
      Toast.makeText(context,"Message Sent",Toast.LENGTH_LONG).show();
   }
   @Override
   protected Void doInBackground(Void... params) {
      Properties props = new Properties();
      props.put("mail.smtp.host", "smtp.gmail.com");
      props.put("mail.smtp.socketFactory.port", "465");
      props.put("mail.smtp.socketFactory.class", "javax.net.ssl.SSLSocketFactory");
      props.put("mail.smtp.auth", "true");
      props.put("mail.smtp.port", "465");
      session = Session.getDefaultInstance(props, new javax.mail.Authenticator() {
         protected PasswordAuthentication getPasswordAuthentication() {
            return new PasswordAuthentication(Config.EMAIL, Config.PASSWORD);
         }
      });
      try {
         MimeMessage mm = new MimeMessage(session);
         mm.setFrom(new InternetAddress(Config.EMAIL));
         mm.addRecipient(Message.RecipientType.TO, new InternetAddress(email));
         mm.setSubject(subject);
         mm.setText(message);
         Transport.send(mm);
      }
      catch (MessagingException e) {
         e.printStackTrace();
      }
      return null;
   }
}
Step 6 − Add the following code to Manifests/AndroidManifest.xml
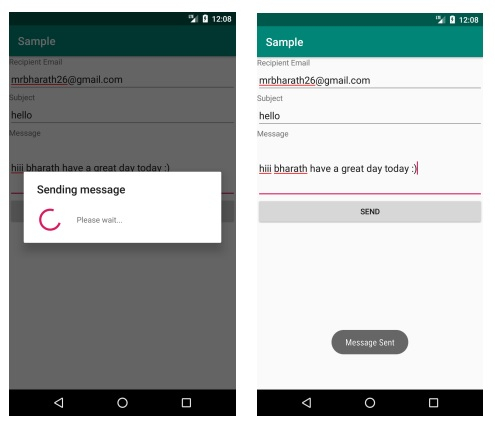
Let's try to run your application. I assume you have connected your actual Android Mobile device with your computer. To run the app from the android studio, open one of your project's activity files and click Run ![]() icon from the toolbar. Select your mobile device as an option and then check your mobile device which will display your default screen −
icon from the toolbar. Select your mobile device as an option and then check your mobile device which will display your default screen −
Click here to download the project code.

3K+ Views
