
Article Categories
- All Categories
-
 Data Structure
-
 Networking
-
 RDBMS
RDBMS
-
 Operating System
-
 Java
Java
-
 MS Excel
-
 iOS
iOS
-
 HTML
HTML
-
 CSS
CSS
-
 Android
-
 Python
-
 C Programming
-
 C++
C++
-
 C#
C#
-
 MongoDB
-
 MySQL
MySQL
-
 Javascript
-
 PHP
PHP
-
 Economics & Finance
How to run Gunicorn on Docker?
In this article, we are going to learn about how to run Gunicorn on Docker.
Before creating the docker container with the gunicorn functionalities, we must know some of the basics of web servers and gunicorn.
Introduction to Gunicorn
Let us suppose we have a web server that shows the output of a python code to the users. This web server will execute the python script each time a request came to it, this will cause it to restart, overload, and delay (heavy delay for huge scripts) in response. So the real problem here we have is a static server but we needed a dynamic solution. Gunicorn is the dynamic solution for the above-mentioned problem statement.
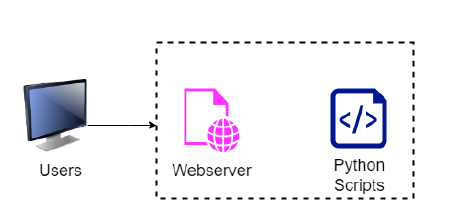
The above image explains the problem statement and the below image shows the structure of the solution.

There is a very famous infrastructure that uses Nginx, gunicorn, and Django together to provide dynamic functionalities. Nginx solves the load balancing and gunicorn solves the static problem.

Deploy on the Docker Container
Creating Django projects is out of scope for this article, we can create a minimalistic app and store that python app on the docker container. This docker container will have the gunicorn installed on it and we will launch the python app on the container.
Algorithm(Steps)
Create a Python application.
Create a requirements file.
Create a dockerfile.
Perform Containerization.
Checking the server for Output.
Step 1: Creat Python application
Create a simple python application object that outputs "Hello Tutorialspoint! "
Example
<div class="code-mirror  language-python" contenteditable="plaintext-only" spellcheck="false" style="outline: none; overflow-wrap: break-word; overflow-y: auto; white-space: pre-wrap;"><span class="token keyword">def</span> <span class="token function">app</span><span class="token punctuation">(</span>environ<span class="token punctuation">,</span> start_response<span class="token punctuation">)</span><span class="token punctuation">:</span>
   data <span class="token operator">=</span> <span class="token string">b'Hello, Tutorialspoint!<br>'</span>
   status <span class="token operator">=</span> <span class="token string">'200 OK'</span>
   response_headers <span class="token operator">=</span> <span class="token punctuation">[</span>
      <span class="token punctuation">(</span><span class="token string">'Content-type'</span><span class="token punctuation">,</span> <span class="token string">'text/plain'</span><span class="token punctuation">)</span><span class="token punctuation">,</span>
      <span class="token punctuation">(</span><span class="token string">'Content-Length'</span><span class="token punctuation">,</span> <span class="token builtin">str</span><span class="token punctuation">(</span><span class="token builtin">len</span><span class="token punctuation">(</span>data<span class="token punctuation">)</span><span class="token punctuation">)</span><span class="token punctuation">)</span>
   <span class="token punctuation">]</span>
   start_response<span class="token punctuation">(</span>status<span class="token punctuation">,</span> response_headers<span class="token punctuation">)</span>
   <span class="token keyword">return</span> <span class="token builtin">iter</span><span class="token punctuation">(</span><span class="token punctuation">[</span>data<span class="token punctuation">]</span><span class="token punctuation">)</span>
</div>
Save this file as myapp.py name.
Step 2: Create a requirements file
<div class="code-mirror  language-python" contenteditable="plaintext-only" spellcheck="false" style="outline: none; overflow-wrap: break-word; overflow-y: auto; white-space: pre-wrap;">python3
gunicorn
</div>
Save this as requirements.txt.
Step 3: Create a dockerfile
This dockerfile will create a docker container image fully functioning with python and gunicorn.
Save the below file as Dockerfile with no extension.
Example
<div class="code-mirror  language-python" contenteditable="plaintext-only" spellcheck="false" style="outline: none; overflow-wrap: break-word; overflow-y: auto; white-space: pre-wrap;">FROM     python
WORKDIR  <span class="token operator">/</span>app
COPY     <span class="token punctuation">.</span><span class="token operator">/</span>myapp<span class="token punctuation">.</span>py 	<span class="token punctuation">.</span><span class="token operator">/</span>
COPY	<span class="token punctuation">.</span><span class="token operator">/</span>requirements<span class="token punctuation">.</span>txt		<span class="token punctuation">.</span><span class="token operator">/</span>
RUN     pip install <span class="token operator">-</span><span class="token operator">-</span>upgrade pip <span class="token operator">-</span><span class="token operator">-</span>no<span class="token operator">-</span>cache<span class="token operator">-</span><span class="token builtin">dir</span>
RUN		pip install -r <span class="token operator">/</span>app<span class="token operator">/</span>requirements<span class="token punctuation">.</span>txt <span class="token operator">-</span><span class="token operator">-</span>no<span class="token operator">-</span>cache<span class="token operator">-</span><span class="token builtin">dir</span>
CMD		<span class="token punctuation">[</span>"gunicorn"<span class="token punctuation">,</span>"<span class="token operator">-</span>w" "<span class="token number">4</span>"<span class="token punctuation">,</span>"myapp<span class="token punctuation">:</span>app"<span class="token punctuation">,</span>"<span class="token operator">-</span><span class="token operator">-</span>bind" "<span class="token number">0.0</span><span class="token number">.0</span><span class="token number">.0</span><span class="token punctuation">:</span><span class="token number">8000</span>"<span class="token punctuation">]</span>
</div>
Step 4: Build docker image from dockerfile
<div class="code-mirror  language-python" contenteditable="plaintext-only" spellcheck="false" style="outline: none; overflow-wrap: break-word; overflow-y: auto; white-space: pre-wrap;"><span class="token comment">#docker build -t unicornimage .</span>
</div>
Step 5: Perform Containerization
Create a docker container from the unicornimage image.
Example
<div class="code-mirror  language-python" contenteditable="plaintext-only" spellcheck="false" style="outline: none; overflow-wrap: break-word; overflow-y: auto; white-space: pre-wrap;"><span class="token comment">#docker run -itd --name unicorncontainer -p 8000:8000 unicornimage</span>
</div>
Step 6: Check if the server is accessible on the host machine
Go to the browser and search localhost:8000 to see the output.

Similarly to create a Django project add django in the requirements.txt file with the gunicorn and you are ready to go.

8K+ Views
