
Article Categories
- All Categories
-
 Data Structure
-
 Networking
-
 RDBMS
RDBMS
-
 Operating System
-
 Java
Java
-
 MS Excel
-
 iOS
iOS
-
 HTML
HTML
-
 CSS
CSS
-
 Android
-
 Python
-
 C Programming
-
 C++
C++
-
 C#
C#
-
 MongoDB
-
 MySQL
MySQL
-
 Javascript
-
 PHP
PHP
-
 Economics & Finance
How to Remove Duplicates But Leaving Lowest Value in Another Column in Excel?
Excel duplicates can frequently lead to misunderstandings and mistakes in data analysis, therefore it's important to understand how to handle them correctly. We'll show you how to find duplicate values in one column and keep the lowest number in another column in this step-by-step tutorial.
In this article, we use the MIN method to eliminate duplicates while keeping the lowest values in a different column. Once you master this method, you'll be able to clean up your data and optimise your process with ease. Excel includes sophisticated tools and functions that may make data manipulation a breeze.
Remove Duplicates But Leaving Lowest Value in Another Column
Here we will first remove the duplicates from the column, then count them using the formula to complete the task. So let us see a simple process to know how you can remove duplicates while leaving the lowest value in another column in Excel.
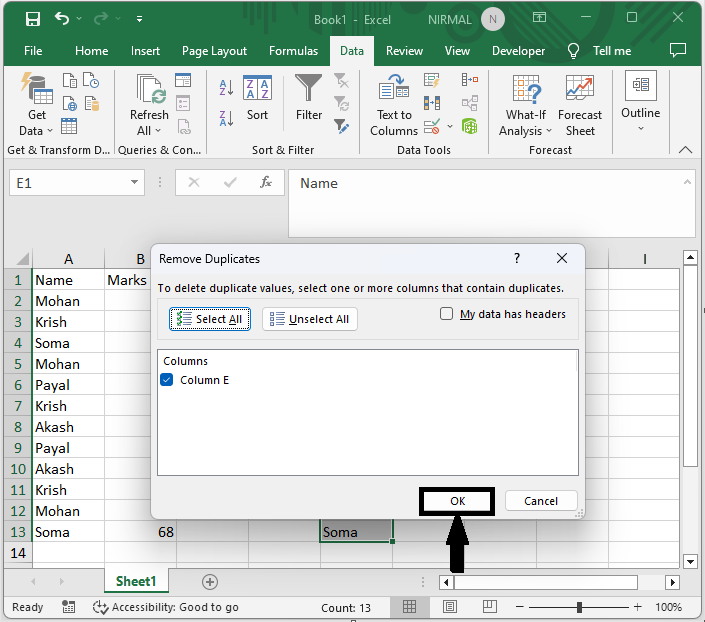
Step 1
Consider an Excel sheet where you have a list of duplicate with values in another column.
First, copy one column to another place. Then select the range of cells, click on data, select remove duplicates, and click OK.
Copy > Select Cells > Data > Remove Duplicates > Ok.
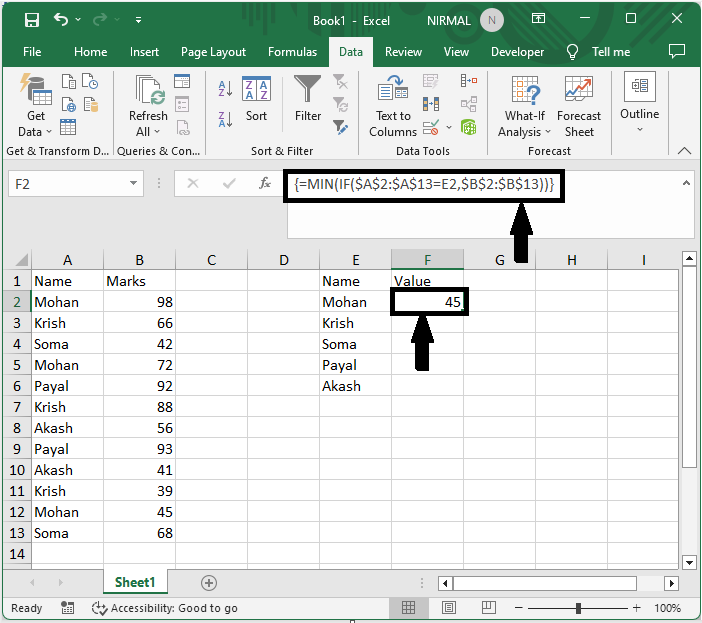
Step 2
Then click on the adjacent cell and enter the formula as
=MIN(IF($A$2:$A$13=E2,$B$2:$B$13)) and click Ctrl + Shift + Enter.
Empty Cell > Formula > Ctrl + Shift + Enter.
Step 3
Then drag down using the autofill handle to complete the task.
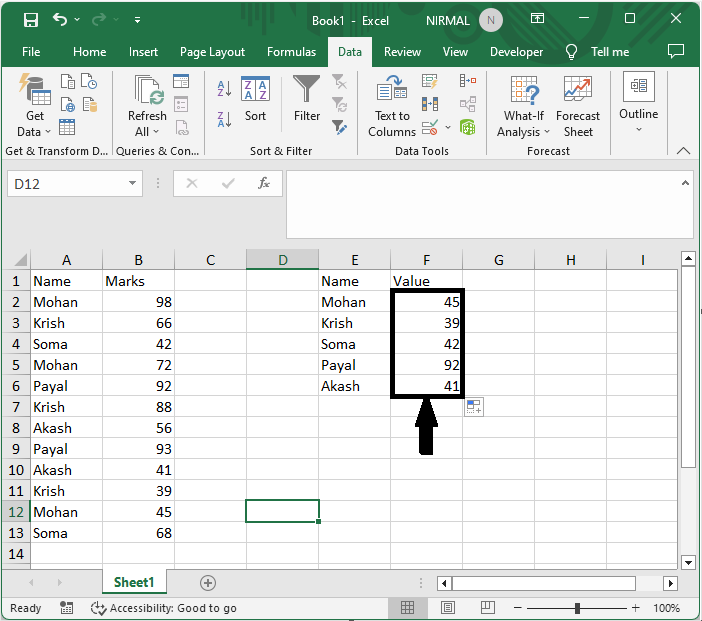
This is how you can remove duplicates, leaving the lowest values in another column in Excel.
Conclusion
In this tutorial, we have used a simple example to demonstrate how you can remove duplicates while leaving the lowest value in another column in Excel to highlight a particular set of data.

902 Views
