
Article Categories
- All Categories
-
 Data Structure
-
 Networking
-
 RDBMS
RDBMS
-
 Operating System
-
 Java
Java
-
 MS Excel
-
 iOS
iOS
-
 HTML
HTML
-
 CSS
CSS
-
 Android
-
 Python
-
 C Programming
-
 C++
C++
-
 C#
C#
-
 MongoDB
-
 MySQL
MySQL
-
 Javascript
-
 PHP
PHP
-
 Economics & Finance
How to properly highlight selected item on Android RecyclerView?
This example demonstrates how do I properly highlight the selected item on android RecyclerView.
Step 1 − Create a new project in Android Studio, go to File ⇒ New Project and fill all required details to create a new project.
Add the following dependency in the build.gradle (Module: app)
implementation 'com.android.support:recyclerview-v7:28.0.0'
Step 2 − Add the following code to res/layout/activity_main.xml.
<?xml version="1.0" encoding="utf-8"?>
<RelativeLayout
xmlns:android="http://schemas.android.com/apk/res/android"
   xmlns:tools="http://schemas.android.com/tools"
   android:layout_width="match_parent"
   android:layout_height="match_parent"
   android:padding="4dp"
   tools:context=".MainActivity">
   <androidx.recyclerview.widget.RecyclerView
      android:id="@+id/recyclerView"
      android:layout_width="match_parent"
      android:layout_height="match_parent"
      android:paddingBottom="8dp" />
</RelativeLayout>
Step 3 − Create a layout resource file (list_layout.xml) and add the following code −
<?xml version="1.0" encoding="utf-8"?>
<RelativeLayout
xmlns:android="http://schemas.android.com/apk/res/android"
   android:id="@+id/container"
   android:layout_width="match_parent"
   android:layout_height="match_parent"
   android:background="@drawable/background_selector"
   android:padding="16dp">
   <TextView
      android:id="@+id/awardTitle"
      android:layout_width="wrap_content"
      android:layout_height="wrap_content"
      android:layout_marginTop="10dp"
      android:text="New Text"
      android:textSize="18sp"
      android:textStyle="bold" />
   <TextView
      android:id="@+id/awardYear"
      android:layout_width="wrap_content"
      android:layout_height="wrap_content"
      android:layout_below="@+id/awardTitle"
      android:layout_alignStart="@+id/awardTitle"
      android:layout_marginTop="20dp"
      android:text="New Text"
      android:textColor="#000" />
   <TextView
      android:id="@+id/playerName"
      android:layout_width="wrap_content"
      android:layout_height="wrap_content"
      android:layout_alignParentEnd="true"
      android:text="New Text" />
</RelativeLayout>
Step 4 − Create drawable resource files as mentioned below and add the respective codes −
background_selector.xml −
<?xml version="1.0" encoding="utf-8"?>
<selector xmlns:android="http://schemas.android.com/apk/res/android">
   <item android:drawable="@color/colorAccent" android:state_pressed="false" android:state_selected="true" />
   <item android:drawable="@android:color/white" android:state_selected="false" />
</selector>
line_divider.xml −
<?xml version="1.0" encoding="utf-8"?>
<shape xmlns:android="http://schemas.android.com/apk/res/android" android:shape="rectangle">
   <size
      android:width="2dp"
      android:height="2dp" />
   <solid android:color="@color/colorPrimaryDark" />
</shape>
Step 5 − Create java class files as mentioned below and add the respective codes −
ItemObject −
class ItemObject {
   private String awardTitle;
   private String awardYear;
   private String player;
   ItemObject(String awardTitle, String awardYear, String player) {
      this.awardTitle = awardTitle;
      this.awardYear = awardYear;
      this.player = player;
   }
   String getAwardTitle() {
      return awardTitle;
   }
   String getAwardYear() {
      return awardYear;
   }
   String getPlayer() {
      return player;
   }
}
RecyclerViewAdapter −
import android.content.Context;
import android.view.LayoutInflater;
import android.view.View;
import android.view.ViewGroup;
import java.util.List;
import androidx.annotation.NonNull;
import androidx.recyclerview.widget.RecyclerView;
public class RecyclerViewAdapter extends
RecyclerView.Adapter<RecyclerViewHolders> {
   private List<ItemObject> itemList;
   RecyclerViewAdapter(Context context, List<ItemObject> itemList) {
      this.itemList = itemList;
   }
   @NonNull
   @Override
   public RecyclerViewHolders onCreateViewHolder(ViewGroup parent, int viewType) {
      View layoutView = LayoutInflater.from(parent.getContext()).inflate(R.layout.list_layout, null);
      return new RecyclerViewHolders(layoutView);
   }
   @Override
   public void onBindViewHolder(RecyclerViewHolders holder, int position) {
      holder.awardTitle.setText("Award Title: " + itemList.get(position).getAwardTitle());
      holder.awardYear.setText("Award Year: " + itemList.get(position).getAwardYear());
      holder.player.setText("Player Name: " + itemList.get(position).getPlayer());
   }
   @Override
   public int getItemCount() {
      return this.itemList.size();
   }
}
RecyclerViewHolders −
import android.util.SparseBooleanArray;
import android.view.View;
import android.widget.TextView;
import androidx.recyclerview.widget.RecyclerView;
class RecyclerViewHolders extends RecyclerView.ViewHolder implements
View.OnClickListener {
   TextView awardTitle;
   TextView awardYear;
   TextView player;
   private SparseBooleanArray selectedItems = new SparseBooleanArray();
   RecyclerViewHolders(View itemView) {
      super(itemView);
      itemView.setOnClickListener(this);
      awardTitle = itemView.findViewById(R.id.awardTitle);
      awardYear = itemView.findViewById(R.id.awardYear);
      player = itemView.findViewById(R.id.playerName);
   }
   @Override
   public void onClick(View view) {
      if (selectedItems.get(getAdapterPosition(), false)) {
         selectedItems.delete(getAdapterPosition());
         view.setSelected(false);
      }
       else {
         selectedItems.put(getAdapterPosition(), true);
         view.setSelected(true);
      }
   }
}
SimpleItemDecoration −
import android.content.Context;
import android.graphics.Canvas;
import android.graphics.drawable.Drawable;
import android.view.View;
import androidx.annotation.NonNull;
import androidx.core.content.ContextCompat;
import androidx.recyclerview.widget.RecyclerView;
class SimpleItemDecoration extends RecyclerView.ItemDecoration {
   private Drawable drawable;
   SimpleItemDecoration(Context context) {
      drawable = ContextCompat.getDrawable(context, R.drawable.line_divider);
   }
   @Override
   public void onDrawOver(@NonNull Canvas canvas, RecyclerView parent, @NonNull RecyclerView.State state) {
      int left = parent.getPaddingLeft();
      int right = parent.getWidth() - parent.getPaddingRight();
      int childCount = parent.getChildCount();
      for (int i = 0; i < childCount; i++) {
         View child = parent.getChildAt(i);
         RecyclerView.LayoutParams params = (RecyclerView.LayoutParams) child.getLayoutParams();
         int top = child.getBottom() + params.bottomMargin;
         int bottom = top + drawable.getIntrinsicHeight();
         drawable.setBounds(left, top, right, bottom);
         drawable.draw(canvas);
      }
   }
}
Step 6 − Add the following code to src/MainActivity.java
import androidx.appcompat.app.AppCompatActivity;
import androidx.recyclerview.widget.LinearLayoutManager;
import androidx.recyclerview.widget.RecyclerView;
import android.os.Bundle;
import java.util.ArrayList;
import java.util.List;
public class MainActivity extends AppCompatActivity {
@Override
protected void onCreate(Bundle savedInstanceState) {
super.onCreate(savedInstanceState);
setContentView(R.layout.activity_main);
RecyclerView recyclerView = findViewById(R.id.recyclerView);
recyclerView.addItemDecoration(new SimpleItemDecoration(this));
LinearLayoutManager layoutManager = new LinearLayoutManager(MainActivity.this);
recyclerView.setLayoutManager(layoutManager);
List<ItemObject> posts = returnListItems();
RecyclerViewAdapter adapter = new RecyclerViewAdapter(MainActivity.this, posts);
recyclerView.setAdapter(adapter);
}
private List<ItemObject> returnListItems() {
List<ItemObject> items = new ArrayList<>();
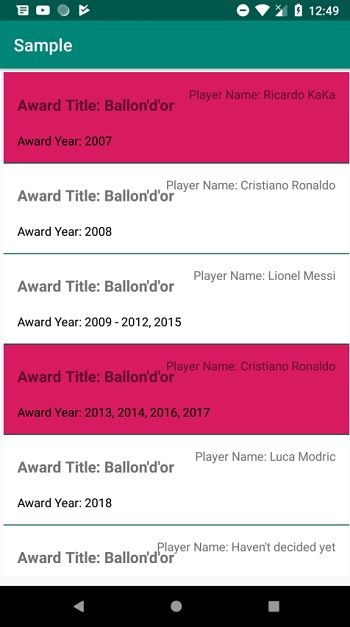
items.add(new ItemObject("Ballon'd'or", "2007", "Ricardo KaKa"));
items.add(new ItemObject("Ballon'd'or", "2008", "Cristiano Ronaldo"));
items.add(new ItemObject("Ballon'd'or", "2009 - 2012, 2015", "Lionel Messi"));
items.add(new ItemObject("Ballon'd'or", "2013, 2014, 2016, 2017", "Cristiano Ronaldo"));
items.add(new ItemObject("Ballon'd'or", "2018", "Luca Modric"));
items.add(new ItemObject("Ballon'd'or", "2019", "Haven't decided yet"));
return items;
}
}
Step 7 − Add the following code to androidManifest.xml
<?xml version="1.0" encoding="utf-8"?>
<manifest xmlns:android="http://schemas.android.com/apk/res/android" package="app.com.sample">
   <application
      android:allowBackup="true"
      android:icon="@mipmap/ic_launcher"
      android:label="@string/app_name"
      android:roundIcon="@mipmap/ic_launcher_round"
      android:supportsRtl="true"
      android:theme="@style/AppTheme">
      <activity android:name=".MainActivity">
         <intent-filter>
            <action android:name="android.intent.action.MAIN" />
            <category android:name="android.intent.category.LAUNCHER" />
         </intent-filter>
      </activity>
   </application>
</manifest>
Let's try to run your application. I assume you have connected your actual Android Mobile device with your computer. To run the app from the android studio, open one of your project's activity files and click Run ![]() icon from the toolbar. Select your mobile device as an option and then check your mobile device which will display your default screen −
icon from the toolbar. Select your mobile device as an option and then check your mobile device which will display your default screen −
Click here to download the project code.

3K+ Views
