
Article Categories
- All Categories
-
 Data Structure
-
 Networking
-
 RDBMS
RDBMS
-
 Operating System
-
 Java
Java
-
 MS Excel
-
 iOS
iOS
-
 HTML
HTML
-
 CSS
CSS
-
 Android
-
 Python
-
 C Programming
-
 C++
C++
-
 C#
C#
-
 MongoDB
-
 MySQL
MySQL
-
 Javascript
-
 PHP
PHP
-
 Economics & Finance
How to insert or display named range on another sheet
It is quite difficult to recall and manage many cells on a single sheet. Consider how time-consuming and difficult it would be to access these cells in a new spreadsheet. Using named ranges is a quick solution. It is important to note, however, that this feature is not available for Excel Web App.
A named range is a name given to a collection of cells or data sets. They are frequently used to eliminate hard-coded values from formulas, making formulas easier to interpret. They also come in handy for data validation, hyperlinks, and dynamic ranges.
Insert or display named range on another sheet
Let?s understand step by step.
Step 1
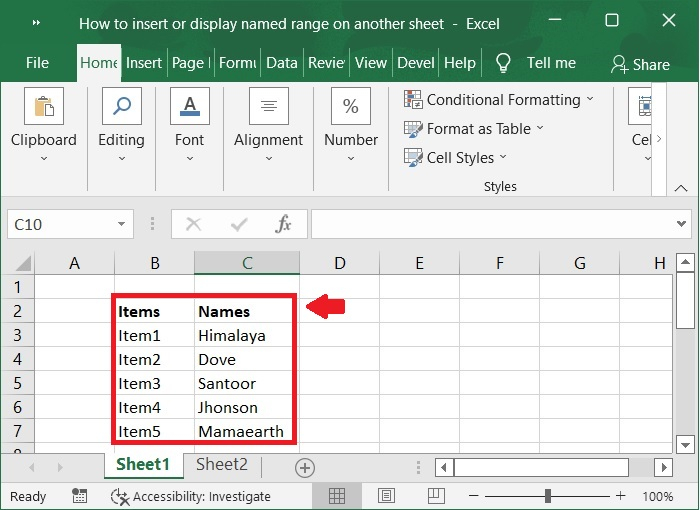
In the first, we must create a sample data. As shown in below screenshot.
Step 2
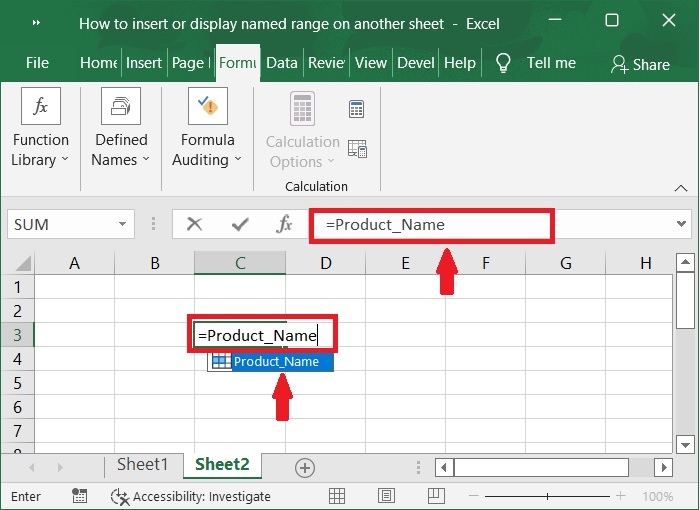
To display a specified range on another sheet, simply use the formula. As shown in the below screenshot.
=Product_Name
Rules for Creating Names
Using named ranges, there are a few things we need to keep in mind ?
A letter, an underscore (_), or a backslash can be used as the initial character (\).
To finish off the name, you have a choice of characters: letters, digits, periods, or underscores (_).
You can't utilize cell references in the names of your cells. Because these are cell references, you cannot, for example, use A1 or DD5.
Spaces, such as "Product Name," are not allowed. When combining two words, an underscore or a hyphen can be used. "ProductName" or "Product_Name" are examples of this.
No operator symbols (+, -, ', '*', '/', '>', &') can be used.
Auto Activate, Auto Close, Database and Extract are all internal Excel names that cannot be used.
Excel utilizes the letters 'C' and 'R' as selection shortcuts; thus, they cannot be used. There is no case sensitivity for names, therefore minuscule c and r are also not allowed.
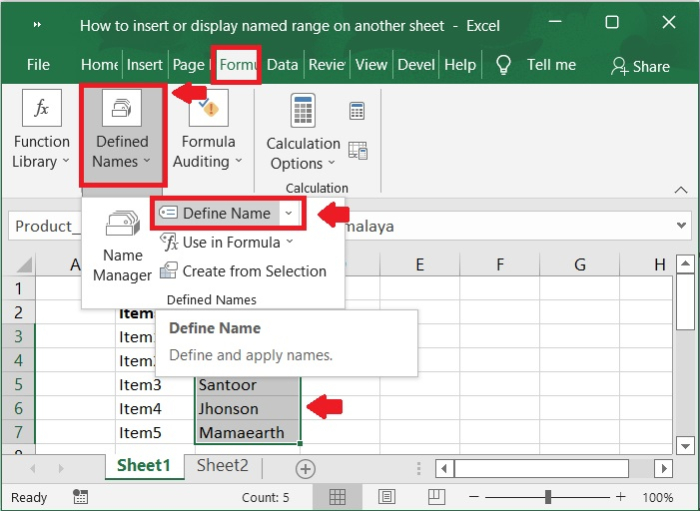
Step 3
Now, give any name to that selected range. From the below screenshot we can observe that "Product_Name" is the name given to the range C3:C7.

Step 4
Now, go to another sheet and select the range as shown below and write the formula as "=Product_Name".
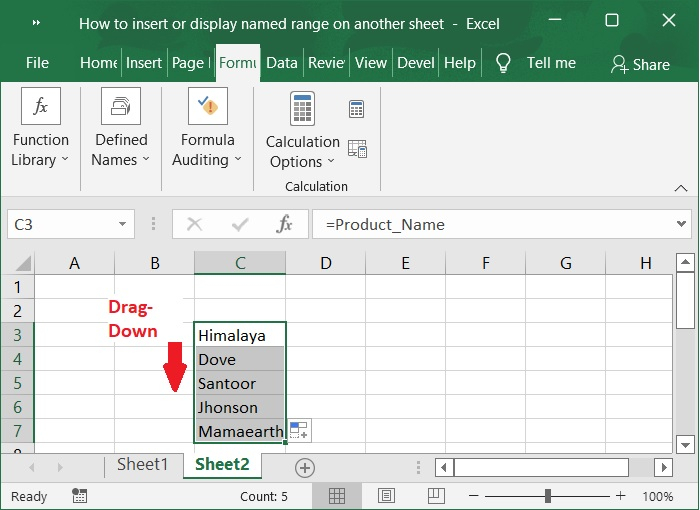
Step 5
Drag drown the cell reference to apply product name range to the selected range of cells. Below is the screenshot for the same.
Conclusion
This article helps you to understand how to insert or display named range on another sheet.

1K+ Views
