
Article Categories
- All Categories
-
 Data Structure
-
 Networking
-
 RDBMS
RDBMS
-
 Operating System
-
 Java
Java
-
 MS Excel
-
 iOS
iOS
-
 HTML
HTML
-
 CSS
CSS
-
 Android
-
 Python
-
 C Programming
-
 C++
C++
-
 C#
C#
-
 MongoDB
-
 MySQL
MySQL
-
 Javascript
-
 PHP
PHP
-
 Economics & Finance
How to filter a RecyclerView with a SearchView on Android?
This example demonstrates how to filter a RecyclerView with a SearchView on Android.
Step 1 − Create a new project in Android Studio, go to File ⇒ New Project and fill all required details to create a new project.
Step 2 − Add the following code to res/layout/activity_main.xml.
<?xml version="1.0" encoding="utf-8"?>
<androidx.constraintlayout.widget.ConstraintLayout
   xmlns:android="http://schemas.android.com/apk/res/android"
   xmlns:app="http://schemas.android.com/apk/res-auto"
   xmlns:tools="http://schemas.android.com/tools"
   android:layout_width="match_parent"
   android:layout_height="match_parent"
   tools:context=".MainActivity">
   <android.support.v7.widget.RecyclerView
      android:id="@+id/recyclerView"
      android:layout_width="match_parent"
      android:layout_height="match_parent"
      android:padding="4dp"
      android:scrollbars="vertical"
      app:layout_constraintBottom_toBottomOf="parent"
      app:layout_constraintEnd_toEndOf="parent"
      app:layout_constraintStart_toStartOf="parent"
      app:layout_constraintTop_toTopOf="parent" />
</androidx.constraintlayout.widget.ConstraintLayout>
Step 3 − Add the following code to src/MainActivity.java
package com.app.sample;
import android.os.Bundle;
import android.view.Menu;
import android.view.MenuInflater;
import android.view.MenuItem;
import android.view.inputmethod.EditorInfo;
import android.widget.SearchView;
import androidx.appcompat.app.AppCompatActivity;
import androidx.recyclerview.widget.LinearLayoutManager;
import androidx.recyclerview.widget.RecyclerView;
import java.util.ArrayList;
import java.util.List;
public class MainActivity extends AppCompatActivity {
   private ExampleAdapter adapter;
   private List<ExampleItem> exampleList;
   @Override
   protected void onCreate(Bundle savedInstanceState) {
      super.onCreate(savedInstanceState);
      setContentView(R.layout.activity_main);
      fillExampleList();
      setUpRecyclerView();
   }
   private void fillExampleList() {
      exampleList = new ArrayList<>();
      exampleList.add(new ExampleItem(R.drawable.ic_android, "One", "Ten"));
      exampleList.add(new ExampleItem(R.drawable.ic_audio, "Two", "Eleven"));
      exampleList.add(new ExampleItem(R.drawable.ic_sun, "Three", "Twelve"));
      exampleList.add(new ExampleItem(R.drawable.ic_android, "Four", "Thirteen"));
      exampleList.add(new ExampleItem(R.drawable.ic_audio, "Five", "Fourteen"));
      exampleList.add(new ExampleItem(R.drawable.ic_sun, "Six", "Fifteen"));
      exampleList.add(new ExampleItem(R.drawable.ic_android, "Seven", "Sixteen"));
      exampleList.add(new ExampleItem(R.drawable.ic_audio, "Eight", "Seventeen"));
      exampleList.add(new ExampleItem(R.drawable.ic_sun, "Nine", "Eighteen"));
   }
   private void setUpRecyclerView() {
      RecyclerView recyclerView = findViewById(R.id.recycler_view);
      recyclerView.setHasFixedSize(true);
      RecyclerView.LayoutManager layoutManager = new LinearLayoutManager(this);
      adapter = new ExampleAdapter(exampleList);
      recyclerView.setLayoutManager(layoutManager);
      recyclerView.setAdapter(adapter);
   }
   @Override
   public boolean onCreateOptionsMenu(Menu menu) {
      MenuInflater inflater = getMenuInflater();
      inflater.inflate(R.menu.example_menu, menu);
      MenuItem searchItem = menu.findItem(R.id.action_search);
      SearchView searchView = (SearchView) searchItem.getActionView();
      searchView.setImeOptions(EditorInfo.IME_ACTION_DONE);
      searchView.setOnQueryTextListener(new SearchView.OnQueryTextListener() {
         @Override
         public boolean onQueryTextSubmit(String query) {
            return false;
         }
         @Override
         public boolean onQueryTextChange(String newText) {
            adapter.getFilter().filter(newText);
            return false;
         }
      });
      return true;
   }
}
Step 4 − Add the following code to src/ExampleItem.java
package com.app.sample;
public class ExampleItem {
   private int imageResource;
   private String text1;
   private String text2;
   public ExampleItem(int imageResource, String text1, String text2) {
      this.imageResource = imageResource;
      this.text1 = text1;
      this.text2 = text2;
   }
   public int getImageResource() {
      return imageResource;
   }
   public String getText1() {
      return text1;
   }
   public String getText2() {
      return text2;
   }
}
Step 5 − Add the following code to src/ExampleAdapter.java
package com.app.sample;
import android.view.LayoutInflater;
import android.view.View;
import android.view.ViewGroup;
import android.widget.Filter;
import android.widget.Filterable;
import android.widget.ImageView;
import android.widget.TextView;
import androidx.annotation.NonNull;
import androidx.recyclerview.widget.RecyclerView;
import java.util.ArrayList;
import java.util.List;
public class ExampleAdapter extends
RecyclerView.Adapter<ExampleAdapter.ExampleViewHolder> implements Filterable {
   private List<ExampleItem> exampleList;
   private List<ExampleItem> exampleListFull;
   class ExampleViewHolder extends RecyclerView.ViewHolder {
      ImageView imageView;
      TextView textView1;
      TextView textView2;
      ExampleViewHolder(View itemView) {
         super(itemView);
         imageView = itemView.findViewById(R.id.image_view);
         textView1 = itemView.findViewById(R.id.text_view1);
         textView2 = itemView.findViewById(R.id.text_view2);
      }
   }
   ExampleAdapter(List<ExampleItem> exampleList) {
      this.exampleList = exampleList;
      exampleListFull = new ArrayList<>(exampleList);
   }
   @NonNull
   @Override
   public ExampleViewHolder onCreateViewHolder(@NonNull ViewGroup parent, int viewType) {
      View v = LayoutInflater.from(parent.getContext()).inflate(R.layout.example_item, parent, false);
      return new ExampleViewHolder(v);
   }
   @Override
   public void onBindViewHolder(@NonNull ExampleViewHolder holder, int position) {
      ExampleItem currentItem = exampleList.get(position);
      holder.imageView.setImageResource(currentItem.getImageResource());
      holder.textView1.setText(currentItem.getText1());
      holder.textView2.setText(currentItem.getText2());
   }
   @Override
   public int getItemCount() {
      return exampleList.size();
   }
   @Override
   public Filter getFilter() {
      return exampleFilter;
   }
   private Filter exampleFilter = new Filter() {
      @Override
      protected FilterResults performFiltering(CharSequence constraint) {
         List<ExampleItem> filteredList = new ArrayList<>();
         if (constraint == null || constraint.length() == 0) {
            filteredList.addAll(exampleListFull);
         } else {
            String filterPattern = constraint.toString().toLowerCase().trim();
            for (ExampleItem item : exampleListFull) {
               if (item.getText2().toLowerCase().contains(filterPattern)) {
                  filteredList.add(item);
               }
            }
         }
         FilterResults results = new FilterResults();
         results.values = filteredList;
         return results;
      }
      @Override
      protected void publishResults(CharSequence constraint, FilterResults results) {
         exampleList.clear();
         exampleList.addAll((List) results.values);
         notifyDataSetChanged();
      }
   };
}
Step 6 − Add the following code to res/layout/example_item.xml
<?xml version="1.0" encoding="utf-8"?>
<android.support.v7.widget.CardView
   xmlns:android="http://schemas.android.com/apk/res/android"
   xmlns:app="http://schemas.android.com/apk/res-auto"
   android:orientation="vertical"
   android:layout_width="match_parent"
   android:layout_height="wrap_content"
   android:layout_marginBottom="4dp"
   app:cardCornerRadius="4dp">
   <RelativeLayout
      android:layout_width="match_parent"
      android:layout_height="match_parent"
      android:layout_margin="4dp">
   <ImageView
      android:id="@+id/image_view"
      android:layout_width="50dp"
      android:layout_height="50dp"
      android:padding="2dp" />
   <TextView
      android:id="@+id/textView1"
      android:layout_width="wrap_content"
      android:layout_height="wrap_content"
      android:layout_alignParentTop="true"
      android:layout_toEndOf="@+id/image_view"
      android:text="Line 1"
      android:textColor="@android:color/black"
      android:textSize="20sp"
      android:textStyle="bold" />
   <TextView
      android:id="@+id/textView2"
      android:layout_width="wrap_content"
      android:layout_height="wrap_content"
      android:layout_below="@+id/text_view1"
      android:layout_marginStart="8dp"
      android:layout_toEndOf="@+id/image_view"
      android:text="Line 2"
      android:textSize="15sp" />
   </RelativeLayout>
</android.support.v7.widget.CardView>
Step 7 − Add the following code to res/menu/example_menu.xml
<?xml version="1.0" encoding="utf-8"?>
<menu xmlns:android="http://schemas.android.com/apk/res/android"
   xmlns:app="http://schemas.android.com/apk/res-auto"
   android:orientation="vertical"
   android:layout_width="match_parent"
   android:layout_height="match_parent">
   <item
      android:id="@+id/actionSearch"
      android:title="Search"
      app:showAsAction="ifRoom|collapseActionView" />
</menu>
Step 8 − Add the following code to Manifest/AndroidManifest.xml
<?xml version="1.0" encoding="utf-8"?>
<manifest xmlns:android="http://schemas.android.com/apk/res/android" package="com.app.sample">
   <application
      android:allowBackup="true"
      android:icon="@mipmap/ic_launcher"
      android:label="@string/app_name"
      android:roundIcon="@mipmap/ic_launcher_round"
      android:supportsRtl="true"
      android:theme="@style/AppTheme">
      <activity android:name=".MainActivity">
         <intent-filter>
            <action android:name="android.intent.action.MAIN" />
            <category android:name="android.intent.category.LAUNCHER" />
         </intent-filter>
      </activity>
</application>
</manifest>
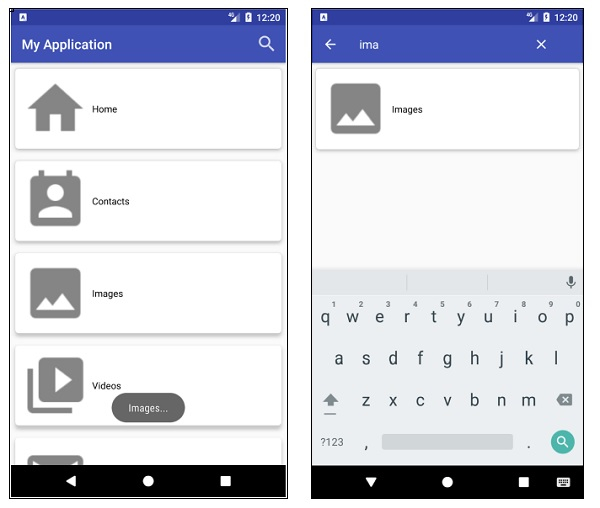
Let's try to run your application. I assume you have connected your actual Android Mobile device with your computer. To run the app from the android studio, open one of your project's activity files and click Run ![]() icon from the toolbar. Select your mobile device as an option and then check your mobile device which will display your default screen −
icon from the toolbar. Select your mobile device as an option and then check your mobile device which will display your default screen −
Click here to download the project code.

6K+ Views
