
Article Categories
- All Categories
-
 Data Structure
-
 Networking
-
 RDBMS
RDBMS
-
 Operating System
-
 Java
Java
-
 MS Excel
-
 iOS
iOS
-
 HTML
HTML
-
 CSS
CSS
-
 Android
-
 Python
-
 C Programming
-
 C++
C++
-
 C#
C#
-
 MongoDB
-
 MySQL
MySQL
-
 Javascript
-
 PHP
PHP
-
 Economics & Finance
How to Disable Default Test Report Generation in TestNG?
TestNG allows to run the test suites from IntelliJ IDE as well as command line. When user run the testing.xml either from IDE or command line, TestNG generates a default report. It saves all reports and respective html files in Project ?>test?output folder. If folder is not present, TestNG creates the folder.
However, user can disable the default test report generation if they are using customized or external reporting mechanism.
In this article we will evaluate how to disable the generation of default test reports:
Disable while running through IntelliJ IDE
Disable while running through command line
Disable in IntelliJ IDE
In this section, we will see how to disable the default report generation when running the testng.xml from IntelliJ IDE.
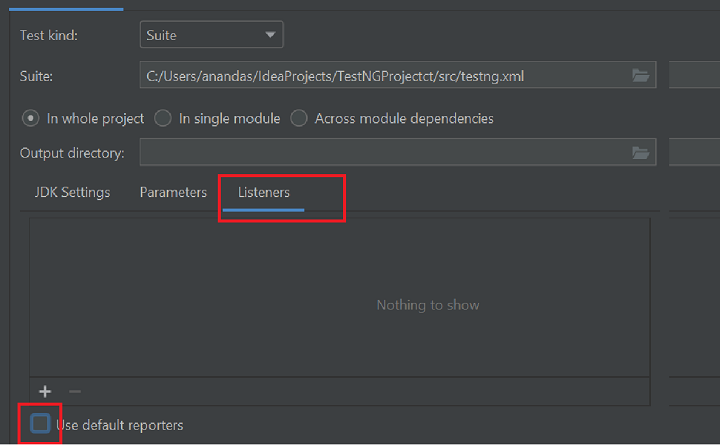
While running the testing.xml from IDE, user must disable the default reports generation checkbox at Add Configuration ?> Listeners tab.
Following screenshot shows how to disable default report generation in IntelliJ.
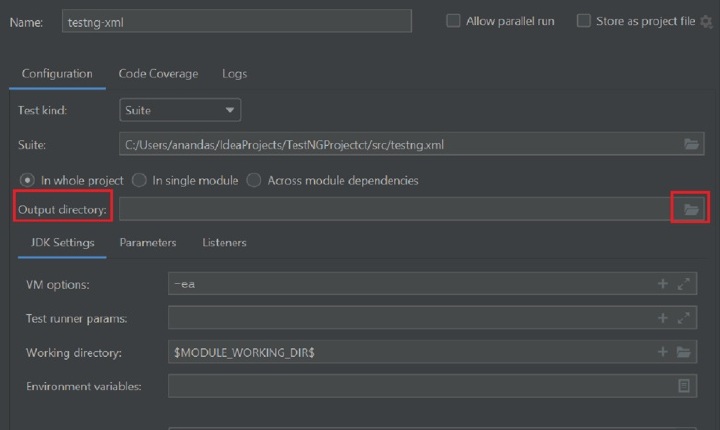
Output directory should be blank.
Following screenshot displays where to remove the path:
Disable Default Report Generation in Command Line
In this section, we will discuss about how to disable the default report generation while running the testng.xml from command line.
When running the testng.xml at command line, a new parameter ?usedefaultlisteners false will be used to disable the default report generation.
Now the complete command will be as following:
java -cp C:\Users\********\IdeaProjects\TestNGProject\lib\*;C:\Users\********\IdeaProjects\TestNGProject\out\production\TestNGProject org.testng.TestNG src/testng.xml -usedefaultlisteners false
After execution of command, it doesn?t generate default reports.
Approach/Algorithm to solve this problem
Step 1: Create different testing classes having different @Test methods.
Step 2: Compile the class, it will create an out folder in IntelliJ and bin folder in eclipse.
Step 3: Place all jar files in lib folder.
Step 4: Now create the testng.xml as given below.
Step 5: Open the cmd.
Step 6: Navigate to the project path using cd <project_path>
Step 7: Run the following command:
java ?cp <path of lib>; <path of out or bin folder> org.testng.TestNG <path of testng>/testng.xml ?usedefaultlisteners false

667 Views
