
Article Categories
- All Categories
-
 Data Structure
-
 Networking
-
 RDBMS
RDBMS
-
 Operating System
-
 Java
Java
-
 MS Excel
-
 iOS
iOS
-
 HTML
HTML
-
 CSS
CSS
-
 Android
-
 Python
-
 C Programming
-
 C++
C++
-
 C#
C#
-
 MongoDB
-
 MySQL
MySQL
-
 Javascript
-
 PHP
PHP
-
 Economics & Finance
How to create Text to Speech in an Android App using Kotlin?
This example demonstrates how to create Text to Speech in an Android App using Kotlin.
Step 1 − Create a new project in Android Studio, go to File ⇒New Project and fill all required details to create a new project.
Step 2 − Add the following code to res/layout/activity_main.xml.
<?xml version="1.0" encoding="utf-8"?>
<RelativeLayout xmlns:android="http://schemas.android.com/apk/res/android"
   xmlns:tools="http://schemas.android.com/tools"
   android:layout_width="match_parent"
   android:layout_height="match_parent"
   android:padding="16dp"
   tools:context=".MainActivity">
   <TextView
      android:layout_width="wrap_content"
      android:layout_height="wrap_content"
      android:layout_centerHorizontal="true"
      android:layout_marginTop="50dp"
      android:text="Tutorials Point"
      android:textAlignment="center"
      android:textColor="@android:color/holo_green_dark"
      android:textSize="32sp"
      android:textStyle="bold" />
   <LinearLayout
      android:layout_width="match_parent"
      android:layout_height="match_parent"
      android:gravity="center">
   <TextView
      android:id="@+id/textView"
      android:layout_width="wrap_content"
      android:layout_height="wrap_content"
      android:textColor="@android:color/holo_red_light"
      android:textSize="24sp"
      android:textStyle="bold|italic" />
   </LinearLayout>
   <LinearLayout
      android:layout_width="wrap_content"
      android:layout_height="wrap_content"
      android:layout_alignParentBottom="true"
      android:layout_centerInParent="true"
      android:orientation="vertical">
   <ImageView
      android:id="@+id/speakImageView"
      android:layout_width="wrap_content"
      android:layout_height="wrap_content"
      android:background="?selectableItemBackground"
      android:src="@android:drawable/ic_btn_speak_now" />
   </LinearLayout>
</RelativeLayout>
Step 3 − Add the following code to MainActivity.kt
import android.app.Activity
import android.content.Intent
import android.os.Bundle
import android.speech.RecognizerIntent
import android.widget.ImageView
import android.widget.TextView
import android.widget.Toast
import androidx.appcompat.app.AppCompatActivity
import java.util.*
import kotlin.collections.ArrayList
class MainActivity : AppCompatActivity() {
   private val REQUESTCODE = 100
   lateinit var textView: TextView
   override fun onCreate(savedInstanceState: Bundle?) {
      super.onCreate(savedInstanceState)
      setContentView(R.layout.activity_main)
      title = "KotlinApp"
      textView = findViewById(R.id.textView)
      val speakImageView: ImageView = findViewById(R.id.speakImageView)
      speakImageView.setOnClickListener {
         val intent = Intent(RecognizerIntent.ACTION_RECOGNIZE_SPEECH)
         intent.putExtra(RecognizerIntent.EXTRA_LANGUAGE_MODEL,
         RecognizerIntent.LANGUAGE_MODEL_FREE_FORM)
         intent.putExtra(RecognizerIntent.EXTRA_LANGUAGE, Locale.getDefault())
         intent.putExtra(RecognizerIntent.EXTRA_PROMPT, "Need to Speak")
         startActivityForResult(intent, REQUESTCODE)
         Toast.makeText(applicationContext, "Sorry your device not supported", Toast.LENGTH_SHORT).show()
      }
   }
   override fun onActivityResult(requestCode: Int, resultCode: Int, data: Intent?) {
      super.onActivityResult(requestCode, resultCode, data)
      if (resultCode == Activity.RESULT_OK && null != data) {
         val result: ArrayList<String> = data.getStringArrayListExtra(RecognizerIntent .EXTRA_RESULTS) textView.text = result[0]
      }
   }
}
Step 4 − Add the following code to androidManifest.xml
<?xml version="1.0" encoding="utf-8"?>
<manifest xmlns:android="http://schemas.android.com/apk/res/android"
   package="app.com.kotlipapp">
   <application
      android:allowBackup="true"
      android:icon="@mipmap/ic_launcher"
      android:label="@string/app_name"
      android:roundIcon="@mipmap/ic_launcher_round"
      android:supportsRtl="true"
      android:theme="@style/AppTheme">
      <activity android:name=".MainActivity">
         <intent-filter>
            <action android:name="android.intent.action.MAIN" />
            <category android:name="android.intent.category.LAUNCHER" />
         </intent-filter>
      </activity>
   </application>
</manifest>
Let's try to run your application. I assume you have connected your actual Android Mobile device with your computer. To run the app from android studio, open one of your project's activity files and click the Run ![]() icon from the toolbar. Select your mobile device as an option and then check your mobile device which will display your default screen −
icon from the toolbar. Select your mobile device as an option and then check your mobile device which will display your default screen −
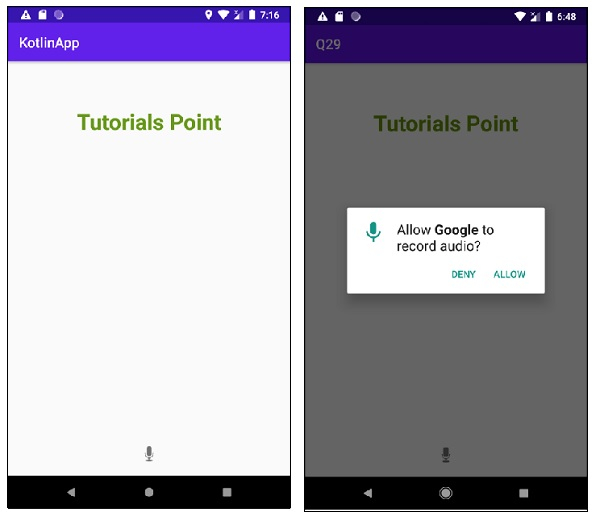

NOTE− Test in your own device for better results
Click here to download the project code.

1K+ Views
