
Article Categories
- All Categories
-
 Data Structure
-
 Networking
-
 RDBMS
RDBMS
-
 Operating System
-
 Java
Java
-
 MS Excel
-
 iOS
iOS
-
 HTML
HTML
-
 CSS
CSS
-
 Android
-
 Python
-
 C Programming
-
 C++
C++
-
 C#
C#
-
 MongoDB
-
 MySQL
MySQL
-
 Javascript
-
 PHP
PHP
-
 Economics & Finance
How to Create a RAID 5 Storage Array with 'mdadm' on Ubuntu 16.04
In this article, we will learn how to create a RAID 5 Array configuration using the ‘mdadm’ utility.
The ‘mdadm’ is a utility which is used to create and manage storage arrays on Linux with RAID capability where the administrators are having great flexibility in managing the individual storages devices and creating the logical storage with a high performance and redundancy.
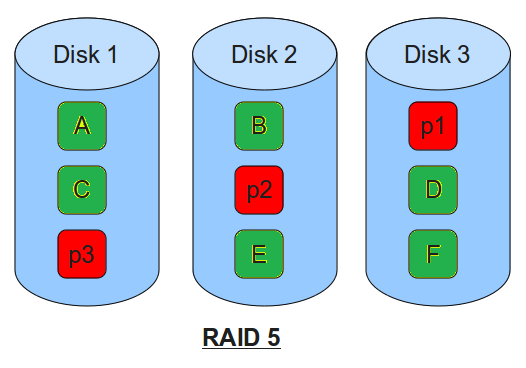
RAID 5 Array is a type where we implement by striping the data across the total available devices. Every component of the each stripe is calculated by parity block. If any device fails the parity block, it will use the remaining blocks to calculate the missing data from the devices. Then the device that receives the parity block will rotate so that each device has the balanced amount of parity information about the storage.
- The Primary benefits of the RAID 5 are redundant with more usable storage capacity.
- In RAID 5, the parity information is distributed and one disk capacity will be used for parity.
Prerequisites
- An Ubuntu machine with a non-root user with sudo permission.
- Multiple raw storage devices for creating RAID storage.
- To accomplish this demo, we need a minimum of 3 storage devices.
To find the attached storages to the machine, we can use the below command.
Creating the New RAID 5 Array using the ‘mdadm’ command.
Before we start any thing we will check the existing the disk attached to the machine. Below is the command to list the available disks.
$ lsblk –o NAME,SIZE,FSTYPE,TYPE,MOUNTPOINT
Output
NAME    SIZE FSTYPE              TYPE MOUNTPOINT
sda       20G                    disk
sdb       20G                    disk
sdc       20G linux_raid_member  disk
vda       20G                    disk
??vda1    20G ext4               part /
??vda15   1M                     part
As we can see in the above output, we have 3 disks without any filesystem with 20GB and the devices are named as /dev/sda, /dev/sdb and /dev/sdc for this machine or session.
For creating the RAID 5 array, we will use the mdadm – to create the command with the device name, we want to create and the raid level with the no of devices attaching to the RAID.
$ sudo mdadm --create --verbose /dev/md0 --level=5 --raid-devices=3 /dev/sda /dev/sdb /dev/sdc
The mdadm tool will start the creation of an array it will take some time to complete the configuration, we can monitor the progress using the below command
$ cat /proc/mdstat
Output
Personalities : [raid1] [linear] [multipath] [raid0] [raid6] [raid5] [raid4] [raid10]
md0 : active raid5 sdc[3] sdb[1] sda[0]
   24792064 blocks super 1.2 level 5, 512k chunk, algorithm 2 [3/2] [UU_]
   [===>.................] recovery = 15.6% (16362536/24792064) finish=7.3min speed=200808K/sec
unused devices: <none>
In the above output we can see the /dev/md0 device is being created with RAID 5 using the /dev/sda, /dev/sdb and /dev/sdc storage devices, this will also show the progress on the raid device.
Creating and Mounting the Filesystem
Before we mount the Array disk, we need to create a filesystem on the array disk which we created using the above steps.
We will create a filesystem on the array
$ sudo mkfs.ext4 –F /dev/md0
We will now create a mount point and attaché the new RAID disk created in the above steps.
$ sudo mkdir –p /mnt/raiddisk1
$ sudo mount /dev/md0 /mnt/raiddisk1
Verifying the New Mount Point or RAID Disk
$ df –h –x devtmpfs –x tmpfs
Output
Filesystem    Size    Used    Avail    Use%    Mounted on
/dev/vda1      20G    1.1G    18G       6%       /
/dev/md0       40G    60M     39G       1%       /mnt/raiddisk1
As we can see, the new filesystem is mounted and accessible.
Now we can scan the active array and append the file with the below command
$ sudo mdadm –details –scan | sudo tee –a /etc/mdadm/mdadm.conf
We needed to update the ‘initramfs’ file so that the RADI array will be available when the machine get started with the boot process.
$ sudo update-initramfs -u
Adding the RAID array to mount automatically at the boot time.
Add the below line to the /etc/fstab.
/dev/md0 /mnt/raiddisk1 ext4 defaults,nofail,discard 0 0
In the above setup and configuration we have configured a RAID 5 level array using three disks and mounted the disk at the boot time so that when ever we restart the server the raid disk will be loaded.

3K+ Views
