 Data Structure
 Networking
 RDBMS
RDBMS Operating System
 Java
Java MS Excel
 iOS
iOS HTML
HTML CSS
CSS Android
 Python
 C Programming
 C++
C++ C#
C# MongoDB
 MySQL
MySQL Javascript
 PHP
PHP
- Selected Reading
- UPSC IAS Exams Notes
- Developer's Best Practices
- Questions and Answers
- Effective Resume Writing
- HR Interview Questions
- Computer Glossary
- Who is Who
How to Create a RAID 0 Storage Array with ‘mdadm’ on Ubuntu 16.04
In this article, we will learn how to create a RAID 0 Array configuration using the ‘mdadm’ utility.
The ‘mdadm’ is a utility which is used to create and manage storage arrays on Linux with RAID capability where the administrators are having a great flexibility in managing the individual storage devices and creating the logical storage with a high performance and redundancy.

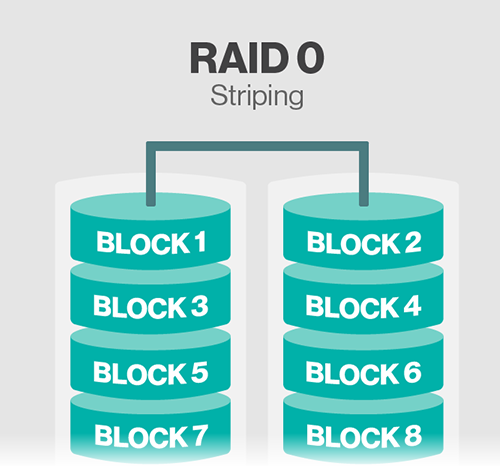
RAID 0 array will work by dividing the data into small chunks and strips that data across the available storage disks, which means that each and every storage disk will contain a portion of data and when retrieving the data multiple disks are referred. There is no redundancy if any of the drives fails since all the data could be lost.
- The primary benefit of the RAID 0 is its high performance.
- Minimum of 2 storage disks are required.
- RAID 0 has no parity.
Prerequisites
- A Ubuntu machine with a non-root user with Sudo permission.
- Minimum two storage devices for creating RAID 0 storage.
To find the attached storages in the machine, we can use the below command.
$ lsblk –o NAME,SIZE,FSTYPE,TYPE,MOUNTPOINT
Output
NAME    SIZE FSTYPE    TYPE MOUNTPOINT
xda       20G             disk
xdb       20G             disk
vda       20G             disk
??vda1    20G ext4        part /
??vda15   1M              part
As we can see in the above output we have 2 disks without any filesystem with 20GB and the devices are named as /dev/xda, /dev/xdb for this machine or session.
Creating the Array
For creating the RAID 0 array, we will use the ‘mdadm’ – create command with the device name we want to create and the raid level with the no of devices attaching to the RAID.
$ sudo mdadm --create --verbose /dev/md0 --level=0 --raid-devices=2 /dev/xda /dev/xdb
The mdadm tool will start the creation of an array and it will take some time to complete the configuration. We can monitor the progress using the below command –
$ cat /proc/mdstat
Personalities : [raid1] [linear] [multipath] [raid0] [raid6] [raid5] [raid4] [raid10]
md0 : active raid0 xdb[1] xda[0]
209584128 blocks super 1.2, 512k chunk, algorithm 2 [3/2] [UU_]
…
unused devices: <none>
In the above output, we can see the /dev/md0 device is being created with RAID 0 using the /dev/xda, /dev/xdb storage devices which will also show the progress on the raid device.
Creating and Mounting the Filesystem
Before we mount the Array disk, we needed to create a filesystem on the array disk which we have created using the above steps.
We will be creating a filesystem on the array
$ sudo mkfs.ext4 –F /dev/md0
We will now create a mount point and attaché the new RAID disk created in the above steps.
$ sudo mkdir –p /mnt/raiddisk1
$ sudo mount /dev/md0 /mnt/raiddisk1
Verifying the new mount point or RAID disk
$ df –h –x devtmpfs –x tmpfs
Output
Filesystem    Size    Used    Avail    Use% Mounted on
/dev/vda1    20G       1.1G    18G       6% /
/dev/md0     40G       120M    39G       3% /mnt/raiddisk1
As we can see the new filesystem is mounted and accessible.
Now we can scan the active array and append the file with the below command
$ sudo mdadm –details –scan | sudo tee –a /etc/mdadm/mdadm.conf
We needed to update the ‘initramfs’ file so that the RADI array will be available when the machine get started with the boot process.
$ sudo update-initramfs -u
Adding the RAID array to mount automatically at the boot time.
Add the below line to the /etc/fstab.
/dev/md0 /mnt/raiddisk1 ext4 defaults,nofail,discard 0 0
In the above setup and configuration we have configured a RAID 0 level array using two disks we can combine two disks and make one single disk with a combined capacity with high and mounted the disk at the boot time, so that whenever we restart the server the raid disk will be loaded.

