
 Data Structure
 Networking
 RDBMS
RDBMS Operating System
 Java
Java MS Excel
 iOS
iOS HTML
HTML CSS
CSS Android
 Python
 C Programming
 C++
C++ C#
C# MongoDB
 MySQL
MySQL Javascript
 PHP
PHP
- Selected Reading
- UPSC IAS Exams Notes
- Developer's Best Practices
- Questions and Answers
- Effective Resume Writing
- HR Interview Questions
- Computer Glossary
- Who is Who
How to create a button programmatically?
In this article, you will learn about how to create a button prograticamtilly in the Swift language. There are different ways to create a button object programmatically in iOS. Let's explore some of them with an example.
We will see the following ways to create a button ?
Step 1 ? In this step, we will create a button object and customize it later when required.
Step 2 ? In this step, we will create a button object using a lazy keyword.
Step 3 ? In this step, we will create a button object and set the frame later.
Create a button and customize it later
Here is an example of how you can create a button programmatically in iOS using Swift ?
Example
import UIKit
class TestController: UIViewController {
   private let loginButton = UIButton()
   override func viewDidLoad() {
      super.viewDidLoad()
      initialSetup()
   }
   private func initialSetup() {
      // basic setup
      view.backgroundColor = .white
      navigationItem.title = "UIButton"

      // login button customization
      loginButton.setTitle("Login", for: .normal)
      loginButton.setTitleColor(.white, for: .normal)
      loginButton.layer.cornerRadius = 10
      loginButton.layer.masksToBounds = true
      loginButton.backgroundColor = .darkGray
      loginButton.titleLabel?.font = UIFont.systemFont(ofSize: 18, weight: .semibold)
      loginButton.addTarget(self, action: #selector(handleLoginButtonTapped), for: .touchUpInside)

      // adding the constraints to login button
      view.addSubview(loginButton)
      loginButton.translatesAutoresizingMaskIntoConstraints = false
      loginButton.centerYAnchor.constraint(equalTo: view.centerYAnchor).isActive = true
      loginButton.centerXAnchor.constraint(equalTo: view.centerXAnchor).isActive = true
      loginButton.heightAnchor.constraint(equalToConstant: 50).isActive = true
      loginButton.widthAnchor.constraint(equalToConstant: 280).isActive = true
   }
   @objc private func handleLoginButtonTapped() {
      print("login button tapped...")
   }
}
Output
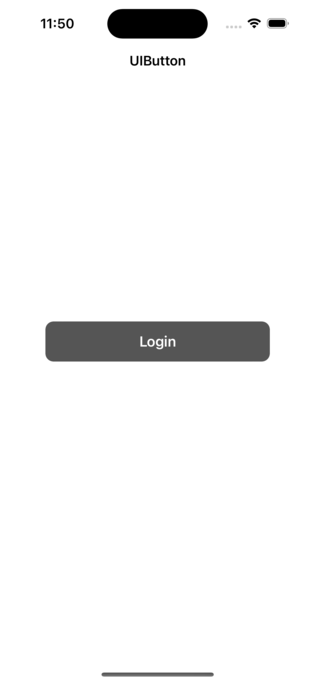
In the above step, a button object named loginButton is created in the controller. The button's title is set to "Login" and the title color is set to white. The button is also given a target-action pair so that when the button is tapped, the function "handleLoginButtonTapped" will be called. Finally, the button is added as a subview to the current view.
You will see that initially, we created a button object. After that, we will customize the button in the viewDidLoad() method. And finally, add it to the super view with some required constraints.
Create a button using the lazy keyword
Here is an example of how you can create a button programmatically in iOS using the lazy keyword in UIKit ?
Example
import UIKit
class TestController: UIViewController {
   private lazy var loginButton: UIButton = {
      let button = UIButton()
      button.setTitle("Login", for: .normal)
      button.setTitleColor(.white, for: .normal)
      button.layer.cornerRadius = 10
      button.layer.masksToBounds = true
      button.backgroundColor = .darkGray
      button.titleLabel?.font = UIFont.systemFont(ofSize: 18, weight: .semibold)
      button.addTarget(self, action: #selector(handleLoginButtonTapped), for: .touchUpInside)
      button.translatesAutoresizingMaskIntoConstraints = false
      return button
   }()
   override func viewDidLoad() {
      super.viewDidLoad()
      initialSetup()
   }
   private func initialSetup() {
      // basic setup
      view.backgroundColor = .white
      navigationItem.title = "UIButton"

      // adding the constraints to login button
      view.addSubview(loginButton)
      loginButton.centerYAnchor.constraint(equalTo: view.centerYAnchor).isActive = true
      loginButton.centerXAnchor.constraint(equalTo: view.centerXAnchor).isActive = true
      loginButton.heightAnchor.constraint(equalToConstant: 50).isActive = true
      loginButton.widthAnchor.constraint(equalToConstant: 280).isActive = true
   }
   @objc private func handleLoginButtonTapped() {
      print("login button tapped...")
   }
}
Output

In the above step, a button object named loginButton is created in the controller using the lazy keyword. The button's title is set to "Login" and the title color is set to white. The button is also given a target-action pair so that when the button is tapped, the function "handleLoginButtonTapped" will be called. Finally, the button is added as a subview to the current view.
Note that with lazy keyword you don't need to add the button as subview in the declaration of button, you can do it later whenever you need it.
Create a button using a frame
Here is an example of how you can create a button programmatically in iOS using Swift ?
Example
import UIKit
class TestController: UIViewController {
   private let loginButton = UIButton(type: .system)
   override func viewDidLoad() {
      super.viewDidLoad()
      initialSetup()
   }
   private func initialSetup() {
      // basic setup
      view.backgroundColor = .white
      navigationItem.title = "UIButton"

      // login button customization
      loginButton.frame = CGRect(x: 20, y: 150, width: 280, height: 50)
      loginButton.setTitle("Login", for: .normal)
      loginButton.setTitleColor(.white, for: .normal)
      loginButton.layer.cornerRadius = 10
      loginButton.layer.masksToBounds = true
      loginButton.backgroundColor = .darkGray
      loginButton.titleLabel?.font = UIFont.systemFont(ofSize: 18, weight: .semibold)
      loginButton.addTarget(self, action: #selector(handleLoginButtonTapped), for: .touchUpInside)

      view.addSubview(loginButton)
   }
   @objc private func handleLoginButtonTapped() {
      print("login button tapped...")
   }
}
Output
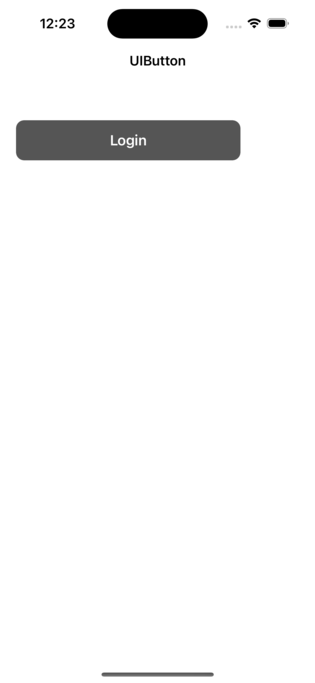
You can change x, y, width and height according to your needs and also you can change the button title and action according to your requirement.
Conclusion
You can programmatically create buttons in a variety of ways. You can create a button object and customize it later whenever you need it in code. In addition, the lazy keyword can be used to create a button object. The UIButton class provides the flexibility to set the frame later in the code. You can see how to set the frame of a button in the above example.
Using a lazy keyword is the most recommended way. You can create a button object and add any customization in a single block. Also, you can add the target in the same block.

2K+ Views
