 Data Structure
 Networking
 RDBMS
RDBMS Operating System
 Java
Java MS Excel
 iOS
iOS HTML
HTML CSS
CSS Android
 Python
 C Programming
 C++
C++ C#
C# MongoDB
 MySQL
MySQL Javascript
 PHP
PHP
- Selected Reading
- UPSC IAS Exams Notes
- Developer's Best Practices
- Questions and Answers
- Effective Resume Writing
- HR Interview Questions
- Computer Glossary
- Who is Who
How to Automatically Remove Duplicates form a List in Excel?
When working with a list of data, it is especially important that there are no duplicate values in Excel. The values that are repeated in the list are known as duplicate values. This tutorial will help you understand how we can automatically remove duplicates from a list in Excel. Duplicates can lead to the wrong analysis and rechecking of data. We can do this process with the help of data validation in Excel.
Automatically Remove Duplicates Form a List in Excel
Here we will first create a data validation list using the formula, then edit the error message. Let us see an uncomplicated process to know how we can automatically remove duplicates from a list in Excel. We will be using the help of data validation to complete our process.
Step 1
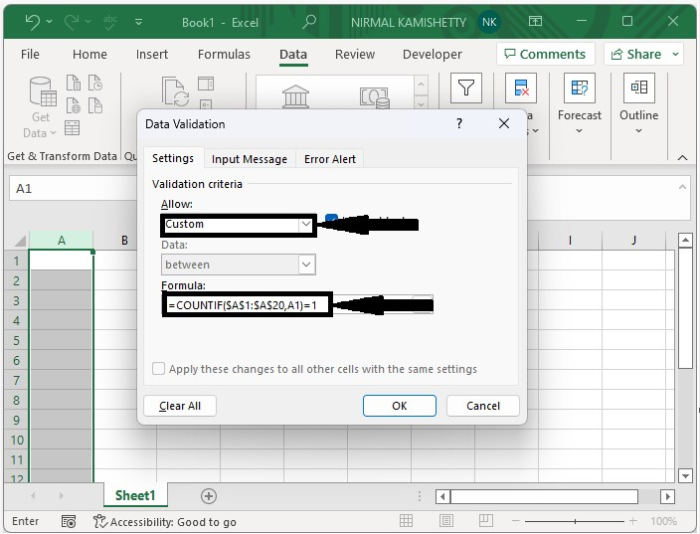
Let us consider a new Excel sheet, then enter your first value and select the column you want to enter the list in, then click on data validation under data to open a pop-up window. Then, in the pop-up window, select "Allow custom" and enter the formula =COUNTIF($A$1:$A$20, A1)=1 in the formula box, as shown below. In the formula, A1:A20 is the range you want to apply the data validation to, but we can change it based on our requirements.

Step 2
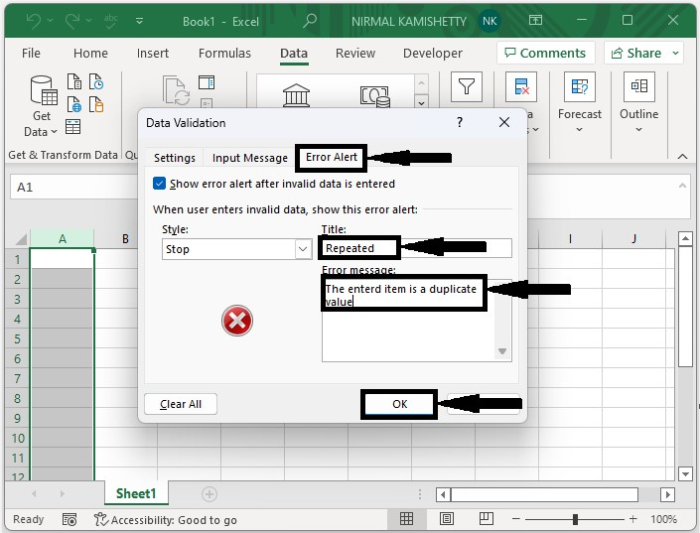
We have completed the process, but we can also customise the error message. Click on "Error Alert," then enter the title as "Repeated" and the message as "The entered item is a duplicate value," then click "OK" to complete the process as shown in the below image.

Step 3
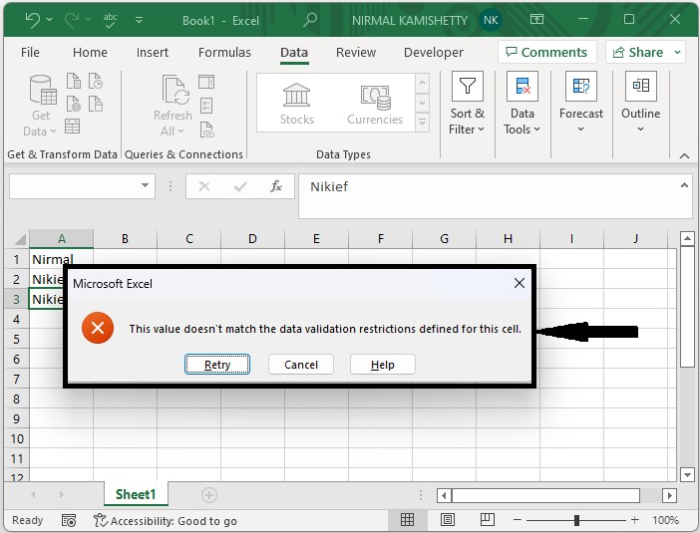
Now, every time we enter a duplicate value, an error message will be displayed on the screen, as shown in the below image. Then click on "Retry" to enter the next element into the sheet.

Conclusion
In this tutorial, we used a simple example to demonstrate how we can automatically remove duplicates from a list in Excel.

