
Article Categories
- All Categories
-
 Data Structure
-
 Networking
-
 RDBMS
RDBMS
-
 Operating System
-
 Java
Java
-
 MS Excel
-
 iOS
iOS
-
 HTML
HTML
-
 CSS
CSS
-
 Android
-
 Python
-
 C Programming
-
 C++
C++
-
 C#
C#
-
 MongoDB
-
 MySQL
MySQL
-
 Javascript
-
 PHP
PHP
-
 Economics & Finance
How to apply a 2D convolution operation in PyTorch?
We can apply a 2D convolution operation over an input image composed of several input planes using the torch.nn.Conv2d() module. It is implemented as a layer in a convolutional neural network (CNN). The input to a 2D convolution layer must be of size [N,C,H,W] where N is the batch size, C is the number of channels, H and W are the height and width of the input tensor.
Generally a 2D convolution operation is applied on the image tensors. For an RGB image, the number of channels is 3. The main feature of a convolution operation is the filter or kernel size and stride. This module supports TensorFloat32.
Syntax
torch.nn.Conv2d(in_channels, out_channels, kernel_size)
Parameters
- in_channels – Number of channels in the input image.
- out_channels – Number of channels produced by the convolution operation.
- kernel_size – Size of the convolving kernel.
Along with the above three parameters, there are some optional parameters also such as stride, padding, dilation, etc. We will take examples of these parameters in detail in the following examples.
Steps
You could use the following steps to apply a 2D convolution operation −
- Import the required library. In all the following examples, the required Python library is torch. Make sure you have already installed it. To apply 2D convolution operation on an image, we need torchvision and Pillow as well.
import torch
import torchvision
from PIL import Image
Define the input tensor or read the input image. If an input is an image, then we first convert it into a torch tensor.
Define in_channels, out_channels, kernel_size, and other parameters.
Next define a convolution operation conv by passing the above-defined parameters to torch.nn.Conv2d().
conv = nn.Conv2d(in_channels, out_channels, kernel_size)
- Apply the convolution operation conv on the input tensor or image tensor.
output = conv(input)
- Next print the tensor after the convolution operation. If the input was an image tensor, then to visualize the image, we first convert the tensor obtained after convolution operation to a PIL image and then visualize the image.
Let's take a couple of examples to have a better understanding.
Input Image
We will use the following image as the input file in Example 2.

Example 1
In the following Python example, we perform 2D convolution operation on an input tensor. We apply different combinations of kernel_size, stride, padding, and dilation.
# Python 3 program to perform 2D convolution operation
import torch
import torch.nn as nn

'''torch.nn.Conv2d(in_channels, out_channels, kernel_size, stride=1, padding=0)
'''
in_channels = 2
out_channels = 3
kernel_size = 2
conv = nn.Conv2d(in_channels, out_channels, kernel_size)

# conv = nn.Conv2d(2, 3, 2)

'''input of size [N,C,H, W]
N==>batch size,
C==> number of channels,
H==> height of input planes in pixels,
W==> width in pixels.
'''

# define the input with below info
N=2
C=2
H=4
W=4
input = torch.empty(N,C,H,W).random_(256)
print("Input Tensor:<br>", input)
print("Input Size:",input.size())

# Perform convolution operation
output = conv(input)
print("Output Tensor:<br>", output)
print("Output Size:",output.size())

# With square kernels (2,2) and equal stride
conv = nn.Conv2d(2, 3, 2, stride=2)
output = conv(input)
print("Output Size:",output.size())

# non-square kernels and unequal stride and with padding
conv = nn.Conv2d(2, 3, (2, 3), stride=(2, 1), padding=(2, 1))
output = conv(input)
print("Output Size:",output.size())

# non-square kernels and unequal stride and with padding and dilation
conv = nn.Conv2d(2, 3, (2, 3), stride=(2, 1), padding=(2, 1),
dilation=(2, 1))
output = conv(input)
print("Output Size:",output.size())
Output
Input Tensor:
   tensor([[[[218., 190., 62., 113.],
      [244., 63., 207., 220.],
      [238., 110., 29., 131.],
      [ 65., 249., 183., 188.]],

      [[122., 250., 28., 126.],
      [ 10., 42., 4., 145.],
      [ 1., 122., 165., 189.],
      [ 59., 100., 1., 187.]]],

      [[[213., 18., 186., 162.],
      [121., 10., 107., 123.],
      [ 32., 129., 5., 227.],
      [ 76., 4., 196., 246.]],

      [[ 41., 191., 64., 195.],
      [146., 163., 39., 177.],
      [121., 84., 223., 144.],
      [ 44., 182., 25., 15.]]]])
Input Size: torch.Size([2, 2, 4, 4])
Output Tensor:
   tensor([[[[ 200.8638, 67.4519, 109.4424],
      [ 100.6047, 58.4399, 95.3557],
      [ 89.4536, 105.6236, 138.5873]],

      [[ -71.7612, -69.3269, 14.8537],
      [ -48.7640, -111.0042, -163.9681],
      [ -60.4490, 0.4771, -34.4785]],

      [[ -74.8413, -156.2264, -51.3553],
      [ -47.2120, -25.1986, -65.1617],
      [-109.8461, -68.7073, -47.6045]]],

      [[[ 90.5058, 51.1314, 138.2387],
      [ 62.8581, 62.5389, 56.5713],
      [ 78.0566, 57.6294, 143.0357]],

      [[-154.6399, -100.9079, -108.6138],
      [ -99.6024, -120.7665, -112.6453],
      [-107.5664, -76.9361, 17.8084]],

      [[ 23.9299, -95.5887, -51.7418],
      [ -46.8106, 15.3651, -66.4384],
      [ 2.1374, -65.6986, -144.9656]]]],
   grad_fn=<MkldnnConvolutionBackward>)
Output Size: torch.Size([2, 3, 3, 3])
Output Size: torch.Size([2, 3, 2, 2])
Output Size: torch.Size([2, 3, 4, 4])
Output Size: torch.Size([2, 3, 3, 4])
Example 2
In the following Python example, we perform 2D convolution operation on an input image. To apply 2D convolution, we first convert the image to a torch tensor and after convolution, again convert it to a PIL image for visualization.
# Python program to perform 2D convolution operation on an image
# Import the required libraries
import torch
import torchvision
from PIL import Image
import torchvision.transforms as T

# Read input image
img = Image.open('dogncat.jpg')

# convert the input image to torch tensor
img = T.ToTensor()(img)
print("Input image size:<br>", img.size()) # size = [3, 466, 700]

# unsqueeze the image to make it 4D tensor
img = img.unsqueeze(0) # image size = [1, 3, 466, 700]
# define convolution layer
# conv = nn.Conv2d(in_channels, out_channels, kernel_size)
conv = torch.nn.Conv2d(3, 3, 2)

# apply convolution operation on image
img = conv(img)

# squeeze image to make it 3D
img = img.squeeze(0) #now size is again [3, 466, 700]

# convert image to PIL image
img = T.ToPILImage()(img)

# display the image after convolution
img.show()
Note − You may get a different output image after the convolution operation because the weights initialized may be different at different runs.
Output
Input image size: torch.Size([3, 525, 700])
Output image size: torch.Size([3, 524, 699])
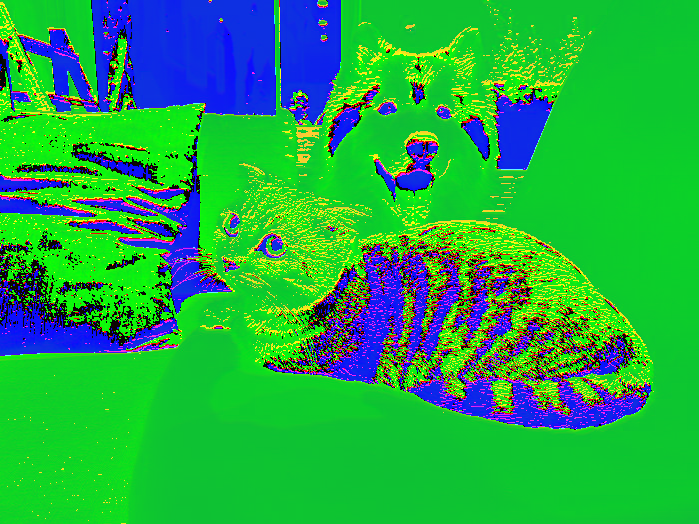
Note that you may see some changes in the image obtained after each run because of the initialization of weights and biases.

8K+ Views
