
Article Categories
- All Categories
-
 Data Structure
-
 Networking
-
 RDBMS
RDBMS
-
 Operating System
-
 Java
Java
-
 MS Excel
-
 iOS
iOS
-
 HTML
HTML
-
 CSS
CSS
-
 Android
-
 Python
-
 C Programming
-
 C++
C++
-
 C#
C#
-
 MongoDB
-
 MySQL
MySQL
-
 Javascript
-
 PHP
PHP
-
 Economics & Finance
How to adjust the hue of an image in PyTorch?
The hue of an image refers to the three primary colors (red, blue, and yellow) and the three secondary colors (orange, green, and violet). To adjust the hue of an image, we apply adjust_hue(). It's one of the functional transforms provided by the torchvision.transforms module.
adjust_hue() transformation accepts both PIL and tensor images. A tensor image is a PyTorch tensor with shape [C, H, W], where C is the number of channels, H is the image height and W is the image width. This transform also accepts a batch of tensor images.
The image hue is adjusted by converting the image to HSV (Hue, Saturation, Value) and cyclically shifting the intensities in the hue channel (H). The image is then converted back to original image mode.
If the image is neither a PIL image nor tensor image, then we first convert it to a tensor image and then apply the adjust_hue(). The hue should be in [-0.5, 0.5]. -0.5 and 0.5 will give an image with complementary colors, while 0 gives the original image.
Syntax
torchvision.transforms.functional.adjust_hue(img, hue_factor)
Parameters
img - Image of which hue is to be adjusted. It is a PIL image or torch tensor. It may be a single image or a batch of images
hue_factor - A float number in the range [−0.5, 0.5]. 0 gives a solid gray image, while -0.5 and 0.5 will give an image with complementary colors.
Output
It returns the hue adjusted image.
Steps
To adjust the hue of an image, one could follow the steps given below
Import the required libraries. In all the following examples, the required Python libraries are torch, Pillow, and torchvision. Make sure you have already installed them.
import torch
import torchvision
import torchvision.transforms.functional as F
from PIL import Image
Read the input image. The input image is a PIL image or a torch tensor.
img = Image.open('meekats.jpg')
Adjust the hue of the image with the desired hue factor.
img = F.adjust_hue(img, -0.1)
Visualize the hue adjusted image.
img.show()
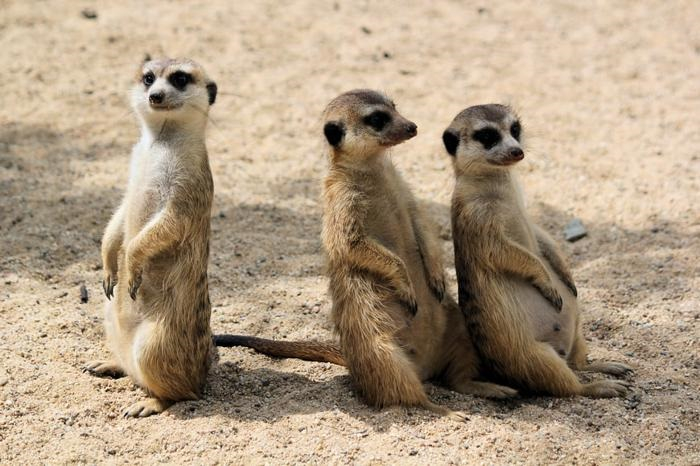
Input Images
We will use this image as the input file in the following examples.
Example 1
In this program, we adjust the hue of the input image with a hue_factor=0.3
# Import the required libraries
import torch
import torchvision
from PIL import Image
import torchvision.transforms.functional as F

# read input image
img = Image.open('meerkats.jpg')

# adjust the t=hue
img = F.adjust_hue(img, 0.3)
display the hue adjusted image
img.show()
Output
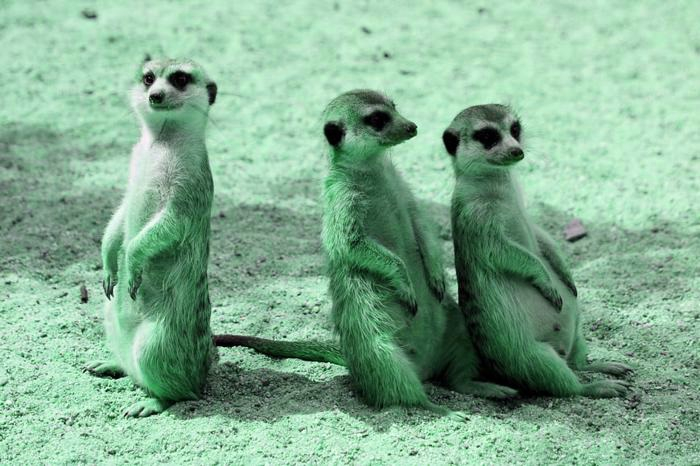
Example 2
In this program, we adjust the hue of the input image with a hue_factor=-0.1
# Import the required libraries
import torch
import torchvision
from torchvision.io import read_image
import torchvision.transforms.functional as F
import torchvision.transforms as T

# read input image as an image tensor
img = read_image('meekats.jpg')

# hue_factor [-0.5, 0.5]
# adjust hue using hue_factor=-0.1
img1 = F.adjust_hue(img, -0.1)

# convert the image tensor to PIL image
img1 = T.ToPILImage()(img1)
# display the PIL image with adjusted hue
img1.show()
Output

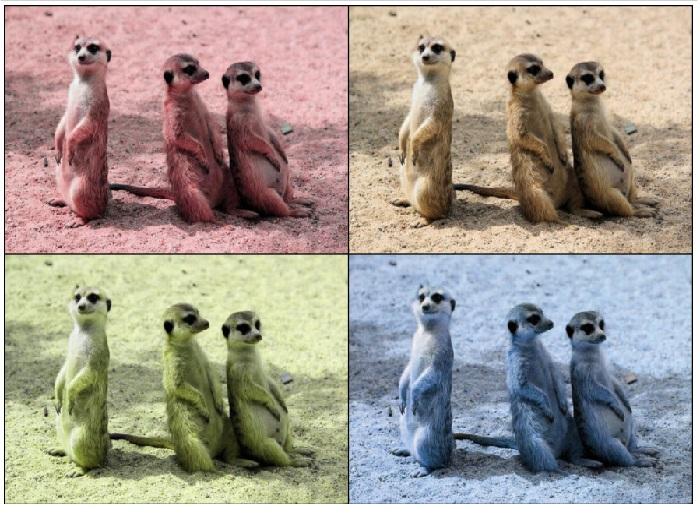
Example 3
# Import the required libraries
import torch
import torchvision
from torchvision.io import read_image
import torchvision.transforms.functional as F
import torchvision.transforms as T

# read input image as an image tensor
img = read_image('meerkats.jpg')

# hue_factor [-0.5, 0.5]
# Take 3 output image with adjusted different hue_factors
img1 = F.adjust_hue(img, -0.1)
img2 = F.adjust_hue(img, 0) # returns original image
img3 = F.adjust_hue(img, 0.1)
img4 = F.adjust_hue(img, 0.5)

# create a grid of above the output images
grid_img = torchvision.utils.make_grid([img1, img2, img3,
img4], nrow=2)

# convert the grid of image tensors to PIL Image
grid_img = T.ToPILImage()(grid_img)
grid_img.show()
Output

2K+ Views
