- GoogleTest - Home
- GoogleTest - Overview
- GoogleTest - Environment Setup
- GoogleTest - Running First Test
- GoogleTest - Nomenclature
- GoogleTest - Disabling Test
- GoogleTest - Assertions
- GoogleTest - Death Tests
- GoogleTest - Test Fixtures
- GoogleTest - Event Listeners
- GoogleTest Useful Resources
- GoogleTest - Quick Guide
- GoogleTest - Useful Resources
- GoogleTest - Discussion
GoogleTest - Environment Setup
This tutorial will guide you through whole process of setting up your own environment for running test cases in GoogleTest framework. It is important to configure all the necessary dependencies in one place before running your tests. For this, please follow the steps mentioned in this tutorial.
There are two primary ways in which you can run your tests on GoogleTest, which are Bazel and CMake. In this tutorial, we will use the CMake. Let's start installing CMake in your local system.
Setting Up CMake for GoogleTest
The CMake is a cross-platform and open-source software which is used to generate build files of another systems. On integrating CMake with GoogleTest, you will be able to perform automated testing within the build process. Here is the step-by-step guide to install and configure CMake for GoogleTest −
Step 1
Search CMake on your favorite browser or go to this link: https://cmake.org/download/. Download the binary distribution according to your system configuration.
Step 2
Locate the downloaded folder in your system and double click on it to start the installation process.
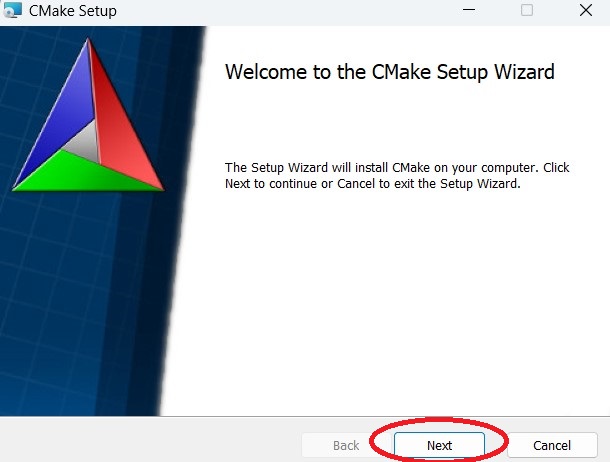
Step 3
On double click, following window will pop-up. Here, click the next button.
Step 4
Accept the terms in License Agreement by clicking on the checkbox and click next.

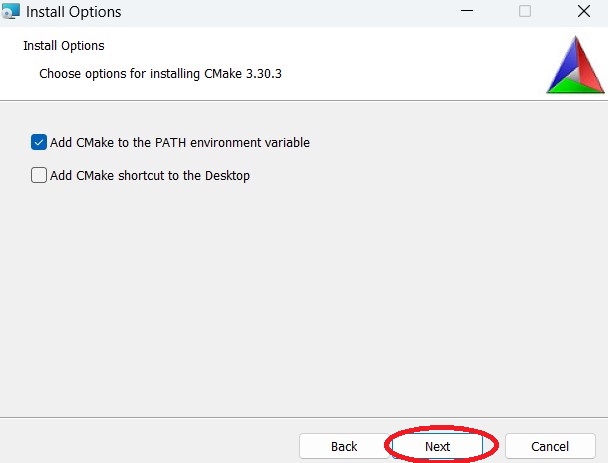
Step 5
Next, you will see the below window. Here, choose the option of adding CMake to the PATH environment variable.
Step 6
In this step, choose the destination folder where you want to install the CMake and click next button.

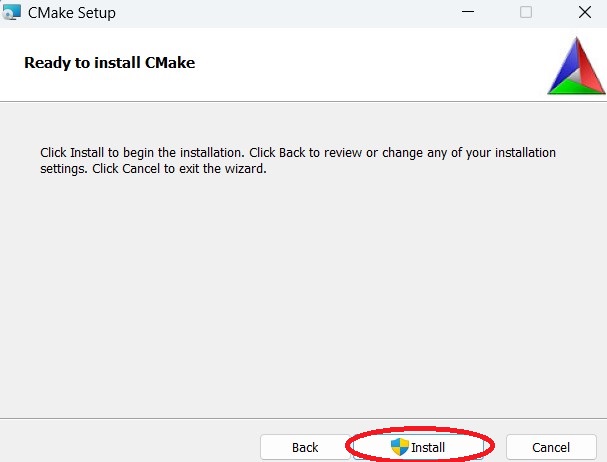
Step 7
Now, click the install button to start the installation.
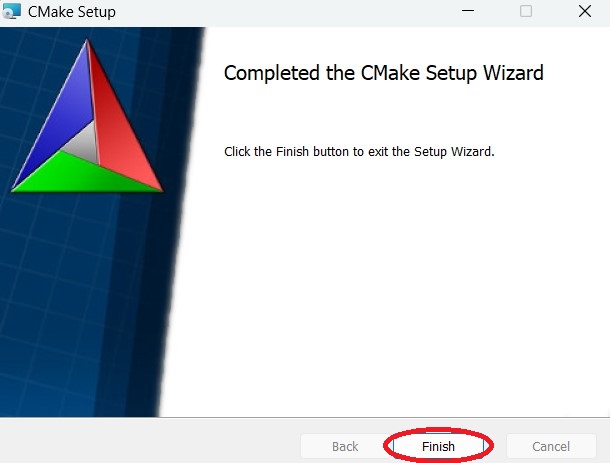
Step 8
On successful completion of the CMake, you will see the below window. Here, click finish button.
Creating "CMakeLists.txt" File
The "CMakeLists.txt" file in CMake is used to configure the build system for a project. This file determine which source files to compile, and how to handle dependencies within the project.
For every project, you need to create "CMakeLists.txt" file and declare the dependency on GoogleTest. To express the dependencies in the CMake, use the FetchContent module. Copy and paste the github link of the GoogleTest inside this module −
cmake_minimum_required(VERSION 3.14)
project(your_project_name)

# GoogleTest requires at least C++14
set(CMAKE_CXX_STANDARD 14)
set(CMAKE_CXX_STANDARD_REQUIRED ON)

include(FetchContent)
FetchContent_Declare(
  googletest
  URL https://github.com/google/googletest/archive/03597a01ee50ed33e9dfd640b249b4be3799d395.zip
)
# For Windows: Prevent overriding the parent project's compiler/linker settings
set(gtest_force_shared_crt ON CACHE BOOL "" FORCE)
FetchContent_MakeAvailable(googletest)
Build Project using CMake
To build your GoogleTest code, you need to add the following code to the end of your "CMakeLists.txt" file −
enable_testing()

add_executable(
  test_file
  test_file.cc
)
target_link_libraries(
  test_file
  GTest::gtest_main
)

include(GoogleTest)
gtest_discover_tests(test_file)
NOTE: We are assuming your GoogleTest code is saved with the "test_file.cc" name.
