
- Flask - Home
- Flask - Overview
- Flask - Environment
- Flask - Application
- Flask - Routing
- Flask - Variable Rules
- Flask - URL Building
- Flask - HTTP Methods
- Flask - Templates
- Flask - Static Files
- Flask - Request Object
- Sending Form Data to Template
- Flask - Cookies
- Flask - Sessions
- Flask - Redirect & Errors
- Flask - Message Flashing
- Flask - File Uploading
- Flask - Extensions
- Flask - Mail
- Flask - WTF
- Flask - SQLite
- Flask - SQLAlchemy
- Flask - Sijax
- Flask - Deployment
- Flask - FastCGI
Flask - Quick Guide
Flask Overview
What is Web Framework?
Web Application Framework or simply Web Framework represents a collection of libraries and modules that enables a web application developer to write applications without having to bother about low-level details such as protocols, thread management etc.
What is Flask?
Flask is a web application framework written in Python. It is developed by Armin Ronacher, who leads an international group of Python enthusiasts named Pocco. Flask is based on the Werkzeug WSGI toolkit and Jinja2 template engine. Both are Pocco projects.
WSGI
Web Server Gateway Interface (WSGI) has been adopted as a standard for Python web application development. WSGI is a specification for a universal interface between the web server and the web applications.
Werkzeug
It is a WSGI toolkit, which implements requests, response objects, and other utility functions. This enables building a web framework on top of it. The Flask framework uses Werkzeug as one of its bases.
Jinja2
Jinja2 is a popular templating engine for Python. A web templating system combines a template with a certain data source to render dynamic web pages.
Flask is often referred to as a micro framework. It aims to keep the core of an application simple yet extensible. Flask does not have built-in abstraction layer for database handling, nor does it have form a validation support. Instead, Flask supports the extensions to add such functionality to the application. Some of the popular Flask extensions are discussed later in the tutorial.
Flask Environment
Prerequisite
Python 2.6 or higher is usually required for installation of Flask. Although Flask and its dependencies work well with Python 3 (Python 3.3 onwards), many Flask extensions do not support it properly. Hence, it is recommended that Flask should be installed on Python 2.7.
Install virtualenv for development environment
virtualenv is a virtual Python environment builder. It helps a user to create multiple Python environments side-by-side. Thereby, it can avoid compatibility issues between the different versions of the libraries.
The following command installs virtualenv
pip install virtualenv
This command needs administrator privileges. Add sudo before pip on Linux/Mac OS. If you are on Windows, log in as Administrator. On Ubuntu virtualenv may be installed using its package manager.
Sudo apt-get install virtualenv
Once installed, new virtual environment is created in a folder.
mkdir newproj
cd newproj
virtualenv venv
To activate corresponding environment, on Linux/OS X, use the following −
venv/bin/activate
On Windows, following can be used
venv\scripts\activate
We are now ready to install Flask in this environment.
pip install Flask
The above command can be run directly, without virtual environment for system-wide installation.
Flask Application
In order to test Flask installation, type the following code in the editor as Hello.py
from flask import Flask
app = Flask(__name__)

@app.route('/')
def hello_world():
   return 'Hello World'

if __name__ == '__main__':
   app.run()
Importing flask module in the project is mandatory. An object of Flask class is our WSGI application.
Flask constructor takes the name of current module (__name__) as argument.
The route() function of the Flask class is a decorator, which tells the application which URL should call the associated function.
app.route(rule, options)
The rule parameter represents URL binding with the function.
The options is a list of parameters to be forwarded to the underlying Rule object.
In the above example, / URL is bound with hello_world() function. Hence, when the home page of web server is opened in browser, the output of this function will be rendered.
Finally the run() method of Flask class runs the application on the local development server.
app.run(host, port, debug, options)
All parameters are optional
| Sr.No. | Parameters & Description |
|---|---|
| 1 |
host Hostname to listen on. Defaults to 127.0.0.1 (localhost). Set to 0.0.0.0 to have server available externally |
| 2 |
port Defaults to 5000 |
| 3 |
debug Defaults to false. If set to true, provides a debug information |
| 4 |
options To be forwarded to underlying Werkzeug server. |
The above given Python script is executed from Python shell.
Python Hello.py
A message in Python shell informs you that
* Running on http://127.0.0.1:5000/ (Press CTRL+C to quit)
Open the above URL (localhost:5000) in the browser. Hello World message will be displayed on it.
Debug mode
A Flask application is started by calling the run() method. However, while the application is under development, it should be restarted manually for each change in the code. To avoid this inconvenience, enable debug support. The server will then reload itself if the code changes. It will also provide a useful debugger to track the errors if any, in the application.
The Debug mode is enabled by setting the debug property of the application object to True before running or passing the debug parameter to the run() method.
app.debug = True
app.run()
app.run(debug = True)
Flask Routing
Modern web frameworks use the routing technique to help a user remember application URLs. It is useful to access the desired page directly without having to navigate from the home page.
The route() decorator in Flask is used to bind URL to a function. For example −
@app.route(/hello)
def hello_world():
   return hello world
Here, URL /hello rule is bound to the hello_world() function. As a result, if a user visits http://localhost:5000/hello URL, the output of the hello_world() function will be rendered in the browser.
The add_url_rule() function of an application object is also available to bind a URL with a function as in the above example, route() is used.
A decorators purpose is also served by the following representation −
def hello_world():
   return hello world
app.add_url_rule(/, hello, hello_world)
Flask Variable Rules
It is possible to build a URL dynamically, by adding variable parts to the rule parameter. This variable part is marked as <variable-name>. It is passed as a keyword argument to the function with which the rule is associated.
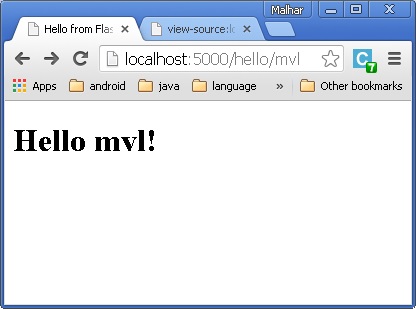
In the following example, the rule parameter of route() decorator contains <name> variable part attached to URL /hello. Hence, if the http://localhost:5000/hello/TutorialsPoint is entered as a URL in the browser, TutorialPoint will be supplied to hello() function as argument.
from flask import Flask
app = Flask(__name__)

@app.route('/hello/<name>')
def hello_name(name):
   return 'Hello %s!' % name

if __name__ == '__main__':
   app.run(debug = True)
Save the above script as hello.py and run it from Python shell. Next, open the browser and enter URL http://localhost:5000/hello/TutorialsPoint.
The following output will be displayed in the browser.
Hello TutorialsPoint!
In addition to the default string variable part, rules can be constructed using the following converters −
| Sr.No. | Converters & Description |
|---|---|
| 1 |
int accepts integer |
| 2 |
float For floating point value |
| 3 |
path accepts slashes used as directory separator character |
In the following code, all these constructors are used.
from flask import Flask
app = Flask(__name__)

@app.route('/blog/<int:postID>')
def show_blog(postID):
   return 'Blog Number %d' % postID

@app.route('/rev/<float:revNo>')
def revision(revNo):
   return 'Revision Number %f' % revNo

if __name__ == '__main__':
   app.run()
Run the above code from Python Shell. Visit the URL http://localhost:5000/blog/11 in the browser.
The given number is used as argument to the show_blog() function. The browser displays the following output −
Blog Number 11
Enter this URL in the browser − http://localhost:5000/rev/1.1
The revision() function takes up the floating point number as argument. The following result appears in the browser window −
Revision Number 1.100000
The URL rules of Flask are based on Werkzeugs routing module. This ensures that the URLs formed are unique and based on precedents laid down by Apache.
Consider the rules defined in the following script −
from flask import Flask
app = Flask(__name__)

@app.route('/flask')
def hello_flask():
   return 'Hello Flask'

@app.route('/python/')
def hello_python():
   return 'Hello Python'

if __name__ == '__main__':
   app.run()
Both the rules appear similar but in the second rule, trailing slash (/) is used. As a result, it becomes a canonical URL. Hence, using /python or /python/ returns the same output. However, in case of the first rule, /flask/ URL results in 404 Not Found page.
Flask URL Building
The url_for() function is very useful for dynamically building a URL for a specific function. The function accepts the name of a function as first argument, and one or more keyword arguments, each corresponding to the variable part of URL.
The following script demonstrates use of url_for() function.
from flask import Flask, redirect, url_for
app = Flask(__name__)

@app.route('/admin')
def hello_admin():
   return 'Hello Admin'

@app.route('/guest/<guest>')
def hello_guest(guest):
   return 'Hello %s as Guest' % guest

@app.route('/user/<name>')
def hello_user(name):
   if name =='admin':
      return redirect(url_for('hello_admin'))
   else:
      return redirect(url_for('hello_guest',guest = name))

if __name__ == '__main__':
   app.run(debug = True)
The above script has a function user(name) which accepts a value to its argument from the URL.
The User() function checks if an argument received matches admin or not. If it matches, the application is redirected to the hello_admin() function using url_for(), otherwise to the hello_guest() function passing the received argument as guest parameter to it.
Save the above code and run from Python shell.
Open the browser and enter URL as − http://localhost:5000/user/admin
The application response in browser is −
Hello Admin
Enter the following URL in the browser − http://localhost:5000/user/mvl
The application response now changes to −
Hello mvl as Guest
Flask HTTP methods
Http protocol is the foundation of data communication in world wide web. Different methods of data retrieval from specified URL are defined in this protocol.
The following table summarizes different http methods −
| Sr.No. | Methods & Description |
|---|---|
| 1 |
GET Sends data in unencrypted form to the server. Most common method. |
| 2 |
HEAD Same as GET, but without response body |
| 3 |
POST Used to send HTML form data to server. Data received by POST method is not cached by server. |
| 4 |
PUT Replaces all current representations of the target resource with the uploaded content. |
| 5 |
DELETE Removes all current representations of the target resource given by a URL |
By default, the Flask route responds to the GET requests. However, this preference can be altered by providing methods argument to route() decorator.
In order to demonstrate the use of POST method in URL routing, first let us create an HTML form and use the POST method to send form data to a URL.
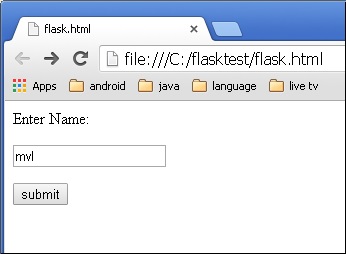
Save the following script as login.html
<html>
   <body>
      <form action = "http://localhost:5000/login" method = "post">
         <p>Enter Name:</p>
         <p><input type = "text" name = "nm" /></p>
         <p><input type = "submit" value = "submit" /></p>
      </form>
   </body>
</html>
Now enter the following script in Python shell.
from flask import Flask, redirect, url_for, request
app = Flask(__name__)
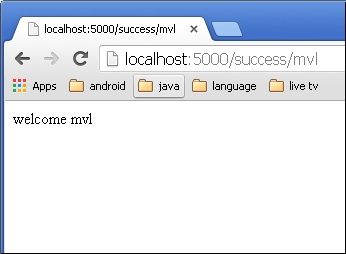
@app.route('/success/<name>')
def success(name):
return 'welcome %s' % name
@app.route('/login',methods = ['POST', 'GET'])
def login():
if request.method == 'POST':
user = request.form['nm']
return redirect(url_for('success',name = user))
else:
user = request.args.get('nm')
return redirect(url_for('success',name = user))
if __name__ == '__main__':
app.run(debug = True)
After the development server starts running, open login.html in the browser, enter name in the text field and click Submit.
Form data is POSTed to the URL in action clause of form tag.
http://localhost/login is mapped to the login() function. Since the server has received data by POST method, value of nm parameter obtained from the form data is obtained by −
user = request.form['nm']
It is passed to /success URL as variable part. The browser displays a welcome message in the window.
Change the method parameter to GET in login.html and open it again in the browser. The data received on server is by the GET method. The value of nm parameter is now obtained by −
User = request.args.get(nm)
Here, args is dictionary object containing a list of pairs of form parameter and its corresponding value. The value corresponding to nm parameter is passed on to /success URL as before.
Flask Templates
It is possible to return the output of a function bound to a certain URL in the form of HTML. For instance, in the following script, hello() function will render Hello World with <h1> tag attached to it.
from flask import Flask
app = Flask(__name__)

@app.route('/')
def index():
   return '<html><body><h1>Hello World</h1></body></html>'

if __name__ == '__main__':
   app.run(debug = True)
However, generating HTML content from Python code is cumbersome, especially when variable data and Python language elements like conditionals or loops need to be put. This would require frequent escaping from HTML.
This is where one can take advantage of Jinja2 template engine, on which Flask is based. Instead of returning hardcode HTML from the function, a HTML file can be rendered by the render_template() function.
from flask import Flask
app = Flask(__name__)

@app.route('/')
def index():
   return render_template(hello.html)

if __name__ == '__main__':
   app.run(debug = True)
Flask will try to find the HTML file in the templates folder, in the same folder in which this script is present.
- Application folder
- Hello.py
- templates
- hello.html
The term web templating system refers to designing an HTML script in which the variable data can be inserted dynamically. A web template system comprises of a template engine, some kind of data source and a template processor.
Flask uses Jinja2 template engine. A web template contains HTML syntax interspersed placeholders for variables and expressions (in these case Python expressions) which are replaced values when the template is rendered.
The following code is saved as hello.html in the templates folder.
<!doctype html>
<html>
   <body>

      <h1>Hello {{ name }}!</h1>

   </body>
</html>
Next, run the following script from Python shell.
from flask import Flask, render_template
app = Flask(__name__)

@app.route('/hello/<user>')
def hello_name(user):
   return render_template('hello.html', name = user)

if __name__ == '__main__':
   app.run(debug = True)
As the development server starts running, open the browser and enter URL as − http://localhost:5000/hello/mvl
The variable part of URL is inserted at {{ name }} place holder.
The Jinja2 template engine uses the following delimiters for escaping from HTML.
- {% ... %} for Statements
- {{ ... }} for Expressions to print to the template output
- {# ... #} for Comments not included in the template output
- # ... ## for Line Statements
In the following example, use of conditional statement in the template is demonstrated. The URL rule to the hello() function accepts the integer parameter. It is passed to the hello.html template. Inside it, the value of number received (marks) is compared (greater or less than 50) and accordingly HTML is conditionally rendered.
The Python Script is as follows −
from flask import Flask, render_template
app = Flask(__name__)

@app.route('/hello/<int:score>')
def hello_name(score):
   return render_template('hello.html', marks = score)

if __name__ == '__main__':
   app.run(debug = True)
HTML template script of hello.html is as follows −
<!doctype html>
<html>
   <body>
      {% if marks>50 %}
         <h1> Your result is pass!</h1>
      {% else %}
         <h1>Your result is fail</h1>
      {% endif %}
   </body>
</html>
Note that the conditional statements if-else and endif are enclosed in delimiter {%..%}.
Run the Python script and visit URL http://localhost/hello/60 and then http://localhost/hello/30 to see the output of HTML changing conditionally.
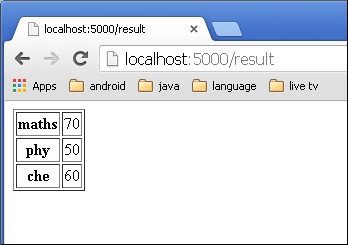
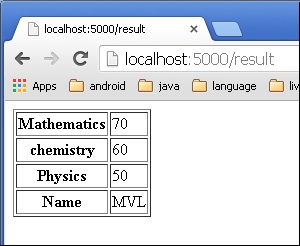
The Python loop constructs can also be employed inside the template. In the following script, the result() function sends a dictionary object to template results.html when URL http://localhost:5000/result is opened in the browser.
The Template part of result.html employs a for loop to render key and value pairs of dictionary object result{} as cells of an HTML table.
Run the following code from Python shell.
from flask import Flask, render_template
app = Flask(__name__)

@app.route('/result')
def result():
   dict = {'phy':50,'che':60,'maths':70}
   return render_template('result.html', result = dict)

if __name__ == '__main__':
   app.run(debug = True)
Save the following HTML script as result.html in the templates folder.
<!doctype html>
<html>
   <body>
      <table border = 1>
         {% for key, value in result.items() %}
            <tr>
               <th> {{ key }} </th>
               <td> {{ value }} </td>
            </tr>
         {% endfor %}
      </table>
   </body>
</html>
Here, again the Python statements corresponding to the For loop are enclosed in {%..%} whereas, the expressions key and value are put inside {{ }}.
After the development starts running, open http://localhost:5000/result in the browser to get the following output.
Flask Static Files
A web application often requires a static file such as a javascript file or a CSS file supporting the display of a web page. Usually, the web server is configured to serve them for you, but during the development, these files are served from static folder in your package or next to your module and it will be available at /static on the application.
A special endpoint static is used to generate URL for static files.
In the following example, a javascript function defined in hello.js is called on OnClick event of HTML button in index.html, which is rendered on / URL of the Flask application.
from flask import Flask, render_template
app = Flask(__name__)

@app.route("/")
def index():
   return render_template("index.html")

if __name__ == '__main__':
   app.run(debug = True)
The HTML script of index.html is given below.
<html>
   <head>
      <script type = "text/javascript"
         src = "{{ url_for('static', filename = 'hello.js') }}" ></script>
   </head>

   <body>
      <input type = "button" onclick = "sayHello()" value = "Say Hello" />
   </body>
</html>
hello.js contains sayHello() function.
function sayHello() {
   alert("Hello World")
}
Flask Request Object
The data from a clients web page is sent to the server as a global request object. In order to process the request data, it should be imported from the Flask module.
Important attributes of request object are listed below −
Form − It is a dictionary object containing key and value pairs of form parameters and their values.
args − parsed contents of query string which is part of URL after question mark (?).
Cookies − dictionary object holding Cookie names and values.
files − data pertaining to uploaded file.
method − current request method.
Flask Sending Form Data to Template
We have already seen that the http method can be specified in URL rule. The Form data received by the triggered function can collect it in the form of a dictionary object and forward it to a template to render it on a corresponding web page.
In the following example, / URL renders a web page (student.html) which has a form. The data filled in it is posted to the /result URL which triggers the result() function.
The results() function collects form data present in request.form in a dictionary object and sends it for rendering to result.html.
The template dynamically renders an HTML table of form data.
Given below is the Python code of application −
from flask import Flask, render_template, request
app = Flask(__name__)

@app.route('/')
def student():
   return render_template('student.html')

@app.route('/result',methods = ['POST', 'GET'])
def result():
   if request.method == 'POST':
      result = request.form
      return render_template("result.html",result = result)

if __name__ == '__main__':
   app.run(debug = True)
Given below is the HTML script of student.html.
<html>
   <body>
      <form action = "http://localhost:5000/result" method = "POST">
         <p>Name <input type = "text" name = "Name" /></p>
         <p>Physics <input type = "text" name = "Physics" /></p>
         <p>Chemistry <input type = "text" name = "chemistry" /></p>
         <p>Maths <input type ="text" name = "Mathematics" /></p>
         <p><input type = "submit" value = "submit" /></p>
      </form>
   </body>
</html>
Code of template (result.html) is given below −
<!doctype html>
<html>
   <body>
      <table border = 1>
         {% for key, value in result.items() %}
            <tr>
               <th> {{ key }} </th>
               <td> {{ value }} </td>
            </tr>
         {% endfor %}
      </table>
   </body>
</html>
Run the Python script and enter the URL http://localhost:5000/ in the browser.

When the Submit button is clicked, form data is rendered on result.html in the form of HTML table.
Flask Cookies
A cookie is stored on a clients computer in the form of a text file. Its purpose is to remember and track data pertaining to a clients usage for better visitor experience and site statistics.
A Request object contains a cookies attribute. It is a dictionary object of all the cookie variables and their corresponding values, a client has transmitted. In addition to it, a cookie also stores its expiry time, path and domain name of the site.
In Flask, cookies are set on response object. Use make_response() function to get response object from return value of a view function. After that, use the set_cookie() function of response object to store a cookie.
Reading back a cookie is easy. The get() method of request.cookies attribute is used to read a cookie.
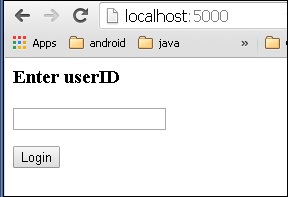
In the following Flask application, a simple form opens up as you visit / URL.
@app.route('/')
def index():
   return render_template('index.html')
This HTML page contains one text input.
<html>
   <body>
      <form action = "/setcookie" method = "POST">
         <p><h3>Enter userID</h3></p>
         <p><input type = 'text' name = 'nm'/></p>
         <p><input type = 'submit' value = 'Login'/></p>
      </form>
   </body>
</html>
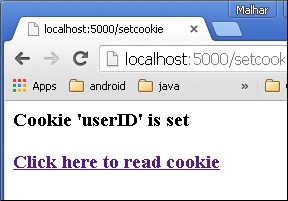
The Form is posted to /setcookie URL. The associated view function sets a Cookie name userID and renders another page.
@app.route('/setcookie', methods = ['POST', 'GET'])
def setcookie():
   if request.method == 'POST':
   user = request.form['nm']

   resp = make_response(render_template('readcookie.html'))
   resp.set_cookie('userID', user)

   return resp
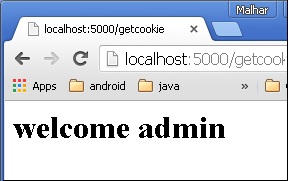
readcookie.html contains a hyperlink to another view function getcookie(), which reads back and displays the cookie value in browser.
@app.route('/getcookie')
def getcookie():
name = request.cookies.get('userID')
return '<h1>welcome '+name+'</h1>'
Run the application and visit http://localhost:5000/
The result of setting a cookie is displayed like this −
The output of read back cookie is shown below.
Flask Sessions
Like Cookie, Session data is stored on client. Session is the time interval when a client logs into a server and logs out of it. The data, which is needed to be held across this session, is stored in the client browser.
A session with each client is assigned a Session ID. The Session data is stored on top of cookies and the server signs them cryptographically. For this encryption, a Flask application needs a defined SECRET_KEY.
Session object is also a dictionary object containing key-value pairs of session variables and associated values.
For example, to set a username session variable use the statement −
Session[username] = admin
To release a session variable use pop() method.
session.pop('username', None)
The following code is a simple demonstration of session works in Flask. URL / simply prompts user to log in, as session variable username is not set.
@app.route('/')
def index():
if 'username' in session:
username = session['username']
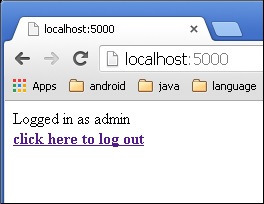
return 'Logged in as ' + username + '<br>' + \
"<b><a href = '/logout'>click here to log out</a></b>"
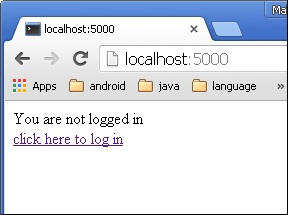
return "You are not logged in <br><a href = '/login'></b>" + \
"click here to log in</b></a>"
As user browses to /login the login() view function, because it is called through GET method, opens up a login form.
A Form is posted back to /login and now session variable is set. Application is redirected to /. This time session variable username is found.
@app.route('/login', methods = ['GET', 'POST'])
def login():
   if request.method == 'POST':
      session['username'] = request.form['username']
      return redirect(url_for('index'))
   return '''

   <form action = "" method = "post">
      <p><input type = text name = username/></p>
      <p<<input type = submit value = Login/></p>
   </form>

   '''
The application also contains a logout() view function, which pops out username session variable. Hence, / URL again shows the opening page.
@app.route('/logout')
def logout():
   # remove the username from the session if it is there
   session.pop('username', None)
   return redirect(url_for('index'))
Run the application and visit the homepage. (Ensure to set secret_key of the application)
from flask import Flask, session, redirect, url_for, escape, request
app = Flask(__name__)
app.secret_key = 'any random string
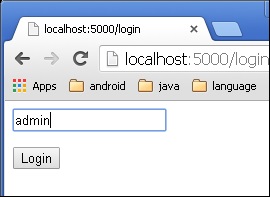
The output will be displayed as shown below. Click the link click here to log in.
The link will be directed to another screen. Type admin.
The screen will show you the message, Logged in as admin.
Flask Redirect & Errors
Flask class has a redirect() function. When called, it returns a response object and redirects the user to another target location with specified status code.
Prototype of redirect() function is as below −
Flask.redirect(location, statuscode, response)
In the above function −
location parameter is the URL where response should be redirected.
statuscode sent to browsers header, defaults to 302.
response parameter is used to instantiate response.
The following status codes are standardized −
- HTTP_300_MULTIPLE_CHOICES
- HTTP_301_MOVED_PERMANENTLY
- HTTP_302_FOUND
- HTTP_303_SEE_OTHER
- HTTP_304_NOT_MODIFIED
- HTTP_305_USE_PROXY
- HTTP_306_RESERVED
- HTTP_307_TEMPORARY_REDIRECT
The default status code is 302, which is for found.
In the following example, the redirect() function is used to display the login page again when a login attempt fails.
from flask import Flask, redirect, url_for, render_template, request
# Initialize the Flask application
app = Flask(__name__)

@app.route('/')
def index():
   return render_template('log_in.html')

@app.route('/login',methods = ['POST', 'GET'])
def login():
   if request.method == 'POST' and request.form['username'] == 'admin' :
      return redirect(url_for('success'))
   else:
      return redirect(url_for('index'))

@app.route('/success')
def success():
   return 'logged in successfully'

if __name__ == '__main__':
   app.run(debug = True)
Flask class has abort() function with an error code.
Flask.abort(code)
The Code parameter takes one of following values −
400 − for Bad Request
401 − for Unauthenticated
403 − for Forbidden
404 − for Not Found
406 − for Not Acceptable
415 − for Unsupported Media Type
429 − Too Many Requests
Let us make a slight change in the login() function in the above code. Instead of re-displaying the login page, if Unauthourized page is to be displayed, replace it with call to abort(401).
from flask import Flask, redirect, url_for, render_template, request, abort
app = Flask(__name__)

@app.route('/')
def index():
   return render_template('log_in.html')

@app.route('/login',methods = ['POST', 'GET'])
def login():
   if request.method == 'POST':
      if request.form['username'] == 'admin' :
         return redirect(url_for('success'))
      else:
         abort(401)
   else:
      return redirect(url_for('index'))

@app.route('/success')
def success():
   return 'logged in successfully'

if __name__ == '__main__':
   app.run(debug = True)
Flask Message Flashing
A good GUI based application provides feedback to a user about the interaction. For example, the desktop applications use dialog or message box and JavaScript uses alerts for similar purpose.
Generating such informative messages is easy in Flask web application. Flashing system of Flask framework makes it possible to create a message in one view and render it in a view function called next.
A Flask module contains flash() method. It passes a message to the next request, which generally is a template.
flash(message, category)
Here,
message parameter is the actual message to be flashed.
category parameter is optional. It can be either error, info or warning.
In order to remove message from session, template calls get_flashed_messages().
get_flashed_messages(with_categories, category_filter)
Both parameters are optional. The first parameter is a tuple if received messages are having category. The second parameter is useful to display only specific messages.
The following flashes received messages in a template.
{% with messages = get_flashed_messages() %}
   {% if messages %}
      {% for message in messages %}
         {{ message }}
      {% endfor %}
   {% endif %}
{% endwith %}
Let us now see a simple example, demonstrating the flashing mechanism in Flask. In the following code, a / URL displays link to the login page, with no message to flash.
@app.route('/')
def index():
   return render_template('index.html')
The link leads a user to /login URL which displays a login form. When submitted, the login() view function verifies a username and password and accordingly flashes a success message or creates error variable.
@app.route('/login', methods = ['GET', 'POST'])
def login():
   error = None

   if request.method == 'POST':
      if request.form['username'] != 'admin' or \
         request.form['password'] != 'admin':
         error = 'Invalid username or password. Please try again!'
      else:
         flash('You were successfully logged in')
         return redirect(url_for('index'))
   return render_template('login.html', error = error)
In case of error, the login template is redisplayed with error message.
Login.html
<!doctype html>
<html>
   <body>
      <h1>Login</h1>

      {% if error %}
         <p><strong>Error:</strong> {{ error }}
      {% endif %}

      <form action = "" method = post>
         <dl>
            <dt>Username:</dt>
            <dd>
               <input type = text name = username
                  value = "{{request.form.username }}">
            </dd>
            <dt>Password:</dt>
            <dd><input type = password name = password></dd>
         </dl>
         <p><input type = submit value = Login></p>
      </form>
   </body>
</html>
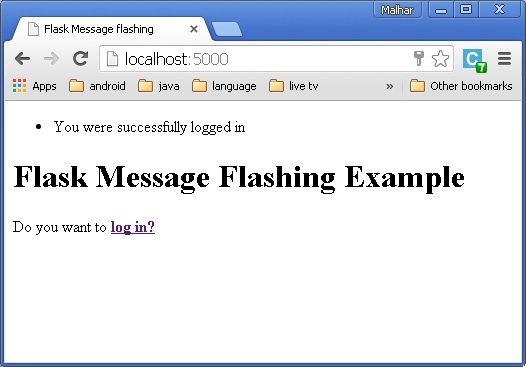
On the other hand, if login is successful, a success message is flashed on the index template.
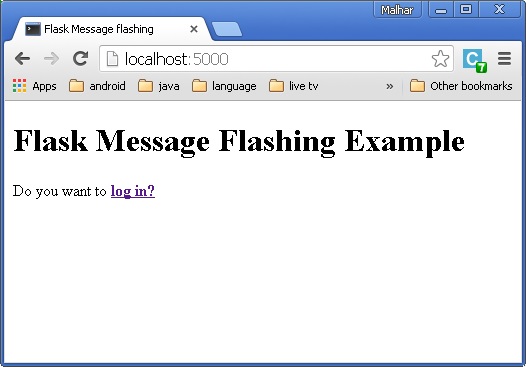
Index.html
<!doctype html>
<html>
   <head>
      <title>Flask Message flashing</title>
   </head>
   <body>
      {% with messages = get_flashed_messages() %}
         {% if messages %}
            <ul>
               {% for message in messages %}
               <li<{{ message }}</li>
               {% endfor %}
            </ul>
         {% endif %}
      {% endwith %}

      <h1>Flask Message Flashing Example</h1>
      <p>Do you want to <a href = "{{ url_for('login') }}">
         <b>log in?</b></a></p>
   </body>
</html>
A complete code for Flask message flashing example is given below −
Flash.py
from flask import Flask, flash, redirect, render_template, request, url_for
app = Flask(__name__)
app.secret_key = 'random string'

@app.route('/')
def index():
   return render_template('index.html')

@app.route('/login', methods = ['GET', 'POST'])
def login():
   error = None

   if request.method == 'POST':
      if request.form['username'] != 'admin' or \
         request.form['password'] != 'admin':
         error = 'Invalid username or password. Please try again!'
      else:
         flash('You were successfully logged in')
         return redirect(url_for('index'))

   return render_template('login.html', error = error)

if __name__ == "__main__":
   app.run(debug = True)
After executing the above codes, you will see the screen as shown below.
When you click on the link, you will be directed to the Login page.
Enter the Username and password.
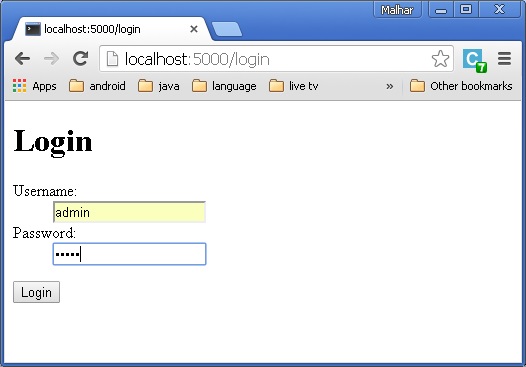
Click Login. A message will be displayed You were successfully logged in .
Flask File Uploading
Handling file upload in Flask is very easy. It needs an HTML form with its enctype attribute set to multipart/form-data, posting the file to a URL. The URL handler fetches file from request.files[] object and saves it to the desired location.
Each uploaded file is first saved in a temporary location on the server, before it is actually saved to its ultimate location. Name of destination file can be hard-coded or can be obtained from filename property of request.files[file] object. However, it is recommended to obtain a secure version of it using the secure_filename() function.
It is possible to define the path of default upload folder and maximum size of uploaded file in configuration settings of Flask object.
| app.config[UPLOAD_FOLDER] | Defines path for upload folder |
| app.config[MAX_CONTENT_PATH] | Specifies maximum size of file yo be uploaded in bytes |
The following code has /upload URL rule that displays upload.html from the templates folder, and /upload-file URL rule that calls uploader() function handling upload process.
upload.html has a file chooser button and a submit button.
<html>
   <body>
      <form action = "http://localhost:5000/uploader" method = "POST"
         enctype = "multipart/form-data">
         <input type = "file" name = "file" />
         <input type = "submit"/>
      </form>
   </body>
</html>
You will see the screen as shown below.
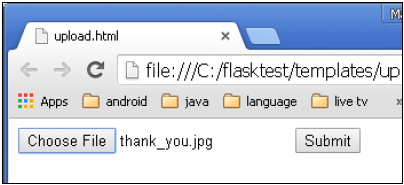
Click Submit after choosing file. Forms post method invokes /upload_file URL. The underlying function uploader() does the save operation.
Following is the Python code of Flask application.
from flask import Flask, render_template, request
from werkzeug import secure_filename
app = Flask(__name__)

@app.route('/upload')
def upload_file():
   return render_template('upload.html')

@app.route('/uploader', methods = ['GET', 'POST'])
def upload_file():
   if request.method == 'POST':
      f = request.files['file']
      f.save(secure_filename(f.filename))
      return 'file uploaded successfully'

if __name__ == '__main__':
   app.run(debug = True)
Flask Extensions
Flask is often referred to as a micro framework, because a core functionality includes WSGI and routing based on Werkzeug and template engine based on Jinja2. In addition, Flask framework has support for cookie and sessions as well as web helpers like JSON, static files etc. Obviously, this is not enough for the development of a full-fledged web application. This is where the Flask extensions come in picture. Flask extensions give extensibility to Flask framework.
There are a large number of Flask extensions available. A Flask extension is a Python module, which adds specific type of support to the Flask application. Flask Extension Registry is a directory of extensions available. The required extension can be downloaded by pip utility.
In this tutorial, we will discuss the following important Flask extensions −
Flask Mail − provides SMTP interface to Flask application
Flask WTF − adds rendering and validation of WTForms
Flask SQLAlchemy − adds SQLAlchemy support to Flask application
Flask Sijax − Interface for Sijax - Python/jQuery library that makes AJAX easy to use in web applications
Each type of extension usually provides extensive documentation about its usage. Since an extension is a Python module, it needs to be imported for it to be used. Flask extensions are generally named as flask-foo. To import,
from flask_foo import [class, function]
For versions of Flask later than 0.7, you can also use the syntax −
from flask.ext import foo
For this usage, a compatibility module needs to be activated. It can be installed by running flaskext_compat.py
import flaskext_compat
flaskext_compat.activate()
from flask.ext import foo
Flask Mail
A web based application is often required to have a feature of sending mail to the users/clients. Flask-Mail extension makes it very easy to set up a simple interface with any email server.
At first, Flask-Mail extension should be installed with the help of pip utility.
pip install Flask-Mail
Then Flask-Mail needs to be configured by setting values of the following application parameters.
| Sr.No | Parameters & Description |
|---|---|
| 1 |
MAIL_SERVER Name/IP address of email server |
| 2 |
MAIL_PORT Port number of server used |
| 3 |
MAIL_USE_TLS Enable/disable Transport Security Layer encryption |
| 4 |
MAIL_USE_SSL Enable/disable Secure Sockets Layer encryption |
| 5 |
MAIL_DEBUG Debug support. Default is Flask applications debug status |
| 6 |
MAIL_USERNAME User name of sender |
| 7 |
MAIL_PASSWORD password of sender |
| 8 |
MAIL_DEFAULT_SENDER sets default sender |
| 9 |
MAIL_MAX_EMAILS Sets maximum mails to be sent |
| 10 |
MAIL_SUPPRESS_SEND Sending suppressed if app.testing set to true |
| 11 |
MAIL_ASCII_ATTACHMENTS If set to true, attached filenames converted to ASCII |
The flask-mail module contains definitions of the following important classes.
Mail class
It manages email-messaging requirements. The class constructor takes the following form −
flask-mail.Mail(app = None)
The Constructor takes the Flask application object as a parameter.
Methods of Mail class
| Sr.No | Methods & Description |
|---|---|
| 1 |
send() Sends contents of Message class object |
| 2 |
connect() Opens connection with mail host |
| 3 |
send_message() Sends message object |
Message class
It encapsulates an email message. Message class constructor has several parameters −
flask-mail.Message(subject, recipients, body, html, sender, cc, bcc,
   reply-to, date, charset, extra_headers, mail_options, rcpt_options)
Message class methods
attach() − adds an attachment to message. This method takes the following parameters −
filename − name of file to attach
content_type − MIME type of file
data − raw file data
disposition − content disposition, if any.
add_recipient() − adds another recipient to message
In the following example, SMTP server of Googles gmail service is used as MAIL_SERVER for Flask-Mail configuration.
Step 1 − Import Mail and Message class from flask-mail module in the code.
from flask_mail import Mail, Message
Step 2 − Then Flask-Mail is configured as per following settings.
app.config['MAIL_SERVER']='smtp.gmail.com'
app.config['MAIL_PORT'] = 465
app.config['MAIL_USERNAME'] = 'yourId@gmail.com'
app.config['MAIL_PASSWORD'] = '*****'
app.config['MAIL_USE_TLS'] = False
app.config['MAIL_USE_SSL'] = True
Step 3 − Create an instance of Mail class.
mail = Mail(app)
Step 4 − Set up a Message object in a Python function mapped by URL rule (/).
@app.route("/")
def index():
   msg = Message('Hello', sender = 'yourId@gmail.com', recipients = ['id1@gmail.com'])
   msg.body = "This is the email body"
   mail.send(msg)
   return "Sent"
Step 5 − The entire code is given below. Run the following script in Python Shell and visit http://localhost:5000/.
from flask import Flask
from flask_mail import Mail, Message

app =Flask(__name__)
mail=Mail(app)

app.config['MAIL_SERVER']='smtp.gmail.com'
app.config['MAIL_PORT'] = 465
app.config['MAIL_USERNAME'] = 'yourId@gmail.com'
app.config['MAIL_PASSWORD'] = '*****'
app.config['MAIL_USE_TLS'] = False
app.config['MAIL_USE_SSL'] = True
mail = Mail(app)

@app.route("/")
def index():
   msg = Message('Hello', sender = 'yourId@gmail.com', recipients = ['id1@gmail.com'])
   msg.body = "Hello Flask message sent from Flask-Mail"
   mail.send(msg)
   return "Sent"

if __name__ == '__main__':
   app.run(debug = True)
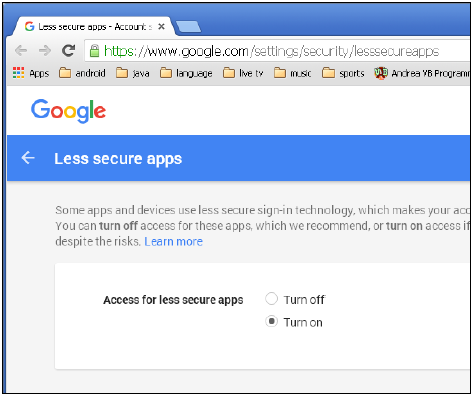
Note that the built-insecurity features in Gmail service may block this login attempt. You may have to decrease the security level. Please log in to your Gmail account and visit this link to decrease the security.
Flask WTF
One of the essential aspects of a web application is to present a user interface for the user. HTML provides a <form> tag, which is used to design an interface. A Forms elements such as text input, radio, select etc. can be used appropriately.
Data entered by a user is submitted in the form of Http request message to the server side script by either GET or POST method.
The Server side script has to recreate the form elements from http request data. So in effect, form elements have to be defined twice once in HTML and again in the server side script.
Another disadvantage of using HTML form is that it is difficult (if not impossible) to render the form elements dynamically. HTML itself provides no way to validate a users input.
This is where WTForms, a flexible form, rendering and validation library comes handy. Flask-WTF extension provides a simple interface with this WTForms library.
Using Flask-WTF, we can define the form fields in our Python script and render them using an HTML template. It is also possible to apply validation to the WTF field.
Let us see how this dynamic generation of HTML works.
First, Flask-WTF extension needs to be installed.
pip install flask-WTF
The installed package contains a Form class, which has to be used as a parent for user- defined form.
WTforms package contains definitions of various form fields. Some Standard form fields are listed below.
| Sr.No | Standard Form Fields & Description |
|---|---|
| 1 |
TextField Represents <input type = 'text'> HTML form element |
| 2 |
BooleanField Represents <input type = 'checkbox'> HTML form element |
| 3 |
DecimalField Textfield for displaying number with decimals |
| 4 |
IntegerField TextField for displaying integer |
| 5 |
RadioField Represents <input type = 'radio'> HTML form element |
| 6 |
SelectField Represents select form element |
| 7 |
TextAreaField Represents <testarea> html form element |
| 8 |
PasswordField Represents <input type = 'password'> HTML form element |
| 9 |
SubmitField Represents <input type = 'submit'> form element |
For example, a form containing a text field can be designed as below −
from flask_wtf import Form
from wtforms import TextField

class ContactForm(Form):
   name = TextField("Name Of Student")
In addition to the name field, a hidden field for CSRF token is created automatically. This is to prevent Cross Site Request Forgery attack.
When rendered, this will result into an equivalent HTML script as shown below.
<input id = "csrf_token" name = "csrf_token" type = "hidden" />
<label for = "name">Name Of Student</label><br>
<input id = "name" name = "name" type = "text" value = "" />
A user-defined form class is used in a Flask application and the form is rendered using a template.
from flask import Flask, render_template
from forms import ContactForm
app = Flask(__name__)
app.secret_key = 'development key'

@app.route('/contact')
def contact():
   form = ContactForm()
   return render_template('contact.html', form = form)

if __name__ == '__main__':
   app.run(debug = True)
WTForms package also contains validator class. It is useful in applying validation to form fields. Following list shows commonly used validators.
| Sr.No | Validators Class & Description |
|---|---|
| 1 |
DataRequired Checks whether input field is empty |
| 2 |
Checks whether text in the field follows email ID conventions |
| 3 |
IPAddress Validates IP address in input field |
| 4 |
Length Verifies if length of string in input field is in given range |
| 5 |
NumberRange Validates a number in input field within given range |
| 6 |
URL Validates URL entered in input field |
We shall now apply DataRequired validation rule for the name field in contact form.
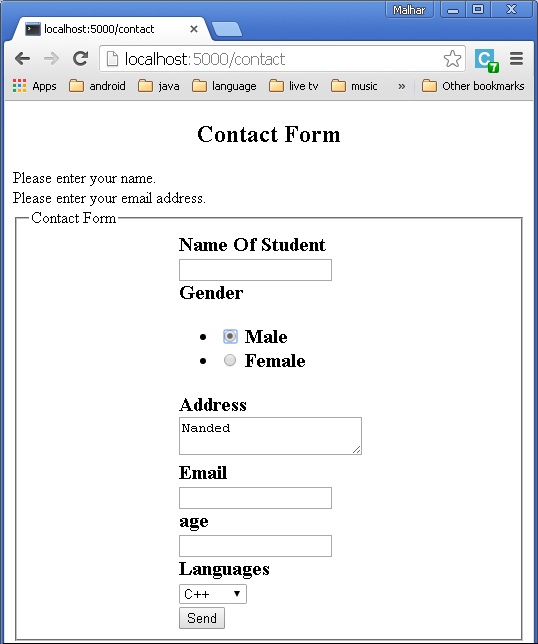
name = TextField("Name Of Student",[validators.Required("Please enter your name.")])
The validate() function of form object validates the form data and throws the validation errors if validation fails. The Error messages are sent to the template. In the HTML template, error messages are rendered dynamically.
{% for message in form.name.errors %}
   {{ message }}
{% endfor %}
The following example demonstrates the concepts given above. The design of Contact form is given below (forms.py).
from flask_wtf import Form
from wtforms import TextField, IntegerField, TextAreaField, SubmitField, RadioField,
   SelectField

from wtforms import validators, ValidationError

class ContactForm(Form):
   name = TextField("Name Of Student",[validators.Required("Please enter
      your name.")])
   Gender = RadioField('Gender', choices = [('M','Male'),('F','Female')])
   Address = TextAreaField("Address")

   email = TextField("Email",[validators.Required("Please enter your email address."),
      validators.Email("Please enter your email address.")])

   Age = IntegerField("age")
   language = SelectField('Languages', choices = [('cpp', 'C++'),
      ('py', 'Python')])
   submit = SubmitField("Send")
Validators are applied to the Name and Email fields.
Given below is the Flask application script (formexample.py).
from flask import Flask, render_template, request, flash
from forms import ContactForm
app = Flask(__name__)
app.secret_key = 'development key'
@app.route('/contact', methods = ['GET', 'POST'])
def contact():
form = ContactForm()
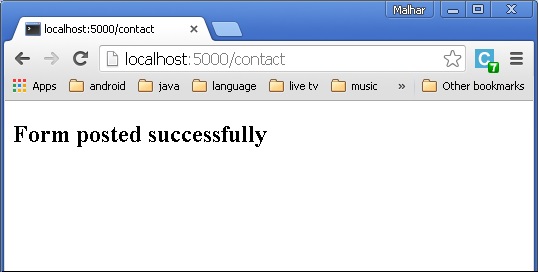
if request.method == 'POST':
if form.validate() == False:
flash('All fields are required.')
return render_template('contact.html', form = form)
else:
return render_template('success.html')
elif request.method == 'GET':
return render_template('contact.html', form = form)
if __name__ == '__main__':
app.run(debug = True)
The Script of the template (contact.html) is as follows −
<!doctype html>
<html>
   <body>
      <h2 style = "text-align: center;">Contact Form</h2>

      {% for message in form.name.errors %}
         <div>{{ message }}</div>
      {% endfor %}

      {% for message in form.email.errors %}
         <div>{{ message }}</div>
      {% endfor %}

      <form action = "http://localhost:5000/contact" method = post>
         <fieldset>
            <legend>Contact Form</legend>
            {{ form.hidden_tag() }}

            <div style = font-size:20px; font-weight:bold; margin-left:150px;>
               {{ form.name.label }}<br>
               {{ form.name }}
               <br>

               {{ form.Gender.label }} {{ form.Gender }}
               {{ form.Address.label }}<br>
               {{ form.Address }}
               <br>

               {{ form.email.label }}<br>
               {{ form.email }}
               <br>

               {{ form.Age.label }}<br>
               {{ form.Age }}
               <br>

               {{ form.language.label }}<br>
               {{ form.language }}
               <br>
               {{ form.submit }}
            </div>

         </fieldset>
      </form>
   </body>
</html>
Run formexample.py in Python shell and visit URL http://localhost:5000/contact. The Contact form will be displayed as shown below.

If there are any errors, the page will look like this −
If there are no errors, success.html will be rendered.
Flask SQLite
Python has an in-built support for SQlite. SQlite3 module is shipped with Python distribution. For a detailed tutorial on using SQLite database in Python, please refer to this link. In this section we shall see how a Flask application interacts with SQLite.
Create an SQLite database database.db and create a students table in it.
import sqlite3

conn = sqlite3.connect('database.db')
print "Opened database successfully";

conn.execute('CREATE TABLE students (name TEXT, addr TEXT, city TEXT, pin TEXT)')
print "Table created successfully";
conn.close()
Our Flask application has three View functions.
First new_student() function is bound to the URL rule (/addnew). It renders an HTML file containing student information form.
@app.route('/enternew')
def new_student():
   return render_template('student.html')
The HTML script for student.html is as follows −
<html>
   <body>
      <form action = "{{ url_for('addrec') }}" method = "POST">
         <h3>Student Information</h3>
         Name<br>
         <input type = "text" name = "nm" /></br>

         Address<br>
         <textarea name = "add" ></textarea><br>

         City<br>
         <input type = "text" name = "city" /><br>

         PINCODE<br>
         <input type = "text" name = "pin" /><br>
         <input type = "submit" value = "submit" /><br>
      </form>
   </body>
</html>
As it can be seen, form data is posted to the /addrec URL which binds the addrec() function.
This addrec() function retrieves the forms data by POST method and inserts in students table. Message corresponding to success or error in insert operation is rendered to result.html.
@app.route('/addrec',methods = ['POST', 'GET'])
def addrec():
   if request.method == 'POST':
      try:
         nm = request.form['nm']
         addr = request.form['add']
         city = request.form['city']
         pin = request.form['pin']

         with sql.connect("database.db") as con:
            cur = con.cursor()
            cur.execute("INSERT INTO students (name,addr,city,pin)
               VALUES (?,?,?,?)",(nm,addr,city,pin) )

            con.commit()
            msg = "Record successfully added"
      except:
         con.rollback()
         msg = "error in insert operation"

      finally:
         return render_template("result.html",msg = msg)
         con.close()
The HTML script of result.html contains an escaping statement {{msg}} that displays the result of Insert operation.
<!doctype html>
<html>
<body>
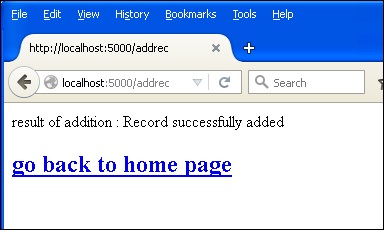
result of addition : {{ msg }}
<h2><a href = "\">go back to home page</a></h2>
</body>
</html>
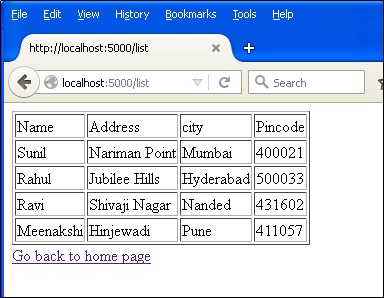
The application contains another list() function represented by /list URL. It populates rows as a MultiDict object containing all records in the students table. This object is passed to the list.html template.
@app.route('/list')
def list():
   con = sql.connect("database.db")
   con.row_factory = sql.Row

   cur = con.cursor()
   cur.execute("select * from students")

   rows = cur.fetchall();
   return render_template("list.html",rows = rows)
This list.html is a template, which iterates over the row set and renders the data in an HTML table.
<!doctype html>
<html>
   <body>
      <table border = 1>
         <thead>
            <td>Name</td>
            <td>Address>/td<
            <td>city</td>
            <td>Pincode</td>
         </thead>

         {% for row in rows %}
            <tr>
               <td>{{row["name"]}}</td>
               <td>{{row["addr"]}}</td>
               <td> {{ row["city"]}}</td>
               <td>{{row['pin']}}</td>
            </tr>
         {% endfor %}
      </table>

      <a href = "/">Go back to home page</a>
   </body>
</html>
Finally, the / URL rule renders a home.html which acts as the entry point of the application.
@app.route('/')
def home():
   return render_template('home.html')
Here is the complete code of Flask-SQLite application.
from flask import Flask, render_template, request
import sqlite3 as sql
app = Flask(__name__)

@app.route('/')
def home():
   return render_template('home.html')

@app.route('/enternew')
def new_student():
   return render_template('student.html')

@app.route('/addrec',methods = ['POST', 'GET'])
def addrec():
   if request.method == 'POST':
      try:
         nm = request.form['nm']
         addr = request.form['add']
         city = request.form['city']
         pin = request.form['pin']

         with sql.connect("database.db") as con:
            cur = con.cursor()

            cur.execute("INSERT INTO students (name,addr,city,pin)
               VALUES (?,?,?,?)",(nm,addr,city,pin) )

            con.commit()
            msg = "Record successfully added"
      except:
         con.rollback()
         msg = "error in insert operation"

      finally:
         return render_template("result.html",msg = msg)
         con.close()

@app.route('/list')
def list():
   con = sql.connect("database.db")
   con.row_factory = sql.Row

   cur = con.cursor()
   cur.execute("select * from students")

   rows = cur.fetchall();
   return render_template("list.html",rows = rows)

if __name__ == '__main__':
   app.run(debug = True)
Run this script from Python shell and as the development server starts running. Visit http://localhost:5000/ in browser which displays a simple menu like this −
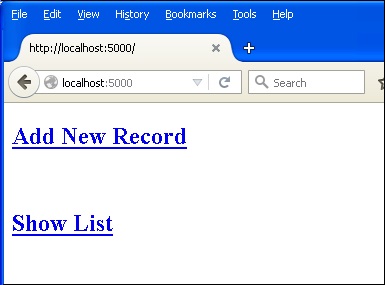
Click Add New Record link to open the Student Information Form.
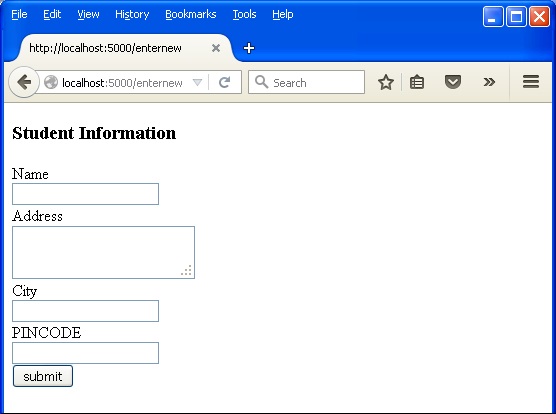
Fill the form fields and submit it. The underlying function inserts the record in the students table.
Go back to the home page and click Show List link. The table showing the sample data will be displayed.
Flask SQLAlchemy
Using raw SQL in Flask web applications to perform CRUD operations on database can be tedious. Instead, SQLAlchemy, a Python toolkit is a powerful OR Mapper that gives application developers the full power and flexibility of SQL. Flask-SQLAlchemy is the Flask extension that adds support for SQLAlchemy to your Flask application.
What is ORM (Object Relation Mapping)?
Most programming language platforms are object oriented. Data in RDBMS servers on the other hand is stored as tables. Object relation mapping is a technique of mapping object parameters to the underlying RDBMS table structure. An ORM API provides methods to perform CRUD operations without having to write raw SQL statements.
In this section, we are going to study the ORM techniques of Flask-SQLAlchemy and build a small web application.
Step 1 − Install Flask-SQLAlchemy extension.
pip install flask-sqlalchemy
Step 2 − You need to import SQLAlchemy class from this module.
from flask_sqlalchemy import SQLAlchemy
Step 3 − Now create a Flask application object and set URI for the database to be used.
app = Flask(__name__)
app.config['SQLALCHEMY_DATABASE_URI'] = 'sqlite:///students.sqlite3'
Step 4 − Then create an object of SQLAlchemy class with application object as the parameter. This object contains helper functions for ORM operations. It also provides a parent Model class using which user defined models are declared. In the snippet below, a students model is created.
db = SQLAlchemy(app)
class students(db.Model):
   id = db.Column('student_id', db.Integer, primary_key = True)
   name = db.Column(db.String(100))
   city = db.Column(db.String(50))
   addr = db.Column(db.String(200))
   pin = db.Column(db.String(10))

def __init__(self, name, city, addr,pin):
   self.name = name
   self.city = city
   self.addr = addr
   self.pin = pin
Step 5 − To create / use database mentioned in URI, run the create_all() method.
db.create_all()
The Session object of SQLAlchemy manages all persistence operations of ORM object.
The following session methods perform CRUD operations −
db.session.add(model object) − inserts a record into mapped table
db.session.delete(model object) − deletes record from table
model.query.all() − retrieves all records from table (corresponding to SELECT query).
You can apply a filter to the retrieved record set by using the filter attribute. For instance, in order to retrieve records with city = Hyderabad in students table, use following statement −
Students.query.filter_by(city = Hyderabad).all()
With this much of background, now we shall provide view functions for our application to add a student data.
The entry point of the application is show_all() function bound to / URL. The Record set of students table is sent as parameter to the HTML template. The Server side code in the template renders the records in HTML table form.
@app.route('/')
def show_all():
   return render_template('show_all.html', students = students.query.all() )
The HTML script of the template (show_all.html) is like this −
<!DOCTYPE html>
<html lang = "en">
   <head></head>
   <body>
      <h3>
         <a href = "{{ url_for('show_all') }}">Comments - Flask
            SQLAlchemy example</a>
      </h3>

      <hr/>
      {%- for message in get_flashed_messages() %}
         {{ message }}
      {%- endfor %}

      <h3>Students (<a href = "{{ url_for('new') }}">Add Student
         </a>)</h3>

      <table>
         <thead>
            <tr>
               <th>Name</th>
               <th>City</th>
               <th>Address</th>
               <th>Pin</th>
            </tr>
         </thead>

         <tbody>
            {% for student in students %}
               <tr>
                  <td>{{ student.name }}</td>
                  <td>{{ student.city }}</td>
                  <td>{{ student.addr }}</td>
                  <td>{{ student.pin }}</td>
               </tr>
            {% endfor %}
         </tbody>
      </table>
   </body>
</html>
The above page contains a hyperlink to /new URL mapping new() function. When clicked, it opens a Student Information form. The data is posted to the same URL in POST method.
new.html
<!DOCTYPE html>
<html>
   <body>
      <h3>Students - Flask SQLAlchemy example</h3>
      <hr/>

      {%- for category, message in get_flashed_messages(with_categories = true) %}
         <div class = "alert alert-danger">
            {{ message }}
         </div>
      {%- endfor %}

      <form action = "{{ request.path }}" method = "post">
         <label for = "name">Name</label><br>
         <input type = "text" name = "name" placeholder = "Name" /><br>
         <label for = "email">City</label><br>
         <input type = "text" name = "city" placeholder = "city" /><br>
         <label for = "addr">addr</label><br>
         <textarea name = "addr" placeholder = "addr"></textarea><br>
         <label for = "PIN">City</label><br>
         <input type = "text" name = "pin" placeholder = "pin" /><br>
         <input type = "submit" value = "Submit" />
      </form>
   </body>
</html>
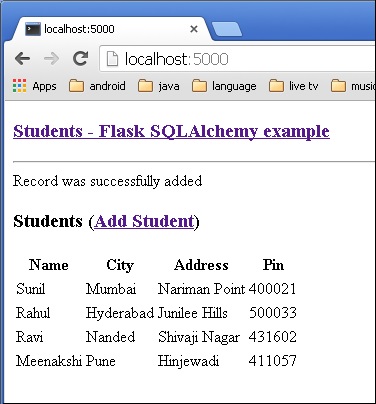
When the http method is detected as POST, the form data is added in the students table and the application returns to homepage showing the added data.
@app.route('/new', methods = ['GET', 'POST'])
def new():
   if request.method == 'POST':
      if not request.form['name'] or not request.form['city'] or not request.form['addr']:
         flash('Please enter all the fields', 'error')
      else:
         student = students(request.form['name'], request.form['city'],
            request.form['addr'], request.form['pin'])

         db.session.add(student)
         db.session.commit()

         flash('Record was successfully added')
         return redirect(url_for('show_all'))
   return render_template('new.html')
Given below is the complete code of application (app.py).
from flask import Flask, request, flash, url_for, redirect, render_template
from flask_sqlalchemy import SQLAlchemy

app = Flask(__name__)
app.config['SQLALCHEMY_DATABASE_URI'] = 'sqlite:///students.sqlite3'
app.config['SECRET_KEY'] = "random string"

db = SQLAlchemy(app)

class students(db.Model):
   id = db.Column('student_id', db.Integer, primary_key = True)
   name = db.Column(db.String(100))
   city = db.Column(db.String(50))
   addr = db.Column(db.String(200))
   pin = db.Column(db.String(10))

def __init__(self, name, city, addr,pin):
   self.name = name
   self.city = city
   self.addr = addr
   self.pin = pin

@app.route('/')
def show_all():
   return render_template('show_all.html', students = students.query.all() )

@app.route('/new', methods = ['GET', 'POST'])
def new():
   if request.method == 'POST':
      if not request.form['name'] or not request.form['city'] or not request.form['addr']:
         flash('Please enter all the fields', 'error')
      else:
         student = students(request.form['name'], request.form['city'],
            request.form['addr'], request.form['pin'])

         db.session.add(student)
         db.session.commit()
         flash('Record was successfully added')
         return redirect(url_for('show_all'))
   return render_template('new.html')

if __name__ == '__main__':
   db.create_all()
   app.run(debug = True)
Run the script from Python shell and enter http://localhost:5000/ in the browser.
Click the Add Student link to open Student information form.

Fill the form and submit. The home page reappears with the submitted data.
We can see the output as shown below.
Flask Sijax
Sijax stands for Simple Ajax and it is a Python/jQuery library designed to help you easily bring Ajax to your application. It uses jQuery.ajax to make AJAX requests.
Installation
Installation of Flask-Sijax is easy.
pip install flask-sijax
Configuration
SIJAX_STATIC_PATH − the static path where you want the Sijax javascript files to be mirrored. The default location is static/js/sijax. In this folder, sijax.js and json2.js files are kept.
SIJAX_JSON_URI − the URI to load the json2.js static file from
Sijax uses JSON to pass the data between the browser and the server. This means that the browsers need either to support JSON natively or get JSON support from the json2.js file.
Functions registered that way cannot provide Sijax functionality, because they cannot be accessed using a POST method by default (and Sijax uses POST requests).
To make a View function capable of handling Sijax requests, make it accessible via POST using @app.route('/url', methods = ['GET', 'POST']) or use the @flask_sijax.route helper decorator like this −
@flask_sijax.route(app, '/hello')
Every Sijax handler function (like this one) receives at least one parameter automatically, much like Python passes self to the object methods. The obj_response parameter is the function's way of talking back to the browser.
def say_hi(obj_response):
   obj_response.alert('Hi there!')
When Sijax request is detected, Sijax handles it like this −
g.sijax.register_callback('say_hi', say_hi)
   return g.sijax.process_request()
Sijax Application
A minimal Sijax application code looks as follows −
import os
from flask import Flask, g
from flask_sijax import sijax

path = os.path.join('.', os.path.dirname(__file__), 'static/js/sijax/')
app = Flask(__name__)

app.config['SIJAX_STATIC_PATH'] = path
app.config['SIJAX_JSON_URI'] = '/static/js/sijax/json2.js'
flask_sijax.Sijax(app)

@app.route('/')
def index():
   return 'Index'

@flask_sijax.route(app, '/hello')
def hello():
   def say_hi(obj_response):
      obj_response.alert('Hi there!')
   if g.sijax.is_sijax_request:
      # Sijax request detected - let Sijax handle it
      g.sijax.register_callback('say_hi', say_hi)
      return g.sijax.process_request()
      return _render_template('sijaxexample.html')

if __name__ == '__main__':
   app.run(debug = True)
When a Sijax requests (a special jQuery.ajax() request) to the server, this request is detected on the server by g.sijax.is_sijax_request(), in which case you let Sijax handle the request.
All the functions registered using g.sijax.register_callback() are exposed for calling from the browser.
Calling g.sijax.process_request() tells Sijax to execute the appropriate (previously registered) function and return the response to the browser.
Flask Deployment
Externally Visible Server
A Flask application on the development server is accessible only on the computer on which the development environment is set up. This is a default behavior, because in debugging mode, a user can execute arbitrary code on the computer.
If debug is disabled, the development server on local computer can be made available to the users on network by setting the host name as 0.0.0.0.
app.run(host = 0.0.0.0)
Thereby, your operating system listens to all public IPs.
Deployment
To switch over from a development environment to a full-fledged production environment, an application needs to be deployed on a real web server. Depending upon what you have, there are different options available to deploy a Flask web application.
For small application, you can consider deploying it on any of the following hosted platforms, all of which offer free plan for small application.
- Heroku
- dotcloud
- webfaction
Flask application can be deployed on these cloud platforms. In addition, it is possible to deploy Flask app on Google cloud platform. Localtunnel service allows you to share your application on localhost without messing with DNS and firewall settings.
If you are inclined to use a dedicated web server in place of above mentioned shared platforms, following options are there to explore.
mod_wsgi
mod_wsgi is an Apache module that provides a WSGI compliant interface for hosting Python based web applications on Apache server.
Installing mod_wsgi
To install an official release direct from PyPi, you can run −
pip install mod_wsgi
To verify that the installation was successful, run the mod_wsgi-express script with the start-server command −
mod_wsgi-express start-server
This will start up Apache/mod_wsgi on port 8000. You can then verify that the installation worked by pointing your browser at −
http://localhost:8000/
Creating .wsgi file
There should be a yourapplication.wsgi file. This file contains the code mod_wsgi, which executes on startup to get the application object. For most applications, the following file should be sufficient −
from yourapplication import app as application
Make sure that yourapplication and all the libraries that are in use are on the python load path.
Configuring Apache
You need to tell mod_wsgi, the location of your application.
<VirtualHost *>
   ServerName example.com
   WSGIScriptAlias / C:\yourdir\yourapp.wsgi

   <Directory C:\yourdir>
      Order deny,allow
      Allow from all
   </Directory>

</VirtualHost>
Standalone WSGI containers
There are many popular servers written in Python that contains WSGI applications and serve HTTP.
- Gunicorn
- Tornado
- Gevent
- Twisted Web
Flask FastCGI
FastCGI is another deployment option for Flask application on web servers like nginix, lighttpd, and Cherokee.
Configuring FastCGI
First, you need to create the FastCGI server file. Let us call it yourapplication.fcgi.
from flup.server.fcgi import WSGIServer
from yourapplication import app

if __name__ == '__main__':
   WSGIServer(app).run()
nginx and older versions of lighttpd need a socket to be explicitly passed to communicate with the FastCGI server. For that to work, you need to pass the path to the socket to the WSGIServer.
WSGIServer(application, bindAddress = '/path/to/fcgi.sock').run()
Configuring Apache
For a basic Apache deployment, your .fcgi file will appear in your application URL e.g. example.com/yourapplication.fcgi/hello/. There are few ways to configure your application so that yourapplication.fcgi does not appear in the URL.
<VirtualHost *>
   ServerName example.com
   ScriptAlias / /path/to/yourapplication.fcgi/
</VirtualHost>
Configuring lighttpd
Basic configuration of lighttpd looks like this −
fastcgi.server = ("/yourapplication.fcgi" => ((
   "socket" => "/tmp/yourapplication-fcgi.sock",
   "bin-path" => "/var/www/yourapplication/yourapplication.fcgi",
   "check-local" => "disable",
   "max-procs" => 1
)))

alias.url = (
   "/static/" => "/path/to/your/static"
)

url.rewrite-once = (
   "^(/static($|/.*))$" => "$1",
   "^(/.*)$" => "/yourapplication.fcgi$1"
)
Remember to enable the FastCGI, alias and rewrite modules. This configuration binds the application to /yourapplication.
