- Flask - Home
- Flask - Overview
- Flask - Environment
- Flask - Application
- Flask - Routing
- Flask - Variable Rules
- Flask - URL Building
- Flask - HTTP Methods
- Flask - Templates
- Flask - Static Files
- Flask - Request Object
- Sending Form Data to Template
- Flask - Cookies
- Flask - Sessions
- Flask - Redirect & Errors
- Flask - Message Flashing
- Flask - File Uploading
- Flask - Extensions
- Flask - Mail
- Flask - WTF
- Flask - SQLite
- Flask - SQLAlchemy
- Flask - Sijax
- Flask - Deployment
- Flask - FastCGI
Flask Mail
A web based application is often required to have a feature of sending mail to the users/clients. Flask-Mail extension makes it very easy to set up a simple interface with any email server.
At first, Flask-Mail extension should be installed with the help of pip utility.
pip install Flask-Mail
Then Flask-Mail needs to be configured by setting values of the following application parameters.
| Sr.No | Parameters & Description |
|---|---|
| 1 |
MAIL_SERVER Name/IP address of email server |
| 2 |
MAIL_PORT Port number of server used |
| 3 |
MAIL_USE_TLS Enable/disable Transport Security Layer encryption |
| 4 |
MAIL_USE_SSL Enable/disable Secure Sockets Layer encryption |
| 5 |
MAIL_DEBUG Debug support. Default is Flask applications debug status |
| 6 |
MAIL_USERNAME User name of sender |
| 7 |
MAIL_PASSWORD password of sender |
| 8 |
MAIL_DEFAULT_SENDER sets default sender |
| 9 |
MAIL_MAX_EMAILS Sets maximum mails to be sent |
| 10 |
MAIL_SUPPRESS_SEND Sending suppressed if app.testing set to true |
| 11 |
MAIL_ASCII_ATTACHMENTS If set to true, attached filenames converted to ASCII |
The flask-mail module contains definitions of the following important classes.
Mail class
It manages email-messaging requirements. The class constructor takes the following form −
flask-mail.Mail(app = None)
The Constructor takes the Flask application object as a parameter.
Methods of Mail class
| Sr.No | Methods & Description |
|---|---|
| 1 |
send() Sends contents of Message class object |
| 2 |
connect() Opens connection with mail host |
| 3 |
send_message() Sends message object |
Message class
It encapsulates an email message. Message class constructor has several parameters −
flask-mail.Message(subject, recipients, body, html, sender, cc, bcc,
   reply-to, date, charset, extra_headers, mail_options, rcpt_options)
Message class methods
attach() − adds an attachment to message. This method takes the following parameters −
filename − name of file to attach
content_type − MIME type of file
data − raw file data
disposition − content disposition, if any.
add_recipient() − adds another recipient to message
In the following example, SMTP server of Googles gmail service is used as MAIL_SERVER for Flask-Mail configuration.
Step 1 − Import Mail and Message class from flask-mail module in the code.
from flask_mail import Mail, Message
Step 2 − Then Flask-Mail is configured as per following settings.
app.config['MAIL_SERVER']='smtp.gmail.com'
app.config['MAIL_PORT'] = 465
app.config['MAIL_USERNAME'] = 'yourId@gmail.com'
app.config['MAIL_PASSWORD'] = '*****'
app.config['MAIL_USE_TLS'] = False
app.config['MAIL_USE_SSL'] = True
Step 3 − Create an instance of Mail class.
mail = Mail(app)
Step 4 − Set up a Message object in a Python function mapped by URL rule (/).
@app.route("/")
def index():
   msg = Message('Hello', sender = 'yourId@gmail.com', recipients = ['id1@gmail.com'])
   msg.body = "This is the email body"
   mail.send(msg)
   return "Sent"
Step 5 − The entire code is given below. Run the following script in Python Shell and visit http://localhost:5000/.
from flask import Flask
from flask_mail import Mail, Message

app =Flask(__name__)
mail=Mail(app)

app.config['MAIL_SERVER']='smtp.gmail.com'
app.config['MAIL_PORT'] = 465
app.config['MAIL_USERNAME'] = 'yourId@gmail.com'
app.config['MAIL_PASSWORD'] = '*****'
app.config['MAIL_USE_TLS'] = False
app.config['MAIL_USE_SSL'] = True
mail = Mail(app)

@app.route("/")
def index():
   msg = Message('Hello', sender = 'yourId@gmail.com', recipients = ['id1@gmail.com'])
   msg.body = "Hello Flask message sent from Flask-Mail"
   mail.send(msg)
   return "Sent"

if __name__ == '__main__':
   app.run(debug = True)
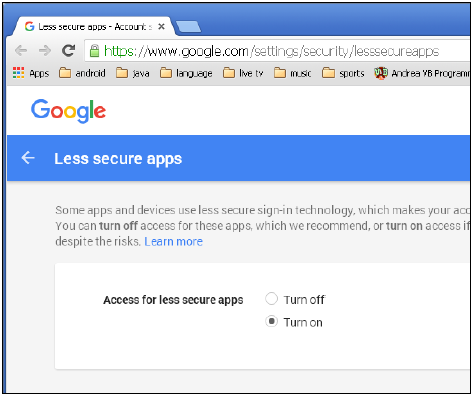
Note that the built-insecurity features in Gmail service may block this login attempt. You may have to decrease the security level. Please log in to your Gmail account and visit this link to decrease the security.