- DAX - Home
- DAX - Overview
- DAX - Calculated Columns
- DAX - Calculated Fields / Measures
- DAX - Editing a Calculated Field
- DAX - Deleting a Calculated Field
- DAX - Syntax
- DAX - Operators
- DAX - Standard Parameters
- DAX - Functions
- DAX - Understanding DAX Functions
- DAX - Evaluation Context
- DAX - Formulas
- Updating Results of DAX Formulas
- Updating Data in the Data Model
- DAX - Recalculating DAX Formulas
- Troubleshooting DAX Formula Recalculation
- DAX - Formula Errors
- DAX - Time Intelligence
- DAX - Filter Functions
- DAX - Scenarios
- Performing Complex Calculations
- DAX - Working with Text and Dates
- Conditional Values & Testing for Errors
- DAX - Using Time Intelligence
- DAX - Ranking & Comparing Values
Excel DAX - Updating Data in the Data Model
DAX is used for calculations on the data in the Data Model in Excel Power Pivot. DAX enables data modeling and reporting activities to be handled in an effective way. However, this requires updating the data in the Data Model from time to time so as to reflect the current data.
You can import data from an external data source into the Data Model of your workbook by establishing a data connection. You can update the data from the source whenever you choose. This option is handy if you are getting data from relational databases that contain live sales information or data feeds that are updated several times a day.
Different Ways of Updating Data in the Data Model
You can update the data in the Data Model in the following ways −
- Refreshing data in the Data Model from time to time.
- Making changes to data sources, such as connection properties.
- Updating the data in the Data Model after the source data has changed.
- Filtering the data to selectively load rows from a table in the data source.
Refreshing Data in the Data Model
In addition to getting updated data from an existing source, you will need to refresh data in your workbook whenever you make changes to the schema of the source data. These changes can include adding columns or tables, or changing the rows that are imported.
Note that addition of data, changing data, or editing filters always triggers recalculation of DAX formulas that depend on that data source. Refer to the chapter Recalculating DAX Formulas for details.
You have two types of data refresh in Data Model −
Manual Refresh
If you choose manual refresh option, you can refresh the data in the Data Model manually at any time. You can refresh all data, which is the default, or you can manually choose the tables and columns to refresh for individual data sources.
Automatic or Scheduled Refresh
If you have published your workbook to a PowerPivot Gallery or SharePoint site that supports PowerPivot, you or the SharePoint administrator can create a schedule for automatically updating the data in the workbook. In such a case, you can schedule unattended data refresh on the server.
Manually Refreshing an Existing Data Source
You can manually refresh your data any time, if you need to update the data from an existing data source or get the recent data for designing new DAX formulas. You can refresh a single table, all tables that share the same data connection or all tables in the Data Model.
If you have imported data from a relational data source, such as SQL Server and Oracle, you can update all the related tables in one operation. The operation of loading new or updated data into the Data Model often triggers recalculation of DAX formulas, both of which might require some time to complete. Hence, you should be aware of the potential impact before you change data sources or refresh the data that is obtained from the data source.
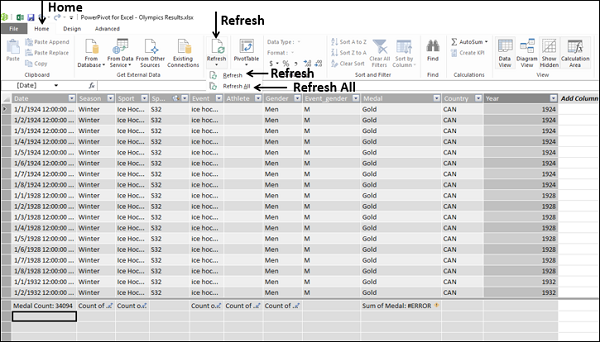
To refresh data for a single table or all tables in a Data Model, do the following −
- Click the Home tab on the Ribbon in the Power Pivot window.
- Click Refresh.
- Click Refresh in the dropdown list for refreshing the selected table.
- Click Refresh All in the dropdown list for refreshing all the tables.
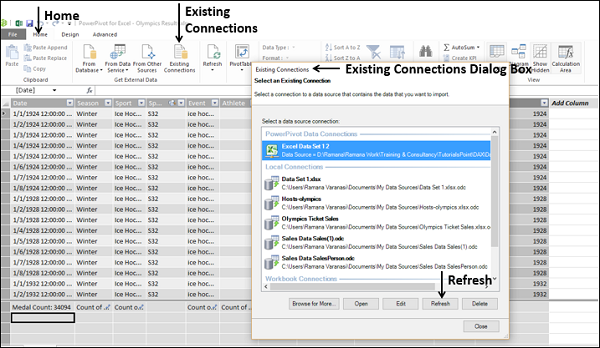
To refresh data for all tables that use the same connection in a Data Model, do the following −
- Click the Home tab on the Ribbon in Power Pivot window.
- Click the Existing Connections in the Get External Data group.
Existing Connections dialog box appears.
- Select a connection.
- Click the Refresh button.
Data Refresh dialog box appears and data refresh progress information is displayed as the PowerPivot engine reloads data from the selected table or from all tables from the data source.
There are three possible outcomes −
Success − Reports on the number of rows imported into each table.
Error − An error can occur if the database is offline, you no longer have permissions. A table or column is deleted or renamed in the source.
Cancelled − This means Excel did not issue the refresh request, probably because refresh is disabled on the connection.
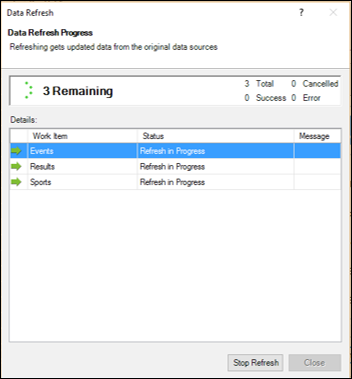
Click the Close button.
Changing a Data Source
To change the data in your Data Model, you can edit the connection information or update the definition of the tables and columns used in your Data Model in the Power Pivot window.
You can make the following changes to the existing data sources −
Connections
- Edit the database name or the server name.
- Change the name of the source text file, spreadsheet, or data feed.
- Change the location of the data source.
- For relational data sources, change the default catalog or initial catalog.
- Change the authentication method or the credentials used to access the data.
- Edit advanced properties on the data source.
Tables
- Add or remove a filter on the data.
- Change the filter criteria.
- Add or remove tables.
- Change the table names.
- Edit mappings between tables in the data source and tables in the Data Model.
- Select different columns from the data source.
Columns
- Change the column names.
- Add new columns.
- Delete columns from the Data Model (does not affect the data source).
You can edit the properties of an existing data source in the following ways −
You can change the connection information, including the file, feed, or database used as a source, its properties or other provider specific connection options.
You can change the table and column mappings and remove references to columns that are no longer used.
You can change the tables, views, or columns that you get from the external data source.
Modifying a Connection to an Existing Data Source
You can modify the connection that you have created to an external data source by changing the external data source used by the current connection. However, the procedure to be followed depends on the data source type.
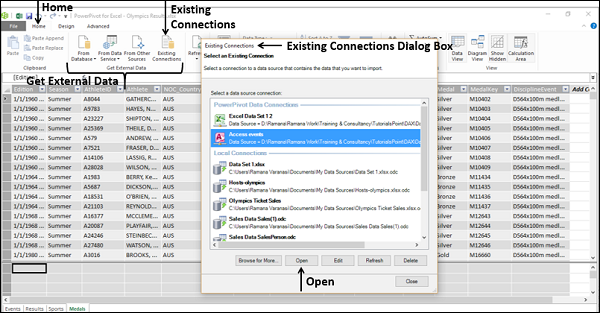
- Click the Home tab on the Ribbon in the PowerPivot window.
- Click the Existing Connections in the Get External Data group.
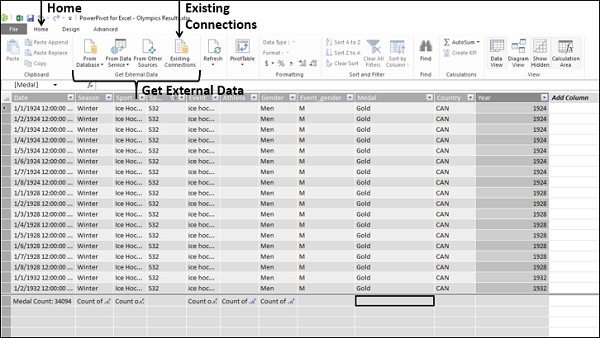
Existing Connections dialog box appears. Select the connection that you want to modify.
Depending on the type of the data source you are changing, the provider might be different. Also the properties that are available may require change. Consider a simple example of a connection to an Excel workbook that contains the data.

Click the Edit button. Edit Connection dialog box appears.
Click the Browse button to locate another database of the same type (Excel workbook in this example), but with a different name or location.
Click the Open button.
The new file will get selected. A message appears stating that you have modified connection information and you need to save and refresh the tables to verify the connection.
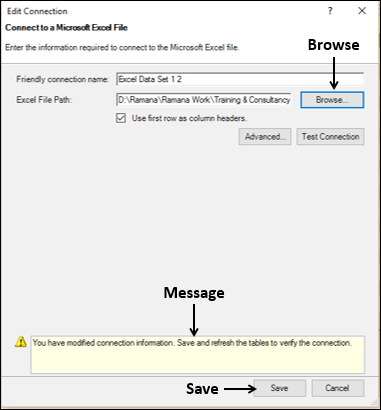
Click the Save button. You will be back in the Existing Connections dialog box.
Click the Refresh button. Data Refresh dialog box appears displaying the data refresh progress. The status of data refresh will be displayed. Refer to the section - Manually Refreshing an Existing Data Source for details.
Click Close, once the data refresh is a success.
Click Close in the Existing Connections dialog box.
Editing Table and Column Mappings (Bindings)
To edit the column mappings when a data source changes, do the following −
Click the tab that contains the table you want to modify in the Power Pivot window.
Click the Design tab on the Ribbon.
Click the Table Properties.
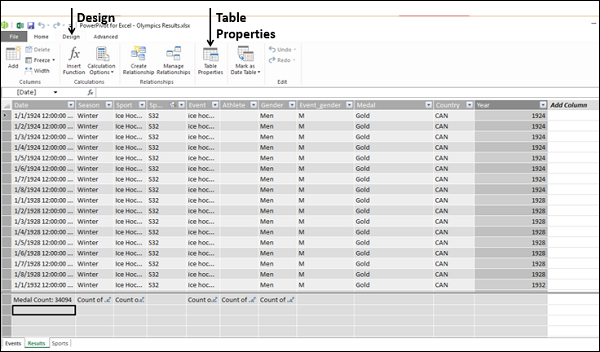
Edit Table Properties dialog box appears.
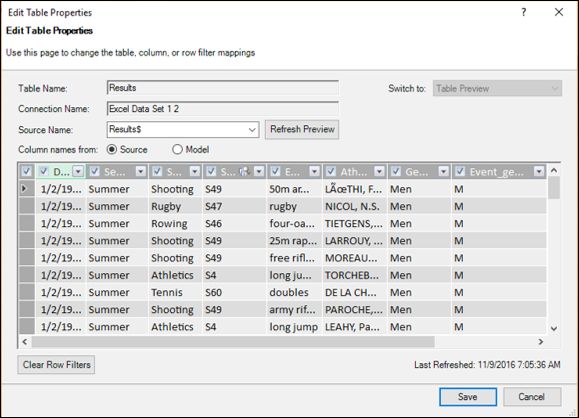
You can observe the following −
The name of the selected table in the Data Model is displayed in the Table Name box.
The name of the corresponding table in the external data source is displayed in the Source Name box.
There are two options for column names from Source and Modal.
If the columns are named differently in the data source and in the Data Model, you can toggle between the two sets of column names by selecting these options.
Preview of the selected table appears in the dialog box.
You can edit the following −
To change the table that is used as a data source, select a different table than the selected one in the Source Name dropdown list.
Change the column mappings if needed −
To add a column that is present in the source but not in the Data Model, select the checkbox beside the column name. Repeat for all the columns that are to be added. The actual data will be loaded into the Data Model, the next time you refresh.
If some columns in the Data Model are no longer available in the current data source, a message appears in the notification area that lists the invalid columns. You do not need to do anything.
Click the Save button.
When you save the current set of table properties, you will get a message Please wait. Then the number of rows retrieved will be displayed.
In the table in the Data Model, any invalid columns are automatically removed and new columns are added.
Changing a Column Name and Data Type
You can change the name of a column in a table in the Data Model as follows −
Double-click on the header of the column. The name of the column in the header will get highlighted.
Type the new column name, overwriting the old name. Alternatively, you can change the name of a column in a table in the Data Model as follows:
Select the column by clicking on its header.
Right-click the column.
Click Rename Column in the dropdown list.
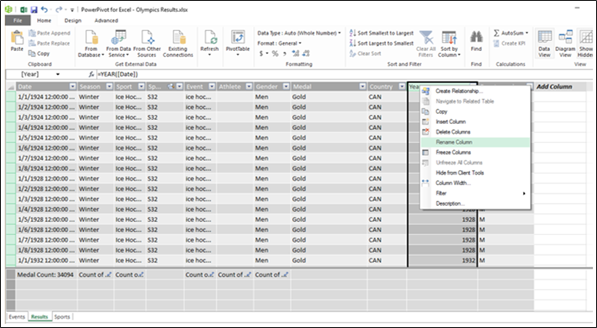
The name of the column in the header will get highlighted. Type the new column name, overwriting the old name.
As you have learnt, all the values in a column in a table in the Data Model must be of the same data type.
To change the data type of a column, do the following −
Select the column that you want to change by clicking its header.
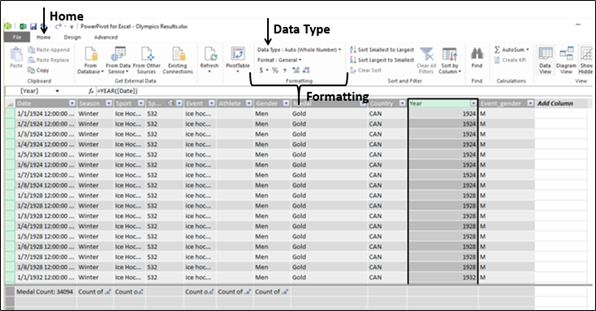
Click the Home tab on the Ribbon.
Click the controls in the Formatting group to modify the column's data type and format.
Adding / Changing a Filter to a Data Source
You can add a filter to a data source when you import data to restrict the number of rows in the table in the Data Model. Later, you can add more rows or decrease the number of rows in the table in the Data Model by changing the filter that you defined earlier.
Adding a Filter to a Data Source During Import
To add a new filter to a data source during data import, do the following −
- Click the Home tab on the Ribbon in Power Pivot window.
- Click one of the data sources in the Get External Data group.
Table Import Wizard dialog box appears.
- Proceed to the step Select Tables and Views.
- Select a table and then click Preview & Filter.
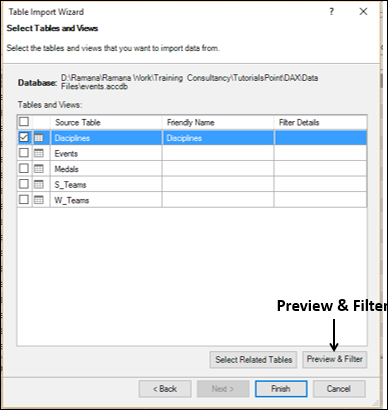
Preview Selected Table dialog box appears.
- Click the column on which you want to apply filter.
- Click the down arrow to the right of the column heading.
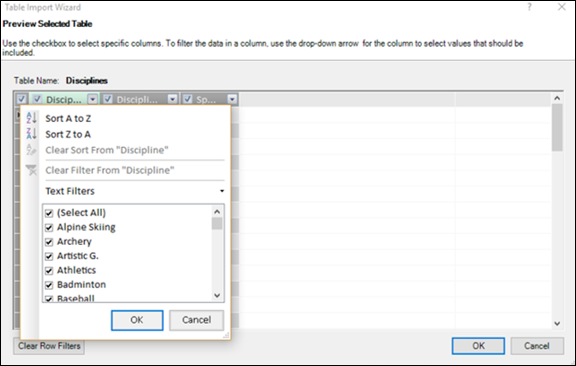
To add a filter, do one of the following −
In the list of column values, select or clear one or more values to filter by and then click OK.
However, if the number of values is extremely large, individual items might not be shown in the list. Instead, you will see the message - "Too many items to show."
Click Number Filters or Text Filters (depending on the data type of the column).
Then, click one of the comparison operator commands (such as Equals), or click Custom Filter. In the Custom Filter dialog box, create the filter and then click OK.
Note − If you make a mistake at any stage, click the Clear Row Filters button and start over.
- Click OK. You will be back to Select Tables and Views page of Table Import Wizard.
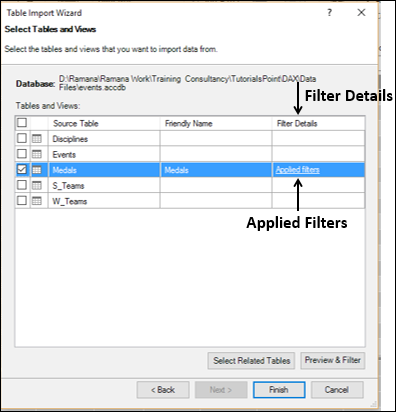
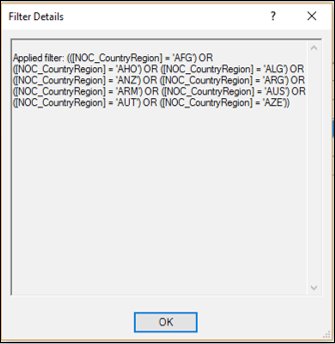
As you can observe, in the column Filter Details, a link Applied Filters appears for the column on which you defined the filter.
You can click the link to view the filter expression that was built by the wizard. But, the syntax for each filter expression depends on the provider and you cannot edit it.
- Click Finish to import the data with filters applied.
- Close the Table Import Wizard.
Changing a Filter to an Existing Data Source
After you have imported the data, you might have to update it from time to time, by either adding more rows or by restricting the existing rows in the table. In such a case, you can change the existing filters on the table or add new filters.
Click the Home tab on the Ribbon in Power Pivot window.
Click the Existing Connections in the Get External Data group. Existing Connections dialog box appears.
Click the connection that contains the table on which you have to change the filter.
Click the Open button.
You will get into Table Import Wizard dialog box. Repeat the steps in the previous section to filter the columns.
