 Data Structure
 Networking
 RDBMS
RDBMS Operating System
 Java
Java MS Excel
 iOS
iOS HTML
HTML CSS
CSS Android
 Python
 C Programming
 C++
C++ C#
C# MongoDB
 MySQL
MySQL Javascript
 PHP
PHP
- Selected Reading
- UPSC IAS Exams Notes
- Developer's Best Practices
- Questions and Answers
- Effective Resume Writing
- HR Interview Questions
- Computer Glossary
- Who is Who
Constrain a number within a given range in Arduino
The constrain() function in Arduino helps to, as the name suggests, constrain a number between an upper bound and a lower bound.
Syntax
constrain(val, min, max)
where, val is the number to be constrained, min is the lower bound value, and max is the upper bound value
If val is less than min, this function will return min. If val is greater than max, this function will return max. As long as val is between min and max, this function will return val.
Example
The following example illustrates the use of this function −
void setup() {
   // put your setup code here, to run once:
   Serial.begin(9600);
   Serial.println();

   int a = 200;
   Serial.println(constrain(a, 5, 210));
   Serial.println(constrain(a, 300, 400));
   Serial.println(constrain(a, 100, 150));
}

void loop() {
   // put your main code here, to run repeatedly:
}
Output
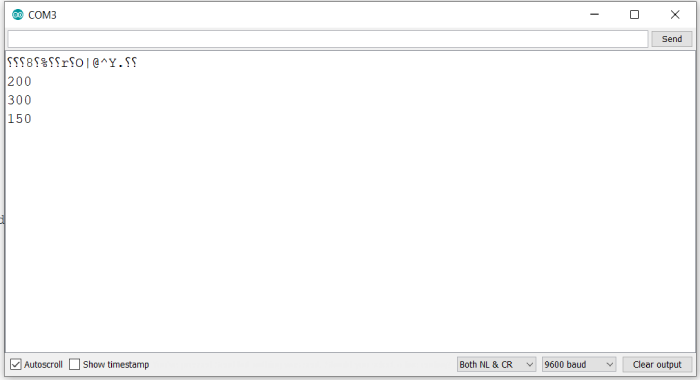
The Serial Monitor output is shown below −

As you can see, in the first case, the integer a was within bounds, so it got returned. In the second case, a was less than the lower bound, hence the lower bound got returned, and in the third case, a was higher than the upper bound, hence the upper bound was returned.
Please note that as per Arduino’s documentation (https://docs.arduino.cc/language-reference/en/functions/math/constrain/) it is recommended to avoid using another function within constrain.
This constrain (analogRead(A0), 10,50); may yield incorrect results. Instead, you can try −
int a = analogRead(A0);
int a_constr = constrain(a, 10, 50);

