 Data Structure
 Networking
 RDBMS
RDBMS Operating System
 Java
Java MS Excel
 iOS
iOS HTML
HTML CSS
CSS Android
 Python
 C Programming
 C++
C++ C#
C# MongoDB
 MySQL
MySQL Javascript
 PHP
PHP
- Selected Reading
- UPSC IAS Exams Notes
- Developer's Best Practices
- Questions and Answers
- Effective Resume Writing
- HR Interview Questions
- Computer Glossary
- Who is Who
Build a Site Bookmark App with JavaScript by using Local Storage
In this tutorial, we'll use JavaScript, CSS, and HTML to build a Site Bookmark app. Through the use of our browser's local storage, we will be able to store links to our favourite websites without having to use any databases.
We can store data client-side thanks to Local Storage, also referred to as the web storage API. Strings are used to represent the data in local storage, which is persistent even when the session is closed. Data can only be deleted manually by the user. Since all of the data is stored on the client side, there is a clear restriction on how long the numbers may be. Depending on the browser we use, we can currently store data in sizes ranging from 2 MB to 10 MB.
Strategy ? The Bookmark App we are creating can perform the following functions ?
The user's entered name and a website link are added to a new bookmark.
The ability to access the webpage
The bookmark is deleted
When saving bookmarks, save all them permanently to LocalStorage.
Following are the file structure and the file names ?
index.html
style.css
main.js
The structure or layout of the web page will be designed using HTML. This consists of following sections ?
Heading ? This contains our website's header. "Build a Site Bookmark App with JavaScript by using Local Storage - TutorialsPoint" is the heading here.
Container ? Both the form and the bookmarks section are included.
Form ? It has two input boxes for the link and site name. One "save" button is also provided for submitting the form.
Bookmarks ? This area, which will vary dynamically depending on input, will hold all of our saved bookmarks.
Example
<!DOCTYPE html>
<html>
<title>Build a Site Bookmark App with JavaScript by using Local Storage - TutorialsPoint</title>
<head>
   <meta charset="UTF-8">
   <meta http-equiv="X-UA-Compatible" content="IE=edge">
   <meta name="viewport" content="width=device-width, initial-scale=1.0">

   <!-- link the CSS file here -->
   <link rel="stylesheet" type="text/css" href="style.css">
</head>
<body>
   <h1>App for Bookmarking Sites on Tutorialspoint!</h1>
   <div class="container">

      <!-- form for entering site information -->
      <form class="form" action="#">
         <div class="input-field">
            <label for="site_name">Site Name</label>
            <input name="site_name" type="text" placeholder="name">
         </div>
         <div class="input-field">
            <label for="url">Site URL</label>
            <input name="url" type="text" placeholder="https://www.mysite.com">
         </div>
         <button class="save_button">Save</button>
      </form>

      <!-- the area in which bookmarks will be shown -->
      <h2>Saved Bookmarks</h2>
      <div class="view_bookmarks"></div>
   </div>

   <!-- link the JavaScript file here -->
   <script src="./main.js"></script>
</body>
</html>
Styling CSS ? The various components are styled and made more visually pleasing using CSS.
The flex layout is used to display the part with the form and view_bookmarks.
Depending on the current situation, each bookmark will be dynamically either added or removed.
*{
   box-sizing: border-box;
   font-family: sans-serif;
}
body{
   margin: 0;
   padding: 0;
   background-color: #979090;
}
a{
   text-decoration: none;
   color: #fff;
}

/*Title style*/
h1{
   width: 100%;
   height: 85px;
   text-align: center;
   line-height: 85px;
   margin: 0;
   padding: 0;
   background-color: #37abbb;
   letter-spacing: 2px;
   word-spacing: 8px;
   color: #fff;
}
h2{
   color: #fff;
   padding-left: 30px;
}
.container{
   width: 620px;
   min-height: 160px;
   background-color: #464040;
   margin: 0 auto;
}

/*form section style*/
.form{
   width: 100%;
   height: auto;
   background-color: #37abbb;
   padding: 38px 48px;
   margin: 20px 0;
}
.input-field{
   display: flex;
   flex-direction: column;
   align-items: center;
   margin-bottom: 15px;
}
.input-field input[type="text"]{
   width: 245px;
   height: 26px;
   outline: none;
   border: none;
   background-color: #fff;
   border-bottom: 2px solid #fff;
   padding-left: 10px;
   color: #000000;
}
.input-field label{
   color: #fff;
   font-weight: bold;
   margin-bottom: 5px;
}
.save_button{
   display: block;
   margin: 0 auto;
   border: none;
   width: 69px;
   height: 26px;
   background-color: #fff;
   color: #000;
   cursor: pointer;
   outline: none;
   font-weight: 500;
}

/*Bookmarks section style*/
.view_bookmarks{
   width: 100%;
   background-color: #37abbb;
   padding: 20px;
}
.btn_bookmark{
   display: flex;
   align-items: center;
   width: 305px;
   height: 42px;
   padding: 5px 20px;
   background-color: #37abbb;
   margin-bottom: 10px;
   background-color: #464040;
}
.btn_bookmark span{
   flex: 1;
   font-weight: bold;
   letter-spacing: 1.5px;
   color: #fff;
}
.btn_bookmark .visit{
   width: 52px;
   height: 26px;
   line-height: 25px;
   text-align: center;
   background-color: #37abbb;
   color: #fff;
   border-radius: 5px;
   margin: 0 5px;
   font-weight: 500;
}
.btn_bookmark .delete{
   width: 62px;
   height: 26px;
   line-height: 25px;
   text-align: center;
   background-color: #e91e63;
   border-radius: 5px;
   font-weight: 500;
}
Functionality ? JavaScript is used to implement the app's primary logic. The app has a number of interconnected features.
Stage 1 (choosing each component and defining the variables) ?
Getting a reference for everything we require from the DOM is the very first thing we require. The querySelector() method is used to choose the necessary HTML layout elements.
This will take input fields like "mySiteName" and "url," ".view_bookmarks," and ".save button" from the DOM and save them in related variables.
They are given variable names such that they can be accessed and changed with convenience.
Define bookmark objects for our local storage as well, which will keep all of your bookmarks.
// choosing the save button
let button = document.querySelector(".save_button");

// Choose the input field.
let siteName = document.querySelector("[name='mySiteName']");
let url = document.querySelector("[name='url']");

// Choose the div with the "bookmarks" class.
let view_bookmarksSection = document.querySelector(".view_bookmarks");

// Keeping bookmarked pages in local storage
if(typeof(localStorage.btn_bookmark) == "undefined"){
   localStorage.btn_bookmark = "";
}
Stage 2 (obtaining values and configuring validation for event submission in form) ?
For the save button, we have an EventListener that watches for form click events. The function will start working whenever a click event takes place.
The page will load again each time the form is submitted. Therefore, we call e.preventDefault() to stop that.
The siteName.value and url.value variables can be used to retrieve the user's entered name and url, respectively.
To make sure we're not saving anything twice and that our form isn't empty, some validation is included.
Pass the user-entered value to the addBookmark() function following thorough validation.
Remember ? The setItem() method, which needs a key and a value, allows us to save items on local storage. In this case, "localStorage.bookmark" is being used to automatically construct a bookmark as a key in our localStorage.
// listener for the form to submit
button.addEventListener("click", function(e){
// Stop the page from refreshing after you submit the form.
   e.preventDefault();
   let patterURL = /https?:\/\/(www\.)?[-a-zA-Z0-9@:%._\+~#=]{2,256}\.[a-z]{2,6}\b([-a-zA-Z0-9@:%_\+.~#?&//=]*)?/gi;
   let arrayItems, check = false, adr, itemAdr;

   // this is Form and URL validation
   if(siteName.value === ""){
      alert("you must fill the siteName input");
   } else if(url.value === ""){
      alert("you must fill the url input");
   } else if(!patterURL.test(url.value)){
      alert("you must enter a valid url");
   } else{
      arrayItems = localStorage.btn_bookmark.split(";");
      adr = url.value;
      adr = adr.replace(/http:\/\/|https:\/\//i, "");
      arrayItems.length--;

      // See if the URL has already been bookmarked
      for(item of arrayItems){
         itemAdr = item.split(',')[1].replace(/http:\/\/|https:\/\//i,"");
         if(itemAdr == adr){
            check = true;
         }
      }
      if(check == true){
         alert("This website is already bookmarked");
      }
      else{

         // If everything is in order, add the bookmark to local storage
         localStorage.btn_bookmark += `${siteName.value},${url.value};`;
         addBookmark(siteName.value, url.value);
         siteName.value = "";
         url.value = "";
      }
   }
});
Stage 3 Add bookmarks on our website ? The site name and url will be sent as arguments to this addBookmark() function. Therefore ?
creates a fresh bookmark object.
This object has the properties visit and delete, as well as the attributes name and URL.
After that, it includes that object into the HTML page's bookmarks area.
The fetchBookmark() function will then be called. Every item is rendered towards the screen via this function.
// Adding the bookmark functionality
function addBookmark(name, url){
   let dataLink = url;

   // Once a bookmark is retrieved, it is displayed in a
   // div with a button to visit the link or delete it
   if(!url.includes("http")){
      url = "//" + url;
   }
   let item = `<div class="btn_bookmark">
      <span>${name}</span>
      <a class="visit" href="${url}" target="_blank"
         data-link='${dataLink}'>Visit</a>
      <a onclick="removeBookmark(this)"
         class="delete" href="#">Delete</a>
   </div>`;
   view_bookmarksSection.innerHTML += item;
}
Stage 4 Now that we can add bookmarks and store them in localStorage, we can render the saved bookmarks. However, even if bookmarks are preserved in localStorage, they all vanish from the website as we refresh the page or start a new session.
This means that we must use the fetchBookmark() function to retrieve the bookmarks from localStorage in order to retain them.
To begin with, we will determine whether the defined bookmark key is empty or not. When it isn't empty ?
Using the split() method, we will compile all bookmarks into an array.
After that, we'll loop through all of the items. And we'll retrieve the name and link for each bookmark.
By using addBookmark() function, we would display these items.
// function to render the bookmarks you've stored
(function fetchBoookmark(){
   if(typeof(localStorage.btn_bookmark) != "undefined" && localStorage.btn_bookmark !== ""){
      let arrayItems = localStorage.btn_bookmark.split(";");
      arrayItems.length--;
      for(item of arrayItems){
         let itemSpli = item.split(',');
         addBookmark(itemSpli[0], itemSpli[1]);
      }
   }
})();
Stage 5 (Delete bookmarks) ? Visiting a link is simple; we just follow the URL. However, to delete a bookmark, we must first locate the particular URL in our localStorage and then take it out of the object.
We will create the removeBookmark() function to do that.
We will first get every bookmark out of local storage and put them in an array.
The array's elements are removed using the splice() method, which then returns the modified item (s).
Additionally, to remove child nodes out from bookmarks parent node, we can use the removeChild() method.
// Perform the bookmark removal function

function removeBookmark(thisItem){
   let arrayItems = [],
   index,
   item = thisItem.parentNode,
   itemURL = item.querySelector(".visit").dataset.link,
   itemName = item.querySelector("span").innerHTML;
   arrayItems = localStorage.btn_bookmark.split(";");
   for(i in arrayItems){
      if(arrayItems[i] == `${itemName},${itemURL}`){
         index = i;
         break;
      }
   }

   // localStorage should be updated
   index = arrayItems.indexOf(`${itemName},${itemURL}`);
   arrayItems.splice(index,1);
   localStorage.btn_bookmark = arrayItems.join(";");

   // bookmark Section should be updated
   view_bookmarksSection.removeChild(item);
}
Output
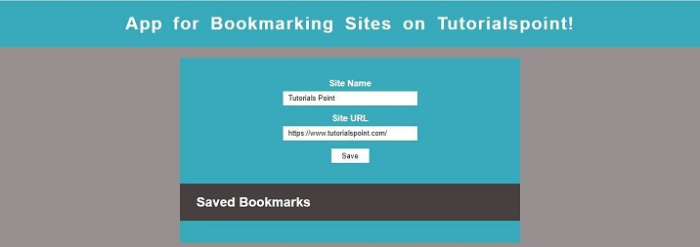
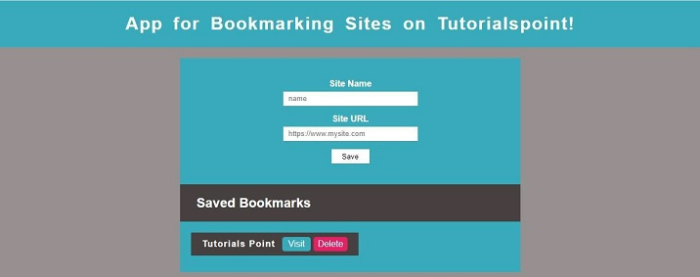
The above code will give the below output ?
The Site Bookmarker software is now ready, as you can see in the output. Additionally, as displayed below, you may view the bookmarks that have been saved in localStorage ?
Basic functionality, such as adding, storing, and removing using local storage, is provided by this App for Bookmarking Sites on Tutorials point. You can be imaginative and provide edit function functionality or make collections using the nested list to save bookmarks.
Before bookmarking the sites as shown below ?

After bookmarking the sites as shown below ?


