- AVRO By Generating a Class
- Serialization by Generating Class
- Deserialization by Generating Class
- AVRO Using Parsers Library
- Serialization Using Parsers
- Deserialization Using Parsers
- AVRO Useful Resources
- AVRO - Quick Guide
- AVRO - Useful Resources
- AVRO - Discussion
AVRO - Serialization By Generating Class
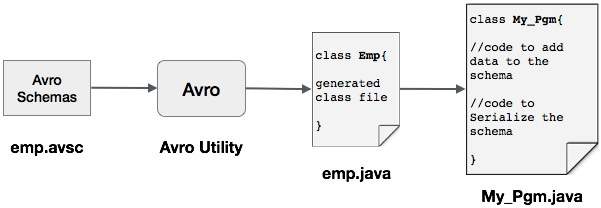
One can read an Avro schema into the program either by generating a class corresponding to a schema or by using the parsers library. This chapter describes how to read the schema by generating a class and Serializing the data using Avr.
Serialization by Generating a Class
To serialize the data using Avro, follow the steps as given below −
Write an Avro schema.
Compile the schema using Avro utility. You get the Java code corresponding to that schema.
Populate the schema with the data.
Serialize it using Avro library.
Defining a Schema
Suppose you want a schema with the following details −
| Field | Name | id | age | salary | address |
| type | String | int | int | int | string |
Create an Avro schema as shown below.
Save it as emp.avsc.
{
   "namespace": "tutorialspoint.com",
   "type": "record",
   "name": "emp",
   "fields": [
      {"name": "name", "type": "string"},
      {"name": "id", "type": "int"},
      {"name": "salary", "type": "int"},
      {"name": "age", "type": "int"},
      {"name": "address", "type": "string"}
   ]
}
Compiling the Schema
After creating an Avro schema, you need to compile the created schema using Avro tools. avro-tools-1.7.7.jar is the jar containing the tools.
Syntax to Compile an Avro Schema
java -jar <path/to/avro-tools-1.7.7.jar> compile schema <path/to/schema-file> <destination-folder>
Open the terminal in the home folder.
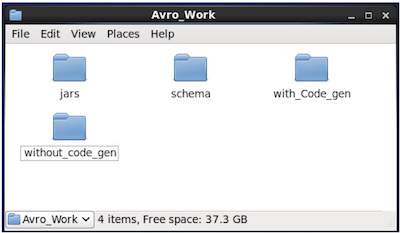
Create a new directory to work with Avro as shown below −
$ mkdir Avro_Work
In the newly created directory, create three sub-directories −
First named schema, to place the schema.
Second named with_code_gen, to place the generated code.
Third named jars, to place the jar files.
$ mkdir schema
$ mkdir with_code_gen
$ mkdir jars
The following screenshot shows how your Avro_work folder should look like after creating all the directories.
Now /home/Hadoop/Avro_work/jars/avro-tools-1.7.7.jar is the path for the directory where you have downloaded avro-tools-1.7.7.jar file.
/home/Hadoop/Avro_work/schema/ is the path for the directory where your schema file emp.avsc is stored.
/home/Hadoop/Avro_work/with_code_gen is the directory where you want the generated class files to be stored.
Now compile the schema as shown below −
$ java -jar /home/Hadoop/Avro_work/jars/avro-tools-1.7.7.jar compile schema /home/Hadoop/Avro_work/schema/emp.avsc /home/Hadoop/Avro/with_code_gen
After compiling, a package according to the name space of the schema is created in the destination directory. Within this package, the Java source code with schema name is created. This generated source code is the Java code of the given schema which can be used in the applications directly.
For example, in this instance a package/folder, named tutorialspoint is created which contains another folder named com (since the name space is tutorialspoint.com) and within it, you can observe the generated file emp.java. The following snapshot shows emp.java −
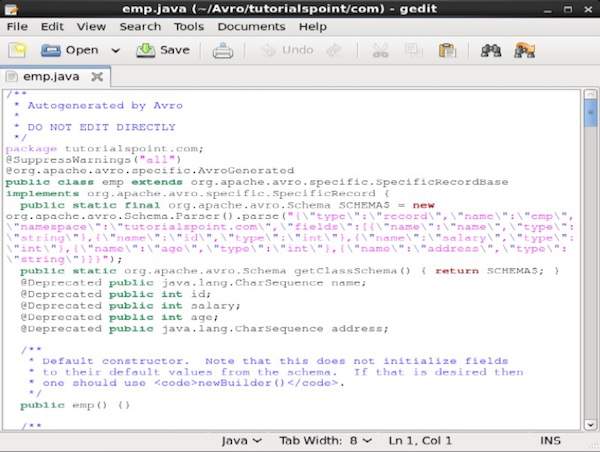
This class is useful to create data according to schema.
The generated class contains −
- Default constructor, and parameterized constructor which accept all the variables of the schema.
- The setter and getter methods for all variables in the schema.
- Get() method which returns the schema.
- Builder methods.
Creating and Serializing the Data
First of all, copy the generated java file used in this project into the current directory or import it from where it is located.
Now we can write a new Java file and instantiate the class in the generated file (emp) to add employee data to the schema.
Let us see the procedure to create data according to the schema using apache Avro.
Step 1
Instantiate the generated emp class.
emp e1=new emp( );
Step 2
Using setter methods, insert the data of first employee. For example, we have created the details of the employee named Omar.
e1.setName("omar");
e1.setAge(21);
e1.setSalary(30000);
e1.setAddress("Hyderabad");
e1.setId(001);
Similarly, fill in all employee details using setter methods.
Step 3
Create an object of DatumWriter interface using the SpecificDatumWriter class. This converts Java objects into in-memory serialized format. The following example instantiates SpecificDatumWriter class object for emp class.
DatumWriter<emp> empDatumWriter = new SpecificDatumWriter<emp>(emp.class);
Step 4
Instantiate DataFileWriter for emp class. This class writes a sequence serialized records of data conforming to a schema, along with the schema itself, in a file. This class requires the DatumWriter object, as a parameter to the constructor.
DataFileWriter<emp> empFileWriter = new DataFileWriter<emp>(empDatumWriter);
Step 5
Open a new file to store the data matching to the given schema using create() method. This method requires the schema, and the path of the file where the data is to be stored, as parameters.
In the following example, schema is passed using getSchema() method, and the data file is stored in the path − /home/Hadoop/Avro/serialized_file/emp.avro.
empFileWriter.create(e1.getSchema(),new File("/home/Hadoop/Avro/serialized_file/emp.avro"));
Step 6
Add all the created records to the file using append() method as shown below −
empFileWriter.append(e1);
empFileWriter.append(e2);
empFileWriter.append(e3);
Example Serialization by Generating a Class
The following complete program shows how to serialize data into a file using Apache Avro −
import java.io.File;
import java.io.IOException;

import org.apache.avro.file.DataFileWriter;
import org.apache.avro.io.DatumWriter;
import org.apache.avro.specific.SpecificDatumWriter;

public class Serialize {
   public static void main(String args[]) throws IOException{

      //Instantiating generated emp class
      emp e1=new emp();

      //Creating values according the schema
      e1.setName("omar");
      e1.setAge(21);
      e1.setSalary(30000);
      e1.setAddress("Hyderabad");
      e1.setId(001);

      emp e2=new emp();

      e2.setName("ram");
      e2.setAge(30);
      e2.setSalary(40000);
      e2.setAddress("Hyderabad");
      e2.setId(002);

      emp e3=new emp();

      e3.setName("robbin");
      e3.setAge(25);
      e3.setSalary(35000);
      e3.setAddress("Hyderabad");
      e3.setId(003);

      //Instantiate DatumWriter class
      DatumWriter<emp> empDatumWriter = new SpecificDatumWriter<emp>(emp.class);
      DataFileWriter<emp> empFileWriter = new DataFileWriter<emp>(empDatumWriter);

      empFileWriter.create(e1.getSchema(), new File("/home/Hadoop/Avro_Work/with_code_gen/emp.avro"));

      empFileWriter.append(e1);
      empFileWriter.append(e2);
      empFileWriter.append(e3);

      empFileWriter.close();

      System.out.println("data successfully serialized");
   }
}
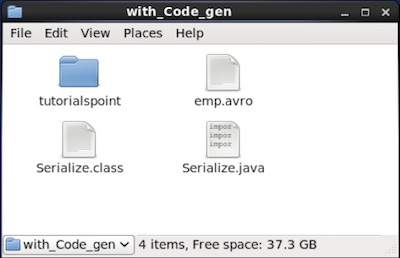
Browse through the directory where the generated code is placed. In this case, at home/Hadoop/Avro_work/with_code_gen.
In Terminal −
$ cd home/Hadoop/Avro_work/with_code_gen/
In GUI −
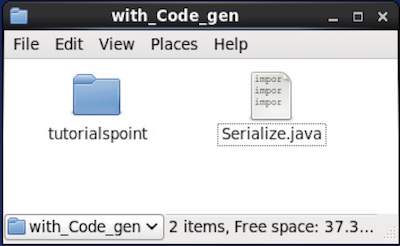
Now copy and save the above program in the file named Serialize.java
Compile and execute it as shown below −
$ javac Serialize.java
$ java Serialize
Output
data successfully serialized
If you verify the path given in the program, you can find the generated serialized file as shown below.