
 Data Structure
 Networking
 RDBMS
RDBMS Operating System
 Java
Java MS Excel
 iOS
iOS HTML
HTML CSS
CSS Android
 Python
 C Programming
 C++
C++ C#
C# MongoDB
 MySQL
MySQL Javascript
 PHP
PHP
- Selected Reading
- UPSC IAS Exams Notes
- Developer's Best Practices
- Questions and Answers
- Effective Resume Writing
- HR Interview Questions
- Computer Glossary
- Who is Who
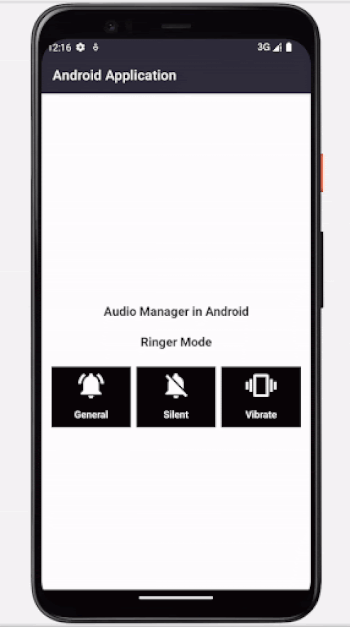
Audio Manager in Android
What is an audio manager in android?
Audio Manager the name itself suggests to us that it is used to manage the audio profile within the android application. This is generally used to switch between different audio modes for android devices such as ringer mode, silent mode and vibrate mode.
Implementation of Audio Manager
We will be creating a simple application in which we will be simply displaying 3 buttons and 2 text views. The 3 buttons inside our android application are used to switch between different audio modes such as Ringer mode, silent mode and vibrate mode. We will be displaying the current activated mode inside our text view to notify the user which mode is currently activated in the user device. We will be following a step by step guide to implement a toast message in an android application.
Step 1 : Creating a new project in Android Studio
Navigate to Android studio as shown in below screen. In the below screen click on New Project to create a new Android Studio Project.
After clicking on New Project you will get to see the below screen.

Inside this screen we have to simply select Empty Activity and click on Next. After clicking on next you will get to see the screen below.
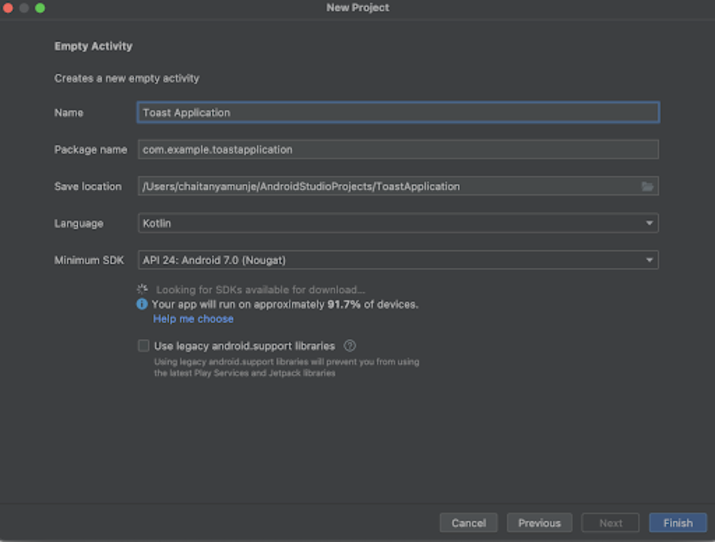
Inside this screen we have to simply specify the project name. Then the package name will be generated automatically.
Note ? Make sure to select the Language as Kotlin.
After specifying all the details click on Finish to create a new Android studio project.
Once our project has been created we will get to see 2 files which are open i.e activity_main.xml and MainActivity.kt file.
Step 2 : Adding images in the drawable folder
Navigate to app>drawable>Right click on it>New>vector asset>Click on the clip art icon and search for the icon which you have to add inside your application. Then simply change the name of the icon and add that icon inside our drawable folder.
Step 3 : Working with activity_main.xml
Navigate to activity_main.xml. If this file is not visible. To open this file. In the left pane navigate to app>res>layout>activity_main.xml to open this file. After opening this file. Add the below code to it. Comments are added in the code to get to know in detail.
<?xml version="1.0" encoding="utf-8"?>
<RelativeLayout xmlns:android="http://schemas.android.com/apk/res/android"
   xmlns:app="http://schemas.android.com/apk/res-auto"
   xmlns:tools="http://schemas.android.com/tools"
   android:layout_width="match_parent"
   android:layout_height="match_parent"
   tools:context=".MainActivity">

   <!-- creating a simple text view -->
   <TextView
      android:id="@+id/idTVHeading"
      android:layout_width="match_parent"
      android:layout_height="wrap_content"
      android:layout_above="@id/idTVMode"
      android:layout_marginStart="5dp"
      android:layout_marginTop="5dp"
      android:layout_marginEnd="5dp"
      android:layout_marginBottom="5dp"
      android:gravity="center"
      android:padding="5dp"
      android:text="Audio Manager in Android"
      android:textAlignment="center"
      android:textColor="#FF000000"
      android:textSize="18sp"
      android:textStyle="bold" />

   <!-- creating a text view for displaying current audio mode-->
   <TextView
      android:id="@+id/idTVMode"
      android:layout_width="match_parent"
      android:layout_height="wrap_content"
      android:layout_centerInParent="true"
      android:layout_margin="5dp"
      android:gravity="center"
      android:padding="5dp"
      android:text="Current RingTone Mode"
      android:textAlignment="center"
      android:textColor="#FF000000"
      android:textSize="18sp"
      android:textStyle="bold" />


   <!-- creating a linear layout for three buttons-->
   <LinearLayout
      android:layout_width="match_parent"
      android:layout_height="wrap_content"
      android:layout_below="@id/idTVMode"
      android:layout_margin="10dp"
      android:orientation="horizontal"
      android:weightSum="3">

      <!-- creating a linear layout for our General button-->
      <LinearLayout
         android:id="@+id/idLLGeneral"
         android:layout_width="0dp"
         android:layout_height="wrap_content"
         android:layout_margin="4dp"
         android:layout_weight="1"
         android:background="@color/black"
         android:orientation="vertical"
         android:padding="3dp">

         <!-- adding image view for our general mode-->
         <ImageView
            android:layout_width="50dp"
            android:layout_height="50dp"
            android:layout_gravity="center"
            android:padding="3dp"
            android:src="@drawable/ic_general"
            app:tint="@color/white" />

         <!-- adding text view for the general mode-->
         <TextView
            android:layout_width="match_parent"
            android:layout_height="wrap_content"
            android:layout_gravity="center"
            android:layout_margin="3dp"
            android:padding="4dp"
            android:text="General"
            android:textAlignment="center"
            android:textColor="@color/white"
            android:textStyle="bold" />

      </LinearLayout>

      <!-- creating a linear layout for our Silent button-->
      <LinearLayout
         android:id="@+id/idLLSilent"
         android:layout_width="0dp"
         android:layout_height="wrap_content"
         android:layout_margin="4dp"
         android:layout_weight="1"
         android:background="@color/black"
         android:orientation="vertical"
         android:padding="3dp">

         <!-- adding image view for our silent mode-->
         <ImageView
            android:layout_width="50dp"
            android:layout_height="50dp"
            android:layout_gravity="center"
            android:padding="3dp"
            android:src="@drawable/ic_silent"
            app:tint="@color/white" />

         <!-- adding text view for the silent mode-->
         <TextView
            android:layout_width="match_parent"
            android:layout_height="wrap_content"
            android:layout_gravity="center"
            android:layout_margin="3dp"
            android:padding="4dp"
            android:text="Silent"
            android:textAlignment="center"
            android:textColor="@color/white"
            android:textStyle="bold" />

      </LinearLayout>

      <!-- creating a linear layout for our Vibrate button-->
      <LinearLayout
         android:id="@+id/idLLVibrate"
         android:layout_width="0dp"
         android:layout_height="wrap_content"
         android:layout_margin="4dp"
         android:layout_weight="1"
         android:background="@color/black"
         android:orientation="vertical"
         android:padding="3dp">

         <!-- adding image view for our vibrate mode-->
         <ImageView
            android:layout_width="50dp"
            android:layout_height="50dp"
            android:layout_gravity="center"
            android:padding="3dp"
            android:src="@drawable/ic_vibrate"
            app:tint="@color/white" />

         <!-- adding text view for the vibrate mode-->
         <TextView
            android:layout_width="match_parent"
            android:layout_height="wrap_content"
            android:layout_gravity="center"
            android:layout_margin="3dp"
            android:padding="4dp"
            android:text="Vibrate"
            android:textAlignment="center"
            android:textColor="@color/white"
            android:textStyle="bold" />

      </LinearLayout>
   </LinearLayout>
</RelativeLayout>
Explanation ? In the above code we are creating a relative layout as a root layout. We can relatively align all the elements within this layout with the help of ids and parameters.
Inside this relative layout we are creating a simple text view which is used to display the heading of the application.
After this text view we are creating one more text view which is used to display the current audio mode which is being activated within our device.
After this text view we are displaying three vertical linear layouts as a button within a horizontal linear layout which is used to change the audio mode of our device. With the help of this linear layout we will be able to switch the audio mode within our application from general to silent, vibrate mode and others.
Step 4 : Working with MainActivity.kt
Navigate to MainActivity.kt. If this file is not visible. To open this file. In the left pane navigate to app>java>your app's package name>MainActivity.kt to open this file. After opening this file. Add the below code to it. Comments are added in the code to get to know in detail.
package com.example.gptapp

import android.app.NotificationManager
import android.content.Context
import android.content.Intent
import android.media.AudioManager
import android.os.Build
import android.os.Bundle
import android.provider.Settings
import android.widget.LinearLayout
import android.widget.TextView
import android.widget.Toast
import androidx.appcompat.app.AppCompatActivity

class MainActivity : AppCompatActivity() {

   // creating variables for 3 linear layout and text view.
   lateinit var silentLL: LinearLayout
   lateinit var generalLL: LinearLayout
   lateinit var vibrateLL: LinearLayout
   lateinit var modeTV: TextView

   // creating class variable for audio manager class.
   private var audioManager: AudioManager? = null

   // current mode to store integer value of ringer mode.
   var currentmode = 0
   override fun onCreate(savedInstanceState: Bundle?) {
      super.onCreate(savedInstanceState)
      setContentView(R.layout.activity_main)
      // initializing variables on below line.
      silentLL = findViewById(R.id.idLLSilent)
      generalLL = findViewById(R.id.idLLGeneral)
      vibrateLL = findViewById(R.id.idLLVibrate)
      modeTV = findViewById(R.id.idTVMode)

      // initializing audio manager class on below line
      audioManager = applicationContext.getSystemService(Context.AUDIO_SERVICE) as AudioManager?

      // setting current mode to ringer mode on below line.
      currentmode = audioManager!!.ringerMode

      // updating text view for different modes on below line.
      when (currentmode) {
         AudioManager.RINGER_MODE_NORMAL -> modeTV.setText("Ringer Mode")
         AudioManager.RINGER_MODE_SILENT -> modeTV.setText("Silent Mode")
         AudioManager.RINGER_MODE_VIBRATE -> modeTV.setText("Vibrate Mode")
         else -> modeTV.setText("Fail to get mode")
      }

      // adding click listener for silent linear layout.
      silentLL.setOnClickListener {
         // creating and initializing variable for notification manager.
         val notificationManager = getSystemService(NOTIFICATION_SERVICE) as NotificationManager
         // on below line we are checking if notification policy access is granted or not.
         if (Build.VERSION.SDK_INT >= Build.VERSION_CODES.M && !notificationManager.isNotificationPolicyAccessGranted) {
            // if the permission is not granted we are opening an intent to accept the policy.
            val intent = Intent(Settings.ACTION_NOTIFICATION_POLICY_ACCESS_SETTINGS)
            startActivity(intent)
         }
         // on below line set ringer mode here will sets your ringer mode to silent mode
         audioManager!!.ringerMode = AudioManager.RINGER_MODE_SILENT
         // on below line displaying a toast message
         Toast.makeText(this@MainActivity, "Silent Mode Activated..", Toast.LENGTH_SHORT).show()
         // on below line setting text to mode text view as silent mode.
         modeTV.setText("Silent Mode Activated..")
      }

      // adding click listener for general linear layout
      generalLL.setOnClickListener {
         // set ringer mode here will sets your ringer mode to normal mode on below line.
         audioManager!!.setRingerMode(AudioManager.RINGER_MODE_NORMAL);
         // displaying toast message on below line.
         Toast.makeText(this@MainActivity, "Ringtone Mode Activated..", Toast.LENGTH_SHORT)
            .show();
         // on below line setting text to mode text view as ringtone mode.
         modeTV.setText("Ringtone Mode Activated..");
      }

      // adding click listener for vibrate linear layout
      vibrateLL.setOnClickListener {
         // set ringer mode here will sets your ringer mode to vibrate on below line.
         audioManager!!.setRingerMode(AudioManager.RINGER_MODE_VIBRATE);
         // displaying toast message on below line.
         Toast.makeText(this@MainActivity, "Vibrate Mode Activated..", Toast.LENGTH_SHORT)
            .show();
         // on below line setting text to mode text view as vibrate mode is activated
         modeTV.setText("Vibrate Mode Activated..");
      }
   }
}
Explanation - In the above code for the MainActivity.kt file. Firstly we are creating a variable for the different views which we have created such as text view and Linear Layout. Then we are creating a variable for the audio manager class and initializing it to null. After that we are creating one more variable for current mode as 0 which is used to choose current audio mode.
Now inside our onCreate method we are initializing our linear layout and text view variables with their unique id which we have given in the activity_main.xml file.
After initializing our views we are initializing our audio manager variable by calling get system service and passing the service name which we have to use. We will be using audio service for managing audio mode in our application. Then we are initializing our current mode variable and inside that we are setting the current ringer mode of the device.
Then we are adding a switch condition inside which we are updating the mode text view message for different ringer modes. We are also specifying the default condition text for our mode text view.
After specifying text for our modeTV we are adding click listener for our different linear layouts
Inside on click listener for each linear layout we are changing the audio mode by calling the audio manager and then changing the text for the current audio mode. After that we are simply displaying the toast message to inform the user that audio mode has been updated.
After adding the above code now we have to simply click on the green icon in the top bar to run our application on a mobile device.
Note ? Make sure you are connected to your real device or emulator.
Conclusion
In the above tutorial we learn What is audio manager in android and How we can use it inside our android application to switch between different audio modes within our android application.

913 Views
