- Apache Tapestry - Home
- Apache Tapestry - Overview
- Apache Tapestry - Architecture
- Apache Tapestry - Installation
- Apache Tapestry - Quick Start
- Apache Tapestry - Project Layout
- Convention Over Configuration
- Apache Tapestry - Annotation
- Pages and Components
- Apache Tapestry - Templates
- Apache Tapestry - Components
- Built-In Components
- Forms & Validation Components
- Apache Tapestry - Ajax Components
- Apache Tapestry - Hibernate
- Apache Tapestry - Storage
- Advanced Features
Apache Tapestry - Components
As discussed earlier, Components and Pages are the same except that the Page is the root component and includes one or more child components. Components always resides inside a page and do almost all the dynamic functionality of the page.
Tapestry components renders a simple HTML links to complex grid functionality with interactive AJAX. A Component can include another component as well. Tapestry components consists of following items −
Component Class − The main Java class of the component.
XML Template − XML template is similar to the Page template. The component class renders the template as the final output. Some components may not have templates. In this case, the output will be generated by the component class itself using the MarkupWriter class.
Body − The component specified inside the page template may have custom markup and it is called Component body. If the component template has <body /> element, then the <body /> element will be replaced by the body of the component. This is similar to the layout discussed earlier in the XML template section.
Rendering − Rendering is a process which transforms XML template and body of the component into actual output of the component.
Parameters − Used to create communication between component & pages and thereby passing data between them.
Events − Delegates functionality from components to its container / parent (pages or another component). It is extensively used in page navigation purpose.
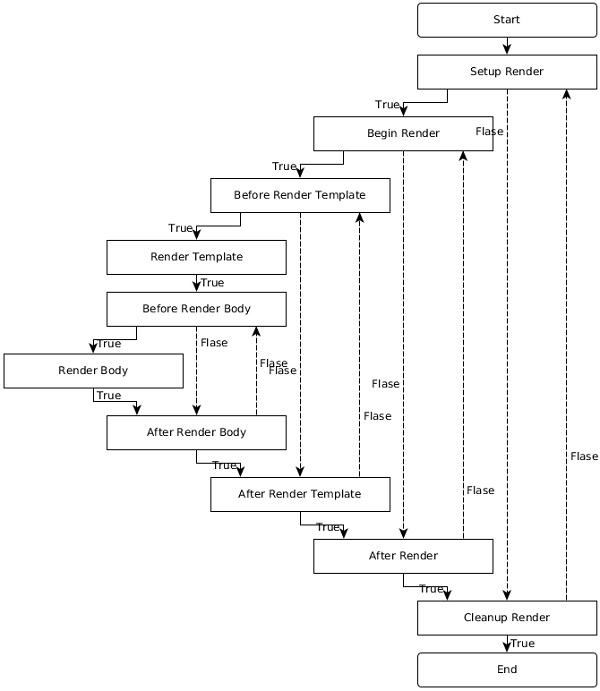
Rendering
The rendering of a component is done in a series of pre-defined phases. Each phase in the component system should have a corresponding method defined by convention or annotation in the component class.
// Using annotaion
@SetupRender
void initializeValues() {
   // initialize values
}

// using convention
boolean afterRender() {
   // do logic
   return true;
}
The phases, its method name and its annotations are listed below.
| Annotation | Default Method Names |
|---|---|
| @SetupRender | setupRender() |
| @BeginRender | beginRender() |
| @BeforeRenderTemplate | beforeRenderTemplate() |
| @BeforeRenderBody | beforeRenderBody() |
| @AfterRenderBody | afterRenderBody() |
| @AfterRenderTemplate | afterRenderTemplate() |
| @AfterRender | afterRender() |
| @CleanupRender | cleanupRender() |
Each phase has a specific purpose and they are as follows −
SetupRender
SetupRender kick-starts the rendering process. It usually sets up the parameters of the component.
BeginRender
BeginRender starts rendering the component. It usually renders the begin / start tag of the component.
BeforeRenderTemplate
BeforeRenderTemplate is used to decorate the XML template, adding special markup around the template. It also provides an option to skip the template rendering.
BeforeRenderBody
BeforeRenderTemplate provides an option to skip the rendering of the component's body element.
AfterRenderBody
AfterRenderBody will be called after the component's body is rendered.
AfterRenderTemplate
AfterRenderTemplate will be called after the component's template is rendered.
AfterRender
AfterRender is the counterpart of the BeginRender and usually renders the close tag.
CleanupRender
CleanupRender is the counterpart of the SetupRender. It releases / disposes all the objects created during rendering process.
The flow of the rendering phases is not forward only. It goes to and fro between phases depending on the return value of a phase.
For example, if the SetupRender method returns false, then rendering jumps to the CleanupRender phase and vice versa. To find a clear understanding of the flow between different phases, check the flow in the diagram given below.
Simple Component
Let us create a simple component, Hello which will have the output message as Hello, Tapestry. Following is the code of the Hello component and its template.
package com.example.MyFirstApplication.components;
public class Hello {
}
<html
   xmlns:t = "https://tapestry.apache.org/schema/tapestry_5_4.xsd"
   xmlns:p = "tapestry:parameter">

   <div>
      <p>Hello, Tapestry (from component).</p>
   </div>

</html>
The Hello component can be called in a page template as −
<html title = "Hello component test page"
   xmlns:t = "https://tapestry.apache.org/schema/tapestry_5_4.xsd"
   xmlns:p = "tapestry:parameter">
<t:hello />
</html>
Similarly, the component may render the same output using MarkupWriter instead of the template as shown below.
package com.example.MyFirstApplication.components;

import org.apache.tapestry5.MarkupWriter;
import org.apache.tapestry5.annotations.BeginRender;

public class Hello {
   @BeginRender
   void renderMessage(MarkupWriter writer) {
      writer.write("<p>Hello, Tapestry (from component)</p>");
   }
}
Let us change the component template and include the <body /> element as shown in the code block below.
<html>
   xmlns:t = "https://tapestry.apache.org/schema/tapestry_5_4.xsd"
   xmlns:p = "tapestry:parameter">

   <div>
      <t:body />
   </div>
</html>
Now, the page template may include body in the component markup as shown below.
<html title = "Hello component test page"
   xmlns:t = "https://tapestry.apache.org/schema/tapestry_5_4.xsd"
   xmlns:p = "tapestry:parameter">

   <t:hello>
      <p>Hello, Tapestry (from page).</p>
   </t:hello>
</html>
The output will be as follows −
<html>
   <div>
      <p>Hello, Tapestry (from page).</p>
   </div>
</html>
Parameters
The primary purpose of these parameters is to create a connection between a field of the component and a property / resource of the page. Using parameters, component and its corresponding page communicate and transfer data between each other. This is called Two Way Data Binding.
For example, a textbox component used to represent the age in a user management page gets its initial value (available in the database) through the parameter. Again, after the user's age is updated and submitted back, the component will send back the updated age through the same parameter.
To create a new parameter in the component class, declare a field and specify a @Parameter annotation. This @Parameter has two optional arguments, which are −
required − makes the parameter as mandatory. Tapestry raises exception if it is not provided.
value − specifies the default value of the parameter.
The parameter should be specified in the page template as attributes of the component tag. The value of the attributes should be specified using Binding Expression / Expansion, which we discussed in the earlier chapters. Some of the expansion which we learned earlier are −
Property expansion (prop:«val») − Get the data from property of the page class.
Message expansion (message:«val») − Get the data from key defined in index.properties file.
Context expansion (context:«val») − Get the data from web context folder /src/main/webapp.
Asset expansion (asset:«val») − Get the data from resources embedded in jar file, /META-INF/assets.
Symbol expansion (symbol:«val») − Get the data from symbols defined in AppModule.javafile.
Tapestry has many more useful expansions, some of which are given below −
Literal expansion (literal:«val») − A literal string.
Var expansion (var:«val») − Allow a render variable of the component to be read or updated.
Validate expansion (validate:«val») − A specialized string used to specify the validation rule of an object. For Example, validate:required, minLength = 5.
Translate (translate:«val») − Used to specify the Translator class (converting client-side to server-side representation) in input validation.
Block (block:«val») − The id of the block element within the template.
Component (component:«val») − The id of the another component within the template.
All the above expansions are read-only except Property expansion and Var expansion. They are used by the component to exchange data with page. When using expansion as attribute values, ${...} should not be used. Instead just use the expansion without dollar and braces symbols.
Component Using Parameter
Let us create a new component, HelloWithParameter by modifying the Hello component to dynamically render the message by adding a name parameter in the component class and changing the component template and page template accordingly.
Create a new component class HelloWithParameter.java.
Add a private field and name it with the @Parameter annotation. Use the required argument to make it mandatory.
@Parameter(required = true)
private String name;
Add a private field, result with @Propery annotation. The result property will be used in the component template. Component template does not have access to fields annotated with @Parameter and only able to access the fields annotated with @Property. The variable available in component templates are called Render Variables.
@Property
 private String result;
Add a RenderBody method and copy the value from the name parameter to result property.
@BeginRender
void initializeValues() {
   result = name;
}
Add a new component template HelloWithParamter.tml and use the result property to render the message.
<div> Hello, ${result} </div>
Add a new property, Username in the test page (testhello.java).
public String getUsername() {
   return "User1";
}
Use the newly created component in the page template and set the Username property in name parameter of HelloWithParameter component.
<t:helloWithParameter name = "username" />
The complete listing is as follows −
package com.example.MyFirstApplication.components;

import org.apache.tapestry5.annotations.*;
public class HelloWithParameter {
   @Parameter(required = true)
   private String name;

   @Property
   private String result;

   @BeginRender
   void initializeValues() {
      result = name;
   }
}
<html
   xmlns:t = "https://tapestry.apache.org/schema/tapestry_5_4.xsd"
   xmlns:p = "tapestry:parameter">

   <div> Hello, ${result} </div>

</html>
package com.example.MyFirstApplication.pages;

import org.apache.tapestry5.annotations.*;
public class TestHello {
   public String getUsername() {
      return "User1";
   }
}
<html title = "Hello component test page"
   xmlns:t = "https://tapestry.apache.org/schema/tapestry_5_4.xsd"
   xmlns:p = "tapestry:parameter">
   <t:helloWithParameter name = "username" />

</html>
The result will be as follows −
<div> Hello, User1 </div>
Advanced Parameter
In the previous chapters, we analyzed how to create and use a simple parameter in a custom component. An advanced parameter may contain complete markup as well. In this case, the markup should be specified inside the component tag such as the sub-section in the page template. The built-in if component have markup for both success and failure condition. The markup for success is specified as the body of the component tag and the markup of failure is specified using an elseparameter.
Let us see how to use the if component. The if component has two parameters −
test − Simple property based parameter.
Else − Advanced parameter used to specify alternative markup, if the condition fails
Tapestry will check the value of the test property using the following logic and return true or false. This is called Type Coercion, a way to convert an object of one type to another type with the same content.
If the data type is String, True if non-blank and not the literal string False (case insensitive).
If the data type is Number, True if non-zero.
If the data type is Collection, True if non-empty.
If the data type is Object, True (as long as its not null).
If the condition passes, the component renders its body; otherwise, it renders the body of the else parameter.
The complete listing is as follows −
package com.example.MyFirstApplication.pages;
public class TestIf {
   public String getUser() {
      return "User1";
   }
}
<html title = "If Test Page"
   xmlns:t = "http://tapestry.apache.org/schema/tapestry_5_4.xsd"
   xmlns:p = "tapestry:parameter">

   <body>
      <h1>Welcome!</h1>
      <t:if test = "user">
         Welcome back, ${user}
         <p:else>
            Please <t:pagelink page = "login">Login</t:pagelink>
         </p:else>
      </t:if>
   </body>

</html>
Component Events / Page Navigation
Tapestry application is a collection of Pages interacting with each other. Till now, we have learned how to create individual pages without any communication between them. A Component event's primary purpose is to provide interaction between pages (within pages as well) using server-side events. Most of the component events originate from client-side events.
For example, when a user clicks a link in a page, Tapestry will call the same page itself with target information instead of calling the target page and raises a server side event. Tapestry page will capture the event, process the target information and do a server side redirection to the target page.
Tapestry follows a Post/Redirect/Get (RPG) design pattern for page navigation. In RPG, when a user does a post request by submitting a form, the server will process the posted data, but does not return the response directly. Instead, it will do a client-side redirection to another page, which will output the result. An RPG pattern is used to prevent duplicate form submissions through browser back button, browser refresh button, etc., Tapestry provides an RPG pattern by providing the following two types of request.
Component Event Request − This type of request targets a particular component in a page and raises events within the component. This request only does a redirection and does not output the response.
Render Request − These types of requests target a page and stream the response back to the client.
To understand the component events and page navigation, we need to know the URL pattern of the tapestry request. The URL pattern for both types of request is as follows −
Component Event Requests −
/<<page_name_with_path>>.<<component_id|event_id>>/<<context_information>>
Render Request −
/<<page_name_with_path>>/<<context_information>>
Some of the examples of the URL patterns are −
Index page can be requested by https://«domain»/«app»/index.
If the Index page is available under a sub-folder admin, then it can be requested by https://«domain»/«app»/admin/index.
If the user clicks on the ActionLink component with id test in the index page, then the URL will be https://«domain»/«app»/index.test.
Events
By default, Tapestry raises OnPassivate and OnActivate events for all requests. For Component event request type, tapestry raises additional one or more events depending on the component. The ActionLink component raises an Action event, while a Form component raises multiple events such as Validate, Success, etc.,
The events can be handled in the page class using the corresponding method handler. The method handler is created either through a method naming convention or through the @OnEvent annotation. The format of the method naming convention is On«EventName»From«ComponentId».
An action event of the ActionLink component with id test can be handled by either one of the following methods −
void OnActionFromTest() {
}
@OnEvent(component = "test", name = "action")
void CustomFunctionName() {
}
If the method name does not have any particular component, then the method will be called for all component with matching events.
void OnAction() {
}
OnPassivate and OnActivate Event
OnPassivate is used to provide context information for an OnActivate event handler. In general, Tapestry provides the context information and it can be used as an argument in the OnActivateevent handler.
For example, if the context information is 3 of type int, then the OnActivate event can be called as −
void OnActivate(int id) {
}
In some scenario, the context information may not be available. In this situation, we can provide the context information to OnActivate event handler through OnPassivate event handler. The return type of the OnPassivate event handler should be used as argument of OnActivate event handler.
int OnPassivate() {
   int id = 3;
   return id;
}
void OnActivate(int id) {
}
Event Handler Return Values
Tapestry issues page redirection based on the return values of the event handler. Event handler should return any one of the following values.
Null Response − Returns null value. Tapestry will construct the current page URL and send to the client as redirect.
public Object onAction() {
   return null;
}
String Response − Returns the string value. Tapestry will construct the URL of the page matching the value and send to the client as redirect.
public String onAction() {
   return "Index";
}
Class Response − Returns a page class. Tapestry will construct the URL of the returned page class and send to the client as redirect.
public Object onAction() {
   return Index.class
}
Page Response − Returns a field annotated with @InjectPage. Tapestry will construct the URL of the injected page and send to the client as redirect.
@InjectPage
private Index index;

public Object onAction(){
   return index;
}
HttpError − Returns the HTTPError object. Tapestry will issue a client side HTTP error.
public Object onAction(){
   return new HttpError(302, "The Error message);
}
Link Response − Returns a link instance directly. Tapestry will construct the URL from Link object and send to the client as redirect.
Stream Response − Returns the StreamResponse object. Tapestry will send the stream as response directly to the client browser. It is used to generate reports and images directly and send it to the client.
Url Response − Returns the java.net.URL object. Tapestry will get the corresponding URL from the object and send to the client as redirect.
Object Response − Returns any values other than above specified values. Tapestry will raise an error.
Event Context
In general, event handler can get the context information using arguments. For example, if the context information is 3 of type int, then the event handler will be −
Object onActionFromTest(int id) {
}
Tapestry properly handles the context information and provides it to methods through arguments. Sometimes, Tapestry may not be able to properly handle it due to complexity of the programming. At that time, we may get the complete context information and process ourselves.
Object onActionFromEdit(EventContext context) {
   if (context.getCount() > 0) {
      this.selectedId = context.get(0);
   } else {
      alertManager.warn("Please select a document.");
      return null;
   }
}
