- Apache Tajo - Home
- Apache Tajo - Introduction
- Apache Tajo - Architecture
- Apache Tajo - Installation
- Apache Tajo - Configuration Settings
- Apache Tajo - Shell Commands
- Apache Tajo - Data Types
- Apache Tajo - Operators
- Apache Tajo - SQL Functions
- Apache Tajo - Math Functions
- Apache Tajo - String Functions
- Apache Tajo - DateTime Functions
- Apache Tajo - JSON Functions
- Apache Tajo - Database Creation
- Apache Tajo - Table Management
- Apache Tajo - SQL Statements
- Aggregate & Window Functions
- Apache Tajo - SQL Queries
- Apache Tajo - Storage Plugins
- Integration with HBase
- Apache Tajo - Integration with Hive
- OpenStack Swift Integration
- Apache Tajo - JDBC Interface
- Apache Tajo - Custom Functions
Apache Tajo - Quick Guide
Apache Tajo - Introduction
Distributed Data Warehouse System
Data warehouse is a relational database that is designed for query and analysis rather than for transaction processing. It is a subject-oriented, integrated, time-variant, and non-volatile collection of data. This data helps analysts to take informed decisions in an organization but relational data volumes are increased day by day.
To overcome the challenges, distributed data warehouse system shares data across multiple data repositories for the purpose of Online Analytical Processing(OLAP). Each data warehouse may belong to one or more organizations. It performs load balancing and scalability. Metadata is replicated and centrally distributed.
Apache Tajo is a distributed data warehouse system which uses Hadoop Distributed File System (HDFS) as the storage layer and has its own query execution engine instead of MapReduce framework.
Overview of SQL on Hadoop
Hadoop is an open-source framework that allows to store and process big data in a distributed environment. It is extremely fast and powerful. However, Hadoop has limited querying capabilities so its performance can be made even better with the help of SQL on Hadoop. This allows users to interact with Hadoop through easy SQL commands.
Some of the examples of SQL on Hadoop applications are Hive, Impala, Drill, Presto, Spark, HAWQ and Apache Tajo.
What is Apache Tajo
Apache Tajo is a relational and distributed data processing framework. It is designed for low latency and scalable ad-hoc query analysis.
Tajo supports standard SQL and various data formats. Most of the Tajo queries can be executed without any modification.
Tajo has fault-tolerance through a restart mechanism for failed tasks and extensible query rewrite engine.
Tajo performs the necessary ETL (Extract Transform and Load process) operations to summarize large datasets stored on HDFS. It is an alternative choice to Hive/Pig.
The latest version of Tajo has greater connectivity to Java programs and third-party databases such as Oracle and PostGreSQL.
Features of Apache Tajo
Apache Tajo has the following features −
- Superior scalability and optimized performance
- Low latency
- User-defined functions
- Row/columnar storage processing framework.
- Compatibility with HiveQL and Hive MetaStore
- Simple data flow and easy maintenance.
Benefits of Apache Tajo
Apache Tajo offers the following benefits −
- Easy to use
- Simplified architecture
- Cost-based query optimization
- Vectorized query execution plan
- Fast delivery
- Simple I/O mechanism and supports various type of storage.
- Fault tolerance
Use Cases of Apache Tajo
The following are some of the use cases of Apache Tajo −
Data warehousing and analysis
Koreas SK Telecom firm ran Tajo against 1.7 terabytes worth of data and found it could complete queries with greater speed than either Hive or Impala.
Data discovery
The Korean music streaming service Melon uses Tajo for analytical processing. Tajo executes ETL (extract-transform-load process) jobs 1.5 to 10 times faster than Hive.
Log analysis
Bluehole Studio, a Korean based company developed TERA a fantasy multiplayer online game. The company uses Tajo for game log analysis and finding principal causes of service quality interrupts.
Storage and Data Formats
Apache Tajo supports the following data formats −
- JSON
- Text file(CSV)
- Parquet
- Sequence File
- AVRO
- Protocol Buffer
- Apache Orc
Tajo supports the following storage formats −
- HDFS
- JDBC
- Amazon S3
- Apache HBase
- Elasticsearch
Apache Tajo - Architecture
The following illustration depicts the architecture of Apache Tajo.
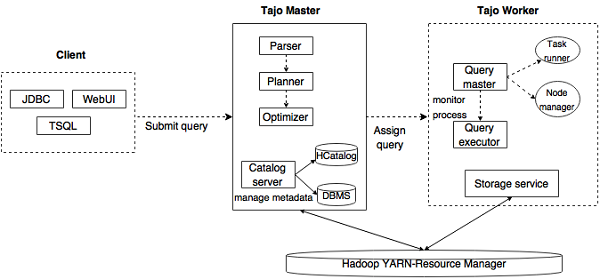
The following table describes each of the components in detail.
| S.No. | Component & Description |
|---|---|
| 1 | Client Client submits the SQL statements to the Tajo Master to get the result. |
| 2 | Master Master is the main daemon. It is responsible for query planning and is the coordinator for workers. |
| 3 | Catalog server Maintains the table and index descriptions. It is embedded in the Master daemon. The catalog server uses Apache Derby as the storage layer and connects via JDBC client. |
| 4 | Worker Master node assigns task to worker nodes. TajoWorker processes data. As the number of TajoWorkers increases, the processing capacity also increases linearly. |
| 5 | Query Master Tajo master assigns query to the Query Master. The Query Master is responsible for controlling a distributed execution plan. It launches the TaskRunner and schedules tasks to TaskRunner. The main role of the Query Master is to monitor the running tasks and report them to the Master node. |
| 6 | Node Managers Manages the resource of the worker node. It decides on allocating requests to the node. |
| 7 | TaskRunner Acts as a local query execution engine. It is used to run and monitor query process. The TaskRunner processes one task at a time. It has the following three main attributes −
|
| 8 | Query Executor It is used to execute a query. |
| 9 | Storage service Connects the underlying data storage to Tajo. |
Workflow
Tajo uses Hadoop Distributed File System (HDFS) as the storage layer and has its own query execution engine instead of the MapReduce framework. A Tajo cluster consists of one master node and a number of workers across cluster nodes.
The master is mainly responsible for query planning and the coordinator for workers. The master divides a query into small tasks and assigns to workers. Each worker has a local query engine that executes a directed acyclic graph of physical operators.
In addition, Tajo can control distributed data flow more flexible than that of MapReduce and supports indexing techniques.
The web-based interface of Tajo has the following capabilities −
- Option to find how the submitted queries are planned
- Option to find how the queries are distributed across nodes
- Option to check the status of the cluster and nodes
Apache Tajo - Installation
To install Apache Tajo, you must have the following software on your system −
- Hadoop version 2.3 or greater
- Java version 1.7 or higher
- Linux or Mac OS
Let us now continue with the following steps to install Tajo.
Verifying Java installation
Hopefully, you have already installed Java version 8 on your machine. Now, you just need to proceed by verifying it.
To verify, use the following command −
$ java -version
If Java is successfully installed on your machine, you could see the present version of the installed Java. If Java is not installed follow these steps to install Java 8 on your machine.
Download JDK
Download the latest version of JDK by visiting the following link and then, download the latest version.
The latest version is JDK 8u 92 and the file is jdk-8u92-linux-x64.tar.gz. Please download the file on your machine. Following this, extract the files and move them to a specific directory. Now, set the Java alternatives. Finally, Java is installed on your machine.
Verifying Hadoop Installation
You have already installed Hadoop on your system. Now, verify it using the following command −
$ hadoop version
If everything is fine with your setup, then you could see the version of Hadoop. If Hadoop is not installed, download and install Hadoop by visiting the following link − https://www.apache.org
Apache Tajo Installation
Apache Tajo provides two execution modes local mode and fully distributed mode. After verifying Java and Hadoop installation proceed with the following steps to install Tajo cluster on your machine. A local mode Tajo instance requires very easy configurations.
Download the latest version of Tajo by visiting the following link − https://www.apache.org/dyn/closer.cgi/tajo
Now you can download the file tajo-0.11.3.tar.gz from your machine.
Extract Tar File
Extract the tar file by using the following command −
$ cd opt/
$ tar tajo-0.11.3.tar.gz
$ cd tajo-0.11.3
Set Environment Variable
Add the following changes to conf/tajo-env.sh file
$ cd tajo-0.11.3
$ vi conf/tajo-env.sh

# Hadoop home. Required
export HADOOP_HOME = /Users/path/to/Hadoop/hadoop-2.6.2

# The java implementation to use.  Required.
export JAVA_HOME = /path/to/jdk1.8.0_92.jdk/
Here, you must specify Hadoop and Java path to tajo-env.sh file. After the changes are made, save the file and quit the terminal.
Start Tajo Server
To launch the Tajo server, execute the following command −
$ bin/start-tajo.sh
You will receive a response similar to the following −
Starting single TajoMaster
starting master, logging to /Users/path/to/Tajo/tajo-0.11.3/bin/../
localhost: starting worker, logging to /Users/path/toe/Tajo/tajo-0.11.3/bin/../logs/

Tajo master web UI: http://local:26080
Tajo Client Service: local:26002
Now, type the command jps to see the running daemons.
$ jps
1010 TajoWorker
1140 Jps
933 TajoMaster
Launch Tajo Shell (Tsql)
To launch the Tajo shell client, use the following command −
$ bin/tsql
You will receive the following output −
welcome to
   _____ ___  _____ ___
  /_  _/ _  |/_  _/   /
   / // /_| |_/ // / /
  /_//_/ /_/___/ \__/  0.11.3

Try \? for help.
Quit Tajo Shell
Execute the following command to quit Tsql −
default> \q
bye!
Here, the default refers to the catalog in Tajo.
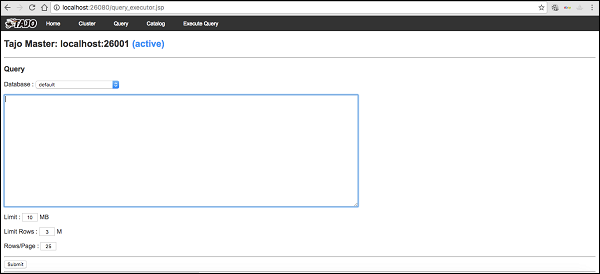
Web UI
Type the following URL to launch the Tajo web UI − http://localhost:26080/
You will now see the following screen which is similar to the ExecuteQuery option.
Stop Tajo
To stop the Tajo server, use the following command −
$ bin/stop-tajo.sh
You will get the following response −
localhost: stopping worker
stopping master
Apache Tajo - Configuration Settings
Tajos configuration is based on Hadoops configuration system. This chapter explains Tajo configuration settings in detail.
Basic Settings
Tajo uses the following two config files −
- catalog-site.xml − configuration for the catalog server.
- tajo-site.xml − configuration for other Tajo modules.
Distributed Mode Configuration
Distributed mode setup runs on Hadoop Distributed File System (HDFS). Lets follow the steps to configure Tajo distributed mode setup.
tajo-site.xml
This file is available @ /path/to/tajo/conf directory and acts as configuration for other Tajo modules. To access Tajo in a distributed mode, apply the following changes to tajo-site.xml.
<property>
   <name>tajo.rootdir</name>
   <value>hdfs://hostname:port/tajo</value>
</property>

<property>
   <name>tajo.master.umbilical-rpc.address</name>
   <value>hostname:26001</value>
</property>

<property>
   <name>tajo.master.client-rpc.address</name>
   <value>hostname:26002</value>
</property>

<property>
   <name>tajo.catalog.client-rpc.address</name>
   <value>hostname:26005</value>
</property>
Master Node Configuration
Tajo uses HDFS as a primary storage type. The configuration is as follows and should be added to tajo-site.xml.
<property>
   <name>tajo.rootdir</name>
   <value>hdfs://namenode_hostname:port/path</value>
</property>
Catalog Configuration
If you want to customize the catalog service, copy $path/to/Tajo/conf/catalogsite.xml.template to $path/to/Tajo/conf/catalog-site.xml and add any of the following configuration as needed.
For example, if you use Hive catalog store to access Tajo, then the configuration should be like the following −
<property>
   <name>tajo.catalog.store.class</name>
   <value>org.apache.tajo.catalog.store.HCatalogStore</value>
</property>
If you need to store MySQL catalog, then apply the following changes −
<property>
   <name>tajo.catalog.store.class</name>
   <value>org.apache.tajo.catalog.store.MySQLStore</value>
</property>

<property>
   <name>tajo.catalog.jdbc.connection.id</name>
   <value><mysql user name></value>
</property>

<property>
   <name>tajo.catalog.jdbc.connection.password</name>
   <value><mysql user password></value>
</property>

<property>
   <name>tajo.catalog.jdbc.uri</name>
   <value>jdbc:mysql://<mysql host name>:<mysql port>/<database name for tajo>
      ?createDatabaseIfNotExist = true</value>
</property>
Similarly, you can register the other Tajo supported catalogs in the configuration file.
Worker Configuration
By default, the TajoWorker stores temporary data on the local file system. It is defined in the tajo-site.xml file as follows −
<property>
   <name>tajo.worker.tmpdir.locations</name>
   <value>/disk1/tmpdir,/disk2/tmpdir,/disk3/tmpdir</value>
</property>
To increase the capacity of running tasks of each worker resource, choose the following configuration −
<property>
   <name>tajo.worker.resource.cpu-cores</name>
   <value>12</value>
</property>

<property>
   <name>tajo.task.resource.min.memory-mb</name>
   <value>2000</value>
</property>

<property>
   <name>tajo.worker.resource.disks</name>
   <value>4</value>
</property>
To make the Tajo worker run in a dedicated mode, choose the following configuration −
<property>
   <name>tajo.worker.resource.dedicated</name>
   <value>true</value>
</property>
Apache Tajo - Shell Commands
In this chapter, we will understand the Tajo Shell commands in detail.
To execute the Tajo shell commands, you need to start the Tajo server and the Tajo shell using the following commands −
Start server
$ bin/start-tajo.sh
Start Shell
$ bin/tsql
The above commands are now ready for execution.
Meta Commands
Let us now discuss the Meta Commands. Tsql meta commands start with a backslash (\).
Help Command
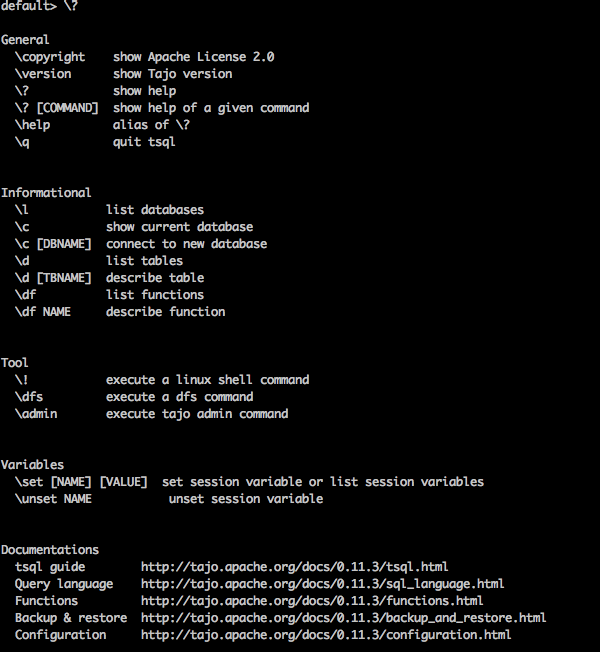
\? Command is used to show the help option.
Query
default> \?
Result
The above \? Command list out all the basic usage options in Tajo. You will receive the following output −
List Database
To list out all the databases in Tajo, use the following command −
Query
default> \l
Result
You will receive the following output −
information_schema
default
At present, we have not created any database so it shows two built in Tajo databases.
Current Database
\c option is used to display the current database name.
Query
default> \c
Result
You are now connected to database "default" as user username.
List out Built-in Functions
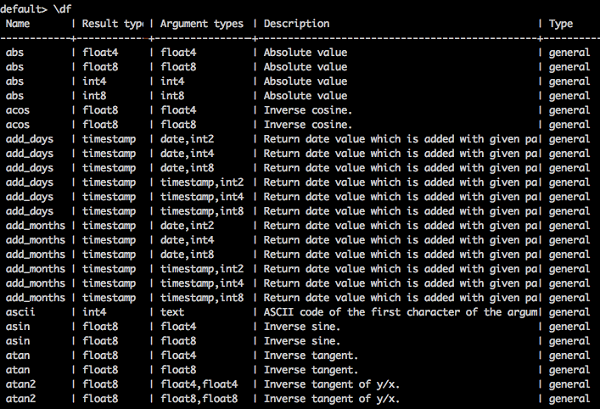
To list out all the built-in function, type the query as follows −
Query
default> \df
Result
You will receive the following output −
Describe Function
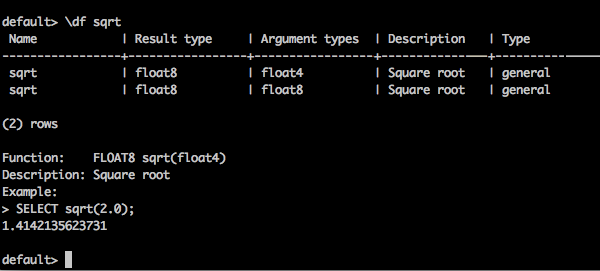
\df function name − This query returns the complete description of the given function.
Query
default> \df sqrt
Result
You will receive the following output −
Quit Terminal
To quit the terminal, type the following query −
Query
default> \q
Result
You will receive the following output −
bye!
Admin Commands
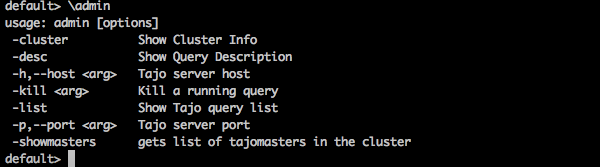
Tajo shell provides \admin option to list out all the admin features.
Query
default> \admin
Result
You will receive the following output −
Cluster Info
To display the cluster information in Tajo, use the following query
Query
default> \admin -cluster
Result
You will receive the following output −

Show master
The following query displays the current master information.
Query
default> \admin -showmasters
Result
localhost
Similarly, you can try other admin commands.
Session Variables
The Tajo client connects to the Master via a unique session id. The session is live until the client is disconnected or expires.
The following command is used to list out all session variables.
Query
default> \set
Result
'SESSION_LAST_ACCESS_TIME' = '1470206387146'
'CURRENT_DATABASE' = 'default'
USERNAME = 'user'
'SESSION_ID' = 'c60c9b20-dfba-404a-822f-182bc95d6c7c'
'TIMEZONE' = 'Asia/Kolkata'
'FETCH_ROWNUM' = '200'
COMPRESSED_RESULT_TRANSFER' = 'false'
The \set key val will set the session variable named key with the value val. For example,
Query
default> \set current_database='default'
Result
usage: \set [[NAME] VALUE]
Here, you can assign the key and value in the \set command. If you need to revert the changes then use the \unset command.
Apache Tajo - Data Types
To execute a query in a Tajo shell, open your terminal and move to the Tajo installed directory and then type the following command −
$ bin/tsql
You will now see the response as shown in the following program −
default>
You can now execute your queries. Otherwise you can run your queries through web console application to the following URL − http://localhost:26080/
Primitive Data Types
Apache Tajo supports the following list of primitive data types −
| S.No. | Data type & Description |
|---|---|
| 1 | integer Used for storing integer value with 4 bytes storage. |
| 2 | tinyint Tiny integer value is 1 byte |
| 3 | smallint Used for storing small size integer 2 bytes value. |
| 4 | bigint Big range integer value has 8 bytes storage. |
| 5 | boolean Returns true/false. |
| 6 | real Used for storing real value. Size is 4 bytes. |
| 7 | float Floating point precision value which has 4 or 8 bytes storage space. |
| 8 | double Double point precision value stored in 8 bytes. |
| 9 | char[(n)] Character value. |
| 10 | varchar[(n)] Variable-length non-Unicode data. |
| 11 | number Decimal values. |
| 12 | binary Binary values. |
| 13 | date Calendar date (year, month, day). Example − DATE '2016-08-22' |
| 14 | time Time of day (hour, minute, second, millisecond) without a time zone. Values of this type are parsed and rendered in the session time zone. |
| 15 | timezone Time of day (hour, minute, second, millisecond) with a time zone. Values of this type are rendered using the time zone from the value. Example − TIME '01:02:03.456 Asia/kolkata' |
| 16 | timestamp Instant in time that includes the date and time of day without a time zone. Example − TIMESTAMP '2016-08-22 03:04:05.321' |
| 17 | text Variable-length Unicode text. |
Apache Tajo - Operators
The following operators are used in Tajo to perform desired operations.
| S.No. | Operator & Description |
|---|---|
| 1 | Arithmetic operators
Presto supports arithmetic operators such as +, −, *, /, %. |
| 2 | Relational operators
<, >, <=, >=, =, <> |
| 3 | Logical operators
AND, OR, NOT |
| 4 | String operators
The || operator performs string concatenation. |
| 5 | Range operators
Range operator is used to test the value in a specific range. Tajo supports BETWEEN, IS NULL, IS NOT NULL operators. |
Apache Tajo - SQL Functions
As of now, you were aware of running simple basic queries on Tajo. In the next subsequent few chapters, we will discuss the following SQL functions −
Apache Tajo - Math Functions
Math functions operate on mathematical formulae. The following table describes the list of functions in detail.
| S.No. | Function & Description |
|---|---|
| 1 | abs(x)
Returns the absolute value of x. |
| 2 | cbrt(x)
Returns the cube root of x. |
| 3 | ceil(x)
Returns x value rounded up to the nearest integer. |
| 4 | floor(x)
Returns x rounded down to the nearest integer. |
| 5 | pi()
Returns pi value. Result will be returned as double value. |
| 6 | radians(x)
converts the angle x in degree radians. |
| 7 | degrees(x)
Returns degree value for x. |
| 8 | pow(x,p)
Returns power of valuep to the x value. |
| 9 | div(x,y)
Returns the division result for the given two x,y integer values. |
| 10 | exp(x)
Returns Eulers number e raised to the power of a number. |
| 11 | sqrt(x)
Returns the square root of x. |
| 12 | sign(x)
Returns the signum function of x, that is −
|
| 13 | mod(n,m)
Returns the modulus (remainder) of n divided by m. |
| 14 | round(x)
Returns the rounded value for x. |
| 15 | cos(x)
Returns the cosine value(x). |
| 16 | asin(x)
Returns the inverse sine value(x). |
| 17 | acos(x)
Returns the inverse cosine value(x). |
| 18 | atan(x)
Returns the inverse tangent value(x). |
| 19 | atan2(y,x)
Returns the inverse tangent value(y/x). |
Data Type Functions
The following table lists out the data type functions available in Apache Tajo.
| S.No. | Function & Description |
|---|---|
| 1 | to_bin(x)
Returns the binary representation of integer. |
| 2 | to_char(int,text)
Converts integer to string. |
| 3 | to_hex(x)
Converts the x value into hexadecimal. |
Apache Tajo - String Functions
The following table lists out the string functions in Tajo.
| S.No. | Function & Description |
|---|---|
| 1 | concat(string1, ..., stringN)
Concatenate the given strings. |
| 2 | length(string)
Returns the length of the given string. |
| 3 | lower(string)
Returns the lowercase format for the string. |
| 4 | upper(string)
Returns the uppercase format for the given string. |
| 5 | ascii(string text)
Returns the ASCII code of the first character of the text. |
| 6 | bit_length(string text)
Returns the number of bits in a string. |
| 7 | char_length(string text)
Returns the number of characters in a string. |
| 8 | octet_length(string text)
Returns the number of bytes in a string. |
| 9 | digest(input text, method text)
Calculates the Digest hash of string. Here, the second arg method refers to the hash method. |
| 10 | initcap(string text)
Converts the first letter of each word to upper case. |
| 11 | md5(string text)
Calculates the MD5 hash of string. |
| 12 | left(string text, int size)
Returns the first n characters in the string. |
| 13 | right(string text, int size)
Returns the last n characters in the string. |
| 14 | locate(source text, target text, start_index)
Returns the location of specified substring. |
| 15 | strposb(source text, target text)
Returns the binary location of specified substring. |
| 16 | substr(source text, start index, length)
Returns the substring for the specified length. |
| 17 | trim(string text[, characters text])
Removes the characters (a space by default) from the start/end/both ends of the string. |
| 18 | split_part(string text, delimiter text, field int)
Splits a string on delimiter and returns the given field (counting from one). |
| 19 | regexp_replace(string text, pattern text, replacement text)
Replaces substrings matched to a given regular expression pattern. |
| 20 | reverse(string)
Reverse operation performed for the string. |
Apache Tajo - DateTime Functions
Apache Tajo supports the following DateTime functions.
| S.No. | Function & Description |
|---|---|
| 1 | add_days(date date or timestamp, int day
Returns date added by the given day value. |
| 2 | add_months(date date or timestamp, int month)
Returns date added by the given month value. |
| 3 | current_date()
Returns todays date. |
| 4 | current_time()
Returns todays time. |
| 5 | extract(century from date/timestamp)
Extracts century from the given parameter. |
| 6 | extract(day from date/timestamp)
Extracts day from the given parameter. |
| 7 | extract(decade from date/timestamp)
Extracts decade from the given parameter. |
| 8 | extract(day dow date/timestamp)
Extracts day of week from the given parameter. |
| 9 | extract(doy from date/timestamp)
Extracts day of year from the given parameter. |
| 10 | select extract(hour from timestamp)
Extracts hour from the given parameter. |
| 11 | select extract(isodow from timestamp)
Extracts day of week from the given parameter. This is identical to dow except for Sunday. This matches the ISO 8601 day of the week numbering. |
| 12 | select extract(isoyear from date)
Extracts ISO year from the specified date. ISO year may be different from the Gregorian year. |
| 13 | extract(microseconds from time)
Extracts microseconds from the given parameter. The seconds field, including fractional parts, multiplied by 1 000 000; |
| 14 | extract(millennium from timestamp )
Extracts millennium from the given parameter.one millennium corresponds to 1000 years. Hence, the third millennium started January 1, 2001. |
| 15 | extract(milliseconds from time)
Extracts milliseconds from the given parameter. |
| 16 | extract(minute from timestamp )
Extracts minute from the given parameter. |
| 17 | extract(quarter from timestamp)
Extracts quarter of the year(1 - 4) from the given parameter. |
| 18 | date_part(field text, source date or timestamp or time)
Extracts date field from text. |
| 19 | now()
Returns current timestamp. |
| 20 | to_char(timestamp, format text)
Converts timestamp to text. |
| 21 | to_date(src text, format text)
Converts text to date. |
| 22 | to_timestamp(src text, format text)
Converts text to timestamp. |
Apache Tajo - JSON Functions
The JSON functions are listed in the following table −
| S.No. | Function & Description |
|---|---|
| 1 | json_extract_path_text(js on text, json_path text)
Extracts JSON string from a JSON string based on json path specified. |
| 2 | json_array_get(json_array text, index int4)
Returns the element at the specified index into the JSON array. |
| 3 | json_array_contains(json_ array text, value any)
Determine if the given value exists in the JSON array. |
| 4 | json_array_length(json_ar ray text)
Returns the length of json array. |
Apache Tajo - Database Creation
This section explains the Tajo DDL commands. Tajo has a built-in database named default.
Create Database Statement
Create Database is a statement used to create a database in Tajo. The syntax for this statement is as follows −
CREATE DATABASE [IF NOT EXISTS] <database_name>
Query
default> default> create database if not exists test;
Result
The above query will generate the following result.
OK
Database is the namespace in Tajo. A database can contain multiple tables with a unique name.
Show Current Database
To check the current database name, issue the following command −
Query
default> \c
Result
The above query will generate the following result.
You are now connected to database "default" as user user1".
default>
Connect to Database
As of now, you have created a database named test. The following syntax is used to connect the test database.
\c <database name>
Query
default> \c test
Result
The above query will generate the following result.
You are now connected to database "test" as user user1.
test>
You can now see the prompt changes from default database to test database.
Drop Database
To drop a database, use the following syntax −
DROP DATABASE <database-name>
Query
test> \c default
You are now connected to database "default" as user user1".
default> drop database test;
Result
The above query will generate the following result.
OK
Apache Tajo - Table Management
A table is a logical view of one data source. It consists of a logical schema, partitions, URL, and various properties. A Tajo table can be a directory in HDFS, a single file, one HBase table, or a RDBMS table.
Tajo supports the following two types of tables −
- external table
- internal table
External Table
External table needs the location property when the table is created. For example, if your data is already there as Text/JSON files or HBase table, you can register it as Tajo external table.
The following query is an example of external table creation.
create external table sample(col1 int,col2 text,col3 int) location hdfs://path/to/table';
Here,
External keyword − This is used to create an external table. This helps to create a table in the specified location.
Sample refers to the table name.
Location − It is a directory for HDFS,Amazon S3, HBase or local file system. To assign a location property for directories, use the below URI examples −
HDFS − hdfs://localhost:port/path/to/table
Amazon S3 − s3://bucket-name/table
local file system − file:///path/to/table
Openstack Swift − swift://bucket-name/table
Table Properties
An external table has the following properties −
TimeZone − Users can specify a time zone for reading or writing a table.
Compression format − Used to make data size compact. For example, the text/json file uses compression.codec property.
Internal Table
A Internal table is also called an Managed Table. It is created in a pre-defined physical location called the Tablespace.
Syntax
create table table1(col1 int,col2 text);
By default, Tajo uses tajo.warehouse.directory located in conf/tajo-site.xml . To assign new location for the table, you can use Tablespace configuration.
Tablespace
Tablespace is used to define locations in the storage system. It is supported for only internal tables. You can access the tablespaces by their names. Each tablespace can use a different storage type. If you dont specify tablespaces then, Tajo uses the default tablespace in the root directory.
Tablespace Configuration
You have conf/tajo-site.xml.template in Tajo. Copy the file and rename it to storagesite.json. This file will act as a configuration for Tablespaces. Tajo data formats uses the following configuration −
HDFS Configuration
$ vi conf/storage-site.json {
   "spaces": {
      "${tablespace_name}": {
         "uri": hdfs://localhost:9000/path/to/Tajo"
      }
   }
}
HBase Configuration
$ vi conf/storage-site.json {
   "spaces": {
      "${tablespace_name}": {
         "uri": hbase:zk://quorum1:port,quorum2:port/"
      }
   }
}
Text File Configuration
$ vi conf/storage-site.json {
   "spaces": {
      "${tablespace_name}": {
         uri: hdfs://localhost:9000/path/to/Tajo
      }
   }
}
Tablespace Creation
Tajos internal table records can be accessed from another table only. You can configure it with tablespace.
Syntax
CREATE TABLE [IF NOT EXISTS] <table_name> [(column_list)] [TABLESPACE tablespace_name]
[using <storage_type> [with (<key> = <value>, ...)]] [AS <select_statement>]
Here,
IF NOT EXISTS − This avoids an error if the same table has not been created already.
TABLESPACE − This clause is used to assign the tablespace name.
Storage type − Tajo data supports formats like text,JSON,HBase,Parquet,Sequencefile and ORC.
AS select statement − Select records from another table.
Configure Tablespace
Start your Hadoop services and open the file conf/storage-site.json, then add the following changes −
$ vi conf/storage-site.json {
   "spaces": {
      space1: {
         "uri": hdfs://localhost:9000/path/to/Tajo"
      }
   }
}
Here, Tajo will refer to the data from HDFS location and space1 is the tablespace name. If you do not start Hadoop services, you cant register tablespace.
Query
default> create table table1(num1 int,num2 text,num3 float) tablespace space1;
The above query creates a table named table1 and space1 refers to the tablespace name.
Data formats
Tajo supports data formats. Lets go through each of the formats one by one in detail.
Text
A character-separated values plain text file represents a tabular data set consisting of rows and columns. Each row is a plain text line.
Creating Table
default> create external table customer(id int,name text,address text,age int)
   using text with('text.delimiter'=',') location file:/Users/workspace/Tajo/customers.csv;
Here, customers.csv file refers to a comma separated value file located in the Tajo installation directory.
To create internal table using text format, use the following query −
default> create table customer(id int,name text,address text,age int) using text;
In the above query, you have not assigned any tablespace so it will take Tajos default tablespace.
Properties
A text file format has the following properties −
text.delimiter − This is a delimiter character. Default is |.
compression.codec − This is a compression format. By default, it is disabled. you can change the settings using specified algorithm.
timezone − The table used for reading or writing.
text.error-tolerance.max-num − The maximum number of tolerance levels.
text.skip.headerlines − The number of header lines per skipped.
text.serde − This is serialization property.
JSON
Apache Tajo supports JSON format for querying data. Tajo treats a JSON object as SQL record. One object equals one row in a Tajo table. Lets consider array.json as follows −
$ hdfs dfs -cat /json/array.json {
   "num1" : 10,
   "num2" : "simple json array",
   "num3" : 50.5
}
After you create this file, switch to the Tajo shell and type the following query to create a table using the JSON format.
Query
default> create external table sample (num1 int,num2 text,num3 float)
   using json location json/array.json;
Always remember that the file data must match with the table schema. Otherwise, you can omit the column names and use * which doesnt require columns list.
To create an internal table, use the following query −
default> create table sample (num1 int,num2 text,num3 float) using json;
Parquet
Parquet is a columnar storage format. Tajo uses Parquet format for easy, fast and efficient access.
Table creation
The following query is an example for table creation −
CREATE TABLE parquet (num1 int,num2 text,num3 float) USING PARQUET;
Parquet file format has the following properties −
parquet.block.size − size of a row group being buffered in memory.
parquet.page.size − The page size is for compression.
parquet.compression − The compression algorithm used to compress pages.
parquet.enable.dictionary − The boolean value is to enable/disable dictionary encoding.
RCFile
RCFile is the Record Columnar File. It consists of binary key/value pairs.
Table creation
The following query is an example for table creation −
CREATE TABLE Record(num1 int,num2 text,num3 float) USING RCFILE;
RCFile has the following properties −
rcfile.serde − custom deserializer class.
compression.codec − compression algorithm.
rcfile.null − NULL character.
SequenceFile
SequenceFile is a basic file format in Hadoop which consists of key/value pairs.
Table creation
The following query is an example for table creation −
CREATE TABLE seq(num1 int,num2 text,num3 float) USING sequencefile;
This sequence file has Hive compatibility. This can be written in Hive as,
CREATE TABLE table1 (id int, name string, score float, type string)
STORED AS sequencefile;
ORC
ORC (Optimized Row Columnar) is a columnar storage format from Hive.
Table creation
The following query is an example for table creation −
CREATE TABLE optimized(num1 int,num2 text,num3 float) USING ORC;
The ORC format has the following properties −
orc.max.merge.distance − ORC file is read, it merges when the distance is lower.
orc.stripe.size − This is the size of each stripe.
orc.buffer.size − The default is 256KB.
orc.rowindex.stride − This is the ORC index stride in number of rows.
Apache Tajo - SQL Statements
In the previous chapter, you have understood how to create tables in Tajo. This chapter explains about the SQL statement in Tajo.
Create Table Statement
Before moving to create a table, create a text file students.csv in Tajo installation directory path as follows −
students.csv
| Id | Name | Address | Age | Marks |
|---|---|---|---|---|
| 1 | Adam | 23 New Street | 21 | 90 |
| 2 | Amit | 12 Old Street | 13 | 95 |
| 3 | Bob | 10 Cross Street | 12 | 80 |
| 4 | David | 15 Express Avenue | 12 | 85 |
| 5 | Esha | 20 Garden Street | 13 | 50 |
| 6 | Ganga | 25 North Street | 12 | 55 |
| 7 | Jack | 2 Park Street | 12 | 60 |
| 8 | Leena | 24 South Street | 12 | 70 |
| 9 | Mary | 5 West Street | 12 | 75 |
| 10 | Peter | 16 Park Avenue | 12 | 95 |
After the file has been created, move to the terminal and start the Tajo server and shell one by one.
Create Database
Create a new database using the following command −
Query
default> create database sampledb;
OK
Connect to the database sampledb which is now created.
default> \c sampledb
You are now connected to database "sampledb" as user user1.
Then, create a table in sampledb as follows −
Query
sampledb>  create external table mytable(id int,name text,address text,age int,mark int)
   using text with('text.delimiter' = ',') location file:/Users/workspace/Tajo/students.csv;
Result
The above query will generate the following result.
OK
Here, the external table is created. Now, you just have to enter the file location. If you have to assign the table from hdfs then use hdfs instead of file.
Next, the students.csv file contains comma separated values. The text.delimiter field is assigned with ,.
You have now created mytable successfully in sampledb.
Show Table
To show tables in Tajo, use the following query.
Query
sampledb> \d
mytable
sampledb> \d mytable
Result
The above query will generate the following result.
table name: sampledb.mytable
table uri: file:/Users/workspace/Tajo/students.csv
store type: TEXT
number of rows: unknown
volume: 261 B
Options:
'timezone' = 'Asia/Kolkata'
'text.null' = '\\N'
'text.delimiter' = ','
schema:
id INT4
name TEXT
address TEXT
age INT4
mark INT4
List table
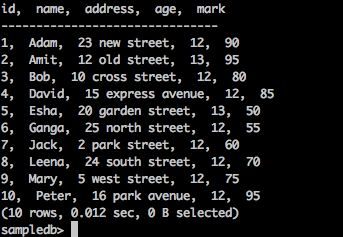
To fetch all the records in the table, type the following query −
Query
sampledb> select * from mytable;
Result
The above query will generate the following result.

Insert Table Statement
Tajo uses the following syntax to insert records in table.
Syntax
create table table1 (col1 int8, col2 text, col3 text);
--schema should be same for target table schema
Insert overwrite into table1 select * from table2;
                     (or)
Insert overwrite into LOCATION '/dir/subdir' select * from table;
Tajos insert statement is similar to the INSERT INTO SELECT statement of SQL.
Query
Lets create a table to overwrite table data of an existing table.
sampledb> create table test(sno int,name text,addr text,age int,mark int);
OK
sampledb> \d
Result
The above query will generate the following result.
mytable
test
Insert Records
To insert records in the test table, type the following query.
Query
sampledb> insert overwrite into test select * from mytable;
Result
The above query will generate the following result.
Progress: 100%, response time: 0.518 sec
Here, mytable" records overwrite the test table. If you dont want to create the test table, then straight away assign the physical path location as mentioned in an alternative option for insert query.
Fetch records
Use the following query to list out all the records in the test table −
Query
sampledb> select * from test;
Result
The above query will generate the following result.
This statement is used to add, remove or modify columns of an existing table.
To rename the table use the following syntax −
Alter table table1 RENAME TO table2;
Query
sampledb> alter table test rename to students;
Result
The above query will generate the following result.
OK
To check the changed table name, use the following query.
sampledb> \d
mytable
students
Now the table test is changed to students table.
Add Column
To insert new column in the students table, type the following syntax −
Alter table <table_name> ADD COLUMN <column_name> <data_type>
Query
sampledb> alter table students add column grade text;
Result
The above query will generate the following result.
OK
Set Property
This property is used to change the tables property.
Query
sampledb> ALTER TABLE students SET PROPERTY 'compression.type' = 'RECORD',
   'compression.codec' = 'org.apache.hadoop.io.compress.Snappy Codec' ;
OK
Here, compression type and codec properties are assigned.
To change the text delimiter property, use the following −
Query
ALTER TABLE students  SET PROPERTY text.delimiter'=',';
OK
Result
The above query will generate the following result.
sampledb> \d students
table name: sampledb.students
table uri: file:/tmp/tajo-user1/warehouse/sampledb/students
store type: TEXT
number of rows: 10
volume: 228 B
Options:
'compression.type' = 'RECORD'
'timezone' = 'Asia/Kolkata'
'text.null' = '\\N'
'compression.codec' = 'org.apache.hadoop.io.compress.SnappyCodec'
'text.delimiter' = ','
schema:
id INT4
name TEXT
addr TEXT
age INT4
mark INT4
grade TEXT
The above result shows that the tables properties are changed using the SET property.
Select Statement
The SELECT statement is used to select data from a database.
The syntax for the Select statement is as follows −
SELECT [distinct [all]] * | <expression> [[AS] <alias>] [, ...]
   [FROM <table reference> [[AS] <table alias name>] [, ...]]
   [WHERE <condition>]
   [GROUP BY <expression> [, ...]]
   [HAVING <condition>]
   [ORDER BY <expression> [ASC|DESC] [NULLS (FIRST|LAST)] [, ]]
Where Clause
The Where clause is used to filter records from the table.
Query
sampledb> select * from mytable where id > 5;
Result
The above query will generate the following result.
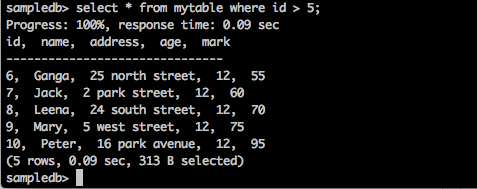
The query returns the records of those students whose id is greater than 5.
Query
sampledb> select * from mytable where name = Peter;
Result
The above query will generate the following result.
Progress: 100%, response time: 0.117 sec

  id,  name,  address,   age
-------------------------------
10,  Peter,  16 park avenue , 12
The result filters Peters records only.
Distinct Clause
A table column may contain duplicate values. The DISTINCT keyword can be used to return only distinct (different) values.
Syntax
SELECT DISTINCT column1,column2 FROM table_name;
Query
sampledb> select distinct age from mytable;
Result
The above query will generate the following result.
Progress: 100%, response time: 0.216 sec
age
-------------------------------
13
12
The query returns the distinct age of students from mytable.
Group By Clause
The GROUP BY clause is used in collaboration with the SELECT statement to arrange identical data into groups.
Syntax
SELECT column1, column2 FROM table_name WHERE [ conditions ] GROUP BY column1, column2;
Query
select age,sum(mark) as sumofmarks from mytable group by age;
Result
The above query will generate the following result.
age,  sumofmarks
-------------------------------
13,  145
12,  610
Here, the mytable" column has two types of ages 12 and 13. Now the query groups the records by age and produces the sum of marks for the corresponding ages of students.
Having Clause
The HAVING clause enables you to specify conditions that filter which group results appear in the final results. The WHERE clause places conditions on the selected columns, whereas the HAVING clause places conditions on the groups created by the GROUP BY clause.
Syntax
SELECT column1, column2 FROM table1 GROUP BY column HAVING [ conditions ]
Query
sampledb> select age from mytable group by age having sum(mark) > 200;
Result
The above query will generate the following result.
age
-------------------------------
12
The query groups the records by age and returns the age when the condition result sum(mark) > 200.
Order By Clause
The ORDER BY clause is used to sort the data in ascending or descending order, based on one or more columns. The Tajo database sorts query results in ascending order by default.
Syntax
SELECT column-list FROM table_name
[WHERE condition]
[ORDER BY column1, column2, .. columnN] [ASC | DESC];
Query
sampledb> select * from mytable where mark > 60 order by name desc;
Result
The above query will generate the following result.
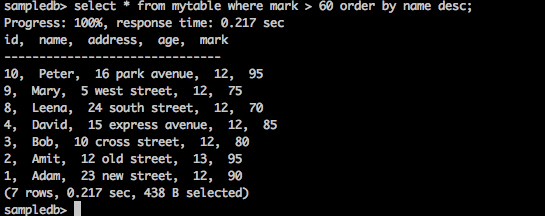
The query returns the names of those students in descending order whose marks are greater than 60.
Create Index Statement
The CREATE INDEX statement is used to create indexes in tables. Index is used for fast retrieval of data. Current version supports index for only plain TEXT formats stored on HDFS.
Syntax
CREATE INDEX [ name ] ON table_name ( { column_name | ( expression ) }
Query
create index student_index on mytable(id);
Result
The above query will generate the following result.
id
To view assigned index for the column, type the following query.
default> \d mytable
table name: default.mytable
table uri: file:/Users/deiva/workspace/Tajo/students.csv
store type: TEXT
number of rows: unknown
volume: 307 B
Options:
   'timezone' = 'Asia/Kolkata'
   'text.null' = '\\N'
   'text.delimiter' = ','
schema:
id INT4
name TEXT
address TEXT
age INT4
mark INT4
Indexes:
"student_index" TWO_LEVEL_BIN_TREE (id ASC NULLS LAST )
Here, TWO_LEVEL_BIN_TREE method is used by default in Tajo.
Drop Table Statement
The Drop Table Statement is used to drop a table from the database.
Syntax
drop table table name;
Query
sampledb> drop table mytable;
To check if the table has been dropped from the table, type the following query.
sampledb> \d mytable;
Result
The above query will generate the following result.
ERROR: relation 'mytable' does not exist
You can also check the query using \d command to list out the available Tajo tables.
Aggregate & Window Functions
This chapter explains the aggregate and window functions in detail.
Aggregation Functions
Aggregate functions produce a single result from a set of input values. The following table describes the list of aggregate functions in detail.
| S.No. | Function & Description |
|---|---|
| 1 | AVG(exp)
Averages a column of all records in a data source. |
| 2 | CORR(expression1, expression2)
Returns the coefficient of correlation between a set of number pairs. |
| 3 | COUNT()
Returns the number rows. |
| 4 | MAX(expression)
Returns the largest value of the selected column. |
| 5 | MIN(expression)
Returns the smallest value of the selected column. |
| 6 | SUM(expression)
Returns the sum of the given column. |
| 7 | LAST_VALUE(expression)
Returns the last value of the given column. |
Window Function
The Window functions execute on a set of rows and return a single value for each row from the query. The term window has the meaning of set of row for the function.
The Window function in a query, defines the window using the OVER() clause.
The OVER() clause has the following capabilities −
- Defines window partitions to form groups of rows. (PARTITION BY clause)
- Orders rows within a partition. (ORDER BY clause)
The following table describes the window functions in detail.
| Function | Return type | Description |
|---|---|---|
| rank() | int | Returns rank of the current row with gaps. |
| row_num() | int | Returns the current row within its partition, counting from 1. |
| lead(value[, offset integer[, default any]]) | Same as input type | Returns value evaluated at the row that is offset rows after the current row within the partition. If there is no such row, default value will be returned. |
| lag(value[, offset integer[, default any]]) | Same as input type | Returns value evaluated at the row that is offset rows before the current row within the partition. |
| first_value(value) | Same as input type | Returns the first value of input rows. |
| last_value(value) | Same as input type | Returns the last value of input rows. |
Apache Tajo - SQL Queries
This chapter explains about the following significant Queries.
- Predicates
- Explain
- Join
Let us proceed and perform the queries.
Predicates
Predicate is an expression which is used to evaluate true/false values and UNKNOWN. Predicates are used in the search condition of WHERE clauses and HAVING clauses and other constructs where a Boolean value is required.
IN predicate
Determines whether the value of expression to test matches any value in the subquery or the list. Subquery is an ordinary SELECT statement that has a result set of one column and one or more rows. This column or all expressions in the list must have the same data type as the expression to test.
Syntax
IN::=
<expression to test> [NOT] IN (<subquery>)
| (<expression1>,...)
Query
select id,name,address from mytable where id in(2,3,4);
Result
The above query will generate the following result.
id,  name,   address
-------------------------------
2,  Amit,  12 old street
3,  Bob,   10 cross street
4,  David, 15 express avenue
The query returns records from mytable for the students id 2,3 and 4.
Query
select id,name,address from mytable where id not in(2,3,4);
Result
The above query will generate the following result.
id,  name,  address
-------------------------------
1,  Adam,   23 new street
5,  Esha,   20 garden street
6,  Ganga,  25 north street
7,  Jack,   2 park street
8,  Leena,  24 south street
9,  Mary,   5 west street
10, Peter,  16 park avenue
The above query returns records from mytable where students is not in 2,3 and 4.
Like Predicate
The LIKE predicate compares the string specified in the first expression for calculating the string value, which is refered to as a value to test, with the pattern that is defined in the second expression for calculating the string value.
The pattern may contain any combination of wildcards such as −
Underline symbol (_), which can be used instead of any single character in the value to test.
Percent sign (%), which replaces any string of zero or more characters in the value to test.
Syntax
LIKE::=
<expression for calculating the string value>
[NOT] LIKE
<expression for calculating the string value>
[ESCAPE <symbol>]
Query
select * from mytable where name like A%';
Result
The above query will generate the following result.
id,  name,  address,     age,  mark
-------------------------------
1,  Adam,  23 new street,  12,  90
2,  Amit,  12 old street,  13,  95
The query returns records from mytable of those students whose names are starting with A.
Query
select * from mytable where name like _a%';
Result
The above query will generate the following result.
id,  name,  address,    age,  mark
-
4,  David,  15 express avenue,  12,  85
6,  Ganga,  25 north street,    12,  55
7,  Jack,  2 park street,       12,  60
9,  Mary,  5 west street,       12,  75
The query returns records from mytable of those students whose names are starting with a as the second char.
Using NULL Value in Search Conditions
Let us now understand how to use NULL Value in the search conditions.
Syntax
Predicate
IS [NOT] NULL
Query
select name from mytable where name is not null;
Result
The above query will generate the following result.
name
-------------------------------
Adam
Amit
Bob
David
Esha
Ganga
Jack
Leena
Mary
Peter
(10 rows, 0.076 sec, 163 B selected)
Here, the result is true so it returns all the names from table.
Query
Let us now check the query with NULL condition.
default> select name from mytable where name is null;
Result
The above query will generate the following result.
name
-------------------------------
(0 rows, 0.068 sec, 0 B selected)
Explain
Explain is used to obtain a query execution plan. It shows a logical and global plan execution of a statement.
Logical Plan Query
explain select * from mytable;
explain
-------------------------------
   => target list: default.mytable.id (INT4), default.mytable.name (TEXT),
      default.mytable.address (TEXT), default.mytable.age (INT4), default.mytable.mark (INT4)

   => out schema: {
   (5) default.mytable.id (INT4), default.mytable.name (TEXT), default.mytable.address (TEXT),
      default.mytable.age (INT4), default.mytable.mark (INT4)
   }

   => in schema: {
	(5) default.mytable.id (INT4), default.mytable.name (TEXT), default.mytable.address (TEXT),
      default.mytable.age (INT4), default.mytable.mark (INT4)
   }
Result
The above query will generate the following result.

The query result shows a logical plan format for the given table. The Logical plan returns the following three results −
- Target list
- Out schema
- In schema
Global Plan Query
explain global select * from mytable;
explain
-------------------------------
-------------------------------------------------------------------------------
Execution Block Graph (TERMINAL - eb_0000000000000_0000_000002)
-------------------------------------------------------------------------------
|-eb_0000000000000_0000_000002
   |-eb_0000000000000_0000_000001
-------------------------------------------------------------------------------
Order of Execution
-------------------------------------------------------------------------------
1: eb_0000000000000_0000_000001
2: eb_0000000000000_0000_000002
-------------------------------------------------------------------------------
=======================================================
Block Id: eb_0000000000000_0000_000001 [ROOT]
=======================================================
SCAN(0) on default.mytable

   => target list: default.mytable.id (INT4), default.mytable.name (TEXT),
      default.mytable.address (TEXT), default.mytable.age (INT4), default.mytable.mark (INT4)

   => out schema: {
	(5) default.mytable.id (INT4), default.mytable.name (TEXT),default.mytable.address (TEXT),
      default.mytable.age (INT4), default.mytable.mark (INT4)
   }

   => in schema: {
	(5) default.mytable.id (INT4), default.mytable.name (TEXT), default.mytable.address (TEXT),
      default.mytable.age (INT4), default.mytable.mark (INT4)
   }
=======================================================
Block Id: eb_0000000000000_0000_000002 [TERMINAL]
=======================================================
(24 rows, 0.065 sec, 0 B selected)
Result
The above query will generate the following result.
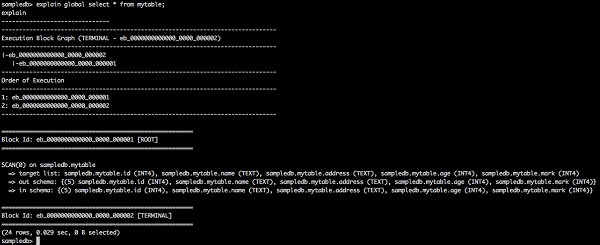
Here, Global plan shows execution block ID, order of execution and its information.
Joins
SQL joins are used to combine rows from two or more tables. The following are the different types of SQL Joins −
- Inner join
- { LEFT | RIGHT | FULL } OUTER JOIN
- Cross join
- Self join
- Natural join
Consider the following two tables to perform joins operations.
Table1 Customers
| Id | Name | Address | Age |
|---|---|---|---|
| 1 | Customer 1 | 23 Old Street | 21 |
| 2 | Customer 2 | 12 New Street | 23 |
| 3 | Customer 3 | 10 Express Avenue | 22 |
| 4 | Customer 4 | 15 Express Avenue | 22 |
| 5 | Customer 5 | 20 Garden Street | 33 |
| 6 | Customer 6 | 21 North Street | 25 |
Table2 customer_order
| Id | Order Id | Emp Id |
|---|---|---|
| 1 | 1 | 101 |
| 2 | 2 | 102 |
| 3 | 3 | 103 |
| 4 | 4 | 104 |
| 5 | 5 | 105 |
Let us now proceed and perform the SQL joins operations on the above two tables.
Inner Join
The Inner join selects all rows from both the tables when there is a match between the columns in both tables.
Syntax
SELECT column_name(s) FROM table1 INNER JOIN table2 ON table1.column_name = table2.column_name;
Query
default> select c.age,c1.empid from customers c inner join customer_order c1 on c.id = c1.id;
Result
The above query will generate the following result.
age,  empid
-------------------------------
21,  101
23,  102
22,  103
22,  104
33,  105
The query matches five rows from both the tables. Hence, it returns the matched rows age from the first table.
Left Outer Join
A left outer join retains all of the rows of the left table, regardless of whether there is a row that matches on the right table or not.
Query
select c.name,c1.empid from customers c left outer join customer_order c1 on c.id = c1.id;
Result
The above query will generate the following result.
name,       empid
-------------------------------
customer1,  101
customer2,  102
customer3,  103
customer4,  104
customer5,  105
customer6,
Here, the left outer join returns name column rows from the customers(left) table and empid column matched rows from the customer_order(right) table.
Right Outer Join
A right outer join retains all of the rows of the right table, regardless of whether there is a row that matches on the left table.
Query
select c.name,c1.empid from customers c right outer join customer_order c1 on c.id = c1.id;
Result
The above query will generate the following result.
name,      empid
-------------------------------
customer1,  101
customer2,  102
customer3,  103
customer4,  104
customer5,  105
Here, the Right Outer Join returns the empid rows from the customer_order(right) table and the name column matched rows from customers table.
Full Outer Join
The Full Outer Join retains all rows from both the left and the right table.
Query
select * from customers c full outer join customer_order c1 on c.id = c1.id;
Result
The above query will generate the following result.
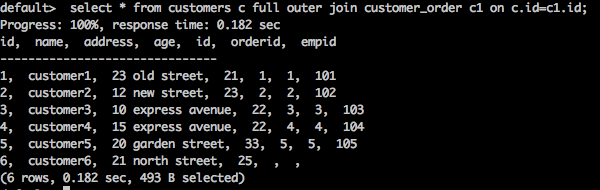
The query returns all the matching and non-matching rows from both the customers and the customer_order tables.
Cross Join
This returns the Cartesian product of the sets of records from the two or more joined tables.
Syntax
SELECT * FROM table1 CROSS JOIN table2;
Query
select orderid,name,address from customers,customer_order;
Result
The above query will generate the following result.
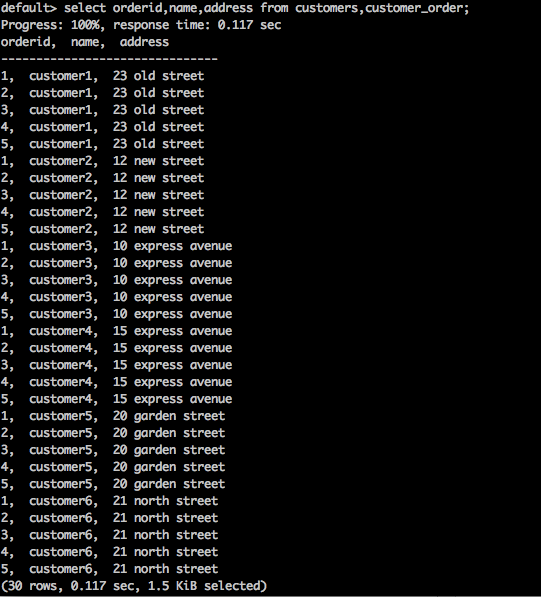
The above query returns the Cartesian product of the table.
Natural Join
A Natural Join does not use any comparison operator. It does not concatenate the way a Cartesian product does. We can perform a Natural Join only if there is at least one common attribute that exists between the two relations.
Syntax
SELECT * FROM table1 NATURAL JOIN table2;
Query
select * from customers natural join customer_order;
Result
The above query will generate the following result.
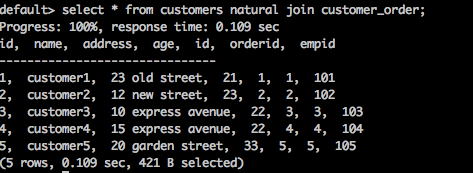
Here, there is one common column id that exists between two tables. Using that common column, the Natural Join joins both the tables.
Self Join
The SQL SELF JOIN is used to join a table to itself as if the table were two tables, temporarily renaming at least one table in the SQL statement.
Syntax
SELECT a.column_name, b.column_name...
FROM table1 a, table1 b
WHERE a.common_filed = b.common_field
Query
default> select c.id,c1.name from customers c, customers c1 where c.id = c1.id;
Result
The above query will generate the following result.
id,   name
-------------------------------
1,   customer1
2,   customer2
3,   customer3
4,   customer4
5,   customer5
6,   customer6
The query joins a customer table to itself.
Apache Tajo - Storage Plugins
Tajo supports various storage formats. To register storage plugin configuration, you should add the changes to the configuration file storage-site.json.
storage-site.json
The structure is defined as follows −
{
   "storages": {
      storage plugin name: {
         "handler": "${class name}, "default-format": plugin name"
      }
   }
}
Each storage instance is identified by URI.
PostgreSQL Storage Handler
Tajo supports PostgreSQL storage handler. It enables user queries to access database objects in PostgreSQL. It is the default storage handler in Tajo so you can easily configure it.
configuration
{
   "spaces": {
      "postgre": {
         "uri": "jdbc:postgresql://hostname:port/database1"
         "configs": {
            "mapped_database": sampledb
            "connection_properties": {
               "user":tajo", "password": "pwd"
            }
         }
      }
   }
}
Here, database1 refers to the postgreSQL database which is mapped to the database sampledb in Tajo.
Apache Tajo - Integration with HBase
Apache Tajo supports HBase integration. This enables us to access HBase tables in Tajo. HBase is a distributed column-oriented database built on top of the Hadoop file system. It is a part of the Hadoop ecosystem that provides random real-time read/write access to data in the Hadoop File System. The following steps are required to configure HBase integration.
Set Environment Variable
Add the following changes to conf/tajo-env.sh file.
$ vi conf/tajo-env.sh
# HBase home directory. It is opitional but is required mandatorily to use HBase.
# export HBASE_HOME = path/to/HBase
After you have included the HBase path, Tajo will set the HBase library file to the classpath.
Create an External Table
Create an external table using the following syntax −
CREATE [EXTERNAL] TABLE [IF NOT EXISTS] <table_name> [(<column_name> <data_type>, ... )]
USING hbase WITH ('table' = '<hbase_table_name>'
, 'columns' = ':key,<column_family_name>:<qualifier_name>, ...'
, 'hbase.zookeeper.quorum' = '<zookeeper_address>'
, 'hbase.zookeeper.property.clientPort' = '<zookeeper_client_port>')
[LOCATION 'hbase:zk://<hostname>:<port>/'] ;
To access HBase tables, you must configure the tablespace location.
Here,
Table − Set hbase origin table name. If you want to create an external table, the table must exists on HBase.
Columns − Key refers to the HBase row key. The number of columns entry need to be equal to the number of Tajo table columns.
hbase.zookeeper.quorum − Set zookeeper quorum address.
hbase.zookeeper.property.clientPort − Set zookeeper client port.
Query
CREATE EXTERNAL TABLE students (rowkey text,id int,name text)
USING hbase WITH ('table' = 'students', 'columns' = ':key,info:id,content:name')
LOCATION 'hbase:zk://<hostname>:<port>/';
Here, the Location path field sets the zookeeper client port id. If you dont set the port, Tajo will refer the property of hbase-site.xml file.
Create Table in HBase
You can start the HBase interactive shell using the hbase shell command as shown in the following query.
Query
/bin/hbase shell
Result
The above query will generate the following result.
hbase(main):001:0>
Steps to Query HBase
To query HBase, you should complete the following steps −
Step 1 − Pipe the following commands to the HBase shell to create a tutorial table.
Query
hbase(main):001:0> create students,{NAME => info},{NAME => content}
put 'students', row-01', 'content:name', 'Adam'
put 'students', row-01', 'info:id', '001'
put 'students', row-02', 'content:name', 'Amit'
put 'students', row-02', 'info:id', '002'
put 'students', row-03', 'content:name', 'Bob'
put 'students', row-03', 'info:id', 003'
Step 2 − Now, issue the following command in hbase shell to load the data into a table.
main):001:0> cat ../hbase/hbase-students.txt | bin/hbase shell
Step 3 − Now, return to the Tajo shell and execute the following command to view the metadata of the table −
default> \d students;

table name: default.students
table path:
store type: HBASE
number of rows: unknown
volume: 0 B
Options:
   'columns' = ':key,info:id,content:name'
   'table' = 'students'

schema:
rowkey  TEXT
id  INT4
name TEXT
Step 4 − To fetch the results from the table, use the following query −
Query
default> select * from students
Result
The above query will fetch the following result −
rowkey,  id,  name
-------------------------------
row-01,  001,  Adam
row-02,  002,  Amit
row-03   003,  Bob
Apache Tajo - Integration with Hive
Tajo supports the HiveCatalogStore to integrate with Apache Hive. This integration allows Tajo to access tables in Apache Hive.
Set Environment Variable
Add the following changes to conf/tajo-env.sh file.
$ vi conf/tajo-env.sh
export HIVE_HOME = /path/to/hive
After you have included the Hive path, Tajo will set the Hive library file to the classpath.
Catalog Configuration
Add the following changes to the conf/catalog-site.xml file.
$ vi conf/catalog-site.xml
<property>
   <name>tajo.catalog.store.class</name>
   <value>org.apache.tajo.catalog.store.HiveCatalogStore</value>
</property>
Once HiveCatalogStore is configured, you can access Hives table in Tajo.
Apache Tajo - OpenStack Swift Integration
Swift is a distributed and consistent object/blob store. Swift offers cloud storage software so that you can store and retrieve lots of data with a simple API. Tajo supports Swift integration.
The following are the prerequisites of Swift Integration −
- Swift
- Hadoop
Core-site.xml
Add the following changes to the hadoop core-site.xml file −
<property>
   <name>fs.swift.impl</name>
   <value>org.apache.hadoop.fs.swift.snative.SwiftNativeFileSystem</value>
   <description>File system implementation for Swift</description>
</property>

<property>
   <name>fs.swift.blocksize</name>
   <value>131072</value>
   <description>Split size in KB</description>
</property>
This will be used for Hadoop to access the Swift objects. After you made all the changes move to the Tajo directory to set Swift environment variable.
conf/tajo-env.h
Open the Tajo configuration file and add set the environment variable as follows −
$ vi conf/tajo-env.h
export TAJO_CLASSPATH = $HADOOP_HOME/share/hadoop/tools/lib/hadoop-openstack-x.x.x.jar
Now, Tajo will be able to query the data using Swift.
Create Table
Lets create an external table to access Swift objects in Tajo as follows −
default> create external table swift(num1 int, num2 text, num3 float)
   using text with ('text.delimiter' = '|') location 'swift://bucket-name/table1';
After the table has been created, you can run the SQL queries.
Apache Tajo - JDBC Interface
Apache Tajo provides JDBC interface to connect and execute queries. We can use the same JDBC interface to connect Tajo from our Java based application. Let us now understand how to connect Tajo and execute the commands in our sample Java application using JDBC interface in this section.
Download JDBC Driver
Download the JDBC driver by visiting the following link − http://apache.org/dyn/closer.cgi/tajo/tajo-0.11.3/tajo-jdbc-0.11.3.jar.
Now, tajo-jdbc-0.11.3.jar file has been downloaded on your machine.
Set Class Path
To make use of the JDBC driver in your program, set the class path as follows −
CLASSPATH = path/to/tajo-jdbc-0.11.3.jar:$CLASSPATH
Connect to Tajo
Apache Tajo provides a JDBC driver as a single jar file and it is available @ /path/to/tajo/share/jdbc-dist/tajo-jdbc-0.11.3.jar.
The connection string to connect the Apache Tajo is of the following format −
jdbc:tajo://host/
jdbc:tajo://host/database
jdbc:tajo://host:port/
jdbc:tajo://host:port/database
Here,
host − The hostname of the TajoMaster.
port − The port number that server is listening. Default port number is 26002.
database − The database name. The default database name is default.
Java Application
Let us now understand Java application.
Coding
import java.sql.*;
import org.apache.tajo.jdbc.TajoDriver;

public class TajoJdbcSample {
   public static void main(String[] args) {
      Connection connection = null;
      Statement statement = null;
      try {
         Class.forName("org.apache.tajo.jdbc.TajoDriver");
         connection = DriverManager.getConnection(jdbc:tajo://localhost/default");
         statement = connection.createStatement();
         String sql;
         sql = "select * from mytable;
         // fetch records from mytable.
         ResultSet resultSet = statement.executeQuery(sql);
         while(resultSet.next()){
            int id  = resultSet.getInt("id");
            String name = resultSet.getString("name");
            System.out.print("ID: " + id + ";\nName: " + name + "\n");
         }
         resultSet.close();
         statement.close();
         connection.close();
      }catch(SQLException sqlException){
         sqlException.printStackTrace();
      }catch(Exception exception){
         exception.printStackTrace();
      }
   }
}
The application can be compiled and run using the following commands.
Compilation
javac -cp /path/to/tajo-jdbc-0.11.3.jar:. TajoJdbcSample.java
Execution
java -cp /path/to/tajo-jdbc-0.11.3.jar:. TajoJdbcSample
Result
The above commands will generate the following result −
ID: 1;
Name: Adam

ID: 2;
Name: Amit

ID: 3;
Name: Bob

ID: 4;
Name: David

ID: 5;
Name: Esha

ID: 6;
Name: Ganga

ID: 7;
Name: Jack

ID: 8;
Name: Leena

ID: 9;
Name: Mary

ID: 10;
Name: Peter
Apache Tajo - Custom Functions
Apache Tajo supports the custom / user defined functions (UDFs). The custom functions can be created in python.
The custom functions are just plain python functions with decorator @output_type(<tajo sql datatype>) as follows −
@ouput_type(integer)
def sum_py(a, b):
   return a + b;
The python scripts with UDFs can be registered by adding the below configuration in tajosite.xml.
<property>
   <name>tajo.function.python.code-dir</name>
   <value>file:///path/to/script1.py,file:///path/to/script2.py</value>
</property>
Once the scripts are registered, restart the cluster and the UDFs will be available right in the SQL query as follows −
select sum_py(10, 10) as pyfn;
Apache Tajo supports user defined aggregate functions as well but does not support user defined window functions.
