
Article Categories
- All Categories
-
 Data Structure
-
 Networking
-
 RDBMS
RDBMS
-
 Operating System
-
 Java
Java
-
 MS Excel
-
 iOS
iOS
-
 HTML
HTML
-
 CSS
CSS
-
 Android
-
 Python
-
 C Programming
-
 C++
C++
-
 C#
C#
-
 MongoDB
-
 MySQL
MySQL
-
 Javascript
-
 PHP
PHP
-
 Economics & Finance
Android Working with Recycler View
Recycler view is a more advanced version of listview and works based on View holder design pattern. Using recyclerview we can show grids as well as a list of items.
This example demonstrates how to integrate RecyclerView by creating a beautiful student records app that displays student name with age.
Step 1 − Create a new project in Android Studio, go to File ⇒ New Project and fill all required details to create a new project.
Step 2 − Open build.gradle and add Recycler view library dependency.
apply plugin: 'com.android.application'
android {
   compileSdkVersion 28
   defaultConfig {
      applicationId "com.example.andy.tutorialspoint"
      minSdkVersion 19
      targetSdkVersion 28
      versionCode 1
      versionName "1.0"
      testInstrumentationRunner "android.support.test.runner.AndroidJUnitRunner"
   }
   buildTypes {
      release {
         minifyEnabled false
         proguardFiles getDefaultProguardFile('proguard-android.txt'), 'proguard-rules.pro'
      }
   }
}
dependencies {
   implementation fileTree(dir: 'libs', include: ['*.jar'])
   implementation 'com.android.support:appcompat-v7:28.0.0'
   implementation 'com.android.support:design:28.0.0'
   implementation 'com.android.support.constraint:constraint-layout:1.1.3'
   implementation 'com.android.support:recyclerview-v7:28.0.0'
   testImplementation 'junit:junit:4.12'
   androidTestImplementation 'com.android.support.test:runner:1.0.2'
   androidTestImplementation 'com.android.support.test.espresso:espresso-core:3.0.2'
}
Step 3 − Add the following code to res/layout/activity_main.xml.
<?xml version="1.0" encoding="utf-8"?>
<RelativeLayout
   xmlns:android="http://schemas.android.com/apk/res/android"
   xmlns:tools="http://schemas.android.com/tools"
   xmlns:app="http://schemas.android.com/apk/res-auto"
   android:layout_width="match_parent"
   android:layout_height="match_parent"
   app:layout_behavior="@string/appbar_scrolling_view_behavior"
   tools:showIn="@layout/activity_main"
   tools:context=".MainActivity">
   <android.support.v7.widget.RecyclerView
      android:id="@+id/recycler_view"
      android:layout_width="match_parent"
      android:layout_height="wrap_content"
      android:scrollbars="vertical"
    />
</RelativeLayout>
In the above code, we have added recycler view to window manager as relative parent layout.
Step 4 − Add the following code to src/MainActivity.java
package com.example.andy.tutorialspoint;
import android.annotation.TargetApi;
import android.os.Build;
import android.os.Bundle;
import android.support.design.widget.TabLayout;
import android.support.v4.view.ViewPager;
import android.support.v7.app.AppCompatActivity;
import android.support.v7.widget.DividerItemDecoration;
import android.support.v7.widget.LinearLayoutManager;
import android.support.v7.widget.RecyclerView;
import android.support.v7.widget.Toolbar;
import java.util.ArrayList;
import java.util.List;
public class MainActivity extends AppCompatActivity {
   private RecyclerView recyclerView;
   private StudentAdapter studentAdapter;
   private List studentDataList =new ArrayList<>();
   @TargetApi(Build.VERSION_CODES.O)
   @Override
   protected void onCreate(Bundle savedInstanceState) {
      super.onCreate(savedInstanceState);
      setContentView(R.layout.activity_main);
      recyclerView = findViewById(R.id.recycler_view);
      studentAdapter=new StudentAdapter(studentDataList);
      RecyclerView.LayoutManager manager=new LinearLayoutManager(this);
      recyclerView.setLayoutManager(manager);
      recyclerView.addItemDecoration(new DividerItemDecoration(this, LinearLayoutManager.VERTICAL));
      recyclerView.setAdapter(studentAdapter);
      StudentDataPrepare();
   }
   private void StudentDataPrepare() {
      studentData data=new studentData("sai",25);
      studentDataList.add(data);
      data=new studentData("sai",25);
      studentDataList.add(data);
      data=new studentData("raghu",20);
      studentDataList.add(data);
      data=new studentData("raj",28);
      studentDataList.add(data);
      data=new studentData("amar",15);
      studentDataList.add(data);
      data=new studentData("bapu",19);
      studentDataList.add(data);
      data=new studentData("chandra",52);
      studentDataList.add(data);
      data=new studentData("deraj",30);
      studentDataList.add(data);
      data=new studentData("eshanth",28);
      studentDataList.add(data);
   }
}
In the above code, we have added a recycler view and studentAdapter. In that student adapter, we have passed studentDatalist as ArrayList. In Student, data list contains the name of the student and age.
Step 5 − Following is the content of the modified file src/ StudentAdapter.java.
package com.example.andy.tutorialspoint;
import android.support.annotation.NonNull;
import android.support.v7.widget.RecyclerView;
import android.view.LayoutInflater;
import android.view.View;
import android.view.ViewGroup;
import android.widget.TextView;
import java.util.List;
class StudentAdapter extends RecyclerView.Adapter {
   List studentDataList;
   public StudentAdapter(List studentDataList) {
      this.studentDataList=studentDataList;
   }
   @NonNull
   @Override
   public MyViewHolder onCreateViewHolder(@NonNull ViewGroup viewGroup, int i) {
      View itemView = LayoutInflater.from(viewGroup.getContext())
      .inflate(R.layout.student_list_row, viewGroup, false);
      return new MyViewHolder(itemView);
   }
   @Override
   public void onBindViewHolder(MyViewHolder viewHolder, int i) {
      studentData data=studentDataList.get(i);
      viewHolder.name.setText(data.name);
      viewHolder.age.setText(String.valueOf(data.age));
   }
   @Override
   public int getItemCount() {
      return studentDataList.size();
   }
   class MyViewHolder extends RecyclerView.ViewHolder {
      TextView name,age;
      public MyViewHolder(View itemView) {
         super(itemView);
         name=itemView.findViewById(R.id.name);
         age=itemView.findViewById(R.id.age);
      }
   }
}
In the adapter class, we have four methods as shown below -
onCreateViewHolder() - It is used to create a view holder and it returns a view.
onBindViewHolder() - it going to bind with created view holder.
getItemCount() - it contains size of list.
MyViewHolder class- it is view holder inner class which is extended by RecyclerView.ViewHolder
Step 6 − Following is the modified content of the xml res/layout/student_list_row.xml.
<?xml version="1.0" encoding="utf-8"?>
<LinearLayout xmlns:android="http://schemas.android.com/apk/res/android"
   android:orientation="horizontal" android:layout_width="match_parent"
   android:weightSum="1"
   android:layout_height="wrap_content">
<TextView
   android:id="@+id/name"
   android:layout_width="0dp"
   android:layout_weight="0.5"
   android:gravity="center"
   android:textSize="15sp"
   android:layout_height="100dp" />
   <TextView
      android:id="@+id/age"
      android:layout_width="0dp"
      android:layout_weight="0.5"
      android:gravity="center"
      android:textSize="15sp"
      android:layout_height="100dp" />
</LinearLayout>
In the above list item view, we have created two text views for name and age.
Step 7 − Following is the content of the modified file src/ studentData.java.
package com.example.andy.tutorialspoint;
class studentData {
   String name;
   int age;
   public studentData(String name, int age) {
      this.name=name;
      this.age=age;
   }
}
In the above code informs about student data object. Let's try to run your application. I assume you have connected your actual Android Mobile device with your computer. To run the app from the android studio, open one of your project's activity files and click Run ![]() icon from the toolbar. Select your mobile device as an option and then check your mobile device which will display your default screen −
icon from the toolbar. Select your mobile device as an option and then check your mobile device which will display your default screen −
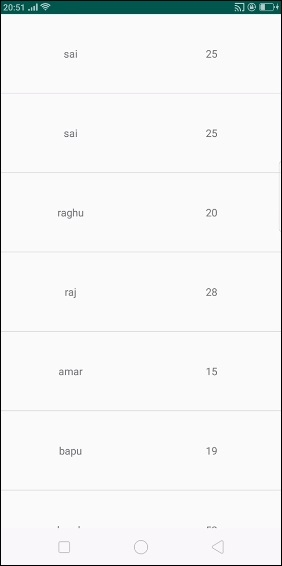
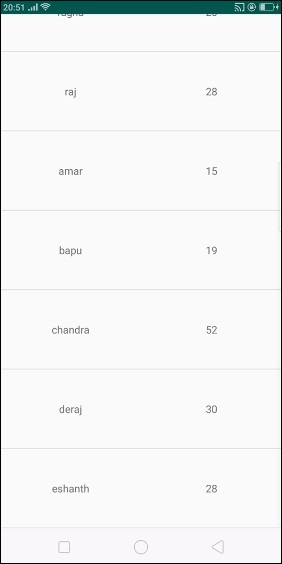
Now scroll down. it shows the result as shown below -
Click here to download the project code

2K+ Views
