
Article Categories
- All Categories
-
 Data Structure
-
 Networking
-
 RDBMS
RDBMS
-
 Operating System
-
 Java
Java
-
 MS Excel
-
 iOS
iOS
-
 HTML
HTML
-
 CSS
CSS
-
 Android
-
 Python
-
 C Programming
-
 C++
C++
-
 C#
C#
-
 MongoDB
-
 MySQL
MySQL
-
 Javascript
-
 PHP
PHP
-
 Economics & Finance
Selected Reading
Adding Navigation Bar programmatically iOS using Swift
To add navigation bar programmatically we’ll go through a series of steps that are mentioned below. We’ll be doing this in ViewWillLayoutSubviews method of our viewController.
Getting the width of the current View.
let width = self.view.frame.width
Creating a navigation bar with the width of our current view and height of 44 px which is the default height of a navigation bar.
let navigationBar: UINavigationBar = UINavigationBar(frame: CGRect(x: 0, y: 0, width: width, height: 44))
Adding the newly created navigation bar to our view.
self.view.addSubview(navigationBar)
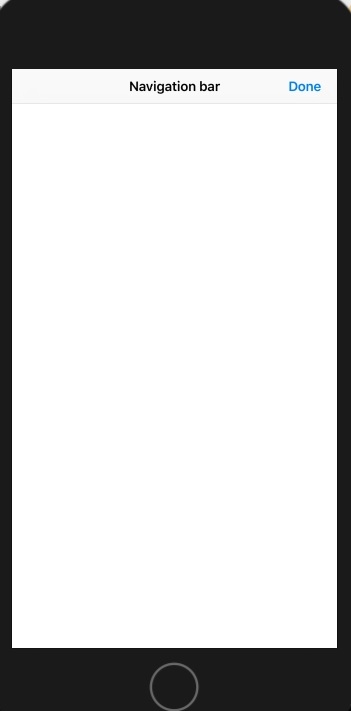
We can further extend this example to add a title and a button to our View. The complete result should look something like the class below.
class ViewController: UIViewController {
   override func viewWillLayoutSubviews() {
      let width = self.view.frame.width
      let navigationBar: UINavigationBar = UINavigationBar(frame: CGRect(x: 0, y: 0, width: width, height: 44))
      self.view.addSubview(navigationBar);
      let navigationItem = UINavigationItem(title: "Navigation bar")
      let doneBtn = UIBarButtonItem(barButtonSystemItem: UIBarButtonItem.SystemItem.done, target: nil, action: #selector(selectorX))
      navigationItem.rightBarButtonItem = doneBtn
      navigationBar.setItems([navigationItem], animated: false)
   }
   override func viewDidLoad() {
      super.viewDidLoad()
   }
   @objc func selectorX() { }
}
When we execute this example our result should look like.

Updated on: 2019-07-30T22:30:25+05:30
3K+ Views

Advertisements