
Article Categories
- All Categories
-
 Data Structure
-
 Networking
-
 RDBMS
RDBMS
-
 Operating System
-
 Java
Java
-
 MS Excel
-
 iOS
iOS
-
 HTML
HTML
-
 CSS
CSS
-
 Android
-
 Python
-
 C Programming
-
 C++
C++
-
 C#
C#
-
 MongoDB
-
 MySQL
MySQL
-
 Javascript
-
 PHP
PHP
-
 Economics & Finance
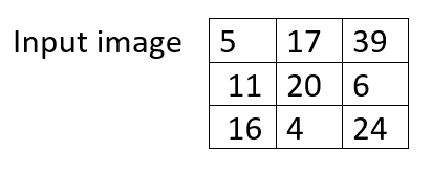
Is there a way to resize image with "nearest neighbour" resampling in HTML5?
Resizing an image is one of the cumbersome tasks since it affects the performance of your website. In case of online photos, size is of great importance. Generally, users prefer small size images since it takes less time to load even with moderate internet connections. If the image is too big, your page may become unresponsive for some time. Web pages with uniformly sized images are attractive and appealing. Hence, it is essential to upload images of appropriate size to your website.
Resizing VS Resampling
Changing the size that is, height and width, of an image to be printed without changing the pixel dimensions of the image is called resizing. In other words, you redistribute the number of original pixels to accommodate in a smaller or larger space within the image.
Example
<div class="code-mirror  language-html" contenteditable="plaintext-only" spellcheck="false" style="outline: none; overflow-wrap: break-word; overflow-y: auto; white-space: pre-wrap;"><span class="token tag"><span class="token tag"><span class="token punctuation"><</span>img</span> <span class="token attr-name">src</span><span class="token attr-value"><span class="token punctuation attr-equals">=</span> "example.jpg"</span> <span class="token attr-name">height</span><span class="token attr-value"><span class="token punctuation attr-equals">=</span> "250"</span> <span class="token attr-name">width</span> <span class="token attr-value"><span class="token punctuation attr-equals">=</span> "400"</span><span class="token punctuation">></span></span>
In CSS,
img {
   width: 500px,
   height: 360px
}
</div>
Note ? For having a responsive image, value of width should be put to 100% while that of height should be auto.
Physically changing the image file size by addition or deletion of pixels within the image is known as Resampling an image. It can be done be changing the resolution of the image to align with the output media type that is, screen or print.
Addition of number of pixels of the image is called upsampling while deletion of number of pixels of the image is called downsampling.
Example
Suppose an image is of size 640* 785 pixels. If you make it 700 * 785 pixels, then it?s called upsampling.
Types of Resampling Images
In this section, let us take a look at the types of resampling images
Nearest neighbour ? It assigns the pixel value by using the closest input pixel. Example: blurry upsampling.
Binary interpolation ? It uses grey value of the four nearest pixels to find out the new pixel value of the image using a bilinear function.
Cubic convolution ? It is based on algorithms having 4*4 or 8*8 matrix around every new pixel of the image.
Nearest neighbor resampling
It is the simplest and common technique used for resampling of images.
Example
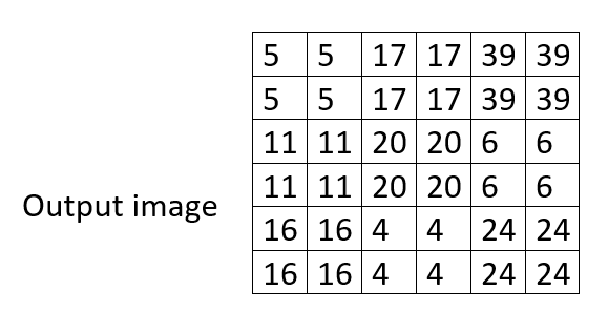 The above pictorial representation shows that a 3*3 matrix of an image can be interpolated to a 6*6 matrix. All the new values are nearest to the input value.
Method 1: Using HTML5
You can resize an image with nearest neighbour resampling using HTML5 canvas.
Example
<div class="code-mirror  language-html" contenteditable="plaintext-only" spellcheck="false" style="outline: none; overflow-wrap: break-word; overflow-y: auto; white-space: pre-wrap;"><span class="token tag"><span class="token tag"><span class="token punctuation"><</span>img</span> <span class="token attr-name">src</span><span class="token attr-value"><span class="token punctuation attr-equals">=</span> "example.jpg"</span> <span class="token attr-name">height</span><span class="token attr-value"><span class="token punctuation attr-equals">=</span> "250"</span> <span class="token attr-name">width</span> <span class="token attr-value"><span class="token punctuation attr-equals">=</span> "400"</span><span class="token punctuation">></span></span>
const x = document.createElement (?canvas?).getContext(? 2d?);
x.drawImage (img, 0,0 ) ;
var pic = x.getImageData( 0, 0, img.height, img.width) .data;
for (let i = 0; i < img.width; ++i ){
   for (let j = 0; j< img.height; ++j){
      let a = (j*img.width + i)*4;
      let r = pic [i];
      let g = pic[i+1];
      let b = pic[i+2];
      let a = pic[i+3];
      ctx2.fillStyle ="rgba("+r+","+g+","+b+","+(a/255) +")";
      ctx2.fillRect(i*zoom,j*zoom,zoom,zoom);
   }
}
</div>
Here,
x is a variable which is used to create an offscreen canvas.
.drawImage method is used to draw an image or a canvas on the current canvas.
Syntax
drawImage (cropping image, X- coordinate of source, Y- coordinate of source, source width, source height, X- coordinate of destination image, Y coordinate of destination image, destion image?s width, destination image?s height).
Example
<div class="code-mirror  language-html" contenteditable="plaintext-only" spellcheck="false" style="outline: none; overflow-wrap: break-word; overflow-y: auto; white-space: pre-wrap;">demo.drawImage ( img, 12, 10, 300, 250, 0, 0, 100, 200)
</div>
.getImageData() is used to return the data of a portion of the canvas. In our code, it is used to get the original pixel dimension of the image.
Syntax
getImageData(x, y, w, h)
Parameters
x ? x-axis coordinate of the top-left corner of the box from which data needs to be taken
y ? y-axis coordinate of the top-left corner of the box from which data needs to be taken.
w ? width of the box
h ? height of the box
Example
<div class="code-mirror  language-html" contenteditable="plaintext-only" spellcheck="false" style="outline: none; overflow-wrap: break-word; overflow-y: auto; white-space: pre-wrap;">demo.getImageData( 0, 23, 100, 200)
</div>
for loop ? It is used to iterate through the height and width of the image and then drawing a grid of rectangles with zoomed up pixels to a different canvas context.
i and j variables ? These are used to generate a unique RGB color for each pixel.
.fillstyle ? It is used to set the color of a portion in the canvas.
a ? This refers to alpha which specifies the opacity of the color.
Syntax
object.fillStyle= rgba()
Example
<div class="code-mirror  language-html" contenteditable="plaintext-only" spellcheck="false" style="outline: none; overflow-wrap: break-word; overflow-y: auto; white-space: pre-wrap;">demo.fillStyle = rgba (255, 164, 0, 1);
</div>
.fillRect() ? This is a method used to draw a rectangle or a box which is filled according to fillstyle specified.
Syntax
fillRect(x, y, w, h)
Parameters
x ? x?axis coordinate of the box?s starting point
y ? y?axis coordinate of the box?s starting point.
w ? width of the box
h ? height of the box
Method 2: Image-rendering
Rendering an image is a process used to generate the type of algorithm used for scaling of the image. It is CSS property which applies to an element itself.
Syntax
image-rendering: value;
Values
auto, pixelated, inherit, initial, revert, unset, revert-layer, crisp-edges.
Example
<div class="code-mirror  language-html" contenteditable="plaintext-only" spellcheck="false" style="outline: none; overflow-wrap: break-word; overflow-y: auto; white-space: pre-wrap;">.demoImage{
   -ms-interpolation-mode: nearest neighbour;
   image- rendering: pixelated;
}
</div>
The ms-interpolation-mode property allows you to set type of interpolation algorithm used for image scaling.
Pixelated ? It enables the image to be composed of larger pixel dimensions if the image is scaled up while using nearest neighbor algorithm.
Conclusion
Having light and fast?loading images in your website enhances the user experience. It attracts the users to your site. Also search engines like google, Microsoft edge etc., favours such websites, hence, increasing the ranking of your site. Therefore, having images with proper resolution is of great importance.
2K+ Views
