- Python Pillow Tutorial
- Python Pillow - Home
- Python Pillow - Overview
- Python Pillow - Environment Setup
- Python Pillow - Using Image Module
- Python Pillow - Working with Images
- Python Pillow - Creating Thumbnails
- Python Pillow - Merging Images
- Python Pillow - Blur an Image
- Python Pillow - Cropping an Image
- Python Pillow - Flip and Rotate Images
- Python Pillow - Resizing an Image
- Python Pillow - Creating a Watermark
- Python Pillow - Adding Filters to an Image
- Python Pillow - Colors on an Image
- Python Pillow - ImageDraw Module
- Python Pillow - Image Sequences
- Python Pillow - Writing Text on Image
- Python Pillow - M L with Numpy
- Python Pillow Useful Resources
- Python Pillow - Quick Guide
- Python Pillow - Useful Resources
- Python Pillow - Discussion
Python Pillow - M L with Numpy
In this chapter, we use numpy to store and manipulate image data using python imaging library – “pillow”.
Before proceeding with this chapter open command prompt in administrator mode and execute the following command in it to install numpy −
pip install numpy
Note − This works only if you have PIP installed and updated.
Creating image from Numpy Array
Creating an RGB image using PIL and save it as a jpg file. In the following example we will −
Create a 150 by 250-pixel array.
Fill left half of the array with orange.
Fill right half of the array with blue.
from PIL import Image
import numpy as np

arr = np.zeros([150, 250, 3], dtype=np.uint8)

arr[:,:100] = [255, 128, 0]

arr[:,100:] = [0, 0, 255]

img = Image.fromarray(arr)

img.show()

img.save("RGB_image.jpg")
Output

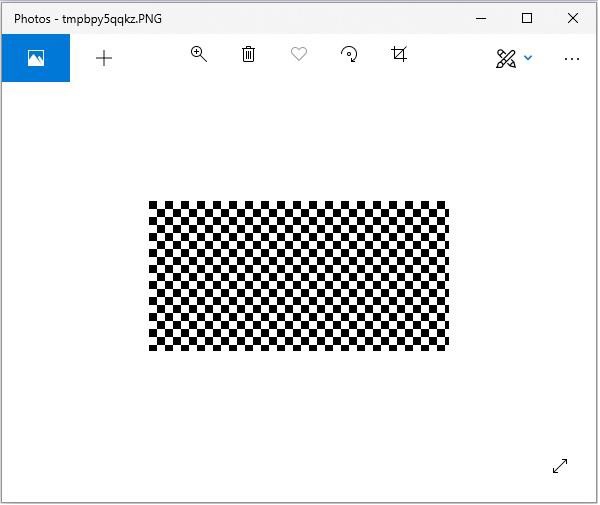
Creating greyscale images
Creating greyscale images is slightly different from creating an RGB image. We can use the 2-dimensional array to create a greyscale image.
from PIL import Image
import numpy as np

arr = np.zeros([150,300], dtype=np.uint8)

#Set grey value to black or white depending on x position
   for x in range(300):
      for y in range(150):
         if (x % 16) // 8 == (y % 16)//8:
            arr[y, x] = 0
         else:
            arr[y, x] = 255
img = Image.fromarray(arr)

img.show()

img.save('greyscale.jpg')
Output
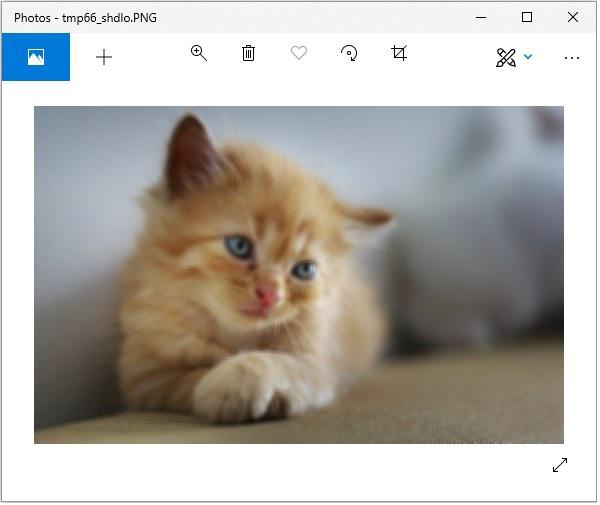
Creating numpy array from an Image
You can convert PIL image to numpy array and vice versa. A small program to demonstrate the same is stated below.
Example
#Import required libraries
from PIL import Image
from numpy import array

#Open Image & create image object
img = Image.open('beach1.jpg')

#Show actual image
img.show()

#Convert an image to numpy array
img2arr = array(img)

#Print the array
print(img2arr)

#Convert numpy array back to image
arr2im = Image.fromarray(img2arr)

#Display image
arr2im.show()

#Save the image generated from an array
arr2im.save("array2Image.jpg")
Output
If you save the above program as Example.py and execute −
It displays the original image.
Displays the array retrieved from it.
Converts the array back into image and displays it.
Since we have used show() method the images are displayed using the default PNG display utility, as follows.
[[[ 0 101 120]
[ 3 108 127]
[ 1 107 123]
...
...
[[ 38 59 60]
[ 37 58 59]
[ 36 57 58]
...
[ 74 65 60]
[ 59 48 42]
[ 66 53 47]]
[[ 40 61 62]
[ 38 59 60]
[ 37 58 59]
...
[ 75 66 61]
[ 72 61 55]
[ 61 48 42]]
[[ 40 61 62]
[ 34 55 56]
[ 38 59 60]
...
[ 82 73 68]
[ 72 61 55]
[ 63 52 46]]]
Original Image
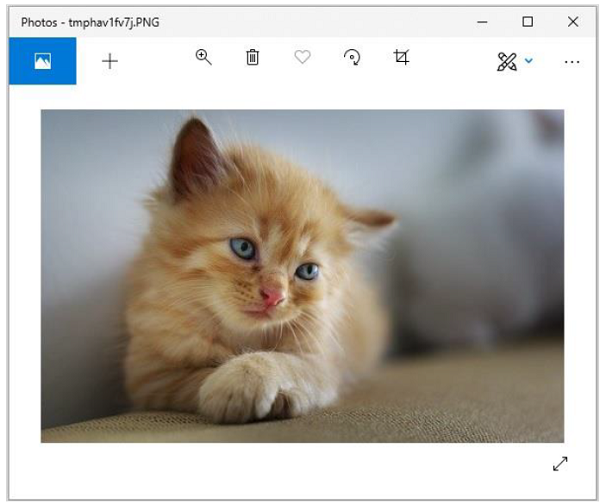
Image constructed from the array
To Continue Learning Please Login