- ZeroMQ - Home
- ZeroMQ - Overview
- ZeroMQ - Installation
- ZeroMQ - Features
- ZeroMQ Messaging
- ZeroMQ - Socket Types
- ZeroMQ - Communication Patterns
- ZeroMQ - Transport Protocols
- ZeroMQ - Message Framing
- Scaling & Performance
- ZeroMQ - Load Balancing
- ZeroMQ - SMP
- ZeroMQ - Multithreading
- ZeroMQ - Performance Considerations
- ZeroMQ Useful Resources
- ZeroMQ - Quick Guide
- ZeroMQ - Useful Resources
- ZeroMQ - Discussion
ZeroMQ - Installation Setup
First step in the journey of learning ZeroMQ is to install the core ZeroMQ library on your system, and depending on the programming language you are using, you need to install the corresponding language bindings to interact with ZeroMQ in your code.
For example, if you are using Python language, you need to install the pyzmq, which provides the Python bindings for ZeroMQ.
ZeroMQ library is not dependent on the operating system for installation. Instead, it depends on the programming language and its respective binding dependencies. Therefore, the installation steps are generally similar across different operating systems.
How to setup ZeroMQ in Java?
The following instructions will explain how to install and set up the ZeroMQ library in Java. To install and use ZeroMQ (MQ) in Java, you need to use a Java binding for ZeroMQ. The most commonly used binding is JeroMQ, which is a pure Java implementation of ZeroMQ.
Here is the step-by-step guide to install ZeroMQ in Java −
Step 1: Create a Maven Project in Java
To create a Maven Project in Java, open your preferred IDE (we are using Eclipse), click on the File menu on the left-top corner, and choose Maven Project in the displayed list, as shown in the following image −

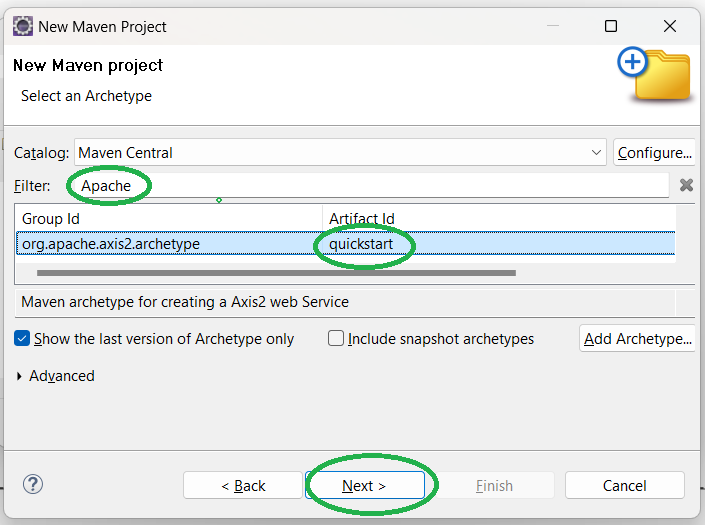
This will give you a "New Maven Project" window. In it, click on the Next button.

In the next window, enter "Apache" in the Filter text box, select quickstart and click on Next.
Then, enter "com.zeromq" in the GroupId text-box and "zeromq" in the ArtifactId text-box, then click Finish (You can choose any values for "GroupId" and "ArtifactId").

After clicking Finish enter 'y' in your terminal and press Enter.
Step 2: Add ZeroMQ Dependency
The simplest way to install ZeroMQ in a Java project is by using JeroMQ, which can be included as a dependency in your project.
If you are using Maven or Gradle (both are Java development tools) to manage your project, add the dependency to your pom.xml or build.gradle file.
<dependency>
<groupId>org.zeromq</groupId>
<artifactId>jeromq</artifactId>
<version>0.5.3</version>
</dependency>

//for the latest SNAPSHOT -->
<dependency>
<groupId>org.zeromq</groupId>
<artifactId>jeromq</artifactId>
<version>0.6.0-SNAPSHOT</version>
</dependency>

//If you can't find the latest snapshot
<repositories>
<repository>
<id>sonatype-nexus-snapshots</id>
<url>https://oss.sonatype.org/content/repositories/snapshots</url>
<releases>
<enabled>false</enabled>
</releases>
<snapshots>
<enabled>true</enabled>
</snapshots>
</repository>
</repositories>
Step 3: Write Your First ZeroMQ Program in Java
Once JeroMQ is included in your project, you can start using it. Following is an example of a basic ZeroMQ publisher and subscriber in Java −
Publisher
The following is the basic example of the "Publisher" −
import org.zeromq.ZMQ;
import org.zeromq.ZMQ.Context;
import org.zeromq.ZMQ.Socket;

public class Publisher {
   public static void main(String[] args) {
      Context context = ZMQ.context(1);
      Socket socket = context.socket(ZMQ.PUB);
      socket.bind("tcp://*:5555");

      while (true) {
         socket.send("Hello, subscribers!".getBytes(), 0);
      }
   }
}
Output
//it will simply send the message to the receiver
Subscriber
The following is the "Subscriber" example −
import org.zeromq.ZMQ;
import org.zeromq.ZMQ.Context;
import org.zeromq.ZMQ.Socket;
public class Subscriber {
   public static void main(String[] args) {
      Context context = ZMQ.context(1);
      Socket socket = context.socket(ZMQ.SUB);
      socket.connect("tcp://localhost:5555");
      socket.subscribe("".getBytes()); // Subscribe to all messages

      while (true) {
         byte[] message = socket.recv(0);
         System.out.println("Received message: " + new String(message));
      }
   }
}
Output
The above program displays all the receive messages, which is sent by "publisher" −
Received message: Hello, subscribers!
Received message: Hello, subscribers!
Received message: Hello, subscribers!
Received message: Hello, subscribers!
Received message: Hello, subscribers!
Received message: Hello, subscribers!
How to setup ZeroMQ in Python?
To Download and install ZeroMQ in Python, we need to download the Python library that binds with ZeroMQ which is PyZMQ library, which is a fast and lightweight messaging library.
PyZMQ works with any reasonable version of Python that should be greater than or equal to 3.7, as well as PyPy. PyZMQ is used for message queuing without a message broker.
Step 1: Install PyZMQ
To install the PyZMQ we can use the pip, which is the most common way to install Python packages. The following are the steps:
Open the terminal and command prompt
- On the window, press window + R, type cmd, and hit enter.
- On Mac or Linux, open a terminal.
Run the pip install command
To install PyZMQ, run the following command in your terminal or command prompt:
pip install pyzmq
The above command will download and install the PyZMQ and the ZeroMQ libraries.
Downloading pyzmq-26.2.0-cp312-cp312-win_amd64.whl.metadata (6.2 kB)
Downloading pyzmq-26.2.0-cp312-cp312-win_amd64.whl (637 kB)
   --------------------- 637.8/637.8 kB 5.8 MB/s eta 0:00:00
Installing collected packages: pyzmq
Successfully installed pyzmq-26.2.0

[notice] A new release of pip is available: 24.0 -> 24.2
[notice] To update, run: python.exe -m pip install --upgrade pip
Step 2: Verification
To confirm that PyZMQ is installed correctly, open the Python shell and run the following command. If it prints the installed version of ZeroMQ and PyZMQ without any errors, the installation is successful.
>>> import zmq
>>> print(zmq.zmq_version())
4.3.5
>>> print(zmq.pyzmq_version())
26.2.0
>>>
Step 3: Write your first ZeroMQ program in Python
As we have already installed the Python messaging library "PyZMQ", we can write a Python program using ZeroMQ.
Publisher
The following is the basic example of the "Publisher" −
import zmq
import time

# Create a ZeroMQ context
context = zmq.Context()

# Create a PUB socket
socket = context.socket(zmq.PUB)
socket.bind("tcp://*:5555")

while True:
   # Send a message every second
   message = "Hello, ZeroMQ!"
   socket.send_string(message)
   print(f"Sent: {message}")
   time.sleep(1)
Output
Sent: Hello, ZeroMQ!
Sent: Hello, ZeroMQ!
Sent: Hello, ZeroMQ!
Sent: Hello, ZeroMQ!
Sent: Hello, ZeroMQ!
Subscriber
The following is the "Subscriber" example −
import zmq

# Create a ZeroMQ context
context = zmq.Context()

# Create a SUB socket
socket = context.socket(zmq.SUB)
socket.connect("tcp://localhost:5555")

# Subscribe to all messages (empty string as subscription)
socket.setsockopt_string(zmq.SUBSCRIBE, "")

while True:
   message = socket.recv_string()
   print(f"Received: {message}")
Output
Received: Hello, ZeroMQ!
Received: Hello, ZeroMQ!
Received: Hello, ZeroMQ!
Received: Hello, ZeroMQ!
Received: Hello, ZeroMQ!
