- WML - Home
- WML - Overview
- WML - Environment
- WML - Syntax
- WML - Elements
- WML - Comments
- WML - Variables
- WML - Formatting
- WML - Fonts
- WML - Images
- WML - Tables
- WML - Links
- WML - Tasks
- WML - Inputs
- WML - Submit Data
- WML - Server Scripts
- WML - Events
- WML - Timer
- WML - Template
- WML - DTD
- WML2 - Tutorial
- WML Tools
- WAP - Emulators
- WML - Validator
- WML Useful Resources
- WML - Quick Guide
- WML - Useful Resources
- WML - Discussion
Selected Reading
WML - onpick Attribute
The onpick attribute is a great shortcut if you are using a select menu. Instead of writing a lot of code that allows the user to go to another card if an option is selected, you can simply place the destination into the onpick attribute. Here is a code fragment without the onpick attribute:
Following is the example showing usage of onpick attribute alongwith <option> element.
<?xml version="1.0"?>
<!DOCTYPE wml PUBLIC "-//WAPFORUM//DTD WML 1.2//EN"
"http://www.wapforum.org/DTD/wml12.dtd">

<wml>

<card id="tutorials" title="Main Menu">
<p>
  Select a tutorial :
  <select title="tutorials" name="selection_list">
    <option onpick="#xhtml">XHTML Tutorial</option>
    <option onpick="#wap">WAP Tutorial</option>
  </select>
</p>
</card>
<card id="xhtml" title="XHTML Tutorial">
<p>
Go through our XHTML tutorial
</p>
</card>
<card id="wap" title="WAP Tutorial">
<p>
Go through our WAP tutorial
</p>
</card>
</wml>
When you load this program, it shows you following screen:
Now, highlight the dropdown box and select it. It will give you two options as follows:
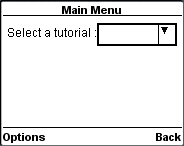
When you load this program, it shows you the following screen:

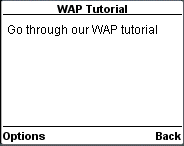
Now, assume you select WAP Tutorial from the list, then it will display the following screen:
wml_events.htm

Advertisements