- Three.js - Home
- Three.js - Introduction
- Three.js - Installation
- Three.js - Hello Cube App
- Three.js - Renderer and Responsiveness
- Three.js - Responsive Design
- Three.js - Debug and Stats
- Three.js - Cameras
- Three.js - Controls
- Three.js - Lights & Shadows
- Three.js - Geometries
- Three.js - Materials
- Three.js - Textures
- Three.js - Drawing Lines
- Three.js - Animations
- Three.js - Creating Text
- Three.js - Loading 3D Models
- Three.js - Libraries and Plugins
- Three.js Useful Resources
- Three.js - Quick Guide
- Three.js - Useful Resources
- Three.js - Discussion
Three.js - Orbit Controls
Orbit controls allow the camera to orbit around the center of the scene. You can also provide a target to move around. You can add Orbitcontrols in a few simple steps.
Create a new instance of the orbit controls and pass the camera.
const controls = new THREE.OrbitControls(camera, render.domElement)
Update the controls for every frame. You can simply do it in your animation loop.
function animate() {
   // any other animations
   controls.update()
   requestAnimationFrame(render)
}
Example
Refer to this example for some basic settings.
orbit-controls.html
<!DOCTYPE html>
<html lang="en">
   <head>
      <meta charset="UTF-8" />
      <meta http-equiv="X-UA-Compatible" content="ie=edge" />
      <<meta name="viewport" content="width=device-width, initial-scale=1.0" />
      <title>Three.js - Orbit Controls</title>
      <style>
         * {
            margin: 0;
            padding: 0;
            box-sizing: border-box;
            font-family: -apple-system, BlinkMacSystemFont, 'Segoe UI', Roboto,
            Oxygen, Ubuntu, Cantarell, 'Open Sans', 'Helvetica Neue', sans-serif;
         }
         html,
         body {
            height: 100vh;
            width: 100vw;
         }
         #threejs-container {
            position: block;
            width: 100%;
            height: 100%;
         }
      </style>
      <script src="https://cdnjs.cloudflare.com/ajax/libs/three.js/r128/three.min.js"></script>
      <script src="https://cdnjs.cloudflare.com/ajax/libs/dat-gui/0.7.7/dat.gui.js"></script>
   </head>
   <body>
      <div id="container"></div>
      <script type="module">
         // Adding orbit controls to Three.js application
         // In this example, autorotate is set to true, so the camera rotates a
         round the cube
         import { OrbitControls } from "https://threejs.org/examples/jsm/controls/OrbitControls.js"
         // controls
         const gui = new dat.GUI()
         console.log('start')
         // sizes
         let width = window.innerWidth
         let height = window.innerHeight
         // scene
         const scene = new THREE.Scene()
         scene.background = new THREE.Color(0x262626)
         console.log(scene.children)
         // renderer
         const renderer = new THREE.WebGL1Renderer()
         renderer.setSize(window.innerWidth, window.innerHeight)
         renderer.shadowMap.enabled = true
         renderer.shadowMap.type = THREE.PCFSoftShadowMap
         renderer.setPixelRatio(Math.min(window.devicePixelRatio, 2))
         // lights
         const ambientLight = new THREE.AmbientLight(0xffffff, 0.5)
         scene.add(ambientLight)
         const light = new THREE.PointLight(0xffffff, 0.5)
         light.position.set(0, 10, 10)
         // for shadow
         light.castShadow = true
         light.shadow.mapSize.width = 1024
         light.shadow.mapSize.height = 1024
         light.shadow.camera.near = 0.5
         light.shadow.camera.far = 100
         scene.add(light)
         // camera
         const camera = new THREE.PerspectiveCamera(60, width / height, 0.1, 1000)
         camera.position.set(0, 0, 10)
         const camFolder = gui.addFolder('Camera')
         camFolder.add(camera.position, 'z', 10, 80, 1)
         camFolder.open()
         const controls = new OrbitControls(camera, renderer.domElement)
         controls.autoRotate = true
         const ocFolder = gui.addFolder('Orbit Controls')
         ocFolder.add(controls, 'enabled')
         ocFolder.add(controls, 'enableZoom')
         ocFolder.add(controls, 'enableRotate')
         ocFolder.add(controls, 'enablePan')
         ocFolder.add(controls, 'autoRotate')
         ocFolder.add(controls, 'autoRotateSpeed', 1, 100, 1)
         ocFolder.open()
         // axes
         const axesHelper = new THREE.AxesHelper(20)
         scene.add(axesHelper)
         // plane
         const planeGeometry = new THREE.PlaneGeometry(1000, 1000)
         const plane = new THREE.Mesh(
            planeGeometry,
            new THREE.MeshPhongMaterial({ color: 0xffffff, side: THREE.DoubleSide })
         )
         plane.rotateX(-Math.PI / 2)
         plane.position.y = -1.75
         plane.receiveShadow = true
         scene.add(plane)
         // cube
         console.log('cube')
         const geometry = new THREE.BoxGeometry(2, 2, 2)
         const matArray = [
            new THREE.MeshPhongMaterial({ color: 0xff8b8b }),
            new THREE.MeshPhongMaterial({ color: 0xf5ffa2 }),
            new THREE.MeshPhongMaterial({ color: 0xb5dccd }),
            new THREE.MeshPhongMaterial({ color: 0xaaffa2 }),
            new THREE.MeshPhongMaterial({ color: 0x9fd1ff }),
            new THREE.MeshPhongMaterial({ color: 0xffaef7 }),
         ]
         const cube = new THREE.Mesh(geometry, matArray)
         cube.position.set(0, 0.5, 0)
         cube.rotateX(Math.PI / 6)
         cube.castShadow = true
         cube.receiveShadow = true
         camera.lookAt(cube.position)
         scene.add(cube)
         // responsiveness
         window.addEventListener('resize', () => {
            width = window.innerWidth
            height = window.innerHeight
            camera.aspect = width / height
            camera.updateProjectionMatrix()
            renderer.setSize(window.innerWidth, window.innerHeight)
            renderer.render(scene, camera)
         })
         // animation
         function animate() {
            requestAnimationFrame(animate)
            //cube.rotation.x += 0.005
            //cube.rotation.y += 0.01
            controls.update()
            renderer.render(scene, camera)
         }
         // rendering the scene
         const container = document.querySelector('#container')
         container.append(renderer.domElement)
         renderer.render(scene, camera)
         animate()
         console.log(scene.children)
     </script>
   </body>
</html>
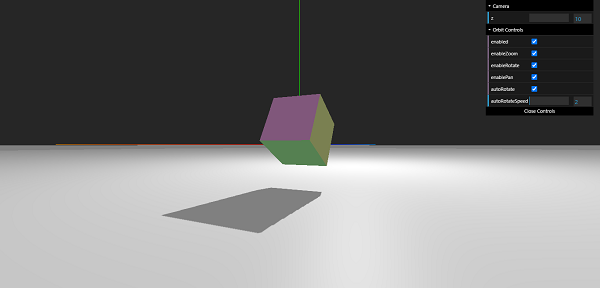
Output

There are many other settings to make your experience better. The code is well-documented; you can refer the codes here.
Advertisements