- Spring DI - Home
- Spring DI - Overview
- Spring DI - Environment Setup
- Spring DI - Create Project
- Spring DI - IOC Containers
- Spring Dependency Injection
Constructor Based Injection Examples
- Spring DI - Constructor Based
- Spring DI - Inner Beans via Constructor
- Spring DI - Collections via Constructor
- Spring DI - Collection Ref via Constructor
- Spring DI - Map via Constructor
- Spring DI - Map Ref via Constructor
Setter Based Injection Examples
- Spring DI - Setter Based
- Spring DI - Inner Beans Setter
- Spring DI - Collections Setter
- Spring DI - Collection Ref Setter
- Spring DI - Map Setter
- Spring DI - Map Ref Setter
Autowiring Examples
- Spring DI - Autowiring
- Spring DI - Autowiring ByName
- Spring DI - Autowiring ByType
- Spring DI - Autowiring Constructor
Factory Method
Spring DI Useful Resources
Spring DI - Quick Guide
Spring DI - Overview
Spring is the most popular application development framework for enterprise Java. Millions of developers around the world use Spring Framework to create high performing, easily testable, and reusable code.
Spring framework is an open source Java platform. It was initially written by Rod Johnson and was first released under the Apache 2.0 license in June 2003.
Spring provides Ioc Containers which tend to be lightweight, especially when compared to EJB containers, for example. This is beneficial for developing and deploying applications on computers with limited memory and CPU resources.
Dependency Injection (DI)
The technology that Spring is most identified with is the Dependency Injection (DI) flavor of Inversion of Control. The Inversion of Control (IoC) is a general concept, and it can be expressed in many different ways. Dependency Injection is merely one concrete example of Inversion of Control.
When writing a complex Java application, application classes should be as independent as possible of other Java classes to increase the possibility to reuse these classes and to test them independently of other classes while unit testing. Dependency Injection helps in gluing these classes together and at the same time keeping them independent.
What is dependency injection exactly? Let's look at these two words separately. Here the dependency part translates into an association between two classes. For example, class A is dependent of class B. Now, let's look at the second part, injection. All this means is, class B will get injected into class A by the IoC.
Dependency injection can happen in the way of passing parameters to the constructor or by post-construction using setter methods. As Dependency Injection is the heart of Spring Framework, we will explain this concept in a separate chapter with relevant example.
Spring DI - Environment Setup
This chapter will guide you on how to prepare a development environment to start your work with Spring and its Dependency Injection, DI Capabilities. It will also teach you how to set up JDK on your machine before you set up spring −
Setup Java Development Kit (JDK)
You can download the latest version of SDK from Oracle's Java site − Java SE Downloads. You will find instructions for installing JDK in downloaded files, follow the given instructions to install and configure the setup. Finally set PATH and JAVA_HOME environment variables to refer to the directory that contains java and javac, typically java_install_dir/bin and java_install_dir respectively.
If you are running Windows and have installed the JDK in C:\jdk-24, you would have to put the following line in your C:\autoexec.bat file.
set PATH=C:\jdk-24;%PATH%
set JAVA_HOME=C:\jdk-24
Alternatively, on Windows NT/2000/XP, you will have to right-click on My Computer, select Properties → Advanced → Environment Variables. Then, you will have to update the PATH value and click the OK button.
On Unix (Solaris, Linux, etc.), if the SDK is installed in /usr/local/jdk-24 and you use the C shell, you will have to put the following into your .cshrc file.
setenv PATH /usr/local/jdk-24/bin:$PATH
setenv JAVA_HOME /usr/local/jdk-24
Alternatively, if you use an Integrated Development Environment (IDE) like Borland JBuilder, Eclipse, IntelliJ IDEA, or Sun ONE Studio, you will have to compile and run a simple program to confirm that the IDE knows where you have installed Java. Otherwise, you will have to carry out a proper setup as given in the document of the IDE.
Popular Java Editors
To write your Java programs, you need a text editor. There are many sophisticated IDEs available in the market. But for now, you can consider one of the following −
Notepad − On Windows machine, you can use any simple text editor like Notepad (Recommended for this tutorial), TextPad.
Netbeans − It is a Java IDE that is open-source and free, which can be downloaded from www.netbeans.org/index.html.
Eclipse − It is also a Java IDE developed by the eclipse open-source community and can be downloaded from www.eclipse.org.
Install Eclipse
In this chapter, we will explain how to set Spring environment in Eclipse IDE. Before proceeding with the installation, make sure that you already have Eclipse installed in your system. If not, download and install Eclipse.
For more information on Eclipse, please refer our Eclipse Tutorial
Step 2: Create a Maven project and set build path
Open eclipse and create a Maven based project as shown below.
Update the pom.xml as shown below to include spring framework libraries. Rest eclipse will handle automatically.
Pom.xml for Spring
open the pom.xml and paste the following content in it and refresh the project.
<project xmlns="http://maven.apache.org/POM/4.0.0"
   xmlns:xsi="http://www.w3.org/2001/XMLSchema-instance"
   xsi:schemaLocation="http://maven.apache.org/POM/4.0.0 https://maven.apache.org/xsd/maven-4.0.0.xsd">
   <modelVersion>4.0.0</modelVersion>
   <groupId>com.tutorialspoint</groupId>
   <artifactId>springdi</artifactId>
   <version>0.0.1-SNAPSHOT</version>
   <name>springdi</name>
   <description>Spring Dependency Injection Project</description>
   <properties>
      <java.version>24</java.version>
      <spring.version>7.0.0-M9</spring.version>
   </properties>
   <build>
      <plugins>
         <plugin>
            <artifactId>maven-compiler-plugin</artifactId>
            <version>3.7.0</version>
            <configuration>
               <source>${java.version}</source>
               <target>${java.version}</target>
            </configuration>
         </plugin>
      </plugins>
   </build>
   <dependencies>
      <dependency>
         <groupId>org.springframework</groupId>
         <artifactId>spring-core</artifactId>
         <version>${spring.version}</version>
      </dependency>
      <dependency>
         <groupId>org.springframework</groupId>
         <artifactId>spring-context</artifactId>
         <version>${spring.version}</version>
      </dependency>
      <dependency>
         <groupId>org.springframework</groupId>
         <artifactId>spring-aspects</artifactId>
         <version>${spring.version}</version>
      </dependency>
      <dependency>
         <groupId>jakarta.annotation</groupId>
         <artifactId>jakarta.annotation-api</artifactId>
         <version>2.1.1</version>
      </dependency>
   </dependencies>
</project>
Spring DI - Create Project
Create a New Project
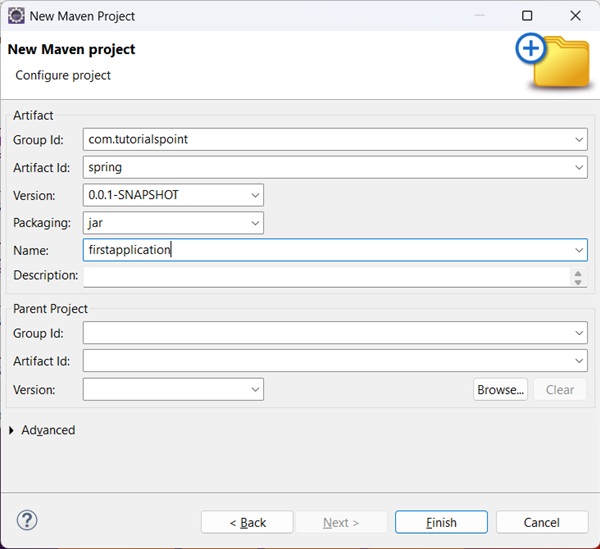
Using eclipse, select File → New → Maven Project. Tick the Create a simple project(skip archetype selection) and click Next.
Enter the details, as shown below −
groupId − com.tutorialspoint
artifactId − springdi
version − 0.0.1-SNAPSHOT
name − springdi
description − Spring Dependency Injection Project
Click on Finish button and an new project will be created.
pom.xml
Update the pom.xml with Spring Core dependency. Following is the full content of pom.xml
<project xmlns="http://maven.apache.org/POM/4.0.0"
   xmlns:xsi="http://www.w3.org/2001/XMLSchema-instance"
   xsi:schemaLocation="http://maven.apache.org/POM/4.0.0 https://maven.apache.org/xsd/maven-4.0.0.xsd">
   <modelVersion>4.0.0</modelVersion>
   <groupId>com.tutorialspoint</groupId>
   <artifactId>springdi</artifactId>
   <version>0.0.1-SNAPSHOT</version>
   <name>springdi</name>
   <description>Spring Dependency Injection Project</description>
   <properties>
      <java.version>24</java.version>
      <spring.version>7.0.0-M9</spring.version>
   </properties>
   <build>
      <plugins>
         <plugin>
            <artifactId>maven-compiler-plugin</artifactId>
            <version>3.7.0</version>
            <configuration>
               <source>${java.version}</source>
               <target>${java.version}</target>
            </configuration>
         </plugin>
      </plugins>
   </build>
   <dependencies>
      <dependency>
         <groupId>org.springframework</groupId>
         <artifactId>spring-core</artifactId>
         <version>${spring.version}</version>
      </dependency>
      <dependency>
         <groupId>org.springframework</groupId>
         <artifactId>spring-context</artifactId>
         <version>${spring.version}</version>
      </dependency>
      <dependency>
         <groupId>org.springframework</groupId>
         <artifactId>spring-aspects</artifactId>
         <version>${spring.version}</version>
      </dependency>
      <dependency>
         <groupId>jakarta.annotation</groupId>
         <artifactId>jakarta.annotation-api</artifactId>
         <version>2.1.1</version>
      </dependency>
   </dependencies>
</project>
applicationcontext.xml
Create applicationcontext.xml in src → main → resources with the following content.
<?xml version="1.0" encoding="UTF-8"?>
<beans xmlns="http://www.springframework.org/schema/beans"
   xmlns:xsi="http://www.w3.org/2001/XMLSchema-instance"
   xsi:schemaLocation="http://www.springframework.org/schema/beans
   http://www.springframework.org/schema/beans/spring-beans-3.0.xsd">
</beans>
Spring DI - IoC Containers
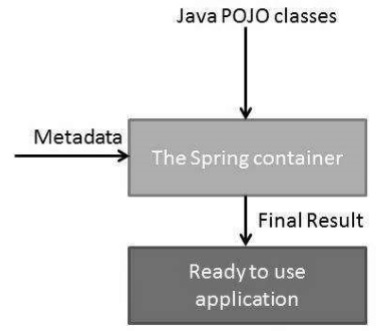
The Spring container is at the core of the Spring Framework. The container will create the objects, wire them together, configure them, and manage their complete life cycle from creation till destruction. The Spring container uses DI to manage the components that make up an application. These objects are called Spring Beans, which we will discuss in the next chapter.
The container gets its instructions on what objects to instantiate, configure, and assemble by reading the configuration metadata provided. The configuration metadata can be represented either by XML, Java annotations, or Java code. The following diagram represents a high-level view of how Spring works. The Spring IoC container makes use of Java POJO classes and configuration metadata to produce a fully configured and executable system or application.
Types of IoC Containers
Spring provides the following two distinct types of containers.
| Sr.No. | Container & Description |
|---|---|
| 1 |
This is the simplest container providing the basic support for DI and is defined by the org.springframework.beans.factory.BeanFactory interface. The BeanFactory and related interfaces, such as BeanFactoryAware, InitializingBean, DisposableBean, are still present in Spring for the purpose of backward compatibility with a large number of third-party frameworks that integrate with Spring. |
| 2 |
Spring ApplicationContext Container This container adds more enterprise-specific functionality such as the ability to resolve textual messages from a properties file and the ability to publish application events to interested event listeners. This container is defined by the org.springframework.context.ApplicationContext interface. |
The ApplicationContext container includes all functionality of the BeanFactorycontainer, so it is generally recommended over BeanFactory. BeanFactory can still be used for lightweight applications like mobile devices or applet-based applications where data volume and speed is significant.
Spring Dependency Injection
Every Java-based application has a few objects that work together to present what the end-user sees as a working application. When writing a complex Java application, application classes should be as independent as possible of other Java classes to increase the possibility to reuse these classes and to test them independently of other classes while unit testing. Dependency Injection (or sometime called wiring) helps in gluing these classes together and at the same time keeping them independent.
Consider you have an application which has a text editor component and you want to provide a spell check. Your standard code would look something like this −
TextEditor class without Dependency Injection
public class TextEditor {
   private SpellChecker spellChecker;

   public TextEditor() {
      spellChecker = new SpellChecker();
   }
}
What we've done here is, create a dependency between the TextEditor and the SpellChecker. In an inversion of control scenario, we would instead do something like this −
TextEditor class with Dependency Injected
public class TextEditor {
   private SpellChecker spellChecker;

   public TextEditor(SpellChecker spellChecker) {
      this.spellChecker = spellChecker;
   }
}
Here, the TextEditor should not worry about SpellChecker implementation. The SpellChecker will be implemented independently and will be provided to the TextEditor at the time of TextEditor instantiation. This entire procedure is controlled by the Spring Framework.
Here, we have removed total control from the TextEditor and kept it somewhere else (i.e. XML configuration file) and the dependency (i.e. class SpellChecker) is being injected into the class TextEditor through a Class Constructor. Thus the flow of control has been "inverted" by Dependency Injection (DI) because you have effectively delegated dependances to some external system.
The second method of injecting dependency is through Setter Methods of the TextEditor class where we will create a SpellChecker instance. This instance will be used to call setter methods to initialize TextEditor's properties.
Types of Dependency Injection
Thus, DI exists in two major variants and the following two sub-chapters will cover both of them with examples −
| Sr.No. | Dependency Injection Type & Description |
|---|---|
| 1 |
Constructor-based dependency injection Constructor-based DI is accomplished when the container invokes a class constructor with a number of arguments, each representing a dependency on the other class. |
| 2 |
Setter-based dependency injection Setter-based DI is accomplished by the container calling setter methods on your beans after invoking a no-argument constructor or no-argument static factory method to instantiate your bean. |
You can mix both, Constructor-based and Setter-based DI but it is a good rule of thumb to use constructor arguments for mandatory dependencies and setters for optional dependencies.
The code is cleaner with the DI principle and decoupling is more effective when objects are provided with their dependencies. The object does not look up its dependencies and does not know the location or class of the dependencies, rather everything is taken care by the Spring Framework.
Constructor Based V/s Setter Based Dependency Injection.
There are few noteworthy differences between constructor based and setter based dependency injection.
Granular control − In case of a constructor accepting multiple values, we need to pass all the values during bean configuration while in case of setters, we can pass value in a particular setter method and can leave other setter unconfigured.
Setter Overrides Constructor − In case of both constructor and setter based injection are used then setter based injection takes preference.
Flexibility − Setter methods doesn't create a new bean instance like constructor and their values can be changed as well.
Spring DI - Constructor Based Dependency Injection
Constructor-Based DI is accomplished when the container invokes a class constructor with a number of arguments, each representing a dependency on the other class.
Example - Usage of Constructor Based DI
The following example shows a class TextEditor that can only be dependency-injected with constructor injection.
Let's update the project created in Spring DI - Create Project chapter. We're adding following files −
TextEditor.java − A class containing a SpellChecker as dependency.
SpellChecker.java − A dependency class.
MainApp.java − Main application to run and test.
TextEditor.java
Here is the content of TextEditor.java file −
package com.tutorialspoint;

public class TextEditor {
   private SpellChecker spellChecker;

   public TextEditor(SpellChecker spellChecker) {
      System.out.println("Inside TextEditor constructor." );
      this.spellChecker = spellChecker;
   }
   public void spellCheck() {
      spellChecker.checkSpelling();
   }
}
SpellChecker.java
Following is the content of another dependent class file SpellChecker.java
package com.tutorialspoint;

public class SpellChecker {
   public SpellChecker(){
      System.out.println("Inside SpellChecker constructor." );
   }
   public void checkSpelling() {
      System.out.println("Inside checkSpelling." );
   }
}
MainApp.java
Following is the content of the MainApp.java file.
package com.tutorialspoint;

import org.springframework.context.ApplicationContext;
import org.springframework.context.support.ClassPathXmlApplicationContext;

public class MainApp {
   public static void main(String[] args) {
      ApplicationContext context = new ClassPathXmlApplicationContext("applicationcontext.xml");

      TextEditor te = (TextEditor) context.getBean("textEditor");
      te.spellCheck();
   }
}
applicationcontext.xml
Following is the configuration file applicationcontext.xml which has configuration for the constructor-based injection −
<?xml version = "1.0" encoding = "UTF-8"?>

<beans xmlns = "http://www.springframework.org/schema/beans"
   xmlns:xsi = "http://www.w3.org/2001/XMLSchema-instance"
   xsi:schemaLocation = "http://www.springframework.org/schema/beans
   http://www.springframework.org/schema/beans/spring-beans-3.0.xsd">

   <!-- Definition for textEditor bean -->
   <bean id = "textEditor" class = "com.tutorialspoint.TextEditor">
      <constructor-arg ref = "spellChecker"/>
   </bean>

   <!-- Definition for spellChecker bean -->
   <bean id = "spellChecker" class = "com.tutorialspoint.SpellChecker"></bean>
</beans>
Output
Once you are done creating the source and bean configuration files, let us run the application. If everything is fine with your application, it will print the following message −
Inside SpellChecker constructor.
Inside TextEditor constructor.
Inside checkSpelling.
Spring DI - Injecting Inner Beans via Constructor
As you know Java inner classes are defined within the scope of other classes, similarly, inner beans are beans that are defined within the scope of another bean. Thus, a <bean/> element inside the <property/> or <constructor-arg/> elements is called inner bean and it is shown below.
<?xml version = "1.0" encoding = "UTF-8"?>

<beans xmlns = "http://www.springframework.org/schema/beans"
   xmlns:xsi = "http://www.w3.org/2001/XMLSchema-instance"
   xsi:schemaLocation = "http://www.springframework.org/schema/beans
   http://www.springframework.org/schema/beans/spring-beans-3.0.xsd">

   <bean id = "outerBean" class = "...">
      <constructor-arg name = "target">
         <bean id = "innerBean" class = "..."/>
      </constructor-arg>
   </bean>

</beans>
Example - Usage of Constructor Based DI of Inner Beans
The following example shows a class TextEditor that can only be dependency-injected with constructor based injection.
Let's update the project created in Spring DI - Create Project chapter. We're adding following files −
TextEditor.java − A class containing a SpellChecker as dependency.
SpellChecker.java − A dependency class.
MainApp.java − Main application to run and test.
TextEditor.java
Here is the content of TextEditor.java file −
package com.tutorialspoint;

public class TextEditor {
   private SpellChecker spellChecker;

   public TextEditor(SpellChecker spellChecker) {
      System.out.println("Inside TextEditor constructor." );
      this.spellChecker = spellChecker;
   }
   // a getter method to return spellChecker
   public SpellChecker getSpellChecker() {
      return spellChecker;
   }
   public void spellCheck() {
      spellChecker.checkSpelling();
   }
}
SpellChecker.java
Following is the content of another dependent class file SpellChecker.java
package com.tutorialspoint;

public class SpellChecker {
   public SpellChecker(){
      System.out.println("Inside SpellChecker constructor." );
   }
   public void checkSpelling() {
      System.out.println("Inside checkSpelling." );
   }
}
MainApp.java
Following is the content of the MainApp.java file.
package com.tutorialspoint;

import org.springframework.context.ApplicationContext;
import org.springframework.context.support.ClassPathXmlApplicationContext;

public class MainApp {
   public static void main(String[] args) {
      ApplicationContext context = new ClassPathXmlApplicationContext("applicationcontext.xml");

      TextEditor te = (TextEditor) context.getBean("textEditor");
      te.spellCheck();
   }
}
applicationcontext.xml
Following is the configuration file applicationcontext.xml which has configuration for the constructor-based injection −
<?xml version = "1.0" encoding = "UTF-8"?>

<beans xmlns = "http://www.springframework.org/schema/beans"
   xmlns:xsi = "http://www.w3.org/2001/XMLSchema-instance"
   xsi:schemaLocation = "http://www.springframework.org/schema/beans
   http://www.springframework.org/schema/beans/spring-beans-3.0.xsd">

   <!-- Definition for textEditor bean using inner bean -->
   <bean id = "textEditor" class = "com.tutorialspoint.TextEditor">
      <constructor-arg name = "spellChecker">
         <bean id = "spellChecker" class = "com.tutorialspoint.SpellChecker"/>
      </constructor-arg>
   </bean>

</beans>
Output
Once you are done creating the source and bean configuration files, let us run the application. If everything is fine with your application, it will print the following message −
Inside SpellChecker constructor.
Inside TextEditor constructor.
Inside checkSpelling.
Spring DI - Injecting Collections via Constructor
You have seen how to configure primitive data type using value attribute and object references using ref attribute of the <property> tag in your Bean configuration file. Both the cases deal with passing singular value to a bean.
Now what if you want to pass plural values like Java Collection types such as List, Set, and Properties. To handle the situation, Spring offers following types of collection configuration elements which are as follows −
| Sr.No | Element & Description |
|---|---|
| 1 |
<list> This helps in wiring ie injecting a list of values, allowing duplicates. |
| 2 |
<set> This helps in wiring a set of values but without any duplicates. |
| 3 |
<props> This can be used to inject a collection of name-value pairs where the name and value are both Strings. |
You can use either <list> or <set> to wire any implementation of java.util.Collection or an array.
In this example, we're showcasing passing direct values of the collection elements.
Example - Usage of Constructor Based DI of Collections
The following example shows a class JavaCollection that is using collections as dependency injected using constructor arguments.
Let's update the project created in Spring DI - Create Project chapter. We're adding following files −
JavaCollection.java − A class containing a collections as dependency.
MainApp.java − Main application to run and test.
JavaCollection.java
Here is the content of JavaCollection.java file −
package com.tutorialspoint;

import java.util.List;
import java.util.Properties;
import java.util.Set;

public class JavaCollection {
   List<String> addressList;
   Set<String>  addressSet;
   Properties addressProp;

   public JavaCollection() {}

   public JavaCollection(List<String> addressList, Set<String> addressSet,
      Properties addressProp) {
      this.addressList = addressList;
      this.addressSet = addressSet;
      this.addressProp = addressProp;
   }
   // a setter method to set List
   public void setAddressList(List<String> addressList) {
      this.addressList = addressList;
   }

   // prints and returns all the elements of the list.
   public List<String> getAddressList() {
      System.out.println("List Elements :"  + addressList);
      return addressList;
   }

   // a setter method to set Set
   public void setAddressSet(Set<String> addressSet) {
      this.addressSet = addressSet;
   }

   // prints and returns all the elements of the Set.
   public Set<String> getAddressSet() {
      System.out.println("Set Elements :"  + addressSet);
      return addressSet;
   }

   // a setter method to set Property
   public void setAddressProp(Properties addressProp) {
      this.addressProp = addressProp;
   }

   // prints and returns all the elements of the Property.
   public Properties getAddressProp() {
      System.out.println("Property Elements :"  + addressProp);
      return addressProp;
   }
}
MainApp.java
Following is the content of the MainApp.java file −
package com.tutorialspoint;

import org.springframework.context.ApplicationContext;
import org.springframework.context.support.ClassPathXmlApplicationContext;

public class MainApp {
   public static void main(String[] args) {
      ApplicationContext context = new ClassPathXmlApplicationContext("applicationcontext.xml");
      JavaCollection jc=(JavaCollection)context.getBean("javaCollection");

      jc.getAddressList();
      jc.getAddressSet();
      jc.getAddressProp();
   }
}
applicationcontext.xml
Following is the configuration file applicationcontext.xml which has configuration for all the type of collections −
<?xml version = "1.0" encoding = "UTF-8"?>

<beans xmlns = "http://www.springframework.org/schema/beans"
   xmlns:xsi = "http://www.w3.org/2001/XMLSchema-instance"
   xsi:schemaLocation = "http://www.springframework.org/schema/beans
   http://www.springframework.org/schema/beans/spring-beans-3.0.xsd">

   <bean id = "javaCollection" class = "com.tutorialspoint.JavaCollection">
      <constructor-arg name = "addressList">
         <list>
            <value>INDIA</value>
            <value>JAPAN</value>
            <value>USA</value>
            <value>UK</value>
         </list>
      </constructor-arg>
      <constructor-arg name = "addressSet">
         <set>
            <value>INDIA</value>
            <value>JAPAN</value>
            <value>USA</value>
            <value>UK</value>
         </set>
      </constructor-arg>
      <constructor-arg name = "addressProp">
         <props>
            <prop key = "one">INDIA</prop>
            <prop key = "two">JAPAN</prop>
            <prop key = "three">USA</prop>
            <prop key = "four">UK</prop>
         </props>
      </constructor-arg>
   </bean>
</beans>
Output
Once you are done creating the source and bean configuration files, let us run the application. If everything is fine with your application, it will print the following message −
List Elements :[INDIA, JAPAN, USA, UK]
Set Elements :[INDIA, JAPAN, USA, UK]
Property Elements :{four=UK, one=INDIA, two=JAPAN, three=USA}
Spring DI - Injecting Collection References via Constructor
You have seen how to configure primitive data type using value attribute and object references using ref attribute of the <property> tag in your Bean configuration file. Both the cases deal with passing singular value to a bean.
Now what if you want to pass plural values like Java Collection types such as List, Set, and Properties. To handle the situation, Spring offers following types of collection configuration elements which are as follows −
| Sr.No | Element & Description |
|---|---|
| 1 |
<list> This helps in wiring ie injecting a list of values, allowing duplicates. |
| 2 |
<set> This helps in wiring a set of values but without any duplicates. |
You can use either <list> or <set> to wire any implementation of java.util.Collection or an array.
In this example, we're showcasing passing collection elements using ref.
Example - Usage of Constructor Refs Based DI of Collections
The following example shows a class JavaCollection that is using collection of dependencies injected using constructor.
Let's update the project created in Spring DI - Create Project chapter. We're adding following files −
Address.java − A class to be used as dependency.
JavaCollection.java − A class containing a collections of dependencies.
MainApp.java − Main application to run and test.
Address.java
Here is the content of Address.java file −
package com.tutorialspoint;

public class Address {
   private String name;

   public String getName() {
      return name;
   }
   public void setName(String name) {
      this.name = name;
   }
   @Override
   public String toString() {
      return name;
   }
}
JavaCollection.java
Here is the content of JavaCollection.java file −
package com.tutorialspoint;

import java.util.List;
import java.util.Set;

public class JavaCollection {
   List<Address> addressList;
   Set<Address>  addressSet;

   public JavaCollection(List<Address> addressList, Set<Address> addressSet) {
      this.addressList = addressList;
      this.addressSet = addressSet;
   }

   // a setter method to set List
   public void setAddressList(List<Address> addressList) {
      this.addressList = addressList;
   }

   // prints and returns all the elements of the list.
   public List<Address> getAddressList() {
      System.out.println("List Elements :"  + addressList);
      return addressList;
   }

   // a setter method to set Set
   public void setAddressSet(Set<Address> addressSet) {
      this.addressSet = addressSet;
   }

   // prints and returns all the elements of the Set.
   public Set<Address> getAddressSet() {
      System.out.println("Set Elements :"  + addressSet);
      return addressSet;
   }
}
MainApp.java
Following is the content of the MainApp.java file −
package com.tutorialspoint;

import org.springframework.context.ApplicationContext;
import org.springframework.context.support.ClassPathXmlApplicationContext;

public class MainApp {
   public static void main(String[] args) {
      ApplicationContext context = new ClassPathXmlApplicationContext("applicationcontext.xml");
      JavaCollection jc=(JavaCollection)context.getBean("javaCollection");

      jc.getAddressList();
      jc.getAddressSet();
   }
}
applicationcontext.xml
Following is the configuration file applicationcontext.xml which has configuration for all the type of collections −
<beans xmlns = "http://www.springframework.org/schema/beans"
   xmlns:xsi = "http://www.w3.org/2001/XMLSchema-instance"
   xsi:schemaLocation = "http://www.springframework.org/schema/beans
   http://www.springframework.org/schema/beans/spring-beans-3.0.xsd">

   <bean id = "address1" class = "com.tutorialspoint.Address">
      <property name="name" value="INDIA"></property>
   </bean>
   <bean id = "address2" class = "com.tutorialspoint.Address">
      <property name="name" value="JAPAN"></property>
   </bean>
   <bean id = "address3" class = "com.tutorialspoint.Address">
      <property name="name" value="USA"></property>
   </bean>
   <bean id = "address4" class = "com.tutorialspoint.Address">
      <property name="name" value="UK"></property>
   </bean>
   <!-- Definition for javaCollection -->
   <bean id = "javaCollection" class = "com.tutorialspoint.JavaCollection">
      <constructor-arg name = "addressList">
         <list>
            <ref bean="address1" />
            <ref bean="address2" />
            <ref bean="address3" />
            <ref bean="address4" />
         </list>
      </constructor-arg>
      <constructor-arg name = "addressSet">
         <set>
            <ref bean="address1" />
            <ref bean="address2" />
            <ref bean="address3" />
            <ref bean="address4" />
         </set>
      </constructor-arg>
   </bean>
</beans>
Output
Once you are done creating the source and bean configuration files, let us run the application. If everything is fine with your application, it will print the following message −
List Elements :[INDIA, JAPAN, USA, UK]
Set Elements :[INDIA, JAPAN, USA, UK]
Spring DI - Injecting Map via Constructor
You have seen how to configure primitive data type using value attribute and object references using ref attribute of the <property> tag in your Bean configuration file. Both the cases deal with passing singular value to a bean.
Now what if you want to pass Map. In this example, we're showcasing passing direct values of the Map using constructor injection.
Example - Usage of Constructor Based DI of Map
The following example shows a class JavaCollection that is using collections as dependency injected using constructor arguments.
Let's update the project created in Spring DI - Create Project chapter. We're adding following files −
JavaCollection.java − A class containing a collections as dependency.
MainApp.java − Main application to run and test.
JavaCollection.java
Here is the content of JavaCollection.java file −
package com.tutorialspoint;

import java.util.Map;

public class JavaCollection {
   Map<String, String>  addressMap;
   public JavaCollection() {}

   public JavaCollection(Map<String, String> addressMap) {
      this.addressMap = addressMap;
   }

   // a setter method to set Map
   public void setAddressMap(Map<String, String> addressMap) {
      this.addressMap = addressMap;
   }

   // prints and returns all the elements of the Map.
   public Map<String, String> getAddressMap() {
      System.out.println("Map Elements :"  + addressMap);
      return addressMap;
   }
}
MainApp.java
Following is the content of the MainApp.java file −
package com.tutorialspoint;

import org.springframework.context.ApplicationContext;
import org.springframework.context.support.ClassPathXmlApplicationContext;

public class MainApp {
   public static void main(String[] args) {
      ApplicationContext context = new ClassPathXmlApplicationContext("applicationcontext.xml");
      JavaCollection jc=(JavaCollection)context.getBean("javaCollection");
      jc.getAddressMap();
   }
}
applicationcontext.xml
Following is the configuration file applicationcontext.xml which has configuration for all the type of collections −
<?xml version = "1.0" encoding = "UTF-8"?>

<beans xmlns = "http://www.springframework.org/schema/beans"
   xmlns:xsi = "http://www.w3.org/2001/XMLSchema-instance"
   xsi:schemaLocation = "http://www.springframework.org/schema/beans
   http://www.springframework.org/schema/beans/spring-beans-3.0.xsd">
   <bean id = "javaCollection" class = "com.tutorialspoint.JavaCollection">
      <constructor-arg name = "addressMap">
         <map>
            <entry key = "1" value = "INDIA"/>
            <entry key = "2" value = "JAPAN"/>
            <entry key = "3" value = "USA"/>
            <entry key = "4" value = "UK"/>
         </map>
      </constructor-arg>
   </bean>
</beans>
Output
Once you are done creating the source and bean configuration files, let us run the application. If everything is fine with your application, it will print the following message −
Map Elements :{1=INDIA, 2=JAPAN, 3=USA, 4=UK}
Spring DI - Injecting Map Reference via Constructor
You have seen how to configure primitive data type using value attribute and object references using ref attribute of the <property> tag in your Bean configuration file. Both the cases deal with passing singular value to a bean.
Now what if you want to pass Map. In this example, we're showcasing passing direct values of the Map using constructor injection.
Example - Usage of Constructor Based DI of Map Refs
Let's update the project created in Spring DI - Create Project chapter. We're adding following files −
Address.java − A class to be used as dependency.
JavaCollection.java − A class containing a collections of dependencies.
MainApp.java − Main application to run and test.
Address.java
Here is the content of Address.java file −
package com.tutorialspoint;

public class Address {
   private String name;

   public String getName() {
      return name;
   }
   public void setName(String name) {
      this.name = name;
   }
   @Override
   public String toString() {
      return name;
   }
}
JavaCollection.java
Here is the content of JavaCollection.java file −
package com.tutorialspoint;

import java.util.Map;

public class JavaCollection {
   Map<String, Address>  addressMap;
   public JavaCollection() {}

   public JavaCollection(Map<String, Address> addressMap) {
      this.addressMap = addressMap;
   }

   // a setter method to set Map
   public void setAddressMap(Map<String, Address> addressMap) {
      this.addressMap = addressMap;
   }

   // prints and returns all the elements of the Map.
   public Map<String, Address> getAddressMap() {
      System.out.println("Map Elements :"  + addressMap);
      return addressMap;
   }
}
MainApp.java
Following is the content of the MainApp.java file −
package com.tutorialspoint;

import org.springframework.context.ApplicationContext;
import org.springframework.context.support.ClassPathXmlApplicationContext;

public class MainApp {
   public static void main(String[] args) {
      ApplicationContext context = new ClassPathXmlApplicationContext("applicationcontext.xml");
      JavaCollection jc=(JavaCollection)context.getBean("javaCollection");
      jc.getAddressMap();
   }
}
applicationcontext.xml
Following is the configuration file applicationcontext.xml which has configuration for all the type of collections −
<?xml version = "1.0" encoding = "UTF-8"?>

<beans xmlns = "http://www.springframework.org/schema/beans"
   xmlns:xsi = "http://www.w3.org/2001/XMLSchema-instance"
   xsi:schemaLocation = "http://www.springframework.org/schema/beans
   http://www.springframework.org/schema/beans/spring-beans-3.0.xsd">
   <bean id = "address1" class = "com.tutorialspoint.Address">
      <property name="name" value="INDIA"></property>
   </bean>
   <bean id = "address2" class = "com.tutorialspoint.Address">
      <property name="name" value="JAPAN"></property>
   </bean>
   <bean id = "address3" class = "com.tutorialspoint.Address">
      <property name="name" value="USA"></property>
   </bean>
   <bean id = "address4" class = "com.tutorialspoint.Address">
      <property name="name" value="UK"></property>
   </bean>
   <bean id = "javaCollection" class = "com.tutorialspoint.JavaCollection">
      <constructor-arg name = "addressMap">
         <map>
            <entry key = "1" value-ref = "address1"/>
            <entry key = "2" value-ref = "address2"/>
            <entry key = "3" value-ref = "address3"/>
            <entry key = "4" value-ref = "address4"/>
         </map>
      </constructor-arg>
   </bean>
</beans>
Output
Once you are done creating the source and bean configuration files, let us run the application. If everything is fine with your application, it will print the following message −
Map Elements :{1=INDIA, 2=JAPAN, 3=USA, 4=UK}
Spring DI - Setter Based Dependency Injection
Setter-based DI is accomplished by the container calling setter methods on your beans after invoking a no-argument constructor or no-argument static factory method to instantiate your bean.
Example - Usage of Setter Based DI
The following example shows a class TextEditor that can only be dependency-injected with setter injection.
Let's update the project created in Spring DI - Create Project chapter. We're adding following files −
TextEditor.java − A class containing a SpellChecker as dependency.
SpellChecker.java − A dependency class.
MainApp.java − Main application to run and test.
TextEditor.java
Here is the content of TextEditor.java file −
package com.tutorialspoint;

public class TextEditor {
   private SpellChecker spellChecker;

   // a setter method to inject the dependency.
   public void setSpellChecker(SpellChecker spellChecker) {
      System.out.println("Inside setSpellChecker." );
      this.spellChecker = spellChecker;
   }
   // a getter method to return spellChecker
   public SpellChecker getSpellChecker() {
      return spellChecker;
   }
   public void spellCheck() {
      spellChecker.checkSpelling();
   }
}
Here you need to check the naming convention of the setter methods. To set a variable spellChecker we are using setSpellChecker() method which is very similar to Java POJO classes.
SpellChecker.java
Following is the content of another dependent class file SpellChecker.java
package com.tutorialspoint;

public class SpellChecker {
   public SpellChecker(){
      System.out.println("Inside SpellChecker constructor." );
   }
   public void checkSpelling() {
      System.out.println("Inside checkSpelling." );
   }
}
MainApp.java
Following is the content of the MainApp.java file.
package com.tutorialspoint;

import org.springframework.context.ApplicationContext;
import org.springframework.context.support.ClassPathXmlApplicationContext;

public class MainApp {
   public static void main(String[] args) {
      ApplicationContext context = new ClassPathXmlApplicationContext("applicationcontext.xml");

      TextEditor te = (TextEditor) context.getBean("textEditor");
      te.spellCheck();
   }
}
applicationcontext.xml
Following is the configuration file applicationcontext.xml which has configuration for the setter-based injection −
<?xml version = "1.0" encoding = "UTF-8"?>

<beans xmlns = "http://www.springframework.org/schema/beans"
   xmlns:xsi = "http://www.w3.org/2001/XMLSchema-instance"
   xsi:schemaLocation = "http://www.springframework.org/schema/beans
   http://www.springframework.org/schema/beans/spring-beans-3.0.xsd">

   <!-- Definition for textEditor bean -->
   <bean id = "textEditor" class = "com.tutorialspoint.TextEditor">
      <property name = "spellChecker" ref = "spellChecker"/>
   </bean>

   <!-- Definition for spellChecker bean -->
   <bean id = "spellChecker" class = "com.tutorialspoint.SpellChecker"></bean>
</beans>
You should note the difference in applicationcontext.xml file defined in the constructor-based injection and the setter-based injection. The only difference is inside the <bean> element where we have used <constructor-arg> tags for constructor-based injection and <property> tags for setter-based injection.
The second important point to note is that in case you are passing a reference to an object, you need to use ref attribute of <property> tag and if you are passing a value directly then you should use value attribute.
Output
Once you are done creating the source and bean configuration files, let us run the application. If everything is fine with your application, it will print the following message −
Inside SpellChecker constructor.
Inside setSpellChecker.
Inside checkSpelling.
Spring DI - Injecting Inner Beans via Setter
As you know Java inner classes are defined within the scope of other classes, similarly, inner beans are beans that are defined within the scope of another bean. Thus, a <bean/> element inside the <property/> or <constructor-arg/> elements is called inner bean and it is shown below.
<?xml version = "1.0" encoding = "UTF-8"?>

<beans xmlns = "http://www.springframework.org/schema/beans"
   xmlns:xsi = "http://www.w3.org/2001/XMLSchema-instance"
   xsi:schemaLocation = "http://www.springframework.org/schema/beans
   http://www.springframework.org/schema/beans/spring-beans-3.0.xsd">
   <bean id = "outerBean" class = "...">
      <property name = "target">
         <bean id = "innerBean" class = "..."/>
      </property>
   </bean>
</beans>
Example - Usage of Setter Based DI of Inner Beans
The following example shows a class TextEditor that can only be dependency-injected with setter based injection.
Let's update the project created in Spring DI - Create Project chapter. We're adding following files −
TextEditor.java − A class containing a SpellChecker as dependency.
SpellChecker.java − A dependency class.
MainApp.java − Main application to run and test.
TextEditor.java
Here is the content of TextEditor.java file −
package com.tutorialspoint;

public class TextEditor {
   private SpellChecker spellChecker;

   // a setter method to inject the dependency.
   public void setSpellChecker(SpellChecker spellChecker) {
      System.out.println("Inside setSpellChecker." );
      this.spellChecker = spellChecker;
   }
   // a getter method to return spellChecker
   public SpellChecker getSpellChecker() {
      return spellChecker;
   }
   public void spellCheck() {
      spellChecker.checkSpelling();
   }
}
SpellChecker.java
Following is the content of another dependent class file SpellChecker.java
package com.tutorialspoint;

public class SpellChecker {
   public SpellChecker(){
      System.out.println("Inside SpellChecker constructor." );
   }
   public void checkSpelling() {
      System.out.println("Inside checkSpelling." );
   }
}
MainApp.java
Following is the content of the MainApp.java file.
package com.tutorialspoint;

import org.springframework.context.ApplicationContext;
import org.springframework.context.support.ClassPathXmlApplicationContext;

public class MainApp {
   public static void main(String[] args) {
      ApplicationContext context = new ClassPathXmlApplicationContext("applicationcontext.xml");

      TextEditor te = (TextEditor) context.getBean("textEditor");
      te.spellCheck();
   }
}
applicationcontext.xml
Following is the configuration file applicationcontext.xml which has configuration for the setter-based injection −
<?xml version = "1.0" encoding = "UTF-8"?>

<beans xmlns = "http://www.springframework.org/schema/beans"
   xmlns:xsi = "http://www.w3.org/2001/XMLSchema-instance"
   xsi:schemaLocation = "http://www.springframework.org/schema/beans
   http://www.springframework.org/schema/beans/spring-beans-3.0.xsd">

   <!-- Definition for textEditor bean using inner bean -->
   <bean id = "textEditor" class = "com.tutorialspoint.TextEditor">
      <property name = "spellChecker">
         <bean id = "spellChecker" class = "com.tutorialspoint.SpellChecker"/>
      </property>
   </bean>
</beans>
Output
Once you are done creating the source and bean configuration files, let us run the application. If everything is fine with your application, it will print the following message −
Inside SpellChecker constructor.
Inside setSpellChecker.
Inside checkSpelling.
Spring DI - Injecting Collections via Setter
You have seen how to configure primitive data type using value attribute and object references using ref attribute of the <property> tag in your Bean configuration file. Both the cases deal with passing singular value to a bean.
Now what if you want to pass plural values like Java Collection types such as List, Set, and Properties. To handle the situation, Spring offers following types of collection configuration elements which are as follows −
| Sr.No | Element & Description |
|---|---|
| 1 |
<list> This helps in wiring ie injecting a list of values, allowing duplicates. |
| 2 |
<set> This helps in wiring a set of values but without any duplicates. |
| 3 |
<props> This can be used to inject a collection of name-value pairs where the name and value are both Strings. |
You can use either <list> or <set> to wire any implementation of java.util.Collection or an array.
In this example, we're showcasing passing direct values of the collection elements.
Example - Usage of Setter Based DI of Collections
The following example shows a class JavaCollection that is using collections as dependency injected using setter arguments.
Let's update the project created in Spring DI - Create Project chapter. We're adding following files −
JavaCollection.java − A class containing a collections as dependency.
MainApp.java − Main application to run and test.
JavaCollection.java
Here is the content of JavaCollection.java file −
package com.tutorialspoint;

import java.util.List;
import java.util.Set;
import java.util.Properties;

public class JavaCollection {
   List<String> addressList;
   Set<String>  addressSet;
   Properties addressProp;

   // a setter method to set List
   public void setAddressList(List<String> addressList) {
      this.addressList = addressList;
   }

   // prints and returns all the elements of the list.
   public List<String> getAddressList() {
      System.out.println("List Elements :"  + addressList);
      return addressList;
   }

   // a setter method to set Set
   public void setAddressSet(Set<String> addressSet) {
      this.addressSet = addressSet;
   }

   // prints and returns all the elements of the Set.
   public Set<String> getAddressSet() {
      System.out.println("Set Elements :"  + addressSet);
      return addressSet;
   }

   // a setter method to set Property
   public void setAddressProp(Properties addressProp) {
      this.addressProp = addressProp;
   }

   // prints and returns all the elements of the Property.
   public Properties getAddressProp() {
      System.out.println("Property Elements :"  + addressProp);
      return addressProp;
   }
}
MainApp.java
Following is the content of the MainApp.java file −
package com.tutorialspoint;

import org.springframework.context.ApplicationContext;
import org.springframework.context.support.ClassPathXmlApplicationContext;

public class MainApp {
   public static void main(String[] args) {
      ApplicationContext context = new ClassPathXmlApplicationContext("applicationcontext.xml");
      JavaCollection jc=(JavaCollection)context.getBean("javaCollection");

      jc.getAddressList();
      jc.getAddressSet();
      jc.getAddressProp();
   }
}
applicationcontext.xml
Following is the configuration file applicationcontext.xml which has configuration for all the type of collections −
<?xml version = "1.0" encoding = "UTF-8"?>

<beans xmlns = "http://www.springframework.org/schema/beans"
   xmlns:xsi = "http://www.w3.org/2001/XMLSchema-instance"
   xsi:schemaLocation = "http://www.springframework.org/schema/beans
   http://www.springframework.org/schema/beans/spring-beans-3.0.xsd">

   <!-- Definition for javaCollection -->
   <bean id = "javaCollection" class = "com.tutorialspoint.JavaCollection">
      <!-- results in a setAddressList(java.util.List) call -->
      <property name = "addressList">
         <list>
            <value>INDIA</value>
            <value>JAPAN</value>
            <value>USA</value>
            <value>UK</value>
         </list>
      </property>

      <!-- results in a setAddressSet(java.util.Set) call -->
      <property name = "addressSet">
         <set>
            <value>INDIA</value>
            <value>JAPAN</value>
            <value>USA</value>
            <value>UK</value>
         </set>
      </property>

      <!-- results in a setAddressProp(java.util.Properties) call -->
      <property name = "addressProp">
         <props>
            <prop key = "one">INDIA</prop>
            <prop key = "two">JAPAN</prop>
            <prop key = "three">USA</prop>
            <prop key = "four">UK</prop>
         </props>
      </property>
   </bean>
</beans>
Output
Once you are done creating the source and bean configuration files, let us run the application. If everything is fine with your application, it will print the following message −
List Elements :[INDIA, JAPAN, USA, UK]
Set Elements :[INDIA, JAPAN, USA, UK]
Property Elements :{four=UK, one=INDIA, two=JAPAN, three=USA}
Spring DI - Injecting Collection References via Setter
You have seen how to configure primitive data type using value attribute and object references using ref attribute of the <property> tag in your Bean configuration file. Both the cases deal with passing singular value to a bean.
Now what if you want to pass plural values like Java Collection types such as List, Set, and Properties. To handle the situation, Spring offers following types of collection configuration elements which are as follows −
| Sr.No | Element & Description |
|---|---|
| 1 |
<list> This helps in wiring ie injecting a list of values, allowing duplicates. |
| 2 |
<set> This helps in wiring a set of values but without any duplicates. |
You can use either <list> or <set> to wire any implementation of java.util.Collection or an array.
In this example, we're showcasing passing collection elements using ref.
Example - Usage of Setter Refs Based DI of Collections
The following example shows a class JavaCollection that is using collection of dependencies injected using setters.
Let's update the project created in Spring DI - Create Project chapter. We're adding following files −
Address.java − A class to be used as dependency.
JavaCollection.java − A class containing a collections of dependencies.
MainApp.java − Main application to run and test.
Address.java
Here is the content of Address.java file −
package com.tutorialspoint;

public class Address {
   private String name;

   public String getName() {
      return name;
   }
   public void setName(String name) {
      this.name = name;
   }
   @Override
   public String toString() {
      return name;
   }
}
JavaCollection.java
Here is the content of JavaCollection.java file −
package com.tutorialspoint;

import java.util.List;
import java.util.Set;

public class JavaCollection {
   List<Address> addressList;
   Set<Address>  addressSet;

   // a setter method to set List
   public void setAddressList(List<Address> addressList) {
      this.addressList = addressList;
   }

   // prints and returns all the elements of the list.
   public List<Address> getAddressList() {
      System.out.println("List Elements :"  + addressList);
      return addressList;
   }

   // a setter method to set Set
   public void setAddressSet(Set<Address> addressSet) {
      this.addressSet = addressSet;
   }

   // prints and returns all the elements of the Set.
   public Set<Address> getAddressSet() {
      System.out.println("Set Elements :"  + addressSet);
      return addressSet;
   }
}
MainApp.java
Following is the content of the MainApp.java file −
package com.tutorialspoint;

import org.springframework.context.ApplicationContext;
import org.springframework.context.support.ClassPathXmlApplicationContext;

public class MainApp {
   public static void main(String[] args) {
      ApplicationContext context = new ClassPathXmlApplicationContext("applicationcontext.xml");
      JavaCollection jc=(JavaCollection)context.getBean("javaCollection");

      jc.getAddressList();
      jc.getAddressSet();
   }
}
applicationcontext.xml
Following is the configuration file applicationcontext.xml which has configuration for all the type of collections −
<beans xmlns = "http://www.springframework.org/schema/beans"
   xmlns:xsi = "http://www.w3.org/2001/XMLSchema-instance"
   xsi:schemaLocation = "http://www.springframework.org/schema/beans
   http://www.springframework.org/schema/beans/spring-beans-3.0.xsd">

   <bean id = "address1" class = "com.tutorialspoint.Address">
      <property name="name" value="INDIA"></property>
   </bean>
   <bean id = "address2" class = "com.tutorialspoint.Address">
      <property name="name" value="JAPAN"></property>
   </bean>
   <bean id = "address3" class = "com.tutorialspoint.Address">
      <property name="name" value="USA"></property>
   </bean>
   <bean id = "address4" class = "com.tutorialspoint.Address">
      <property name="name" value="UK"></property>
   </bean>

   <!-- Definition for javaCollection -->
   <bean id = "javaCollection" class = "com.tutorialspoint.JavaCollection">
      <!-- results in a setAddressList(java.util.List) call -->
      <property name = "addressList">
         <list>
            <ref bean="address1" />
            <ref bean="address2" />
            <ref bean="address3" />
            <ref bean="address4" />
         </list>
      </property>

      <!-- results in a setAddressSet(java.util.Set) call -->
      <property name = "addressSet">
         <set>
            <ref bean="address1" />
            <ref bean="address2" />
            <ref bean="address3" />
            <ref bean="address4" />
         </set>
      </property>
   </bean>
</beans>
Output
Once you are done creating the source and bean configuration files, let us run the application. If everything is fine with your application, it will print the following message −
List Elements :[INDIA, JAPAN, USA, UK]
Set Elements :[INDIA, JAPAN, USA, UK]
Spring DI - Injecting Map via Setter
You have seen how to configure primitive data type using value attribute and object references using ref attribute of the <property> tag in your Bean configuration file. Both the cases deal with passing singular value to a bean.
Now what if you want to pass Map. In this example, we're showcasing passing direct values of the Map using setter injection.
Example - Usage of Setter Based DI of Map
The following example shows a class JavaCollection that is using collections as dependency injected using constructor arguments.
Let's update the project created in Spring DI - Create Project chapter. We're adding following files −
JavaCollection.java − A class containing a collections as dependency.
MainApp.java − Main application to run and test.
JavaCollection.java
Here is the content of JavaCollection.java file −
package com.tutorialspoint;

import java.util.Map;

public class JavaCollection {
   Map<String, String>  addressMap;
   public JavaCollection() {}

   public JavaCollection(Map<String, String> addressMap) {
      this.addressMap = addressMap;
   }

   // a setter method to set Map
   public void setAddressMap(Map<String, String> addressMap) {
      this.addressMap = addressMap;
   }

   // prints and returns all the elements of the Map.
   public Map<String, String> getAddressMap() {
      System.out.println("Map Elements :"  + addressMap);
      return addressMap;
   }
}
MainApp.java
Following is the content of the MainApp.java file −
package com.tutorialspoint;

import org.springframework.context.ApplicationContext;
import org.springframework.context.support.ClassPathXmlApplicationContext;

public class MainApp {
   public static void main(String[] args) {
      ApplicationContext context = new ClassPathXmlApplicationContext("applicationcontext.xml");
      JavaCollection jc=(JavaCollection)context.getBean("javaCollection");
      jc.getAddressMap();
   }
}
applicationcontext.xml
Following is the configuration file applicationcontext.xml which has configuration for all the type of collections −
<?xml version = "1.0" encoding = "UTF-8"?>

<beans xmlns = "http://www.springframework.org/schema/beans"
   xmlns:xsi = "http://www.w3.org/2001/XMLSchema-instance"
   xsi:schemaLocation = "http://www.springframework.org/schema/beans
   http://www.springframework.org/schema/beans/spring-beans-3.0.xsd">

   <bean id = "javaCollection" class = "com.tutorialspoint.JavaCollection">
      <property name = "addressMap">
         <map>
            <entry key = "1" value = "INDIA"/>
            <entry key = "2" value = "JAPAN"/>
            <entry key = "3" value = "USA"/>
            <entry key = "4" value = "UK"/>
         </map>
      </property>
   </bean>
</beans>
Output
Once you are done creating the source and bean configuration files, let us run the application. If everything is fine with your application, it will print the following message −
Map Elements :{1=INDIA, 2=JAPAN, 3=USA, 4=UK}
Spring DI - Injecting Map Reference via Setter
You have seen how to configure primitive data type using value attribute and object references using ref attribute of the <property> tag in your Bean configuration file. Both the cases deal with passing singular value to a bean.
Now what if you want to pass Map. In this example, we're showcasing passing direct values of the Map using setter injection.
Example - Usage of Constructor Based DI of Map Refs
Let's update the project created in Spring DI - Create Project chapter. We're adding following files −
Address.java − A class to be used as dependency.
JavaCollection.java − A class containing a collections of dependencies.
MainApp.java − Main application to run and test.
Address.java
Here is the content of Address.java file −
package com.tutorialspoint;

public class Address {
   private String name;

   public String getName() {
      return name;
   }
   public void setName(String name) {
      this.name = name;
   }
   @Override
   public String toString() {
      return name;
   }
}
JavaCollection.java
Here is the content of JavaCollection.java file −
package com.tutorialspoint;

import java.util.Map;

public class JavaCollection {
   Map<String, Address>  addressMap;
   public JavaCollection() {}

   public JavaCollection(Map<String, Address> addressMap) {
      this.addressMap = addressMap;
   }

   // a setter method to set Map
   public void setAddressMap(Map<String, Address> addressMap) {
      this.addressMap = addressMap;
   }

   // prints and returns all the elements of the Map.
   public Map<String, Address> getAddressMap() {
      System.out.println("Map Elements :"  + addressMap);
      return addressMap;
   }
}
MainApp.java
Following is the content of the MainApp.java file −
package com.tutorialspoint;

import org.springframework.context.ApplicationContext;
import org.springframework.context.support.ClassPathXmlApplicationContext;

public class MainApp {
   public static void main(String[] args) {
      ApplicationContext context = new ClassPathXmlApplicationContext("applicationcontext.xml");
      JavaCollection jc=(JavaCollection)context.getBean("javaCollection");
      jc.getAddressMap();
   }
}
applicationcontext.xml
Following is the configuration file applicationcontext.xml which has configuration for all the type of collections −
<?xml version = "1.0" encoding = "UTF-8"?>

<beans xmlns = "http://www.springframework.org/schema/beans"
   xmlns:xsi = "http://www.w3.org/2001/XMLSchema-instance"
   xsi:schemaLocation = "http://www.springframework.org/schema/beans
   http://www.springframework.org/schema/beans/spring-beans-3.0.xsd">
   <bean id = "address1" class = "com.tutorialspoint.Address">
      <property name="name" value="INDIA"></property>
   </bean>
   <bean id = "address2" class = "com.tutorialspoint.Address">
      <property name="name" value="JAPAN"></property>
   </bean>
   <bean id = "address3" class = "com.tutorialspoint.Address">
      <property name="name" value="USA"></property>
   </bean>
   <bean id = "address4" class = "com.tutorialspoint.Address">
      <property name="name" value="UK"></property>
   </bean>
   <bean id = "javaCollection" class = "com.tutorialspoint.JavaCollection">
      <property name = "addressMap">
         <map>
            <entry key = "1" value-ref = "address1"/>
            <entry key = "2" value-ref = "address2"/>
            <entry key = "3" value-ref = "address3"/>
            <entry key = "4" value-ref = "address4"/>
         </map>
      </property>
   </bean>
</beans>
Output
Once you are done creating the source and bean configuration files, let us run the application. If everything is fine with your application, it will print the following message −
Map Elements :{1=INDIA, 2=JAPAN, 3=USA, 4=UK}
Spring DI - Autowiring
You have learnt how to declare beans using the <bean> element and inject <bean> using <constructor-arg> and <property> elements in XML configuration file.
The Spring container can autowire relationships between collaborating beans without using <constructor-arg> and <property> elements, which helps cut down on the amount of XML configuration you write for a big Spring-based application.
Autowiring Modes
Following are the autowiring modes, which can be used to instruct the Spring container to use autowiring for dependency injection. You use the autowire attribute of the <bean/> element to specify autowire mode for a bean definition.
| Sr.No | Mode & Description |
|---|---|
| 1 |
no This is default setting which means no autowiring and you should use explicit bean reference for wiring. You have nothing to do special for this wiring. This is what you already have seen in Dependency Injection chapter. |
| 2 |
Autowiring by property name. Spring container looks at the properties of the beans on which autowire attribute is set to byName in the XML configuration file. It then tries to match and wire its properties with the beans defined by the same names in the configuration file. |
| 3 |
Autowiring by property datatype. Spring container looks at the properties of the beans on which autowire attribute is set to byType in the XML configuration file. It then tries to match and wire a property if its type matches with exactly one of the beans name in configuration file. If more than one such beans exists, a fatal exception is thrown. |
| 4 |
Similar to byType, but type applies to constructor arguments. If there is not exactly one bean of the constructor argument type in the container, a fatal error is raised. |
| 5 |
autodetect Spring first tries to wire using autowire by constructor, if it does not work, Spring tries to autowire by byType. |
You can use byType or constructor autowiring mode to wire arrays and other typed-collections.
Limitations with autowiring
Autowiring works best when it is used consistently across a project. If autowiring is not used in general, it might be confusing for developers to use it to wire only one or two bean definitions. Though, autowiring can significantly reduce the need to specify properties or constructor arguments but you should consider the limitations and disadvantages of autowiring before using them.
| Sr.No. | Limitations & Description |
|---|---|
| 1 |
Overriding possibility You can still specify dependencies using <constructor-arg> and <property> settings which will always override autowiring. |
| 2 |
Primitive data types You cannot autowire so-called simple properties such as primitives, Strings, and Classes. |
| 3 |
Confusing nature Autowiring is less exact than explicit wiring, so if possible prefer using explict wiring. |
Spring DI - Autowiring ByName
This mode specifies autowiring by property name. Spring container looks at the beans on which auto-wire attribute is set to byName in the XML configuration file. It then tries to match and wire its properties with the beans defined by the same names in the configuration file. If matches are found, it will inject those beans. Otherwise, bean(s) will not be wired.
For example, if a bean definition is set to autowire byName in the configuration file, and it contains a spellChecker property (that is, it has a setSpellChecker(...)method), Spring looks for a bean definition named spellChecker, and uses it to set the property. Still you can wire the remaining properties using <property> tags. The following example will illustrate the concept.
Example - Usage of Autowiring ByName
The following example shows a class TextEditor that can only be dependency-injected using pure setter-based injection.
Let's update the project created in Spring DI - Create Project chapter. We're adding following files −
TextEditor.java − A class containing a SpellChecker as dependency.
SpellChecker.java − A dependency class.
MainApp.java − Main application to run and test.
TextEditor.java
Here is the content of TextEditor.java file −
package com.tutorialspoint;

public class TextEditor {
   private SpellChecker spellChecker;
   private String name;

   public void setSpellChecker( SpellChecker spellChecker ){
      this.spellChecker = spellChecker;
   }
   public SpellChecker getSpellChecker() {
      return spellChecker;
   }
   public void setName(String name) {
      this.name = name;
   }
   public String getName() {
      return name;
   }
   public void spellCheck() {
      spellChecker.checkSpelling();
   }
}
SpellChecker.java
Following is the content of another dependent class file SpellChecker.java −
package com.tutorialspoint;

public class SpellChecker {
   public SpellChecker(){
      System.out.println("Inside SpellChecker constructor." );
   }
   public void checkSpelling(){
      System.out.println("Inside checkSpelling." );
   }
}
MainApp.java
Following is the content of the MainApp.java file −
package com.tutorialspoint;

import org.springframework.context.ApplicationContext;
import org.springframework.context.support.ClassPathXmlApplicationContext;

public class MainApp {
   public static void main(String[] args) {
      ApplicationContext context = new ClassPathXmlApplicationContext("applicationcontext.xml");
      TextEditor te = (TextEditor) context.getBean("textEditor");
      te.spellCheck();
   }
}
applicationcontext.xml
Following is the configuration file applicationcontext.xml which has configuration for autowiring byName −
<?xml version = "1.0" encoding = "UTF-8"?>

<beans xmlns = "http://www.springframework.org/schema/beans"
   xmlns:xsi = "http://www.w3.org/2001/XMLSchema-instance"
   xsi:schemaLocation = "http://www.springframework.org/schema/beans
   http://www.springframework.org/schema/beans/spring-beans-3.0.xsd">

   <!-- Definition for textEditor bean -->
   <bean id = "textEditor" class = "com.tutorialspoint.TextEditor" autowire = "byName">
      <property name = "name" value = "Generic Text Editor" />
   </bean>

   <!-- Definition for spellChecker bean -->
   <bean id = "spellChecker" class = "com.tutorialspoint.SpellChecker"></bean>
</beans>
Output
Once you are done creating the source and bean configuration files, let us run the application. If everything is fine with your application, it will print the following message −
Inside SpellChecker constructor.
Inside checkSpelling.
Spring DI - Autowiring ByType
This mode specifies autowiring by property type. Spring container looks at the beans on which autowire attribute is set to byType in the XML configuration file. It then tries to match and wire a property if its type matches with exactly one of the beans name in the configuration file. If matches are found, it will inject those beans. Otherwise, bean(s) will not be wired.
For example, if a bean definition is set to autowire byType in the configuration file, and it contains a spellChecker property of SpellChecker type, Spring looks for a bean definition named SpellChecker, and uses it to set the property. Still you can wire the remaining properties using <property> tags. The following example will illustrate the concept.
Example - Usage of Autowiring ByType
The following example shows a class TextEditor that can only be dependency-injected using pure setter-based injection.
Let's update the project created in Spring DI - Create Project chapter. We're adding following files −
TextEditor.java − A class containing a SpellChecker as dependency.
SpellChecker.java − A dependency class.
MainApp.java − Main application to run and test.
TextEditor.java
Here is the content of TextEditor.java file −
package com.tutorialspoint;

public class TextEditor {
   private SpellChecker spellChecker;
   private String name;

   public void setSpellChecker( SpellChecker spellChecker ){
      this.spellChecker = spellChecker;
   }
   public SpellChecker getSpellChecker() {
      return spellChecker;
   }
   public void setName(String name) {
      this.name = name;
   }
   public String getName() {
      return name;
   }
   public void spellCheck() {
      spellChecker.checkSpelling();
   }
}
SpellChecker.java
Following is the content of another dependent class file SpellChecker.java −
package com.tutorialspoint;

public class SpellChecker {
   public SpellChecker(){
      System.out.println("Inside SpellChecker constructor." );
   }
   public void checkSpelling(){
      System.out.println("Inside checkSpelling." );
   }
}
MainApp.java
Following is the content of the MainApp.java file −
package com.tutorialspoint;

import org.springframework.context.ApplicationContext;
import org.springframework.context.support.ClassPathXmlApplicationContext;

public class MainApp {
   public static void main(String[] args) {
      ApplicationContext context = new ClassPathXmlApplicationContext("applicationcontext.xml");
      TextEditor te = (TextEditor) context.getBean("textEditor");
      te.spellCheck();
   }
}
applicationcontext.xml
Following is the configuration file applicationcontext.xml which has configuration for autowiring byType −
<?xml version = "1.0" encoding = "UTF-8"?>

<beans xmlns = "http://www.springframework.org/schema/beans"
   xmlns:xsi = "http://www.w3.org/2001/XMLSchema-instance"
   xsi:schemaLocation = "http://www.springframework.org/schema/beans
   http://www.springframework.org/schema/beans/spring-beans-3.0.xsd">

   <!-- Definition for textEditor bean -->
   <bean id = "textEditor" class = "com.tutorialspoint.TextEditor" autowire = "byType">
      <property name = "name" value = "Generic Text Editor" />
   </bean>

   <!-- Definition for spellChecker bean -->
   <bean id = "spellChecker" class = "com.tutorialspoint.SpellChecker"></bean>

</beans>
Output
Once you are done creating the source and bean configuration files, let us run the application. If everything is fine with your application, it will print the following message −
Inside SpellChecker constructor.
Inside checkSpelling.
Spring DI - Autowiring via Constructor
This mode is very similar to byType, but it applies to constructor arguments. Spring container looks at the beans on which autowire attribute is set constructor in the XML configuration file. It then tries to match and wire its constructor's argument with exactly one of the beans name in the configuration file. If matches are found, it will inject those beans. Otherwise, bean(s) will not be wired.
For example, if a bean definition is set to autowire by constructor in configuration file, and it has a constructor with one of the arguments of SpellChecker type, Spring looks for a bean definition named SpellChecker, and uses it to set the constructor's argument. Still you can wire remaining arguments using <constructor-arg> tags. The Following example will illustrate the concept.
Example - Usage of Autowiring via Constructor
The following example shows a class TextEditor that can only be dependency-injected using pure constructor-based injection.
Let's update the project created in Spring DI - Create Project chapter. We're adding following files −
TextEditor.java − A class containing a SpellChecker as dependency.
SpellChecker.java − A dependency class.
MainApp.java − Main application to run and test.
TextEditor.java
Here is the content of TextEditor.java file −
package com.tutorialspoint;

public class TextEditor {
   private SpellChecker spellChecker;
   private String name;

   public TextEditor( SpellChecker spellChecker ){
      this.spellChecker = spellChecker;
   }
   public SpellChecker getSpellChecker() {
      return spellChecker;
   }
   public void setName(String name) {
      this.name = name;
   }
   public String getName() {
      return name;
   }
   public void spellCheck() {
      spellChecker.checkSpelling();
   }
}
SpellChecker.java
Following is the content of another dependent class file SpellChecker.java −
package com.tutorialspoint;

public class SpellChecker {
   public SpellChecker(){
      System.out.println("Inside SpellChecker constructor." );
   }
   public void checkSpelling(){
      System.out.println("Inside checkSpelling." );
   }
}
MainApp.java
Following is the content of the MainApp.java file −
package com.tutorialspoint;

import org.springframework.context.ApplicationContext;
import org.springframework.context.support.ClassPathXmlApplicationContext;

public class MainApp {
   public static void main(String[] args) {
      ApplicationContext context = new ClassPathXmlApplicationContext("applicationcontext.xml");
      TextEditor te = (TextEditor) context.getBean("textEditor");
      te.spellCheck();
   }
}
applicationcontext.xml
Following is the configuration file applicationcontext.xml which has configuration for autowiring constructor −
<?xml version = "1.0" encoding = "UTF-8"?>

<beans xmlns = "http://www.springframework.org/schema/beans"
   xmlns:xsi = "http://www.w3.org/2001/XMLSchema-instance"
   xsi:schemaLocation = "http://www.springframework.org/schema/beans
   http://www.springframework.org/schema/beans/spring-beans-3.0.xsd">

   <!-- Definition for textEditor bean -->
   <bean id = "textEditor" class = "com.tutorialspoint.TextEditor" autowire = "constructor">
      <property name = "name" value = "Generic Text Editor" />
   </bean>

   <!-- Definition for spellChecker bean -->
   <bean id = "spellChecker" class = "com.tutorialspoint.SpellChecker"></bean>

</beans>
Output
Once you are done creating the source and bean configuration files, let us run the application. If everything is fine with your application, it will print the following message −
Inside SpellChecker constructor.
Inside checkSpelling.
Spring DI - Static Factory
Spring provides an option to inject dependency using factory-method attribute.
Example - Usage of Static Factory Methods for dependency injection
The following example shows a class TextEditor that can only be dependency-injected using pure setter-based injection.
Let's update the project created in Spring DI - Create Project chapter. We're adding following files −
TextEditor.java − A class containing a SpellChecker as dependency.
SpellChecker.java − A dependency class.
MainApp.java − Main application to run and test.
TextEditor.java
Here is the content of TextEditor.java file −
package com.tutorialspoint;

public class TextEditor {
   private SpellChecker spellChecker;
   private String name;

   public void setSpellChecker( SpellChecker spellChecker ){
      this.spellChecker = spellChecker;
   }
   public SpellChecker getSpellChecker() {
      return spellChecker;
   }
   public void setName(String name) {
      this.name = name;
   }
   public String getName() {
      return name;
   }
   public void spellCheck() {
      spellChecker.checkSpelling();
   }
}
SpellChecker.java
Following is the content of another dependent class file SpellChecker.java −
This class constructor is private. So its object can not be created directly using new operator by other object. It has a static factory method to get an instance.
package com.tutorialspoint;

public class SpellChecker {
   private SpellChecker(){
      System.out.println("Inside SpellChecker constructor." );
   }
   public static SpellChecker getInstance() {
      System.out.println("Inside SpellChecker getInstance." );
      return new SpellChecker();
   }
   public void checkSpelling(){
      System.out.println("Inside checkSpelling." );
   }
}
MainApp.java
Following is the content of the MainApp.java file −
package com.tutorialspoint;

import org.springframework.context.ApplicationContext;
import org.springframework.context.support.ClassPathXmlApplicationContext;

public class MainApp {
   public static void main(String[] args) {
      ApplicationContext context = new ClassPathXmlApplicationContext("applicationcontext.xml");
      TextEditor te = (TextEditor) context.getBean("textEditor");
      te.spellCheck();
   }
}
applicationcontext.xml
Following is the configuration file applicationcontext.xml which has configuration for autowiring byName −
<?xml version = "1.0" encoding = "UTF-8"?>

<beans xmlns = "http://www.springframework.org/schema/beans"
   xmlns:xsi = "http://www.w3.org/2001/XMLSchema-instance"
   xsi:schemaLocation = "http://www.springframework.org/schema/beans
   http://www.springframework.org/schema/beans/spring-beans-3.0.xsd">

   <!-- Definition for textEditor bean -->
   <bean id = "textEditor" class = "com.tutorialspoint.TextEditor" autowire = "byName">
      <property name = "name" value = "Generic Text Editor" />
   </bean>

   <!-- Definition for spellChecker bean -->
   <bean id = "spellChecker" class = "com.tutorialspoint.SpellChecker" factory-method="getInstance"></bean>
</beans>
Output
Once you are done creating the source and bean configuration files, let us run the application. If everything is fine with your application, it will print the following message −
Inside SpellChecker getInstance.
Inside SpellChecker constructor.
Inside checkSpelling.
