- Spring Boot ORM - Home
- Spring Boot ORM - Overview
- Spring Boot ORM - Environment Setup
- Spring Boot ORM - JPA
Spring Boot ORM & Spring Data JPA
- Spring Boot ORM - Create Project
- Spring Boot ORM - application.properties
- Spring Boot ORM - Update Project
- Spring Boot ORM - Test Hibernate
Spring Boot ORM & EclipseLink
- Spring Boot ORM - Maven EclipseLink
- Spring Boot ORM - Update Project EclipseLink
- Spring Boot ORM - Test EclipseLink
Spring Boot ORM Resources
Spring Boot ORM - Quick Guide
Spring Boot ORM - Overview
The Spring Framework integrates well with ORM frameworks like Hibernate, Java Persistence API (JPA), Java Data Objects (JDO) and iBATIS SQL Maps. Spring provides resource management, data access object (DAO) implementations, and transaction strategies. Spring allows to configure ORM library features through dependency management. Spring maintains a uniform DAO Exception hiearchies and a generic transaction management for all the ORM libraries it supports.
Features of Spring Boot ORM
Spring IoC container facilitates ORM configurations and easy deployment. Following are the key benefits of using Spring framework to create ORM DAO.
Easy to Test − Using spring IoC, an ORM implementation can be easily configured. Each piece of persistence unit can be tested in isolation.
Common Data Access Exception − Spring wraps ORM Tools exceptions to a common runtime exception as DataAccessException. This approach helps to handle most persistence exception (non-recoverable) in appropriate layers. No need to handle ORM specific boilerplate catch/throws/exception declarations.
General Resource Management − Spring application contexts manages persistence objects, their configurations easily. For example, Hibernate SessionFactory instances, JPA EntityManagerFactory instances, JDBC DataSource instances, iBatis SQL Maps configuration objects and other related objects. Spring handles the local as well JTA transaction management by itself.
Integrated transaction management − Spring AOP can be used to wrap an ORM code with a declarative AOP styled interceptor either using @Transaction annotation or by specifying transaction AOP advice in XML configuration file. Spring handles transaction semantics, exception handling, rollback and so on. Spring allows to swap transaction managers without affecting the ORM code.
Spring Boot ORM - Environment Setup
This chapter will guide you on how to prepare a development environment to start your work with Spring Boot Framework. It will also teach you how to set up JDK, Tomcat and STS on your machine before you set up Spring Framework −
Step 1 - Setup Java Development Kit (JDK)
You can download the latest version of SDK from Oracle's Java site − Java SE Downloads. You will find instructions for installing JDK in downloaded files, follow the given instructions to install and configure the setup. Finally set PATH and JAVA_HOME environment variables to refer to the directory that contains java and javac, typically java_install_dir/bin and java_install_dir respectively.
If you are running Windows and have installed the JDK in C:\jdk-24, you would have to put the following line in your C:\autoexec.bat file.
set PATH=C:\jdk-24;%PATH%
set JAVA_HOME=C:\jdk-24
Alternatively, on Windows NT/2000/XP, you will have to right-click on My Computer, select Properties → Advanced → Environment Variables. Then, you will have to update the PATH value and click the OK button.
On Unix (Solaris, Linux, etc.), if the SDK is installed in /usr/local/jdk-24 and you use the C shell, you will have to put the following into your .cshrc file.
setenv PATH /usr/local/jdk-24/bin:$PATH
setenv JAVA_HOME /usr/local/jdk-24
Alternatively, if you use an Integrated Development Environment (IDE) like Borland JBuilder, Eclipse, IntelliJ IDEA, or Sun ONE Studio, you will have to compile and run a simple program to confirm that the IDE knows where you have installed Java. Otherwise, you will have to carry out a proper setup as given in the document of the IDE.
Step 2 - Setup Spring Tool Suite
All the examples in this tutorial have been written using Spring Tool Suite IDE. So we would suggest you should have the latest version of Spring Tool Suite installed on your machine.
To install Spring Tool Suite IDE, download the latest Spring Tool Suite binaries from www.eclipse.org/downloads. Once you download the installation, unpack the binary distribution into a convenient location. For example, in C:\sts\sts-4.30.0.RELEASE on Windows, or /usr/local/sts/sts-4.30.0.RELEASE on Linux/Unix and finally set PATH variable appropriately.
Spring Tool Suite can be started by executing the following commands on Windows machine, or you can simply double-click on SpringToolSuite4.exe
E:\sts\sts-4.30.0.RELEASE\SpringToolSuite4.exe
Eclipse can be started by executing the following commands on Unix (Solaris, Linux, etc.) machine −
$/usr/local/sts/sts-4.30.0.RELEASE/SpringToolSuite4
Step 3 - Setup Spring Boot Project
Now if everything is fine, then you can proceed to set up your Spring Boot. Following are the simple steps to download and install the Spring Boot Project on your machine.
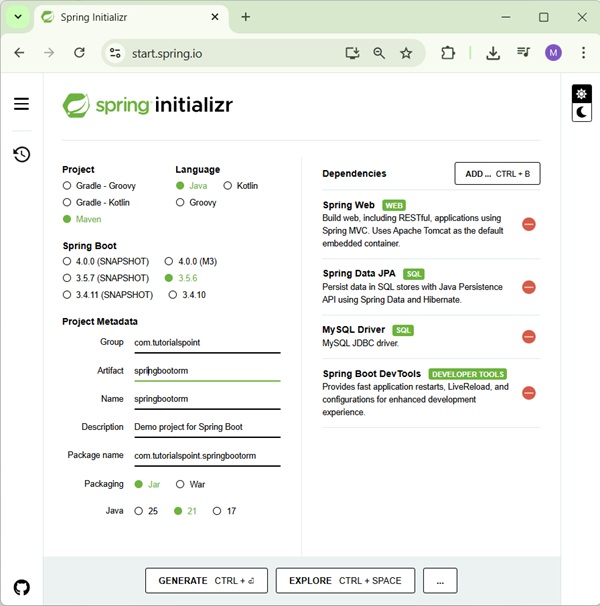
Go to spring Initializr link to create a spring boot project, https://start.spring.io/.
Select project as Maven Project.
Select language as Java.
Select Spring Boot version as 3.5.6.
Set Project Metadata - Group as com.tutorialspoint, Artifact as springbootorm, name as springbootorm, Description as Demo project for Spring Boot ORM and package name as com.tutorialspoint.springbootorm.
Select packaging as Jar.
Select java as 21.
Add dependencies as Spring Web, Spring Data JPA, H2 Database and Spring Boot DevTools.
Now click on GENERATE Button to generate the project structure.
Once the maven based spring boot project is downloaded, then import the maven project into eclipse and rest eclipse will handle. It will download the maven dependencies and build the project to make it ready for further development.
Step 4 - POSTMAN for REST APIs Testing
POSTMAN is a useful tool to test REST Based APIs. To install POSTMAN, download the latest POSTMAN binaries from www.postman.com/downloads/. Once you download the installable, follow the instructions to install and use it.
Spring Boot ORM - JPA
Java Persistence API (JPA) is a collection of classes and interfaces that allow object/relational mapping of Java objects with databases. In JPA, Entity classes are defined in persistence.xml file. Spring Boot does not use persistence.xml. Instead it uses "Entity Scanning" is the process of finding and registering Entity classes with the persistence provider.
What is Entity Scanning?
Entity Discovery − When the provider finds a class with the @Entity annotation, it recognizes it as a persistent entity and registers it.
Persistence Unit − The discovered entities are then associated with a persistence unit, which defines a set of entities managed by a single EntityManager.
Scanning Packages − The JPA provider scans specified packages or directories for classes annotated with the @Entity annotation.
By default the auto-configured packages are scanned.
Configuring Entity Scanning in Spring Boot
-
Default Scanning − By default, Spring Boot scans the package of your main application class and its sub-packages for entity classes.
-
Customizing Scanning − You can use the @EntityScan annotation to specify the packages to scan. For example:
@SpringBootApplication
@EntityScan(basePackages = {"com.example.entities"})
public class Application {
   // ...
}
Spring Data JPA Repositories
Spring Data JPA implements interfaces that are used to access data from database (relational, NoSQL or anything else). Spring Data repositories extend from either Repository or CrudRepository.
@Repository
public interface EmployeeRepository extends CrudRepository<Employee, Integer>  {
}
Creating and Deleting Databases
JPA databases are automatically created if you use an embedded database like H2, Derby. To create and drop tables, your application.properties should look like this −
spring.jpa.hibernate.ddl-auto=create-drop
Mapping associations between classes
Mapping associations can be of two types −
Unidirectional association − In this association, only one entity holds a reference to the other. For example, One to Many or Many to One relationship.
Bidirectional association − In a bidirectional association, both entities (source and target) have a relationship field that refers to each other. For example, Many to Many relationship.
One-to-Many Relationship (Unidirectional)
Imagine a Department entity and its Employees. Each department has many employees, but each employee belongs to one department only.
Department.java
package com.tutorialspoint;

import jakarta.persistence.*;
import java.util.*;

@Entity
public class Department {
   @Id
   private Long id;

   @OneToMany
   @JoinColumn(name = "department_id")
   private List<Employee> employees;

   public Department() {}

   public Long getId() {
      return id;
   }

   public void setId(Long id) {
      this.id = id;
   }
   public List<Employee> getEmployees() {
      return employees;
   }
   public void setEmployees(List<Employee> employees) {
      this.employees = employees;
   }
}
Employee.java
package com.tutorialspoint;

import jakarta.persistence.Entity;
import jakarta.persistence.Id;

@Entity
public class Employee {
   @Id
   private Long id;

   public Long getId() {
      return id;
   }

   public void setId(Long id) {
      this.id = id;
   }
}
Many-to-One Relationship (Unidirectional)
Consider a Student and a School. Each student can be enrolled in only one school, but each school can have multiple students.
Student.java
package com.tutorialspoint;

import jakarta.persistence.*;

@Entity
public class Student {
   @Id
   @GeneratedValue(strategy = GenerationType.IDENTITY)
   private Long id;
   private String name;

   @ManyToOne
   @JoinColumn(name = "school_id")
   private School school;

   public Long getId() {
      return id;
   }
   public void setId(Long id) {
      this.id = id;
   }
   public String getName() {
      return name;
   }
   public void setName(String name) {
      this.name = name;
   }
   public School getSchool() {
      return school;
   }
   public void setSchool(School school) {
      this.school = school;
   }
}
School.java
package com.tutorialspoint;

import jakarta.persistence.Entity;
import jakarta.persistence.Id;
import java.util.List;

@Entity
public class School {
   @Id
   private Long id;
   private List<Student> students;

   public Long getId() {
      return id;
   }
   public void setId(Long id) {
      this.id = id;
   }
   public List<Student> getStudents() {
      return students;
   }
   public void setStudents(List<Student> students) {
      this.students = students;
   }
}
Many-to-Many Relationship (Bidirectional)
In a bidirectional association, both entities (source and target) have a relationship field that refers to each other. Imagine a Book and an Author. Each book has one author, but each author can write multiple books.
Book.java
package com.tutorialspoint;

import jakarta.persistence.*;

@Entity
public class Book {
   @Id
   private Long id;
   private String title;

   @ManyToOne
   @JoinColumn(name = "author_id")
   private Author author;

   public Long getId() {
      return id;
   }
   public void setId(Long id) {
      this.id = id;
   }
   public String getTitle() {
      return title;
   }
   public void setTitle(String title) {
      this.title = title;
   }
   public Author getAuthor() {
      return author;
   }
   public void setAuthor(Author author) {
      this.author = author;
   }
}
Author.java
package com.tutorialspoint;

import jakarta.persistence.*;
import java.util.List;

@Entity
public class Author {

   @Id
   private Long id;
   private String name;

   @OneToMany(mappedBy = "author")
   private List<Book> books;

   public Long getId() {
      return id;
   }
   public void setId(Long id) {
      this.id = id;
   }
   public String getName() {
      return name;
   }
   public void setName(String name) {
      this.name = name;
   }
   public List<Book> getBooks() {
      return books;
   }
   public void setBooks(List<Book> books) {
      this.books = books;
   }
}
Spring Boot ORM - Create Project
Using STS (Spring Tool Suite), select File −> Import −> Existing Maven Project and click Next.

Select the project downloaded and extracted from spring initializr during environment setup, as shown below:
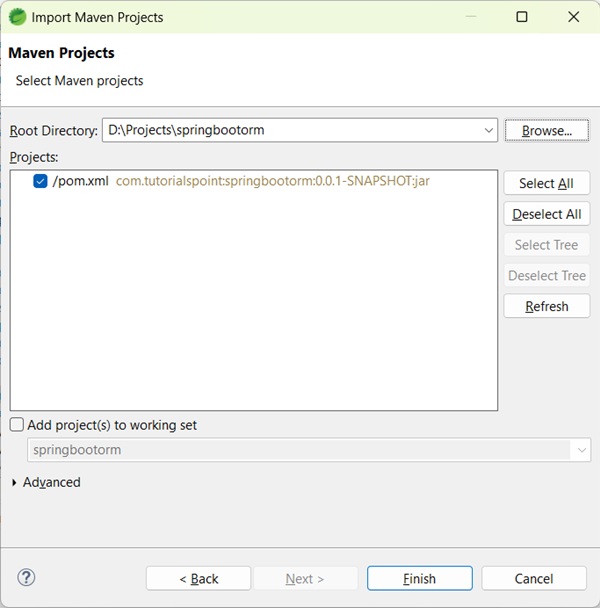
Click on Finish button and a new project will be created.
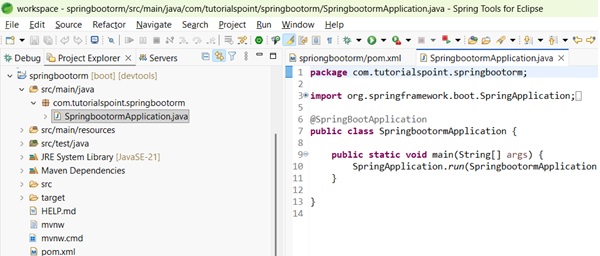
Now as we've our project ready, let check following dependencies in pom.xml.
Spring Boot Starter Framework libraries
MySQL Connector
Other related dependencies.
As we are using spring boot, its starter projects automatically handles most of the dependencies.
pom.xml
<?xml version="1.0" encoding="UTF-8"?>
<project xmlns="http://maven.apache.org/POM/4.0.0" xmlns:xsi="http://www.w3.org/2001/XMLSchema-instance"
   xsi:schemaLocation="http://maven.apache.org/POM/4.0.0 https://maven.apache.org/xsd/maven-4.0.0.xsd">
   <modelVersion>4.0.0</modelVersion>
   <parent>
      <groupId>org.springframework.boot</groupId>
      <artifactId>spring-boot-starter-parent</artifactId>
      <version>3.5.6</version>
      <relativePath/> <!-- lookup parent from repository -->
   </parent>
   <groupId>com.tutorialspoint</groupId>
   <artifactId>springbootorm</artifactId>
   <version>0.0.1-SNAPSHOT</version>
   <name>springbootorm</name>
   <description>Demo project for Spring Boot ORM</description>
   <url/>
   <licenses>
      <license/>
   </licenses>
   <developers>
      <developer/>
   </developers>
   <scm>
      <connection/>
      <developerConnection/>
      <tag/>
      <url/>
   </scm>
   <properties>
      <java.version>21</java.version>
   </properties>
   <dependencies>
      <dependency>
         <groupId>org.springframework.boot</groupId>
         <artifactId>spring-boot-starter-data-jpa</artifactId>
      </dependency>
      <dependency>
         <groupId>org.springframework.boot</groupId>
         <artifactId>spring-boot-starter-web</artifactId>
      </dependency>
      <dependency>
         <groupId>org.springframework.boot</groupId>
         <artifactId>spring-boot-devtools</artifactId>
         <scope>runtime</scope>
         <optional>true</optional>
      </dependency>
      <dependency>
         <groupId>com.mysql</groupId>
         <artifactId>mysql-connector-j</artifactId>
         <scope>runtime</scope>
      </dependency>
      <dependency>
         <groupId>org.springframework.boot</groupId>
         <artifactId>spring-boot-starter-test</artifactId>
         <scope>test</scope>
      </dependency>
   </dependencies>
   <build>
      <plugins>
         <plugin>
            <groupId>org.springframework.boot</groupId>
            <artifactId>spring-boot-maven-plugin</artifactId>
         </plugin>
      </plugins>
   </build>
</project>
Spring Boot ORM - application.properties
Spring boot reads application as well as persistence related properties from application.properties. Here we can configure the hibernate or any other ORM framework specific properties as well. We're using generic properties so that we can switch between ORM without changing much code. By default, spring boot configure hibernate as ORM provider if no other ORM library is specified in POM.xml.
Create application.properties under src −> main −> resources directory and update as shown below.
application.properties
spring.application.name=springbootorm
#datasource configurations
spring.datasource.url=jdbc:mysql://localhost:3306/tutorialspoint
spring.datasource.username=guest
spring.datasource.password=guest123
spring.datasource.driver-class-name=com.mysql.cj.jdbc.Driver
# show SQL
spring.jpa.show-sql: true
# DDL generation
spring.jpa.generate-ddl=true
Following is the description of key attributes of application.properties.
spring.datasource − Database specific attributes like connection url, username, password, driver class etc.
spring.jpa − jpa specific attributes like to show sql, to allow create tables etc.
Spring Boot ORM - Update Project
Let's now add a REST API to our the spring application which can add, edit, delete and display employee(s).
Entity
Create an entity Employee to persist Employee Object to Employee Table.
Employee.java
package com.tutorialspoint.springbootorm.entity;

import jakarta.persistence.Entity;
import jakarta.persistence.GeneratedValue;
import jakarta.persistence.GenerationType;
import jakarta.persistence.Id;

// entity class to persist object to Employee Table
@Entity
public class Employee {

   @Id
   @GeneratedValue(strategy = GenerationType.IDENTITY)
   private int id;
   private String name;
   private int age;
   private String email;

   // setter, getter methods
   public int getId() {
      return id;
   }

   public void setId(int id) {
      this.id = id;
   }

   public String getName() {
      return name;
   }

   public void setName(String name) {
      this.name = name;
   }

   public int getAge() {
      return age;
   }

   public void setAge(int age) {
      this.age = age;
   }

   public String getEmail() {
      return email;
   }

   public void setEmail(String email) {
      this.email = email;
   }
}
Repository
Create a Repository to perform database operations on Employee Object.
EmployeeRepository.java
package com.tutorialspoint.springbootorm.repository;

import org.springframework.data.repository.CrudRepository;
import org.springframework.stereotype.Repository;

import com.tutorialspoint.springbootorm.entity.Employee;

@Repository
public interface EmployeeRepository extends CrudRepository<Employee, Integer>  {
}
Service
Create a Service to call repository instance to perform database operations on Employee Object.
EmployeeService.java
package com.tutorialspoint.springbootorm.service;

import java.util.ArrayList;
import java.util.List;

import org.springframework.beans.factory.annotation.Autowired;
import org.springframework.stereotype.Service;

import com.tutorialspoint.springbootorm.entity.Employee;
import com.tutorialspoint.springbootorm.repository.EmployeeRepository;

@Service
public class EmployeeService {

   @Autowired
   EmployeeRepository repository;

   // get an employee by id
   public Employee getEmployeeById(int id) {
      return repository.findById(id).get();
   }

   // get list of all employees
   public List<Employee> getAllEmployees(){
      List<Employee> employees = new ArrayList<Employee>();
      repository.findAll().forEach(employee -> employees.add(employee));
      return employees;
   }

   // create or update an employee
   public void saveOrUpdate(Employee employee) {
      repository.save(employee);
   }

   // delete the employee
   public void deleteEmployeeById(int id) {
      repository.deleteById(id);
   }
}
Controller
Create a controller for REST APIs.
EmployeeController.java
package com.tutorialspoint.springbootorm.controller;

import java.util.List;

import org.springframework.beans.factory.annotation.Autowired;
import org.springframework.web.bind.annotation.DeleteMapping;
import org.springframework.web.bind.annotation.GetMapping;
import org.springframework.web.bind.annotation.PathVariable;
import org.springframework.web.bind.annotation.PostMapping;
import org.springframework.web.bind.annotation.PutMapping;
import org.springframework.web.bind.annotation.RequestBody;
import org.springframework.web.bind.annotation.RequestMapping;
import org.springframework.web.bind.annotation.RestController;

import com.tutorialspoint.springbootorm.entity.Employee;
import com.tutorialspoint.springbootorm.service.EmployeeService;

@RestController
@RequestMapping(path = "/emp")
public class EmployeeController {

   @Autowired
   EmployeeService employeeService;

   // GET mapping to get all the employees
   @GetMapping("/employees")
   public List<Employee> getAllEmployees(){
      return employeeService.getAllEmployees();
   }

   // GET mapping to get an employee by id
   @GetMapping("/employee/{id}")
   public Employee getEmployee(@PathVariable("id") int id) {
      return employeeService.getEmployeeById(id);
   }

   // DELETE mapping to delete an employee by id
   @DeleteMapping("/employee/{id}")
   public void deleteEmployee(@PathVariable("id") int id) {
      employeeService.deleteEmployeeById(id);
   }

   // POST mapping to create a new employee
   @PostMapping("/employee")
   public void addEmployee(@RequestBody Employee employee) {
      employeeService.saveOrUpdate(employee);
   }

   // PUT mapping to update an employee
   @PutMapping("/employee")
   public void updateEmployee(@RequestBody Employee employee) {
      employeeService.saveOrUpdate(employee);
   }
}
Main Application
Main Application class to boot the application.
SpringBootOrmApplication.java
package com.tutorialspoint.springbootorm;

import org.springframework.boot.SpringApplication;
import org.springframework.boot.autoconfigure.SpringBootApplication;

// Main Application
@SpringBootApplication
public class SpringBootOrmApplication {
   public static void main(String[] args) {
      SpringApplication.run(SpringBootOrmApplication.class, args);
   }
}
Spring Boot ORM - Test Hibernate
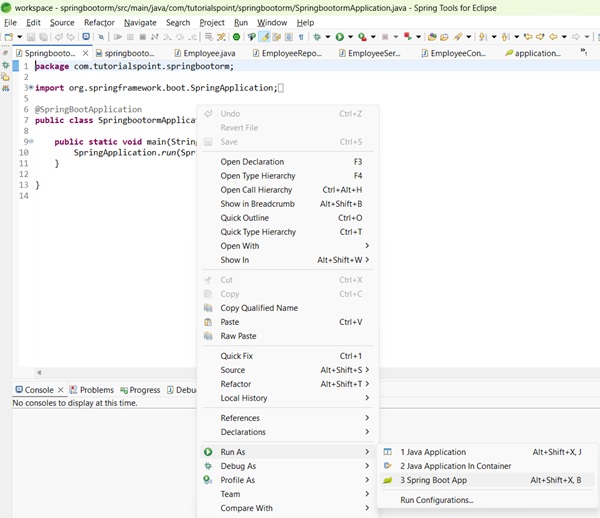
Now in STS, right click on the springbootorm project, select Run As -> Spring Boot App context or select SpringbootormApplication class and select Run As -> Spring Boot App−
Output
You will similar result in STS Console.
  .   ____          _            __ _ _
 /\\ / ___'_ __ _ _(_)_ __  __ _ \ \ \ \
( ( )\___ | '_ | '_| | '_ \/ _` | \ \ \ \
 \\/  ___)| |_)| | | | | || (_| |  ) ) ) )
  '  |____| .__|_| |_|_| |_\__, | / / / /
 =========|_|==============|___/=/_/_/_/

[32m :: Spring Boot :: [39m              [2m (v3.5.6)[0;39m

[2m2025-10-01T12:15:14.278+05:30[0;39m [32m INFO[0;39m [35m9412[0;39m [2m--- [springbootorm] [  restartedMain] [0;39m[36mc.t.s.SpringbootormApplication          [0;39m [2m:[0;39m Starting SpringbootormApplication using Java 21.0.6 with PID 9412 (D:\Projects\springbootorm\target\classes started by mahes in D:\Projects\springbootorm)
[2m2025-10-01T12:15:14.282+05:30[0;39m [32m INFO[0;39m [35m9412[0;39m [2m--- [springbootorm] [  restartedMain] [0;39m[36mc.t.s.SpringbootormApplication          [0;39m [2m:[0;39m No active profile set, falling back to 1 default profile: "default"
[2m2025-10-01T12:15:14.381+05:30[0;39m [32m INFO[0;39m [35m9412[0;39m [2m--- [springbootorm] [  restartedMain] [0;39m[36m.e.DevToolsPropertyDefaultsPostProcessor[0;39m [2m:[0;39m Devtools property defaults active! Set 'spring.devtools.add-properties' to 'false' to disable
[2m2025-10-01T12:15:14.381+05:30[0;39m [32m INFO[0;39m [35m9412[0;39m [2m--- [springbootorm] [  restartedMain] [0;39m[36m.e.DevToolsPropertyDefaultsPostProcessor[0;39m [2m:[0;39m For additional web related logging consider setting the 'logging.level.web' property to 'DEBUG'
[2m2025-10-01T12:15:15.064+05:30[0;39m [32m INFO[0;39m [35m9412[0;39m [2m--- [springbootorm] [  restartedMain] [0;39m[36m.s.d.r.c.RepositoryConfigurationDelegate[0;39m [2m:[0;39m Bootstrapping Spring Data JPA repositories in DEFAULT mode.
[2m2025-10-01T12:15:15.125+05:30[0;39m [32m INFO[0;39m [35m9412[0;39m [2m--- [springbootorm] [  restartedMain] [0;39m[36m.s.d.r.c.RepositoryConfigurationDelegate[0;39m [2m:[0;39m Finished Spring Data repository scanning in 48 ms. Found 1 JPA repository interface.
[2m2025-10-01T12:15:15.547+05:30[0;39m [32m INFO[0;39m [35m9412[0;39m [2m--- [springbootorm] [  restartedMain] [0;39m[36mo.s.b.w.embedded.tomcat.TomcatWebServer [0;39m [2m:[0;39m Tomcat initialized with port 8080 (http)
[2m2025-10-01T12:15:15.561+05:30[0;39m [32m INFO[0;39m [35m9412[0;39m [2m--- [springbootorm] [  restartedMain] [0;39m[36mo.apache.catalina.core.StandardService  [0;39m [2m:[0;39m Starting service [Tomcat]
[2m2025-10-01T12:15:15.561+05:30[0;39m [32m INFO[0;39m [35m9412[0;39m [2m--- [springbootorm] [  restartedMain] [0;39m[36mo.apache.catalina.core.StandardEngine   [0;39m [2m:[0;39m Starting Servlet engine: [Apache Tomcat/10.1.46]
[2m2025-10-01T12:15:15.605+05:30[0;39m [32m INFO[0;39m [35m9412[0;39m [2m--- [springbootorm] [  restartedMain] [0;39m[36mo.a.c.c.C.[Tomcat].[localhost].[/]      [0;39m [2m:[0;39m Initializing Spring embedded WebApplicationContext
[2m2025-10-01T12:15:15.605+05:30[0;39m [32m INFO[0;39m [35m9412[0;39m [2m--- [springbootorm] [  restartedMain] [0;39m[36mw.s.c.ServletWebServerApplicationContext[0;39m [2m:[0;39m Root WebApplicationContext: initialization completed in 1223 ms
[2m2025-10-01T12:15:15.733+05:30[0;39m [32m INFO[0;39m [35m9412[0;39m [2m--- [springbootorm] [  restartedMain] [0;39m[36mcom.zaxxer.hikari.HikariDataSource      [0;39m [2m:[0;39m HikariPool-1 - Starting...
[2m2025-10-01T12:15:16.119+05:30[0;39m [32m INFO[0;39m [35m9412[0;39m [2m--- [springbootorm] [  restartedMain] [0;39m[36mcom.zaxxer.hikari.pool.HikariPool       [0;39m [2m:[0;39m HikariPool-1 - Added connection com.mysql.cj.jdbc.ConnectionImpl@724a9a19
[2m2025-10-01T12:15:16.120+05:30[0;39m [32m INFO[0;39m [35m9412[0;39m [2m--- [springbootorm] [  restartedMain] [0;39m[36mcom.zaxxer.hikari.HikariDataSource      [0;39m [2m:[0;39m HikariPool-1 - Start completed.
[2m2025-10-01T12:15:16.161+05:30[0;39m [32m INFO[0;39m [35m9412[0;39m [2m--- [springbootorm] [  restartedMain] [0;39m[36mo.hibernate.jpa.internal.util.LogHelper [0;39m [2m:[0;39m HHH000204: Processing PersistenceUnitInfo [name: default]
[2m2025-10-01T12:15:16.242+05:30[0;39m [32m INFO[0;39m [35m9412[0;39m [2m--- [springbootorm] [  restartedMain] [0;39m[36morg.hibernate.Version                   [0;39m [2m:[0;39m HHH000412: Hibernate ORM core version 6.6.29.Final
[2m2025-10-01T12:15:16.291+05:30[0;39m [32m INFO[0;39m [35m9412[0;39m [2m--- [springbootorm] [  restartedMain] [0;39m[36mo.h.c.internal.RegionFactoryInitiator   [0;39m [2m:[0;39m HHH000026: Second-level cache disabled
[2m2025-10-01T12:15:16.622+05:30[0;39m [32m INFO[0;39m [35m9412[0;39m [2m--- [springbootorm] [  restartedMain] [0;39m[36mo.s.o.j.p.SpringPersistenceUnitInfo     [0;39m [2m:[0;39m No LoadTimeWeaver setup: ignoring JPA class transformer
[2m2025-10-01T12:15:16.757+05:30[0;39m [32m INFO[0;39m [35m9412[0;39m [2m--- [springbootorm] [  restartedMain] [0;39m[36morg.hibernate.orm.connections.pooling   [0;39m [2m:[0;39m HHH10001005: Database info:
	Database JDBC URL [Connecting through datasource 'HikariDataSource (HikariPool-1)']
	Database driver: undefined/unknown
	Database version: 8.0.43
	Autocommit mode: undefined/unknown
	Isolation level: undefined/unknown
	Minimum pool size: undefined/unknown
	Maximum pool size: undefined/unknown
[2m2025-10-01T12:15:17.401+05:30[0;39m [32m INFO[0;39m [35m9412[0;39m [2m--- [springbootorm] [  restartedMain] [0;39m[36mo.h.e.t.j.p.i.JtaPlatformInitiator      [0;39m [2m:[0;39m HHH000489: No JTA platform available (set 'hibernate.transaction.jta.platform' to enable JTA platform integration)
Hibernate: create table employee (id integer not null auto_increment, age integer not null, email varchar(255), name varchar(255), primary key (id)) engine=InnoDB
[2m2025-10-01T12:15:17.579+05:30[0;39m [32m INFO[0;39m [35m9412[0;39m [2m--- [springbootorm] [  restartedMain] [0;39m[36mj.LocalContainerEntityManagerFactoryBean[0;39m [2m:[0;39m Initialized JPA EntityManagerFactory for persistence unit 'default'
[2m2025-10-01T12:15:17.787+05:30[0;39m [33m WARN[0;39m [35m9412[0;39m [2m--- [springbootorm] [  restartedMain] [0;39m[36mJpaBaseConfiguration$JpaWebConfiguration[0;39m [2m:[0;39m spring.jpa.open-in-view is enabled by default. Therefore, database queries may be performed during view rendering. Explicitly configure spring.jpa.open-in-view to disable this warning
[2m2025-10-01T12:15:18.084+05:30[0;39m [32m INFO[0;39m [35m9412[0;39m [2m--- [springbootorm] [  restartedMain] [0;39m[36mo.s.b.d.a.OptionalLiveReloadServer      [0;39m [2m:[0;39m LiveReload server is running on port 35729
[2m2025-10-01T12:15:18.131+05:30[0;39m [32m INFO[0;39m [35m9412[0;39m [2m--- [springbootorm] [  restartedMain] [0;39m[36mo.s.b.w.embedded.tomcat.TomcatWebServer [0;39m [2m:[0;39m Tomcat started on port 8080 (http) with context path '/'
[2m2025-10-01T12:15:18.137+05:30[0;39m [32m INFO[0;39m [35m9412[0;39m [2m--- [springbootorm] [  restartedMain] [0;39m[36mc.t.s.SpringbootormApplication          [0;39m [2m:[0;39m Started SpringbootormApplication in 4.28 seconds (process running for 5.172)
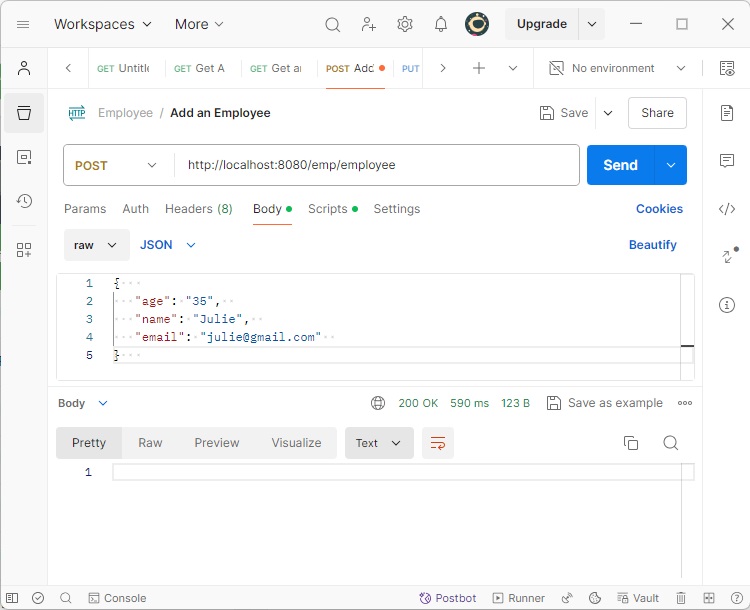
Add an Employee
Once server is up and running, Use Postman to make a POST request to add a record first.
Set the following parameters in POSTMAN.
HTTP Method − POST
URL − http://localhost:8080/emp/employee
BODY − An employee JSON
{
   "age": "35",
   "name": "Julie",
   "email": "julie@gmail.com"
}
Click on Send Button and check the response status to be OK.
Get all Employees
Now make a GET Request to get all records.
Set the following parameters in POSTMAN.
HTTP Method − GET
URL − http://localhost:8080/emp/employees
Click the send button and verify the response.
[{
   "id": 1,
   "age": 35,
   "name": "Julie",
   "email": "julie@gmail.com"
}]

Spring Boot ORM - EcipseLink Integration
Exclude hibernate dependencies
Spring Boot by default use Hibernate as ORM implementation. In order to use EclipseLink, we first need to exclude hibernate dependencies from spring-data-jpa dependency in pom.xml
<dependency>
   <groupId>org.springframework.boot</groupId>
   <artifactId>spring-boot-starter-data-jpa</artifactId>
   <exclusions>
      <exclusion>
         <groupId>org.hibernate</groupId>
         <artifactId>hibernate-entitymanager</artifactId>
      </exclusion>
      <exclusion>
         <groupId>org.hibernate</groupId>
         <artifactId>hibernate-core</artifactId>
      </exclusion>
   </exclusions>
</dependency>
Include Eclipse Link dependency
Now include eclipse−link dependency in pom.xml.
<dependency>
   <groupId>org.eclipse.persistence</groupId>
   <artifactId>org.eclipse.persistence.jpa</artifactId>
   <version>4.0.4</version>
</dependency>
Complete Source pom.xml
Following is the complete pom.xml
pom.xml
<?xml version="1.0" encoding="UTF-8"?>
<project xmlns="http://maven.apache.org/POM/4.0.0" xmlns:xsi="http://www.w3.org/2001/XMLSchema-instance"
   xsi:schemaLocation="http://maven.apache.org/POM/4.0.0 https://maven.apache.org/xsd/maven-4.0.0.xsd">
   <modelVersion>4.0.0</modelVersion>
   <parent>
      <groupId>org.springframework.boot</groupId>
      <artifactId>spring-boot-starter-parent</artifactId>
      <version>3.5.6</version>
      <relativePath/> <!-- lookup parent from repository -->
   </parent>
   <groupId>com.tutorialspoint</groupId>
   <artifactId>springbootorm</artifactId>
   <version>0.0.1-SNAPSHOT</version>
   <name>springbootorm</name>
   <description>Demo project for Spring Boot ORM</description>
   <url/>
   <licenses>
      <license/>
   </licenses>
   <developers>
      <developer/>
   </developers>
   <scm>
      <connection/>
      <developerConnection/>
      <tag/>
      <url/>
   </scm>
   <properties>
      <java.version>21</java.version>
   </properties>
   <dependencies>
      <dependency>
         <groupId>org.springframework.boot</groupId>
         <artifactId>spring-boot-starter-data-jpa</artifactId>
         <exclusions>
            <exclusion>
               <groupId>org.hibernate</groupId>
               <artifactId>hibernate-entitymanager</artifactId>
            </exclusion>
            <exclusion>
               <groupId>org.hibernate</groupId>
               <artifactId>hibernate-core</artifactId>
            </exclusion>
         </exclusions>
      </dependency>
      <dependency>
         <groupId>org.springframework.boot</groupId>
         <artifactId>spring-boot-starter-web</artifactId>
      </dependency>
      <dependency>
         <groupId>org.eclipse.persistence</groupId>
         <artifactId>org.eclipse.persistence.jpa</artifactId>
         <version>4.0.4</version>
      </dependency>
      <dependency>
         <groupId>org.springframework.boot</groupId>
         <artifactId>spring-boot-devtools</artifactId>
         <scope>runtime</scope>
         <optional>true</optional>
      </dependency>
      <dependency>
         <groupId>com.mysql</groupId>
         <artifactId>mysql-connector-j</artifactId>
         <scope>runtime</scope>
      </dependency>
      <dependency>
         <groupId>org.springframework.boot</groupId>
         <artifactId>spring-boot-starter-test</artifactId>
         <scope>test</scope>
      </dependency>
   </dependencies>
   <build>
      <plugins>
         <plugin>
            <groupId>org.springframework.boot</groupId>
            <artifactId>spring-boot-maven-plugin</artifactId>
         </plugin>
      </plugins>
   </build>
</project>
Save the file and eclipse will update the dependencies automatically.
Spring Boot ORM - EclipseLink Integration
Spring Boot uses HibernateJpaAutoConfiguration which configures the hibernate implementation by default. In order to switch to EclipseLink, we need to create a custom configuration class which will extend the JpaBaseConfiguration class. JpaBaseConfiguration is the base class which is used to extend and configure JPA for any ORM implementation. Following is the code of EclipsLinkJpaConfiguration.
JPA Configuration
Create EclipseLink Configuration class.
EclipsLinkJpaConfiguration.java
package com.tutorialspoint.springbootorm;

import java.util.HashMap;
import java.util.Map;

import javax.sql.DataSource;

import org.eclipse.persistence.config.BatchWriting;
import org.eclipse.persistence.config.PersistenceUnitProperties;
import org.eclipse.persistence.logging.SessionLog;
import org.springframework.beans.factory.ObjectProvider;
import org.springframework.boot.autoconfigure.orm.jpa.JpaBaseConfiguration;
import org.springframework.boot.autoconfigure.orm.jpa.JpaProperties;
import org.springframework.context.annotation.Bean;
import org.springframework.context.annotation.Configuration;
import org.springframework.jdbc.datasource.DriverManagerDataSource;
import org.springframework.orm.jpa.vendor.AbstractJpaVendorAdapter;
import org.springframework.orm.jpa.vendor.EclipseLinkJpaVendorAdapter;
import org.springframework.transaction.jta.JtaTransactionManager;

// EclipseLink Specific Configuration Class
@Configuration
public class EclipsLinkJpaConfiguration extends JpaBaseConfiguration {

   protected EclipsLinkJpaConfiguration(DataSource dataSource, JpaProperties properties,
      ObjectProvider<JtaTransactionManager> jtaTransactionManager) {
      super(dataSource, properties, jtaTransactionManager);
   }

   // EclipseLink JPA Adaptor
   @Override
   protected AbstractJpaVendorAdapter createJpaVendorAdapter() {
      return new EclipseLinkJpaVendorAdapter();
   }

   // EclipseLink Properties
   @Override
   protected Map<String, Object> getVendorProperties() {
      Map<String, Object> map = new HashMap<>();
      map.put(PersistenceUnitProperties.WEAVING, "false");
      map.put(PersistenceUnitProperties.LOGGING_LEVEL, SessionLog.FINER_LABEL);
      map.put(PersistenceUnitProperties.DDL_GENERATION, PersistenceUnitProperties.CREATE_ONLY);
      map.put(PersistenceUnitProperties.LOGGING_LEVEL, SessionLog.FINER_LABEL);
      return map;
   }

   // Database Connection properties setup
   @Bean
   public static DataSource dataSource() {
      final DriverManagerDataSource dataSource = new DriverManagerDataSource();
      dataSource.setDriverClassName("com.mysql.cj.jdbc.Driver");
      dataSource.setUrl("jdbc:mysql://localhost:3306/tutorialspoint");
      dataSource.setUsername("guest");
      dataSource.setPassword("guest123");
      return dataSource;
   }

   @Override
   protected Map<String, Object> getVendorProperties(DataSource dataSource) {
      final Map<String, Object> ret = new HashMap<>();
      ret.put(PersistenceUnitProperties.BATCH_WRITING, BatchWriting.JDBC);
      return ret;
   }
}
We've added Adapter, DataSource and properties using createJpaVendorAdapter(), dataSource() and getVendorProperties() methods respectively.
Update Entity
Update the Entity as well to use Integer instead of int.
Employee.java
package com.tutorialspoint.springbootorm.entity;

import jakarta.persistence.Entity;
import jakarta.persistence.GeneratedValue;
import jakarta.persistence.GenerationType;
import jakarta.persistence.Id;

// entity class to persist object to Employee Table
@Entity
public class Employee {

   @Id
   @GeneratedValue(strategy = GenerationType.IDENTITY)
   private Integer id;
   private String name;
   private Integer age;
   private String email;

   // setter, getter methods
   public Integer getId() {
      return id;
   }

   public void setId(Integer id) {
      this.id = id;
   }

   public String getName() {
      return name;
   }

   public void setName(String name) {
      this.name = name;
   }

   public Integer getAge() {
      return age;
   }

   public void setAge(Integer age) {
      this.age = age;
   }

   public String getEmail() {
      return email;
   }

   public void setEmail(String email) {
      this.email = email;
   }
}
Spring Boot ORM - Test EclipseLink
Now in STS, right click on the springbootorm project, select Run As -> Spring Boot App context or select SpringbootormApplication class and select Run As -> Spring Boot App−
Output
You will similar result in STS Console.
  .   ____          _            __ _ _
 /\\ / ___'_ __ _ _(_)_ __  __ _ \ \ \ \
( ( )\___ | '_ | '_| | '_ \/ _` | \ \ \ \
 \\/  ___)| |_)| | | | | || (_| |  ) ) ) )
  '  |____| .__|_| |_|_| |_\__, | / / / /
 =========|_|==============|___/=/_/_/_/

 :: Spring Boot ::                (v3.5.6)

2025-10-01T12:38:17.680+05:30  INFO 17584 --- [springbootorm] [  restartedMain] c.t.s.SpringbootormApplication           : Starting SpringbootormApplication using Java 21.0.6 with PID 17584 (D:\Projects\springbootorm\target\classes started by mahes in D:\Projects\springbootorm)
2025-10-01T12:38:17.684+05:30  INFO 17584 --- [springbootorm] [  restartedMain] c.t.s.SpringbootormApplication           : No active profile set, falling back to 1 default profile: "default"
2025-10-01T12:38:17.748+05:30  INFO 17584 --- [springbootorm] [  restartedMain] .e.DevToolsPropertyDefaultsPostProcessor : Devtools property defaults active! Set 'spring.devtools.add-properties' to 'false' to disable
2025-10-01T12:38:17.748+05:30  INFO 17584 --- [springbootorm] [  restartedMain] .e.DevToolsPropertyDefaultsPostProcessor : For additional web related logging consider setting the 'logging.level.web' property to 'DEBUG'
2025-10-01T12:38:18.732+05:30  INFO 17584 --- [springbootorm] [  restartedMain] .s.d.r.c.RepositoryConfigurationDelegate : Bootstrapping Spring Data JPA repositories in DEFAULT mode.
2025-10-01T12:38:18.808+05:30  INFO 17584 --- [springbootorm] [  restartedMain] .s.d.r.c.RepositoryConfigurationDelegate : Finished Spring Data repository scanning in 68 ms. Found 1 JPA repository interface.
2025-10-01T12:38:19.546+05:30  INFO 17584 --- [springbootorm] [  restartedMain] o.s.b.w.embedded.tomcat.TomcatWebServer  : Tomcat initialized with port 8080 (http)
2025-10-01T12:38:19.567+05:30  INFO 17584 --- [springbootorm] [  restartedMain] o.apache.catalina.core.StandardService   : Starting service [Tomcat]
2025-10-01T12:38:19.568+05:30  INFO 17584 --- [springbootorm] [  restartedMain] o.apache.catalina.core.StandardEngine    : Starting Servlet engine: [Apache Tomcat/10.1.46]
2025-10-01T12:38:19.638+05:30  INFO 17584 --- [springbootorm] [  restartedMain] o.a.c.c.C.[Tomcat].[localhost].[/]       : Initializing Spring embedded WebApplicationContext
2025-10-01T12:38:19.640+05:30  INFO 17584 --- [springbootorm] [  restartedMain] w.s.c.ServletWebServerApplicationContext : Root WebApplicationContext: initialization completed in 1888 ms
2025-10-01T12:38:20.197+05:30  INFO 17584 --- [springbootorm] [  restartedMain] o.s.o.j.p.SpringPersistenceUnitInfo      : No LoadTimeWeaver setup: ignoring JPA class transformer
2025-10-01T12:38:20.204+05:30  INFO 17584 --- [springbootorm] [  restartedMain] j.LocalContainerEntityManagerFactoryBean : Initialized JPA EntityManagerFactory for persistence unit 'default'
[EL Info]: 2025-10-01 12:38:20.287--ServerSession(1787443485)--EclipseLink, version: Eclipse Persistence Services - 4.0.4.v202407190748-059428cdd2583c46f1f3e50d235854840a6fa9a7
2025-10-01T12:38:21.187+05:30  WARN 17584 --- [springbootorm] [  restartedMain] JpaBaseConfiguration$JpaWebConfiguration : spring.jpa.open-in-view is enabled by default. Therefore, database queries may be performed during view rendering. Explicitly configure spring.jpa.open-in-view to disable this warning
2025-10-01T12:38:21.818+05:30  INFO 17584 --- [springbootorm] [  restartedMain] o.s.b.d.a.OptionalLiveReloadServer       : LiveReload server is running on port 35729
2025-10-01T12:38:21.866+05:30  INFO 17584 --- [springbootorm] [  restartedMain] o.s.b.w.embedded.tomcat.TomcatWebServer  : Tomcat started on port 8080 (http) with context path '/'
2025-10-01T12:38:21.877+05:30  INFO 17584 --- [springbootorm] [  restartedMain] c.t.s.SpringbootormApplication           : Started SpringbootormApplication in 4.698 seconds (process running for 5.22)
Get all Employees
Now make a GET Request to get all records.
Set the following parameters in POSTMAN.
HTTP Method − GET
URL − http://localhost:8080/emp/employees
Click the send button and verify the response.
[{
   "id": 1,
   "age": 35,
   "name": "Julie",
   "email": "julie@gmail.com"
}]
You will see similar updates in STS Console as well.
2025-10-01T12:39:02.648+05:30  INFO 17584 --- [springbootorm] [nio-8080-exec-2] o.a.c.c.C.[Tomcat].[localhost].[/]       : Initializing Spring DispatcherServlet 'dispatcherServlet'
2025-10-01T12:39:02.650+05:30  INFO 17584 --- [springbootorm] [nio-8080-exec-2] o.s.web.servlet.DispatcherServlet        : Initializing Servlet 'dispatcherServlet'
2025-10-01T12:39:02.652+05:30  INFO 17584 --- [springbootorm] [nio-8080-exec-2] o.s.web.servlet.DispatcherServlet        : Completed initialization in 2 ms
[EL Fine]: sql: 2025-10-01 12:39:03.017--ServerSession(1787443485)--Connection(967713301)--SELECT ID, AGE, EMAIL, NAME FROM EMPLOYEE
