- Requests - Home
- Requests - Overview
- Requests - Environment Setup
- Requests - How Http Requests Work?
- Requests - Working with Requests
- Handling Response for HTTP Requests
- Requests - HTTP Requests Headers
- Requests - Handling GET Requests
- Handling POST, PUT, PATCH & DELETE Requests
- Requests - File Upload
- Requests - Working with Cookies
- Requests - Working with Errors
- Requests - Handling Timeouts
- Requests - Handling Redirection
- Requests - Handling History
- Requests - Handling Sessions
- Requests - SSL Certification
- Requests - Authentication
- Requests - Event Hooks
- Requests - Proxy
- Requests - Web Scraping using Requests
- Requests Useful Resources
- Requests - Quick Guide
- Requests - Useful Resources
- Requests - Discussion
Requests - Quick Guide
Requests - Overview
Requests is a HTTP library that provides easy functionality to deal with http request/response in your web application. The library is developed in python.
The official website of Python Requests which is available at https://pypi.org/project/requests/ defines Requests as follows −
Requests is an elegant and simple HTTP library for Python, built for human beings.
Features of Requests
The features of Requests are discussed below −
Request
The python requests library has easy to use methods available to handle Http request. Passing of parameters and handling the request type like GET, POST, PUT, DELETE, etc. is very easy.
Response
You can get the response in the format you need and the supported ones are text format, binary response, json response, and raw response.
Headers
The library allows you to read, update or send new headers as per your requirements.
Timeouts
Timeouts can be easily added to the URL you are requesting using python requests library. It so happens that you are using a third-party URL and waiting for a response.
It is always a good practice to give a timeout on the URL as we might want the URL to respond within that timeout with a response or an error that is coming because of timeout. Not doing so can cause either to wait on that request indefinitely.
Error handling
The requests module gives support for error handling and some of which are Connection Error, Timeout errors, TooManyRedirects, Response.raise_for_status errors, etc.
Cookies
The library allows you to read, write and update for the requested URL.
Sessions
To maintain the data, you require between requests you need sessions. So, if the same host is called again and again you can re-use the TCP connection which in turn will improve the performance.
SSL certificates
SSL certificate is a security feature that comes with secure urls. When you use Requests, it also verifies SSL certificates for the https URL given. SSL Verification is enabled by default in the requests library and will throw an error if the certificate is not present.
Authentication
HTTP authentication is on the server-side asking for some authentication information like username, password when the client requests a URL. This is an additional security for the request and the response being exchanged between the client and the server.
Advantages of using Python Requests Library
Following are the advantages of using Python Requests Library −
Easy to use and fetch the data from the URL given.
Requests library can be used to scrape the data from the website.
Using requests, you can get, post, delete, update the data for the URL given.
The handling of cookies and session is very easy.
The security is also taken care of the help of authentication module support.
Requests - Environment Setup
In this chapter, we will work on the installation of Requests. To start working with the Requests module, we need to install Python first. So we are going to work on following−
- Install Python
- Install Requests
Installing Python
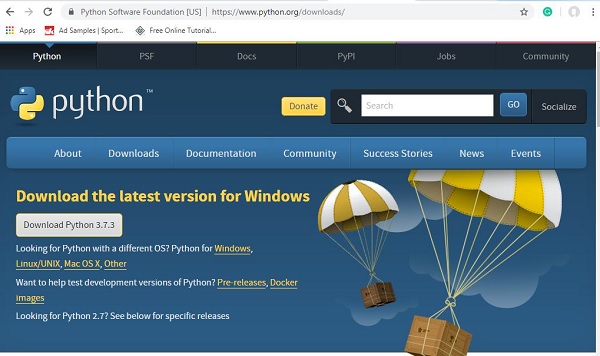
Go to the Python official site: https://www.python.org/downloads/ as shown below and click on the latest version available for Windows, Linux/Unix, and Mac OS. Download Python as per your 64 or 32 bit OS available with you.
Once you have downloaded, click on the .exe file and follow the steps to install python on your system.
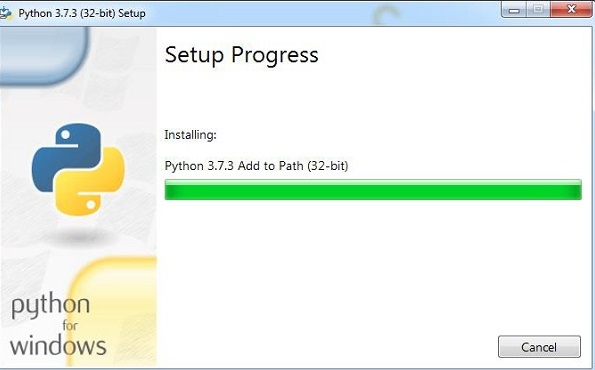
The python package manager, i.e., pip will also get installed by default with the above installation. To make it work globally on your system, directly add the location of python to the PATH variable. The same is shown at the start of the installation to remember to check the checkbox which says ADD to PATH. In case you forget to check it, please follow the below-given steps to add to PATH.
To add to PATH follow the steps−
Right-click on your Computer icon and click on properties > Advanced System Settings.
It will display the screen as shown below −

Click on Environment Variables as shown above. It will display the screen as shown below −
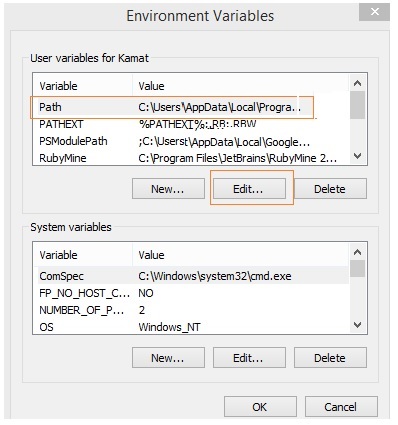
Select Path and click on Edit button, add the location path of your python at the end. Now, let us check the python version.
Checking the python version
E:\prequests>python --version
Python 3.7.3
Install Requests
Now that we have python installed, we are going to install Requests.
Once python is installed, python package manager i.e. pip will also get installed. Following is the command to check pip version.
E:\prequests>pip --version
pip 19.1.1 from c:\users\xxxxx\appdata\local\programs\python\python37\lib\site-p
ackages\pip (python 3.7)
We have pip installed and the version is 19.1.1. Now, will use pip to install Requests module.
The command is given below−
pip install requests
E:\prequests>pip install requests
Requirement already satisfied: requests in c:\users\xxxx\appdata\local\programs
\python\python37\lib\site-packages (2.22.0)
Requirement already satisfied: certifi>=2017.4.17 in c:\users\kamat\appdata\loca
l\programs\python\python37\lib\site-packages (from requests) (2019.3.9)
Requirement already satisfied: urllib3!=1.25.0,!=1.25.1,<1.26,>=1.21.1 in c:\use
rs\xxxxx\appdata\local\programs\python\python37\lib\site-packages (from requests
) (1.25.3)
Requirement already satisfied: idna<2.9,>=2.5 in c:\users\xxxxxxx\appdata\local\pr
ograms\python\python37\lib\site-packages (from requests) (2.8)
Requirement already satisfied: chardet<3.1.0,>=3.0.2 in c:\users\xxxxx\appdata\l
ocal\programs\python\python37\lib\site-packages (from requests) (3.0.4)
We already have the module installed, so in the command prompt it says Requirement already satisfied; if not installed it would have downloaded the required packages for installation.
To check the details of the requests module installed, you can use the following command−
pip show requests
E:\prequests>pip show requests
Name: requests
Version: 2.22.0
Summary: Python HTTP for Humans.
Home-page: http://python-requests.org
Author: Kenneth Reitz
Author-email: me@kennethreitz.org
License: Apache 2.0
Location: c:\users\xxxxx\appdata\local\programs\python\python37\lib\site-package
S
Requires: certifi, idna, urllib3, chardet
Required-by:
The version of Requests module is 2.22.0.
Requests - How Http Requests Work?
Pythons Requests is a HTTP library that will help us exchange data between the client and the server. Consider you have a UI with a form, wherein you need to enter the user details, so once you enter it, you have to submit the data which is nothing but a Http POST or PUT request from the client to server to save the data.
When you want the data, you need to fetch it from the server, which is again a Http GET request. The exchange of data between the client when it requests the data and the server responding with the required data, this relationship between the client and the server is very important.
The request is made to the URL given and it could be a secure or non-secure URL.
The request to the URL can be done using GET, POST, PUT, DELETE. The most commonly used is the GET method, mainly used when you want to fetch data from the server.
You can also send data to the URL as a query string for example−
https://jsonplaceholder.typicode.com/users?id=9&username=Delphine
So here, we are passing id = 9 and username = Delphine to the URL. All the values are sent in key/value pair after the question mark(?) and multiple params are passed to the URL separated by &.
Using the request library, the URL is called as follows using a string dictionary.
Wherein the data to the URL is sent as a dictionary of strings. If you want to pass id=9 and username=Delphine, you can do as follows−
payload = {'id': '9', 'username': 'Delphine'}
The requests library is called as follows−
res = requests.get('https://jsonplaceholder.typicode.com/users', params=payload')
Using POST, we can do as follows−
res = requests.post('https://jsonplaceholder.typicode.com/users', data = {'id':'9', 'username':'Delphine'})
Using PUT
res = requests.put('https://jsonplaceholder.typicode.com/users', data = {'id':'9', 'username':'Delphine'})
Using DELETE
res = requests.delete('https://jsonplaceholder.typicode.com/users')
The response from the Http request can be in text encoded form, binary encoded, json format or raw response. The details of the request and response are explained in detail in the next chapters.
Requests - Working with Requests
In this chapter, we will understand how to work with the requests module. We will look into the following−
- Making HTTP Requests.
- Passing Parameters to HTTP Requests.
Making HTTP Requests
To make a Http request, we need to first import the request module as shown below−
import requests
Let us now see, how to make a call to URL using the requests module.
Let us use the URL− https://jsonplaceholder.typicode.com/users in the code, to test Requests Module.
Example
import requests
getdata = requests.get('https://jsonplaceholder.typicode.com/users')
print(getdata.status_code)
The url− https://jsonplaceholder.typicode.com/users is called using requests.get() method. The response object of the URL is stored in the getdata variable. When we print the variable, it gives the 200 response code, which means that we have got the response successfully.
Output
E:\prequests>python makeRequest.py
<Response [200]>
To get the content from the response, we can do so using getdata.content as shown below−
Example
import requests
getdata = requests.get('https://jsonplaceholder.typicode.com/users')
print(getdata.content)
getdata.content, will print all the data available in the response.
Output
E:\prequests>python makeRequest.py
b'[\n {\n  "id": 1,\n  "name": "Leanne Graham",\n  "username": "Bret",\n
"email": "Sincere@april.biz",\n  "address": {\n  "street": "Kulas Light
",\n  "suite": "Apt. 556",\n  "city": "Gwenborough",\n  "zipcode": "
92998-3874",\n  "geo": {\n "lat": "-37.3159",\n  "lng": "81.149
6"\n }\n },\n  "phone": "1-770-736-8031 x56442",\n  "website": "hild
egard.org",\n  "company": {\n "name": "Romaguera-Crona",\n  "catchPhr
ase": "Multi-layered client-server neural-net",\n  "bs": "harness real-time
e-markets"\n }\n }
Passing Parameters to HTTP Requests
Just requesting the URL is not sufficient, we also need to pass parameters to the URL.
The params are mostly passed as key/value pair, for example−
https://jsonplaceholder.typicode.com/users?id=9&username=Delphine
So, we have id=9 and username=Delphine. Now, will see how to pass such data to requests Http module.
Example
import requests
payload = {'id': 9, 'username': 'Delphine'}
getdata = requests.get('https://jsonplaceholder.typicode.com/users', params=payload)
print(getdata.content)
The details are stored in the object payload in the key/value pair and passed to params, inside get() method.
Output
E:\prequests>python makeRequest.py
b'[\n {\n "id": 9,\n "name": "Glenna Reichert",\n "username": "Delphin
e",\n "email": "Chaim_McDermott@dana.io",\n "address": {\n "street":
"Dayna Park",\n "suite": "Suite 449",\n "city": "Bartholomebury",\n
"zipcode": "76495-3109",\n "geo": {\n "lat": "24.6463",\n
"lng": "-168.8889"\n }\n },\n "phone": "(775)976-6794 x41206",\n "
website": "conrad.com",\n "company": {\n "name": "Yost and Sons",\n
"catchPhrase": "Switchable contextually-based project",\n "bs": "aggregate
real-time technologies"\n }\n }\n]'
We are now getting the details of the id=9 and username=Delphine details in the response.
If you want to see, how the URL looks after passing the parameters, making use of the response object to the URL.
Example
import requests
payload = {'id': 9, 'username': 'Delphine'}
getdata = requests.get('https://jsonplaceholder.typicode.com/users', params=payload)
print(getdata.url)
Output
E:\prequests>python makeRequest.py
https://jsonplaceholder.typicode.com/users?id=9&username=Delphine
Handling Response for HTTP Requests
In this chapter, we will get into more details of the response received from the requests module. We will discuss the following details−
- Getting Response
- JSON Response
- RAW Response
- Binary Response
Getting Response
We will make a request to the URL using request.get() method.
import requests
getdata = requests.get('https://jsonplaceholder.typicode.com/users');
The getdata has the response object. It has all the details of the response. We can get a response in 2 ways using (.text) and (.content). Using response.text will give you the data back in text format as shown below−
Example
E:\prequests>python makeRequest.py
[
 {
   "id": 1,
   "name": "Leanne Graham",
   "username": "Bret",
   "email": "Sincere@april.biz",
   "address": {
   "street": "Kulas Light",
   "suite": "Apt. 556",
   "city": "Gwenborough",
   "zipcode": "92998-3874",
   "geo": {
   "lat": "-37.3159",
   "lng": "81.1496"
   }
  },
   "phone": "1-770-736-8031 x56442",
   "website": "hildegard.org",
   "company": {
   "name": "Romaguera-Crona",
   "catchPhrase": "Multi-layered client-server neural-net",
   "bs": "harness real-time e-markets"
  }
},
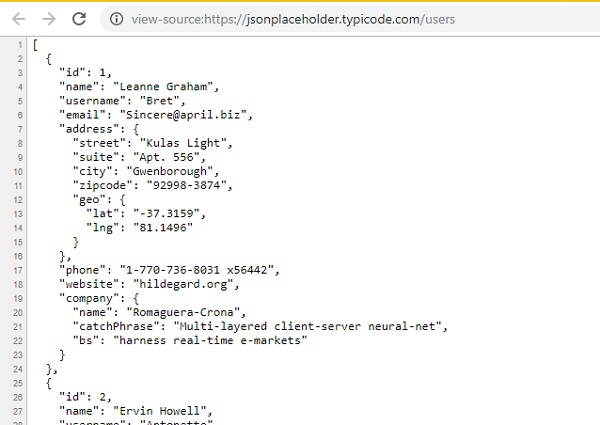
You will see the response is the same, as how it would have appeared in the browser when you do view source for the URL as shown below−
You can also try out .html URL and see the content using response.text, it will be the same as the view source content for the .html URL in the browser.
Now, let us try response.content for the same URL and see the output.
Example
import requests
getdata = requests.get('https://jsonplaceholder.typicode.com/users')
print(getdata.content)
Output
E:\prequests>python makeRequest.py
b'[\n {\n "id": 1,\n "name": "Leanne Graham",\n "username": "Bret",\n
"email": "Sincere@april.biz",\n "address": {\n "street": "Kulas Light
",\n "suite": "Apt. 556",\n "city": "Gwenborough",\n "zipcode": "
92998-3874",\n "geo": {\n "lat": "-37.3159",\n "lng": "81.149
6"\n }\n },\n "phone": "1-770-736-8031 x56442",\n "website": "hild
egard.org",\n "company": {\n "name": "Romaguera-Crona",\n "catchPhr
ase": "Multi-layered client-server neural-net",\n "bs": "harness real-time
e-markets"\n }\n },\n {\n "id": 2,\n "name": "Ervin Howell",\n "us
ername": "Antonette",\n "email": "Shanna@melissa.tv",\n "address": {\n
"street": "Victor Plains",\n "suite": "Suite 879",\n "city": "Wisoky
burgh",\n "zipcode": "90566-7771",\n "geo": {\n "lat": "-43.950
9",\n "lng": "-34.4618"\n }\n },\n "phone": "010-692-6593 x091
25",\n "website": "anastasia.net",\n "company": {\n "name": "Deckow-C
rist",\n "catchPhrase": "Proactive didactic contingency",\n "bs": "syn
ergize scalable supply-chains"\n }\n },\n {\n "id": 3,\n "name": "Cle
mentine Bauch",\n "username": "Samantha",\n "email":
"Nathan@yesenia.net",
\n "address": {\n "street": "Douglas Extension",\n "suite": "Suite
847",\n "city": "McKenziehaven",\n "zipcode": "59590-4157",\n "ge
o": {\n "lat": "-68.6102",\n "lng": "-47.0653"\n }\n },\n
The response is given in bytes. You will get a letter b at the start of the response. With the requests module, you can get the encoding used and also change the encoding if required. For example, to get the encoding you can use response.encoding.
print(getdata.encoding)
Output
utf-8
You can change the encoding as follows− You can use the encoding of your choice.
getdata.encoding = 'ISO-8859-1'
JSON Response
You can also get the response for the Http request in json format by using response.json() method as follows−
Example
import requests
getdata = requests.get('https://jsonplaceholder.typicode.com/users')
print(getdata.json())
Output
E:\prequests>python makeRequest.py
[{'id': 1, 'name': 'Leanne Graham', 'username': 'Bret', 'email': 'Sincere@april.
biz', 'address': {'street': 'Kulas Light', 'suite': 'Apt. 556', 'city': 'Gwenbor
ough', 'zipcode': '92998-3874', 'geo': {'lat': '-37.3159', 'lng': '81.1496'}},
'
phone': '1-770-736-8031 x56442', 'website': 'hildegard.org', 'company': {'name':
'Romaguera-Crona', 'catchPhrase': 'Multi-layered client-server neural-net', 'bs
': 'harness real-time e-markets'}}]
RAW Response
In case you need the raw response for the Http URL you can make use of response.raw, also add stream=True inside the get method as shown below−
Example
import requests
getdata = requests.get('https://jsonplaceholder.typicode.com/users', stream=True)
print(getdata.raw)
Output
E:\prequests>python makeRequest.py
<urllib3.response.HTTPResponse object at 0x000000A8833D7B70>
To read for more content from the raw data you can do so as follows−
print(getdata.raw.read(50))
Output
E:\prequests>python makeRequest.py
b'\x1f\x8b\x08\x00\x00\x00\x00\x00\x00\x03\x95\x98[o\xe38\x12\x85\xdf\xe7W\x10y\
xda\x01F\x82.\xd4m\x9f\xdc\x9dd\xba\xb7\x93\xf4\x06q\xef4\x06\x83A@K\x15\x89m'
Binary Response
To get a binary response we can make use of response.content.
Example
import requests
getdata = requests.get('https://jsonplaceholder.typicode.com/users')
print(getdata.content)
Output
E:\prequests>python makeRequest.py
b'[\n {\n "id": 1,\n "name": "Leanne Graham",\n "username": "Bret",\n
"email": "Sincere@april.biz",\n "address": {\n "street": "Kulas Light
",\n "suite": "Apt. 556",\n "city": "Gwenborough",\n "zipcode": "
92998-3874",\n "geo": {\n "lat": "-37.3159",\n "lng": "81.149
6"\n }\n },\n "phone": "1-770-736-8031 x56442",\n "website": "hild
egard.org",\n "company": {\n "name": "Romaguera-Crona",\n "catchPhr
ase": "Multi-layered client-server neural-net",\n "bs": "harness real-time
e-markets"\n }\n },\n {\n "id": 2,\n "name": "Ervin Howell",\n "us
ername": "Antonette",\n "email": "Shanna@melissa.tv",\n "address": {\n
"street": "Victor Plains",\n "suite": "Suite 879",\n "city": "Wisoky
burgh",\n "zipcode": "90566-7771",\n "geo": {\n "lat": "-43.950
9",\n "lng": "-34.4618"\n }\n },\n "phone": "010-692-6593 x091
25",\n "website": "anastasia.net",\n "company": {\n "name": "Deckow-C
rist",\n "catchPhrase": "Proactive didactic contingency",\n "bs": "syn
ergize scalable supply-chains"\n }\n },\n {\n "id": 3,\n "name": "Cle
mentine Bauch",\n "username": "Samantha",\n "email": "Nathan@yesenia.net",
\n "address": {\n "street": "Douglas Extension",\n "suite": "Suite
847",\n "city": "McKenziehaven",\n "zipcode": "59590-4157",\n "ge
o": {\n "lat": "-68.6102",\n "lng": "-47.0653"\n }\n },\n
The response is given in bytes. You will get a letter b at the start of the response. The binary response is mostly used for non-text requests.
Requests - HTTP Requests Headers
In the previous chapter, we have seen how to make the request and get the response. This chapter will explore a little more on the header section of the URL. So, we are going to look into the following−
- Understanding Request Headers
- Custom Headers
- Response Headers
Understanding Request Headers
Hit any URL in the browser, inspect it and check in developer tool network tab.
You will get response headers, request headers, payload, etc.
For example, consider the following URL−
https://jsonplaceholder.typicode.com/users
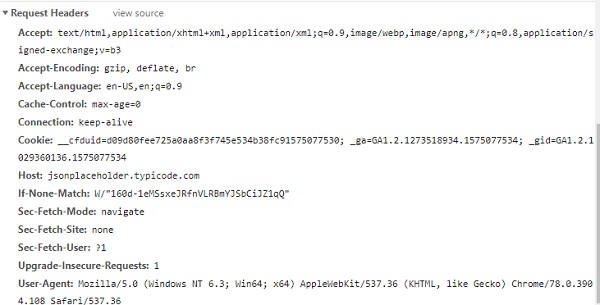
You can get the header details as follows−
Example
import requests
getdata = requests.get('https://jsonplaceholder.typicode.com/users', stream=True)
print(getdata.headers)
Output
E:\prequests>python makeRequest.py
{'Date': 'Sat, 30 Nov 2019 05:15:00 GMT', 'Content-Type': 'application/json; cha
rset=utf-8', 'Transfer-Encoding': 'chunked', 'Connection': 'keep-alive', 'Set-Co
okie': '__cfduid=d2b84ccf43c40e18b95122b0b49f5cf091575090900; expires=Mon, 30-De
c-19 05:15:00 GMT; path=/; domain=.typicode.com; HttpOnly', 'X-Powered-By': 'Exp
ress', 'Vary': 'Origin, Accept-Encoding', 'Access-Control-Allow-Credentials': 't
rue', 'Cache-Control': 'max-age=14400', 'Pragma': 'no-cache', 'Expires': '-1', '
X-Content-Type-Options': 'nosniff', 'Etag': 'W/"160d-1eMSsxeJRfnVLRBmYJSbCiJZ1qQ
"', 'Content-Encoding': 'gzip', 'Via': '1.1 vegur', 'CF-Cache-Status': 'HIT', 'A
ge': '2271', 'Expect-CT': 'max-age=604800, report-uri="https://report-uri.cloudf
lare.com/cdn-cgi/beacon/expect-ct"', 'Server': 'cloudflare', 'CF-RAY': '53da574f
f99fc331-SIN'}
To read any http header you can do so as follows−
getdata.headers["Content-Encoding"] // gzip
Custom Headers
You can also send headers to the URL being called as shown below.
Example
import requests
headers = {'x-user': 'test123'}
getdata = requests.get('https://jsonplaceholder.typicode.com/users', headers=headers)
The headers passed has to be string, bytestring, or Unicode format. The behavior of the request will not change as per the custom headers passed.
Response Headers
The response headers look like below when you check the URL in the browser developer tool, network tab−
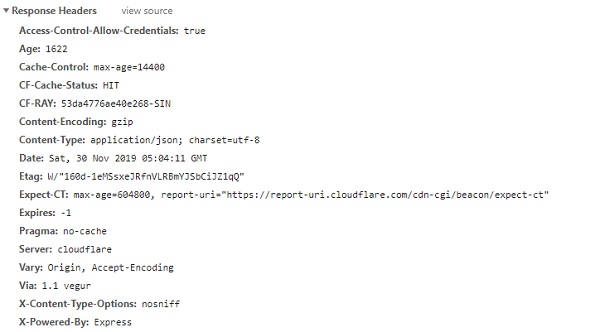
To get the details of the headers from the requests module use. Response.headers are as shown below−
Example
import requests
getdata = requests.get('https://jsonplaceholder.typicode.com/users')
print(getdata.headers)
Output
E:\prequests>python makeRequest.py
{'Date': 'Sat, 30 Nov 2019 06:08:10 GMT', 'Content-Type': 'application/json; cha
rset=utf-8', 'Transfer-Encoding': 'chunked', 'Connection': 'keep-alive', 'Set-Co
okie': '__cfduid=de1158f1a5116f3754c2c353055694e0d1575094090; expires=Mon, 30-De
c-19 06:08:10 GMT; path=/; domain=.typicode.com; HttpOnly', 'X-Powered-By': 'Exp
ress', 'Vary': 'Origin, Accept-Encoding', 'Access-Control-Allow-Credentials': 't
rue', 'Cache-Control': 'max-age=14400', 'Pragma': 'no-cache', 'Expires': '-1', '
X-Content-Type-Options': 'nosniff', 'Etag': 'W/"160d-1eMSsxeJRfnVLRBmYJSbCiJZ1qQ
"', 'Content-Encoding': 'gzip', 'Via': '1.1 vegur', 'CF-Cache-Status': 'HIT', 'A
ge': '5461', 'Expect-CT': 'max-age=604800, report-uri="https://report-uri.cloudf
lare.com/cdn-cgi/beacon/expect-ct"', 'Server': 'cloudflare', 'CF-RAY': '53daa52f
3b7ec395-SIN'}
You can get any specific header you want as follows−
print(getdata.headers["Expect-CT"])
Output
max-age=604800, report-uri="https://report-uri.cloudflare.com/cdn-cgi/beacon/exp
ect-ct
You can also get the header details by using the get() method.
print(getdata.headers.get("Expect-CT"))
Output
max-age=604800, report-uri="https://report-uri.cloudflare.com/cdn-cgi/beacon/exp
ect-ct
Requests - Handling GET Requests
This chapter will concentrate more on the GET requests, which is the most common and used very often. The working of GET in the requests module is very easy. Here is a simple example about working with the URL using the GET method.
Example
import requests
getdata = requests.get('https://jsonplaceholder.typicode.com/users')
print(getdata.content)
getdata.content, will print all the data available in the response.
Output
E:\prequests>python makeRequest.py
b'[\n {\n "id": 1,\n "name": "Leanne Graham",\n "username": "Bret",\n
"email": "Sincere@april.biz",\n "address": {\n "street": "Kulas Light
",\n "suite": "Apt. 556",\n "city": "Gwenborough",\n "zipcode": "
92998-3874",\n "geo": {\n "lat": "-37.3159",\n "lng": "81.149
6"\n }\n },\n "phone": "1-770-736-8031 x56442",\n "website": "hild
egard.org",\n "company": {\n "name": "Romaguera-Crona",\n "catchPhr
ase": "Multi-layered client-server neural-net",\n "bs": "harness real-time
e-markets"\n }\n }
You can also pass parameters to the get method using the param attribute as shown below−
import requests
payload = {'id': 9, 'username': 'Delphine'}
getdata = requests.get('https://jsonplaceholder.typicode.com/users',
params=payload)
print(getdata.content)
The details are stored in the object payload in the key/value pair and passed to params, inside get() method.
Output
E:\prequests>python makeRequest.py
b'[\n {\n "id": 9,\n "name": "Glenna Reichert",\n "username": "Delphin
e",\n "email": "Chaim_McDermott@dana.io",\n "address": {\n "street":
"Dayna Park",\n "suite": "Suite 449",\n "city": "Bartholomebury",\n
"zipcode": "76495-3109",\n "geo": {\n "lat": "24.6463",\n
"lng": "-168.8889"\n }\n },\n "phone": "(775)976-6794 x41206",\n "
website": "conrad.com",\n "company": {\n "name": "Yost and Sons",\n
"catchPhrase": "Switchable contextually-based project",\n "bs": "aggregate
real-time technologies"\n }\n }\n]'
Handling POST, PUT, PATCH and DELETE Requests
In this chapter, we will understand how to use the POST method using requests library and also pass parameters to the URL.
Using POST
For PUT request, the Requests library has requests.post() method, the example of it is shown below:
import requests
myurl = 'https://postman-echo.com/post'
myparams = {'name': 'ABC', 'email':'xyz@gmail.com'}
res = requests.post(myurl, data=myparams)
print(res.text)
Output
E:\prequests>python makeRequest.py
{"args":{},"data":"","files":{},"form":{"name":"ABC","email":"xyz@gmail.com"},"headers":{"x-forwarded-proto":"https","host":"postman-echo.com","content-length":"30","accept":"*/*","accept-encoding":"gzip,deflate","content-type":"application/x-www-form-urlencoded","user-agent":"python-requests/2.22.0","x-forwarded-port":"443"},"json":{"name":"ABC","email":"xyz@gmail.com"},"url":"https://postman-echo.com/post"}
In the example shown above, you can pass the form data as key-value pair to the data param inside requests.post(). We will also see how to work with PUT, PATCH and DELETE in requests module.
Using PUT
For PUT request, the Requests library has requests.put() method, the example of it is shown below.
import requests
myurl = 'https://postman-echo.com/put'
myparams = {'name': 'ABC', 'email':'xyz@gmail.com'}
res = requests.put(myurl, data=myparams)
print(res.text)
Output
E:\prequests>python makeRequest.py
{"args":{},"data":"","files":{},"form":{"name":"ABC","email":"xyz@gmail.com"},"h
eaders":{"x-forwarded-proto":"https","host":"postman-echo.com","content-length":
"30","accept":"*/*","accept-encoding":"gzip, deflate","content-type":"applicatio
n/x-www-form-urlencoded","user-agent":"python-requests/2.22.0","x-forwarded-port
":"443"},"json":{"name":"ABC","email":"xyz@gmail.com"},"url":"https://postman-ec
ho.com/put"}
Using PATCH
For the PATCH request, the Requests library has requests.patch() method, the example of it is shown below.
import requests
myurl = https://postman-echo.com/patch'
res = requests.patch(myurl, data="testing patch")
print(res.text)
Output
E:\prequests>python makeRequest.py
{"args":{},"data":{},"files":{},"form":{},"headers":{"x-forwarded-proto":"https"
,"host":"postman-echo.com","content-length":"13","accept":"*/*","accept-encoding
":"gzip, deflate","user-agent":"python-requests/2.22.0","x-forwarded-port":"443"
},"json":null,"url":"https://postman-echo.com/patch"}
Using DELETE
For the DELETE request, the Requests library has requests.delete() method, the example of it is shown below.
import requests
myurl = 'https://postman-echo.com/delete'
res = requests.delete(myurl, data="testing delete")
print(res.text)
Output
E:\prequests>python makeRequest.py
{"args":{},"data":{},"files":{},"form":{},"headers":{"x-forwarded-proto":"https"
,"host":"postman-echo.com","content-length":"14","accept":"*/*","accept-encoding
":"gzip, deflate","user-agent":"python-requests/2.22.0","x-forwarded-port":"443"
},"json":null,"url":"https://postman-echo.com/delete"}
Requests - File Upload
In this chapter, we will upload a file using request and read the contents of the file uploaded. We can do it using the files param as shown in the example below.
We will use the http://httpbin.org/post to upload the file.
Example
import requests
myurl = 'https://httpbin.org/post'
files = {'file': open('test.txt', 'rb')}
getdata = requests.post(myurl, files=files)
print(getdata.text)
Test.txt
File upload test using Requests
Example
var total = [0, 1, 2, 3].reduceRight(function(a, b){ return a + b; });
console.log("total is : " + total );
Output
E:\prequests>python makeRequest.py
{
  "args": {},
  "data": "",
  "files": {
   "file": "File upload test using Requests"
  },
  "form": {},
  "headers": {
   "Accept": "*/*",
   "Accept-Encoding": "gzip, deflate",
   "Content-Length": "175",
   "Content-Type": "multipart/form-data;
boundary=28aee3a9d15a3571fb80d4d2a94bf
d33",
   "Host": "httpbin.org",
   "User-Agent": "python-requests/2.22.0"
  },
  "json": null,
  "origin": "117.223.63.135, 117.223.63.135",
  "url": "https://httpbin.org/post"
}
It is also possible to send the contents of the file as shown below−
Example
import requests
myurl = 'https://httpbin.org/post'
files = {'file': ('test1.txt', 'Welcome to TutorialsPoint')}
getdata = requests.post(myurl, files=files)
print(getdata.text)
Output
E:\prequests>python makeRequest.py
{
  "args": {},
  "data": "",
  "files": {
   "file": "Welcome to TutorialsPoint"
},
"form": {},
"headers": {
   "Accept": "*/*",
   "Accept-Encoding": "gzip, deflate",
   "Content-Length": "170",
   "Content-Type": "multipart/form-data; boundary=f2837238286fe40e32080aa7e172b
e4f",
  "Host": "httpbin.org",
  "User-Agent": "python-requests/2.22.0"
},
  "json": null,
  "origin": "117.223.63.135, 117.223.63.135",
  "url": "https://httpbin.org/post"
}
Requests - Working with Cookies
This chapter will discuss how to deal with cookies. You can get the cookies as well as send your cookies while calling the URL using the requests library.
The url, https://jsonplaceholder.typicode.com/users when hits in the browser we can get the details of the cookies as shown below−
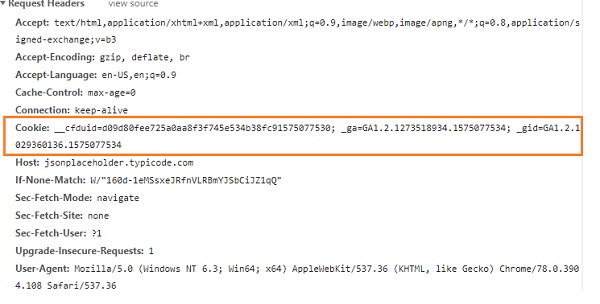
You can read the cookies as shown below−
Example
import requests
getdata = requests.get('https://jsonplaceholder.typicode.com/users')
print(getdata.cookies["__cfduid"])
Output
E:\prequests>python makeRequest.py
d1733467caa1e3431fb7f768fa79ed3741575094848
You can also send cookies when we make a request.
Example
import requests
cookies = dict(test='test123')
getdata = requests.get('https://httpbin.org/cookies',cookies=cookies)
print(getdata.text)
Output
E:\prequests>python makeRequest.py
{
   "cookies": {
   "test": "test123"
}
}
Requests - Working with Errors
This chapter will discuss how to deal with errors coming down when working with the Http request library. It is always a good practice to have errors managed for all possible cases.
Error Exception
The requests module gives the following types of error exception−
ConnectionError− This will be raised, if there is any connection error. For example, the network failed, DNS error so the Request library will raise ConnectionError exception.
Response.raise_for_status()− Based on status code i.e. 401, 404 it will raise HTTPError for the url requested.
HTTPError− This error will be raised for an invalid response coming down for the request made.
Timeout− Errors raised for a timeout for the URL requested.
TooManyRedirects− If the limit is crossed for maximum redirections than it will raise TooManyRedirects error.
Example
Here is an example of errors shown for timeout−
import requests
getdata = requests.get('https://jsonplaceholder.typicode.com/users',timeout=0.001)
print(getdata.text)
Output
raise ConnectTimeout(e, request=request)
requests.exceptions.ConnectTimeout: HTTPSConnectionPool(host='jsonplaceholder.ty
picode.com', port=443): Max retries exceeded with url: /users (Caused by Connect
TimeoutError(<urllib3.connection.VerifiedHTTPSConnection object at
0x000000B02AD
E76A0>, 'Connection to jsonplaceholder.typicode.com timed out. (connect timeout= 0.001)'))
Requests - Handling Timeouts
Timeouts can be easily added to the URL you are requesting. It so happens that, you are using a third-party URL and waiting for a response. It is always a good practice to give a timeout on the URL, as we might want the URL to respond within a timespan with a response or an error. Not doing so, can cause to wait on that request indefinitely.
We can give timeout to the URL by using the timeout param and value is passed in seconds as shown in the example below−
Example
import requests
getdata = requests.get('https://jsonplaceholder.typicode.com/users',timeout=0.001)
print(getdata.text)
Output
raise ConnectTimeout(e, request=request)
requests.exceptions.ConnectTimeout: HTTPSConnectionPool(host='jsonplaceholder.ty
picode.com', port=443): Max retries exceeded with url: /users (Caused by Connect
TimeoutError(<urllib3.connection.VerifiedHTTPSConnection object at 0x000000B02AD
E76A0>, 'Connection to jsonplaceholder.typicode.com timed out. (connect timeout=
0.001)'))
The timeout given is as follows−
getdata = requests.get('https://jsonplaceholder.typicode.com/users',timeout=0.001)
The execution throws connection timeout error as shown in the output. The timeout given is 0.001, which is not possible for the request to get back the response and throws an error. Now, we will increase the timeout and check.
Example
import requests
getdata = requests.get('https://jsonplaceholder.typicode.com/users',timeout=1.000)
print(getdata.text)
Output
E:\prequests>python makeRequest.py
[
 {
   "id": 1,
   "name": "Leanne Graham",
   "username": "Bret",
   "email": "Sincere@april.biz",
   "address": {
   "street": "Kulas Light",
   "suite": "Apt. 556",
   "city": "Gwenborough",
   "zipcode": "92998-3874",
   "geo": {
   "lat": "-37.3159",
   "lng": "81.1496"
   }
  },
   "phone": "1-770-736-8031 x56442",
   "website": "hildegard.org",
   "company": {
   "name": "Romaguera-Crona",
   "catchPhrase": "Multi-layered client-server neural-net",
   "bs": "harness real-time e-markets"
 }
With a timeout of 1 second, we can get the response for the URL requested.
Requests - Handling Redirection
This chapter will take a look at how the Request library handles the url redirection case.
Example
import requests
getdata = requests.get('http://google.com/')
print(getdata.status_code)
print(getdata.history)
The url− http://google.com will be redirected using status code 301(Moved Permanently) to https://www.google.com/. The redirection will be saved in the history.
Output
When the above code is executed, we get the following result−
E:\prequests>python makeRequest.py
200
[<Response [301]>]
You can stop redirection of a URL using allow_redirects=False. It can be done on GET, POST, OPTIONS, PUT, DELETE, PATCH methods used.
Example
Here is an example on the same.
import requests
getdata = requests.get('http://google.com/', allow_redirects=False)
print(getdata.status_code)
print(getdata.history)
print(getdata.text)
Now if you check the output, the redirection will not be allowed and will get a status code of 301.
Output
E:\prequests>python makeRequest.py
301
[]
<HTML><HEAD><meta http-equiv="content-type" content="text/html;charset=utf-8">
<TITLE>301 Moved</TITLE></HEAD><BODY>
<H1>301 Moved</H1>
The document has moved
<A HREF="http://www.google.com/">here</A>.
</BODY></HTML>
Requests - Handling History
You can get the history of a given URL by using response.history. If the given URL has any redirects, the same will be stored in history.
For history
import requests
getdata = requests.get('http://google.com/')
print(getdata.status_code)
print(getdata.history)
Output
E:\prequests>python makeRequest.py
200
[<Response [301]>]
The response.history property will have the details of the response objects that were done based on the request. The values present will be sorted from the oldest to the newest ones. The response.history property tracks all the redirection done on the URL requested.
Requests - Handling Sessions
To maintain the data between requests you need sessions. So, if the same host is called again and again, you can reuse the TCP connection which in turn will improve the performance. Let us now see, how to maintain cookies across requests made using sessions.
Adding cookies using session
import requests
req = requests.Session()
cookies = dict(test='test123')
getdata = req.get('https://httpbin.org/cookies',cookies=cookies)
print(getdata.text)
Output
E:\prequests>python makeRequest.py
{
   "cookies": {
   "test": "test123"
}
}
Using session, you can preserve the cookies data across requests. It is also possible to pass headers data using the session as shown below−
Example
import requests
req = requests.Session()
req.headers.update({'x-user1': 'ABC'})
headers = {'x-user2': 'XYZ'}
getdata = req.get('https://httpbin.org/headers', headers=headers)
print(getdata.headers)
Requests - SSL Certification
SSL certificate is a security feature that comes with secure urls. When you use Requests library, it also verifies SSL certificates for the https URL given. SSL verification is enabled by default in the requests module and will throw an error if the certificate is not present.
Working with secure URL
Following is the example of working with secure URL−
import requests
getdata = requests.get(https://jsonplaceholder.typicode.com/users)
print(getdata.text)
Output
E:\prequests>python makeRequest.py
[
   {
   "id": 1,
   "name": "Leanne Graham",
   "username": "Bret",
   "email": "Sincere@april.biz",
   "address": {
   "street": "Kulas Light",
   "suite": "Apt. 556",
   "city": "Gwenborough",
   "zipcode": "92998-3874",
   "geo": {
   "lat": "-37.3159",
   "lng": "81.1496"
   }
  },
   "phone": "1-770-736-8031 x56442",
   "website": "hildegard.org",
   "company": {
   "name": "Romaguera-Crona",
   "catchPhrase": "Multi-layered client-server neural-net",
   "bs": "harness real-time e-markets"
   }
  }
]
We are easily getting a response from the above https URL, and it is because the request module can verify the SSL certificate.
You can disable the SSL verification by simply adding verify=False as shown in the example below.
Example
import requests
getdata = requests.get('https://jsonplaceholder.typicode.com/users', verify=False)
print(getdata.text)
You will get the output, but it will also give a warning message that, the SSL certificate is not verified and adding certificate verification is advised.
Output
E:\prequests>python makeRequest.py
connectionpool.py:851: InsecureRequestWarning: Unverified HTTPS request is being
made. Adding certificate verification is strongly advised. See: https://urllib3
   .readthedocs.io/en/latest/advanced-usage.htm  l#ssl-warnings
 InsecureRequestWarning)
[
 {
  "id": 1,
   "name": "Leanne Graham",
   "username": "Bret",
   "email": "Sincere@april.biz",
   "address": {
   "street": "Kulas Light",
   "suite": "Apt. 556",
   "city": "Gwenborough",
   "zipcode": "92998-3874",
   "geo": {
   "lat": "-37.3159",
   "lng": "81.1496"
   }
  },
   "phone": "1-770-736-8031 x56442",
   "website": "hildegard.org",
   "company": {
   "name": "Romaguera-Crona",
   "catchPhrase": "Multi-layered   client-server neural-net",
   "bs": "harness real-time e-markets"
  }
 }
]
You can also verify SSL certificate by hosting it at your end, and giving the path using verify param as shown below.
Example
import requests
getdata = requests.get('https://jsonplaceholder.typicode.com/users', verify='C:\Users\AppData\Local\certificate.txt')
print(getdata.text)
Output
E:\prequests>python makeRequest.py
[
  {
   "id": 1,
   "name": "Leanne Graham",
   "username": "Bret",
   "email": "Sincere@april.biz",
   "address": {
   "street": "Kulas Light",
   "suite": "Apt. 556",
   "city": "Gwenborough",
   "zipcode": "92998-3874",
   "geo": {
   "lat": "-37.3159",
   "lng": "81.1496"
   }
  },
   "phone": "1-770-736-8031 x56442",
   "website": "hildegard.org",
   "company": {
   "name": "Romaguera-Crona",
   "catchPhrase": "Multi-layered   client-server neural-net",
   "bs": "harness real-time e-markets"
   }
  }
]
Requests - Authentication
This chapter will discuss the types of authentication available in the Requests module.
We are going to discuss the following−
Working of Authentication in HTTP Requests
Basic Authentication
Digest Authentication
OAuth2 Authentication
Working of Authentication in HTTP Requests
HTTP authentication is on the server-side asking for some authentication information like username, password when the client requests a URL. This is additional security for the request and the response being exchanged between the client and the server.
From the client-side these additional authentication information i.e. username and password can be sent in the headers, which later on the server side will be validated. The response will be delivered from the server-side only when the authentication is valid.
Requests library has most commonly used authentication in requests.auth, which are Basic Authentication (HTTPBasicAuth) and Digest Authentication (HTTPDigestAuth).
Basic Authentication
This is the simplest form of providing authentication to the server. To work with basic authentication, we are going to use HTTPBasicAuth class available with requests library.
Example
Here is a working example of how to use it.
import requests
from requests.auth import HTTPBasicAuth
response_data = requests.get('httpbin.org/basic-auth/admin/admin123', auth=HTTPDigestAuth('admin', 'admin123'))
print(response_data.text)
We are calling the url, https://httpbin.org/basic-auth/admin/admin123 with user as admin and password as admin123.
So, this URL will not work without authentication, i.e. user and password. Once you give the authentication using the auth param, then only the server will give back the response.
Output
E:\prequests>python makeRequest.py
{
   "authenticated": true,
   "user": "admin"
}
Digest Authentication
This is another form of authentication available with requests. We are going to make use of HTTPDigestAuth class from requests.
Example
import requests
from requests.auth import HTTPDigestAuth
response_data = requests.get('https://httpbin.org/digest-auth/auth/admin/admin123>, auth=HTTPDigestAuth('admin', 'admin123'))
print(response_data.text)
Output
E:\prequests>python makeRequest.py
{
   "authenticated": true,
   "user": "admin"
}
OAuth2 Authentication
To use OAuth2 Authentication, we need requests_oauth2 library. To install requests_oauth2 do the following−
pip install requests_oauth2
The display in your terminal while installing will be something as shown below−
E:\prequests>pip install requests_oauth2
Collecting requests_oauth2
Downloading https://files.pythonhosted.org/packages/52/dc/01c3c75e6e7341a2c7a9
71d111d7105df230ddb74b5d4e10a3dabb61750c/requests-oauth2-0.3.0.tar.gz
Requirement already satisfied: requests in c:\users\xyz\appdata\local\programs
\python\python37\lib\site-packages (from requests_oauth2) (2.22.0)
Requirement already satisfied: six in c:\users\xyz\appdata\local\programs\pyth
on\python37\lib\site-packages (from requests_oauth2) (1.12.0)
Requirement already satisfied: urllib3!=1.25.0,!=1.25.1,<1.26,>=1.21.1 in c:\use
rs\xyz\appdata\local\programs\python\python37\lib\site-packages (from requests
->requests_oauth2) (1.25.3)
Requirement already satisfied: certifi>=2017.4.17 in c:\users\xyz\appdata\loca
l\programs\python\python37\lib\site-packages (from requests->requests_oauth2) (2
019.3.9)
Requirement already satisfied: chardet<3.1.0,>=3.0.2 in c:\users\xyz\appdata\l
ocal\programs\python\python37\lib\site-packages (from requests->requests_oauth2)
(3.0.4)
Requirement already satisfied: idna<2.9,>=2.5 in c:\users\xyz\appdata\local\pr
ograms\python\python37\lib\site-packages (from requests->requests_oauth2) (2.8)
Building wheels for collected packages: requests-oauth2
Building wheel for requests-oauth2 (setup.py) ... done
Stored in directory: C:\Users\xyz\AppData\Local\pip\Cache\wheels\90\ef\b4\43
3743cbbc488463491da7df510d41c4e5aa28213caeedd586
Successfully built requests-oauth2
We are done installing requests-oauth2. To use the APIs of Google, Twitter we need its consent and the same is done using OAuth2 authentication.
For OAuth2 authentication we will need Client ID and a Secret Key. The details of how to get it, is mentioned on https://developers.google.com/identity/protocols/OAuth2.
Later on, login to Google API Console which is available at https://console.developers.google.com/and get the client id and secret key.
Example
Here is an example of how to use "requests-oauth2".
import requests
from requests_oauth2.services import GoogleClient
google_auth = GoogleClient(
   client_id="xxxxxxxxxxxxxxxxxxxxxxxxxx.apps.googleusercontent.com",
redirect_uri="http://localhost/auth/success.html",
)
a = google_auth.authorize_url(
   scope=["profile", "email"],
   response_type="code",
)
res = requests.get(a)
print(res.url)
We will not be able to redirect to the URL given, as it needs to login to the Gmail account, but here, you will see from the example, that google_auth works and the authorized URL is given.
Output
E:\prequests>python oauthRequest.py
https://accounts.google.com/o/oauth2/auth?redirect_uri=
http%3A%2F%2Flocalhost%2Fauth%2Fsuccess.html&
client_id=xxxxxxxxxxxxxxxxxxxxx.apps.googleusercontent.com&
scope=profile+email&response_type=code
Requests - Event Hooks
We can add events to the URL requested using event hooks. In the example below, we are going to add a callback function that will get called when the response is available.
Example
To add the callback, we need to make use of hooks param as shown in the example below−
mport requests
def printData(r, *args, **kwargs):
   print(r.url)
   print(r.text)
getdata = requests.get('https://jsonplaceholder.typicode.com/users',
hooks={'response': printData})
Output
E:\prequests>python makeRequest.py
https://jsonplaceholder.typicode.com/users
[
{
   "id": 1,
   "name": "Leanne Graham",
   "username": "Bret",
   "email": "Sincere@april.biz",
   "address": {
   "street": "Kulas Light",
   "suite": "Apt. 556",
   "city": "Gwenborough",
   "zipcode": "92998-3874",
   "geo": {
    "lat": "-37.3159",
    "lng": "81.1496"
   }
  },
   "phone": "1-770-736-8031 x56442",
   "website": "hildegard.org",
   "company": {
   "name": "Romaguera-Crona",
   "catchPhrase": "Multi-layered client-server neural-net",
   "bs": "harness real-time e-markets"
   }
  }
]
You can also call multiple callback functions as shown below−
Example
import requests
def printRequestedUrl(r, *args, **kwargs):
   print(r.url)
def printData(r, *args, **kwargs):
   print(r.text)
getdata = requests.get('https://jsonplaceholder.typicode.com/users', hooks={'response': [printRequestedUrl, printData]})
Output
E:\prequests>python makeRequest.py
https://jsonplaceholder.typicode.com/users
[
  {
   "id": 1,
   "name": "Leanne Graham",
   "username": "Bret",
   "email": "Sincere@april.biz",
   "address": {
   "street": "Kulas Light",
   "suite": "Apt. 556",
   "city": "Gwenborough",
   "zipcode": "92998-3874",
   "geo": {
   "lat": "-37.3159",
   "lng": "81.1496"
 }
  },
   "phone": "1-770-736-8031 x56442",
   "website": "hildegard.org",
   "company": {
   "name": "Romaguera-Crona",
   "catchPhrase": "Multi-layered client-server neural-net",
    "bs": "harness real-time e-markets"
   }
  }
]
You can also add the hook to the Session created as shown below−
Example
import requests
def printData(r, *args, **kwargs):
print(r.text)
s = requests.Session()
s.hooks['response'].append(printData)
s.get('https://jsonplaceholder.typicode.com/users')
Output
E:\prequests>python makeRequest.py
[
 {
   "id": 1,
   "name": "Leanne Graham",
   "username": "Bret",
   "email": "Sincere@april.biz",
   "address": {
   "street": "Kulas Light",
   "suite": "Apt. 556",
   "city": "Gwenborough",
   "zipcode": "92998-3874",
   "geo": {
   "lat": "-37.3159",
   "lng": "81.1496"
   }
  },
   "phone": "1-770-736-8031 x56442",
   "website": "hildegard.org",
   "company": {
   "name": "Romaguera-Crona",
   "catchPhrase": "Multi-layered client-server neural-net",
   "bs": "harness real-time e-markets"
   }
  }
]
Requests - Proxy
So far, we have seen clients directly connecting and talking to the server. Using proxy, the interaction happens as follows−
The client sends a request to the proxy.
The proxy sends the request to the server.
The server sends back the response to the proxy.
The proxy will send a response back to the client.
Using Http-proxy is additional security assigned to manage the data exchange between client and server. The requests libraries also have provision to handle proxy, by using the proxies param as shown below−
Example
import requests
proxies = {
'http': 'http://localhost:8080'
}
res = requests.get('http://httpbin.org/', proxies=proxies)
print(res.status_code)
The request will route to ('http://localhost:8080 URL.
Output
200
Requests - Web Scraping using Requests
We have already seen how we can get data from a given URL using python requests library. We will try to scrap the data from the site of Tutorialspoint which is available at https://www.tutorialspoint.com/tutorialslibrary.htm using the following−
Requests Library
Beautiful soup library from python
We have already installed the Requests library, let us now install Beautiful soup package. Here is the official website for beautiful soup available at https://www.crummy.com/software/BeautifulSoup/bs4/doc/ in case you want to explore some more functionalities of beautiful soup.
Installing Beautifulsoup
We shall see how to install Beautiful Soup below−
E:\prequests>pip install beautifulsoup4
Collecting beautifulsoup4
Downloading https://files.pythonhosted.org/packages/3b/c8/a55eb6ea11cd7e5ac4ba
cdf92bac4693b90d3ba79268be16527555e186f0/beautifulsoup4-4.8.1-py3-none-any.whl (
101kB)
|| 102kB 22kB/s
Collecting soupsieve>=1.2 (from beautifulsoup4)
Downloading https://files.pythonhosted.org/packages/81/94/03c0f04471fc245d08d0
a99f7946ac228ca98da4fa75796c507f61e688c2/soupsieve-1.9.5-py2.py3-none-any.whl
Installing collected packages: soupsieve, beautifulsoup4
Successfully installed beautifulsoup4-4.8.1 soupsieve-1.9.5
We now have python requests library and beautiful soup installed.
Let us now write the code, that will scrap the data from the URL given.
Web scraping
import requests
from bs4 import BeautifulSoup
res = requests.get('https://www.tutorialspoint.com/tutorialslibrary.htm')
print("The status code is ", res.status_code)
print("\n")
soup_data = BeautifulSoup(res.text, 'html.parser')
print(soup_data.title)
print("\n")
print(soup_data.find_all('h4'))
Using requests library, we can fetch the content from the URL given and beautiful soup library helps to parse it and fetch the details the way we want.
You can use a beautiful soup library to fetch data using Html tag, class, id, css selector and many more ways. Following is the output we get wherein we have printed the title of the page and also all the h4 tags on the page.
Output
E:\prequests>python makeRequest.py
The status code is 200
<title>Free Online Tutorials and Courses</title>
[<h4>Academic</h4>, <h4>Computer Science</h4>, <h4>Digital Marketing</h4>, <h4>M
onuments</h4>,<h4>Machine Learning</h4>, <h4>Mathematics</h4>, <h4>Mobile Devel
opment</h4>,<h4>SAP</h4>, <h4>Software Quality</h4>, <h4>Big Data & Analyti
cs</h4>, <h4>Databases</h4>, <h4>Engineering Tutorials</h4>, <h4>Mainframe Devel
opment</h4>, <h4>Microsoft Technologies</h4>, <h4>Java Technologies</h4>,<h4>XM
L Technologies</h4>, <h4>Python Technologies</h4>, <h4>Sports</h4>, <h4>Computer
Programming</h4>,<h4>DevOps</h4>, <h4>Latest Technologies</h4>, <h4>Telecom</h4>, <h4>Exams Syllabus</h4>, <h4>UPSC IAS Exams</h4>, <h4>Web Development</h4>,
<h4>Scripts</h4>, <h4>Management</h4>,<h4>Soft Skills</h4>, <h4>Selected Readin
g</h4>, <h4>Misc</h4>]
