- Python Pyramid - Home
- Python Pyramid - Overview
- Pyramid - Environment Setup
- Python Pyramid - Hello World
- Pyramid - Application Configuration
- Python Pyramid - Url Routing
- Python Pyramid - View Configuration
- Python Pyramid - Route Prefix
- Python Pyramid - Templates
- Pyramid - HTML Form Template
- Python Pyramid - Static Assets
- Python Pyramid - Request Object
- Python Pyramid - Response Object
- Python Pyramid - Sessions
- Python Pyramid - Events
- Python Pyramid - Message Flashing
- Pyramid - Using SQLAlchemy
- Python Pyramid - Cookiecutter
- Python Pyramid - Creating A Project
- Python Pyramid - Project Structure
- Python Pyramid - Package Structure
- Creating A Project Manually
- Command Line Pyramid
- Python Pyramid - Testing
- Python Pyramid - Logging
- Python Pyramid - Security
- Python Pyramid - Deployment
- Python Pyramid Useful Resources
- Python Pyramid - Quick Guide
- Python Pyramid - Useful Resources
- Python Pyramid - Discussion
Python Pyramid - Quick Guide
Python Pyramid - Overview
Pyramid is an open source, WSGI compliant web framework written in Python. Initially the project named as Pylons, but later released under the new name Pyramid.
Pyramid is a minimalistic web framework. It doesn't come packaged with any templating library or doesn't have support for any specific database packages.
However, it can be integrated both with SQL databases via SQLAlchemy and with the Zope Object Database, as well as other NoSQL databases such as CouchDB.
Pyramid can also be configured to work with templating libraries such as Mako, Jinja2 or Chameleon.
Pyramid has been developed by Chris McDonough. The first version of Pyramid was released in January 2011. The latest version, Pyramid 2.0 has been released in March 2021.
Comparison with Other Python Frameworks
Pyramid web application framework is inspired by Zope and Django frameworks. As a result, it combines the best provisions of the two.
Pyramid is largely based on repose.bfg framework. After it was merged with the Pylons project, the same was renamed as Pyramid in 2010.
The ability to extend Pyramid application is borrowed from Zope library. Without modifying the application code, the application can be reused, modified or extended. The features such as declarative security layer and traversal of routes is inherited from Zope.
As is the case of Pylons 1.0, Pyramid doesn't enforce any policy. It also lets the user choose any database or templating system The URL dispatch approach is also inspired by Pylons.
The concept of views is based on similar approach of Django. Extensive documentation is also a Django features adapted by Pyramid.
Although the definition doesn't fit exactly, Pyramid can be said to follow MVC (Model-View-Controller) approach.
Python Pyramid - Environment Setup
It is recommended that the Pyramid package be installed on a system having Python 3.6 or above version installed. Pyramid can be installed on Linux, MacOS as well as Windows platform. Simplest way of installing it is by using PIP installer, preferably under a Python virtual environment.
pip3 install pyramid
Although a Pyramid web application can be run using the built-in WSGI development server that is a part of the wsgiref module, it is not recommended for use in production environment. Hence, we also install Waitress, a production-quality pure-Python WSGI server (also a part of Pylons project).
pip3 install waitress
This will install Pyramid (ver 2.0), Waitress (ver 2.1.2) in addition to other dependencies from Pylon project such that WebOb, PasteDeploy, and others. To check what gets installed, run pip freeze command.
pip3 freeze
hupper==1.10.3
PasteDeploy==2.1.1
plaster==1.0
plaster-pastedeploy==0.7
pyramid==2.0
translationstring==1.4
venusian==3.0.0
waitress==2.1.2
WebOb==1.8.7
zope.deprecation==4.4.0
zope.interface==5.4.0
Python Pyramid - Hello World
Example
To check whether Pyramid along with its dependencies are properly installed, enter the following code and save it as hello.py, using any Python-aware editor.
from wsgiref.simple_server import make_server
from pyramid.config import Configurator
from pyramid.response import Response

def hello_world(request):
   return Response('Hello World!')

if __name__ == '__main__':
   with Configurator() as config:
      config.add_route('hello', '/')
      config.add_view(hello_world, route_name='hello')
      app = config.make_wsgi_app()
   server = make_server('0.0.0.0', 6543, app)
   server.serve_forever()
The Configurator object is required to define the URL route and bind a view function to it. The WSGI application object is obtained from this config object is an argument to the make_server() function along with the IP address and port of localhost. The server object enters a listening loop when serve_forever() method is called.
Run this program from the command terminal as.
Python hello.py
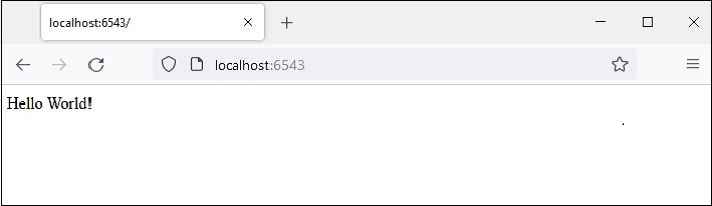
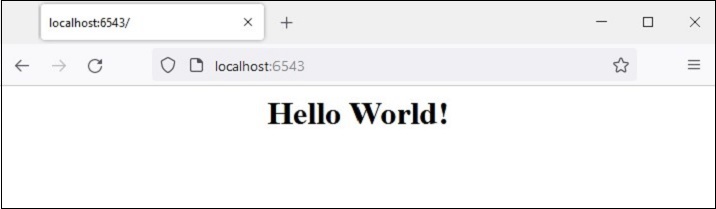
Output
The WSGI server starts running. Open the browser and enter http://loccalhost:6543/ in the address bar. When the request is accepted, the hello_world() view function gets executed. It returns the Hello world message. The Hello world message will be seen in the browser window.
As mentioned earlier, the development server created by make_server() function in the wsgiref module is not suited for production environment. Instead, we shall use Waitress server. Modify the hello.py as per the following code −
from pyramid.config import Configurator
from pyramid.response import Response
from waitress import serve

def hello_world(request):
   return Response('Hello World!')

if __name__ == '__main__':
   with Configurator() as config:
      config.add_route('hello', '/')
      config.add_view(hello_world, route_name='hello')
      app = config.make_wsgi_app()
      serve(app, host='0.0.0.0', port=6543)
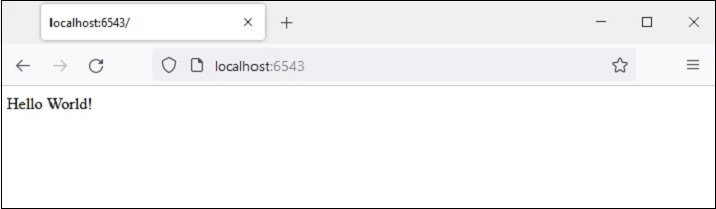
All other functionality is same, except we use serve() function of waitress module to start the WSGI server. On visiting the '/' route in the browser after running the program, the Hello world message is displayed as before.
Instead of a function, a callable class can also be used as a view. A callable class is the one which overrides the __call__() method.
from pyramid.response import Response
class MyView(object):
   def __init__(self, request):
      self.request = request
   def __call__(self):
      return Response('hello world')
Python Pyramid - Application Configuration
The Pyramid application object has an application registry that stores mappings of view functions to routes, and other application-specific component registrations. The Configurator class is used to build the application registry.
The Configurator life cycle is managed by a context manager that returns an application object.
with Configurator(settings=settings) as config:
   #configuration methods
   app = config.make_wsgi_app()
The Configurator class defines the following important methods to customize the application −
add_route()
This method registers a route for URL dispatch. Following arguments are used −
name − The first required positional argument must be a unique name for the route. The name is used to identify the route when registering views or generating URLs.
pattern − The second required positional argument is a string representing the URL path optionally containing variable placeholders for parsing the variable data from the URL. The placeholders are surrounded by curly brackets. For example, "/students/{id}".
request_method − The value can be one of "GET", "POST", "HEAD", "DELETE", "PUT". Requests only of this type will be matched against the route.
add_view()
This method adds a view configuration to the application registry. It binds a view function to the route_name present in the configuration. The arguments required are −
view − The name of a view function.
route_name − A string that must match the name of a route configuration declaration.
request_method − Either a string (such as "GET", "POST", "PUT", "DELETE", "HEAD" or "OPTIONS") representing an HTTP REQUEST_METHOD, or a tuple containing one or more of these strings.
add_static_view()
This method adds a view used to render static assets such as images and CSS files, and uses the following arguments −
name − This argument is a string representing an application-relative local URL prefix, or a full URL.
Path − This argument represents the path on disk where the static files reside. Its value can be an absolute or a package-relative path.
This method in turn calls the add_route() method of Configurator object.
add_notfound_view()
This method adds a view to be executed when a matching view cannot be found for the current request. The following code shows an example −
from pyramid.config import Configurator
from pyramid.response import Response

def notfound(request):
   return Response('Not Found', status='404 Not Found')

config.add_notfound_view(notfound)
add_forbidden_view()
Configures the application registry so as to define a view to be executed when there is HTTPForbidden exception raised. The argument list contains a reference to a function that returns a 403 status response. If no argument is provided, the registry adds default_exceptionresponse_view().
add_exception_view()
This method causes addition of an exception view function to the configuration, for the specified exception.
make_wsgi_app()
This method returns a Pyramid WSGI application object.
scan()
This is a wrapper for registering views. It imports all application modules looking for @view_config decorators.
For each one, it calls config.add_view(view) with the same keyword arguments. A call to scan() function performs the scan of the package and all the subpackages for all the decorations.
A typical sequence of statements that performs configuration of application registry is as in the following code snippet −
from pyramid.config import Configurator

with Configurator() as config:
   config.add_route('hello', '/')
   config.add_view(hello_world, route_name='hello')
   app = config.make_wsgi_app()
This approach towards configuration of the application is called imperative configuration. Pyramid provides another approach towards configuration, called as decorative configuration.
Declarative Configuration
Sometimes, it becomes difficult to do the configuration by imperative code, especially when the application code is spread across many files. The declarative configuration is a convenient approach. The pyramid.view model defines view_config a function, class or method decorator - that allows the view registrations very close to the definition of view function itself.
Two important arguments are provided to @view_config() decorator. They are route_name and request_method. They bear same explanation as in add_route() method of Configurator class. The function just below it is decorated so that it is bound to the route added to the registry of the application object.
Give below is the example of declarative configuration of hello_world() view function −
from pyramid.response import Response
from pyramid.view import view_config

@view_config(route_name='hello', request_method='GET')
def hello_world(request):
   return Response('Hello World!')
The view_config decorator adds an attribute to the hello_world() function, making it available for a scan to find it later.
Example
The combination of configuration decoration and the invocation of a scan is collectively known as declarative configuration. Following code configures the application registry with declarative approach.
The scan() function discovers the routes and their mapped views, so that there is the need to add imperative configuration statements.
from wsgiref.simple_server import make_server
from pyramid.config import Configurator
from pyramid.response import Response
from pyramid.view import view_config

@view_config(route_name='hello', request_method='GET')
def hello_world(request):
   return Response('Hello World!')

if __name__ == '__main__':
   with Configurator() as config:
      config.add_route('hello', '/')
      config.scan()
      app = config.make_wsgi_app()
   server = make_server('0.0.0.0', 6543, app)
   server.serve_forever()
The scanner translates the arguments to view_config into a call to the pyramid.config.Configurator.add_view() method, so that the action is equivalent to the following statement −
config.add_view(hello_world, route_name='hello', request_method='GET')
Output
After the above program is run, the WSGI server starts. When the browser visits the link http://localhost:6543/, the "Hello World" message is rendered as before.
Python Pyramid - Url Routing
Before the advent of MVC architecture, web applications used the mechanism of mapping the URL entered by the user in the browser, to a program file whose output was rendered as HTML to as a response back to the browser. Pyramid framework uses a routing mechanism where the endpoint of the URL is matched with different URL patterns registered in the application's registry, invokes its mapped view and renders the response.
A typical URL comprises of three parts: The protocol (such as http:// or https://) followed by the IP address or hostname. The remaining part of the URL after first / after the hostname is called as the path or endpoint.
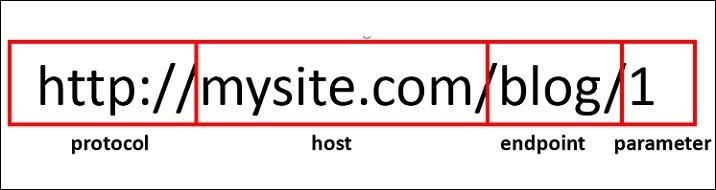
The endpoint followed by one or more variable parts forms the route. The variable part identifiers are surrounded by curly brackets. For example, for the above URL, the route is /blog/{id}
The WSGI application acts as a router. It checks the incoming request against the URL patterns present in the route map. If a match is found, its associated view callable is executed and the response is returned.
Route Configuration
A new route is added to the application by invoking add_route() method of the Configurator object. A route has a name, which acts as an identifier to be used for URL generation and a pattern that is meant to match against the PATH_INFO portion of a URL (the portion following the scheme and port, e.g., /blog/1 in the URL http://example.com/blog/1).
As mentioned earlier, the pattern parameter of add_route() method can have one or more placeholder identifiers surrounded by curly brackets and separated by /. Following statement assigns 'index' as the name of route given to '/{name}/{age}' pattern.
config.add_route('index', '/{name}/{age}')
To associate a view callable to this route, we use add_view() function as follows −
config.add_view(index, route_name='index')
The index() function should be available for the route to be matched to it.
def index(request):
   return Response('Root Configuration Example')
Example
We put these statements in the program below −
from wsgiref.simple_server import make_server
from pyramid.config import Configurator
from pyramid.response import Response

def index(request):
   return Response('Root Configuration Example')

if __name__ == '__main__':
   with Configurator() as config:
      config.add_route('index', '/{name}/{age}')
      config.add_view(index, route_name='index')
      app = config.make_wsgi_app()
server = make_server('0.0.0.0', 6543, app)
server.serve_forever()
Output
Run the above code and visit http://localhost:6543/Ravi/21 in the browser. As the URL's PATH_INFO matches with the index route, the following output is displayed −

The pattern used in route configuration usually starts with a forward slash (/) character. A pattern segment (an individual item between / characters in the pattern) may either be a literal string, or it may be a placeholder marker (e.g., {name}), or a certain combination of both. A replacement marker does not need to be preceded by a / character.
Here are some examples of route patterns
/student/{name}/{marks}
/{id}/student/{name}/{marks}
/customer/{id}/item/{itemno}
/{name}/{age}
The place holder identifier must be a valid Python identifier. Hence, it must begin with an uppercase or lowercase ASCII letter or an underscore, and it can only have uppercase or lowercase ASCII letters, underscores, and numbers.
Route Matching
When the incoming request matches with the URL pattern associated with a particular route configuration, a dictionary object named matchdict is added as an attribute of the request object.
The request.matchdict contains the values that match replacement patterns in the pattern element. The keys in a matchdict are strings, while their values are Unicode objects.
In the previous example, change the index() view function to following −
def index(request):
   return Response(str(request.matchdict))
The browser displays the path parameters in the form of a dict object.
When the request matches a route pattern, the request object passed to the view function also includes a matched_route attribute. The name of the matched route can be obtained from its name property.
Example
In the following example, we have two view functions student_view() and book_view() defined with the help of @view.config() decorator.
The application's registry is configured to have two corresponding routes 'student' mapped to '/student/{name}/{age}' pattern and 'book' mapped to '/book/{title}/{price}' pattern. We call the scan() method of configurator object to add the views.
from wsgiref.simple_server import make_server
from pyramid.config import Configurator
from pyramid.response import Response
from pyramid.view import view_config

@view_config(route_name='student')
def student_view(request):
   return Response(str(request.matchdict))
@view_config(route_name='book')
def book_view(request):
   title=request.matchdict['title']
   price=request.matchdict['price']
   return Response('Title: {}, Price: {}'.format(title,price))
if __name__ == '__main__':
   with Configurator() as config:
      config.add_route('student', '/student/{name}/{age}')
      config.add_route('book', '/book/{title}/{price}')
      config.scan()
      app = config.make_wsgi_app()
   server = make_server('0.0.0.0', 6543, app)
   server.serve_forever()
Output
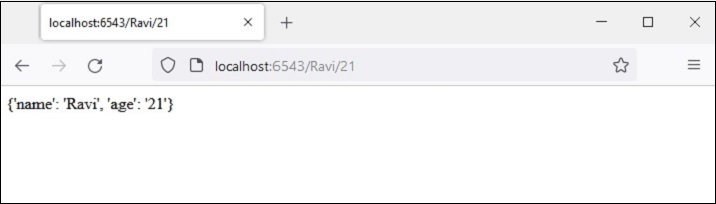
When the browser is given http://localhost:6543/student/Ravi/21 URL, the output is
{'name': 'Ravi', 'age': '21'}
If the URL entered is http://localhost:6543/book/Python/300, the output is
Title: Python, Price: 300
Python Pyramid - View Configuration
The term "View Configuration" refers to the mechanism of associating a view callable (a function, method or a class) with the information of route configuration. Pyramid finds the best callable for the given URL pattern.
There are three ways to configure a view −
Using add_view() method
Using @view_config() decorator
Using @view_defaults () class decorator
Using add_view() Method
This is the simplest method of configuring a view imperatively by calling the add_view() method of the Configurator object.
This method uses the following arguments −
name − The view name required to match this view callable. If name is not supplied, the empty string is used (implying the default view).
context − This resource must be an object of a Python class in order for this view to be found and called. If context is not supplied, the value None, which matches any resource, is used.
route_name − This value must match the name of a route configuration declaration that must match before this view will be called. If route_name is supplied, the view callable will be invoked only when the named route has matched.
request_type − an interface that the request must provide in order for this view to be found and called.
request_method − a string (such as "GET", "POST", "PUT", "DELETE", "HEAD", or "OPTIONS") representing an HTTP REQUEST_METHOD or a tuple containing one or more of these strings. The view will be called only when the method attribute of the request matches a supplied value.
request_param − This argument can be any string or a sequence of strings. The view will only be called when the request.params dictionary has a key which matches the supplied value.
Example
In the following example, two functions getview() and postview() are defined and associated with two routes of the same name. These functions just return the name of the HTTP method by which they are called.
The getview() function is called when the URL /get is requested using GET method. Similarly, the postview() function is executed when /post path id requested by POST method.
from wsgiref.simple_server import make_server
from pyramid.config import Configurator
from pyramid.response import Response
def getview(request):
   ret=request.method
   return Response('Method: {}'.format(ret))
def postview(request):
   ret=request.method
   return Response('Method: {}'.format(ret))

if __name__ == '__main__':
   with Configurator() as config:
      config.add_route('getview', '/get')
      config.add_route('postview', '/post')
      config.add_view(getview, route_name='getview',request_method='GET')
      config.add_view(postview,route_name='postview', request_method='POST')
      app = config.make_wsgi_app()
      server = make_server('0.0.0.0', 6543, app)
      server.serve_forever()
While the GET request can be sent by using the web browser as HTTP client, it is not possible to use it for POST request. Hence, we use the CURL command line utility.
C:\Users\Acer>curl localhost:6543/get
Method: GET
C:\Users\Acer>curl -d "param1=value1" -H "Content-Type: application/json" -X POST http://localhost:6543/post
Method: POST
As mentioned earlier, the request_method parameter can be a list of one or more HTTP methods. Let us modify the above program and define a single oneview() function that identifies the HTTP method that causes its execution.
def oneview(request):
   ret=request.method
   return Response('Method: {}'.format(ret))
This function is registered in the application's configuration for all the HTTP methods.
config.add_route('oneview', '/view')
config.add_view(oneview, route_name='oneview',
   request_method=['GET','POST', 'PUT', 'DELETE'])
Output
The CURL output is shown as below −
C:\Users\Acer>curl localhost:6543/view
Method: GET
C:\Users\Acer>curl -d "param1=value1" -H "Content-Type: application/json" -X POST http://localhost:6543/view
Method: POST
C:\Users\Acer>curl -d "param1=value1" -H "Content-Type: application/json" -X PUT http://localhost:6543/view
Method: PUT
C:\Users\Acer>curl -X DELETE http://localhost:6543/view
Method: DELETE
Using @view_config() Decorator
Instead of adding views imperatively, the @view_config decorator can be used to associate the configured routes with a function, a method or even a callable class.
Example
As described in the Declarative Configuration section, a registered route can be associated with a function as in the following example −
from wsgiref.simple_server import make_server
from pyramid.config import Configurator
from pyramid.response import Response
from pyramid.view import view_config
@view_config(route_name='hello')
def hello_world(request):
   return Response('Hello World!')
if __name__ == '__main__':
   with Configurator() as config:
      config.add_route('hello', '/')
      config.scan()
      app = config.make_wsgi_app()
   server = make_server('0.0.0.0', 6543, app)
   server.serve_forever()
Note that the views are added into the application configuration only after calling the scan() method. While removes the need for imperatively adding the views, the performance may be slightly slower.
Output
The view_config() decorator can also be given same arguments as that of add_view() method. All arguments may be omitted.
@view_config()
def hello_world(request):
   return Response('Hello World!')
In such a case, the function will be registered with any route name, any request method or parameters.
The view_config decorator is placed just before the definition of callable view function, as in the above example. It can also be put on top of a class if it is to be used as the view callable. Such a class must have a __call__() method.
In the following Pyramid application code, the MyView class is used as a callable and is decorated by the @view_config decorator.
from wsgiref.simple_server import make_server
from pyramid.config import Configurator
from pyramid.response import Response
from pyramid.view import view_config

@view_config(route_name='hello')
class MyView(object):
   def __init__(self, request):
      self.request = request

   def __call__(self):
      return Response('hello World')

if __name__ == '__main__':
   with Configurator() as config:
      config.add_route('hello', '/')
      #config.add_view(MyView, route_name='hello')
      config.scan()
      app = config.make_wsgi_app()
   server = make_server('0.0.0.0', 6543, app)
   server.serve_forever()
Note that instead of scanning for view configurations, we can add views by explicitly calling the add_view() method.
Example
If the methods in a class have to be associated with different routes, separate @view_config() should be used on top of each one of them, as done in the following example. Here, we have two methods bound to two separate routes.
from wsgiref.simple_server import make_server
from pyramid.config import Configurator
from pyramid.response import Response
from pyramid.view import

class MyView(object):
   def __init__(self, request):
      self.request = request

   @view_config(route_name='getview', request_method='GET')
   def getview(self):
      return Response('hello GET')
   @view_config(route_name='postview', request_method='POST')
   def postview(self):
      return Response('hello POST')

if __name__ == '__main__':
   with Configurator() as config:
      config.add_route('getview', '/get')
      config.add_route('postview', '/post')
      config.scan()
      app = config.make_wsgi_app()
   server = make_server('0.0.0.0', 6543, app)
   server.serve_forever()
Output
Here's the output of CURL commands −
C:\Users\Acer>curl localhost:6543/get
hello GET
C:\Users\Acer>curl -d "param1=value1" -H "Content-Type: application/json" -X POST http://localhost:6543/post
hello POST
Using @view_defaults() Decorator
view_defaults() is a class decorator. If you have to add the methods in a class as view with some common parameters and some specific parameters, the common parameters can be specified in the view_defaults() decorator on top of the class, performing configuration of each method by a separate view_config() before each one of them.
Example
In the following code, we have different methods responding to the same route but with different request_method. Hence we define the rout name as default, and specify the request_method in each view configuration.
from wsgiref.simple_server import make_server
from pyramid.config import Configurator
from pyramid.response import Response
from pyramid.view import view_config
from pyramid.view import view_defaults

@view_defaults(route_name='myview')
class MyView(object):
   def __init__(self, request):
      self.request = request

   @view_config( request_method='GET')
   def getview(self):
      return Response('hello GET')
   @view_config(request_method='POST')
   def postview(self):
      return Response('hello POST')
   @view_config(request_method='PUT')
   def putview(self):
      return Response('hello PUT')
   @view_config(request_method='DELETE')
   def delview(self):
      return Response('hello DELETE')

if __name__ == '__main__':
   with Configurator() as config:
      config.add_route('myview', '/view')
      config.scan()
      app = config.make_wsgi_app()
   server = make_server('0.0.0.0', 6543, app)
   server.serve_forever()
Output
The CURL commands with different HTTP requests to the server are as follows −
C:\Users\Acer>curl localhost:6543/view
hello GET
C:\Users\Acer>curl -d "param1=value1" -H "Content-Type: application/json" -X POST http://localhost:6543/view
hello POST
C:\Users\Acer>curl -d "param1=value1" -H "Content-Type: application/json" -X PUT http://localhost:6543/view
hello PUT
C:\Users\Acer>curl -X DELETE http://localhost:6543/view
hello DELETE
Python Pyramid - Route Prefix
Many times, similar URL patterns are registered with different routes in more than one Python code modules. For example, we have a student_routes.py where /list and /add URL patterns are registered with 'list' and 'add' routes. The view functions associated with these routes are list() and add(), respectively.
#student_routes.py
from pyramid.config import Configurator
from pyramid.response import Response
from pyramid.view import view_config

@view_config( route_name='add')
def add(request):
   return Response('add student')
@view_config(route_name='list')
def list(request):
   return Response('Student list')

def students(config):
   config.add_route('list', '/list')
   config.add_route('add', '/add')
   config.scan()
These routes will eventually be registered when the students() function is called.
At the same time, there is book_routes.py, in which the same URLs /list and add/ are registered to 'show' and 'new' routes. Their associated views are list() and add() respectively. The module has books() function which adds the routes.
#book_routes.py
from pyramid.config import Configurator
from pyramid.response import Response
from pyramid.view import view_config

@view_config( route_name='new')
def add(request):
   return Response('add book')
@view_config(route_name='show')
def list(request):
   return Response('Book list')
def books(config):
   config.add_route('show', '/list')
   config.add_route('new', '/add')
   config.scan()
Obviously, there is a conflict between URL patterns as '/list' and '/add' point to two routes each and this conflict must be resolved. This is done by using the route_prefix parameter of the config.include() method.
The first parameter to config.include() is the function which adds the routes, and the second is the route_prefix string which will be prepended to the URL pattern used in the included function.
Hence, the statement
config.include(students, route_prefix='/student')
will result in the '/list' URL pattern changed to '/student/list' and '/add' becomes 'student/add'. Similarly, we can add prefix to these URL patterns in the books() function.
config.include(books, route_prefix='/books')
Example
The code that starts the server is as below −
from wsgiref.simple_server import make_server
from pyramid.config import Configurator
from pyramid.response import Response
from student_routes import students
from book_routes import books

if __name__ == '__main__':
   with Configurator() as config:
      config.include(students, route_prefix='/student')
      config.include(books, route_prefix='/book')
      app = config.make_wsgi_app()
   server = make_server('0.0.0.0', 6543, app)
   server.serve_forever()
Output
Let us run the above code and test the routes by following CURL commands.
C:\Users\Acer>curl localhost:6543/student/list
Student list
C:\Users\Acer>curl localhost:6543/student/add
add student
C:\Users\Acer>curl localhost:6543/book/add
add book
C:\Users\Acer>curl localhost:6543/book/list
Book list
Python Pyramid - Templates
By default, the content-type of the response of a view function is in plain text. In order to render HTML, the text of the response body may include HTML tags, as in the following example −
Example
from wsgiref.simple_server import make_server
from pyramid.config import Configurator
from pyramid.response import Response

def hello_world(request):
   return Response('<h1 style="text-align:center;">Hello World!</h1>')

if __name__ == '__main__':
   with Configurator() as config:
      config.add_route('hello', '/')
      config.add_view(hello_world, route_name='hello')
      app = config.make_wsgi_app()
   server = make_server('0.0.0.0', 6543, app)
   server.serve_forever()
Output
After starting the server (by running the above code), visit to http://localhost:6543/, the browser renders following output −
However, this method of rendering HTML, especially if it is likely to contain certain variable data, is extremely cumbersome. For this purpose, web frameworks use templating libraries. A template library merges the variable data with the otherwise static HTML code to generate and render web pages dynamically.
Template Bindings
Pyramid provides templating support with the help of bindings to popular template libraries such as jinja2, Mako and Chameleon.
| Template Language | Pyramid Bindings | Default Extensions |
|---|---|---|
| Chameleon | pyramid_chameleon | .pt, .txt |
| Jinja2 | pyramid_jinja2 | .jinja2 |
| Mako | pyramid_mako | .mak, .mako |
First of all, we need to install the corresponding Python library for using the required template library. For example, to use jinja2 template, install pyramid_jinja2 using PIP installer.
pip3 install pyramid_jinja2
Then we need to include it in the application configuration.
config.include('pyramid_jinja2')
The pyramid.renderers module defines render_to_response() function. It is used with following parameters −
render_to_response(renderer_name, value, request)
The renderer_name is the template web page, usually saved in the templates subfolder of the application directory, the value parameter is a dictionary passed as a context to the template, and the request object obtained from WSGI environment.
Save the following HTML script as hello.jinja2 in the templates folder.
<html>
   <body>
      <h1>Hello, {{ name }}!</h1>
   </body>
</html>
Jinja2 Template Library
Here, 'name' is a jinja2 template variable. The jinja2 template language inserts variables and programming constructs in the HTML scripts using following syntax −
Expressions
{{ ... }} for Expressions to print to the template output.
{% ... %} for Statements.
{# ... #} for Comments not included in the template output.
Conditionals
{% if expr %}
{% else %}
{% endif %}
Loop
{% for var in iterable %}
{% endfor %}
In hello.jinja2 {{ name }}, the value of 'name' context variable is dynamically rendered in the view response.
Rendering Template
The hello_world() view function directly renders this template by calling render_to_response() function. It also sends a context value to the template.
from pyramid.renderers import render_to_response

def hello_world(request):
   return render_to_response('templates/hello.jinja2',{'name':'Tutorialspoint'},
request=request)
Example
As usual, this view is added to the hello route, pointing to / URL. The complete application code is as follows −
from wsgiref.simple_server import make_server
from pyramid.config import Configurator
from pyramid.response import Response
from pyramid.renderers import render_to_response

def hello_world(request):
   return render_to_response('templates/hello.jinja2', {'name':'Tutorialspoint'}, request=request)

if __name__ == '__main__':
   with Configurator() as config:
      config.add_route('hello', '/')
      config.include('pyramid_jinja2')
      config.add_view(hello_world, route_name='hello')
      app = config.make_wsgi_app()
   server = make_server('0.0.0.0', 6543, app)
   server.serve_forever()
Output
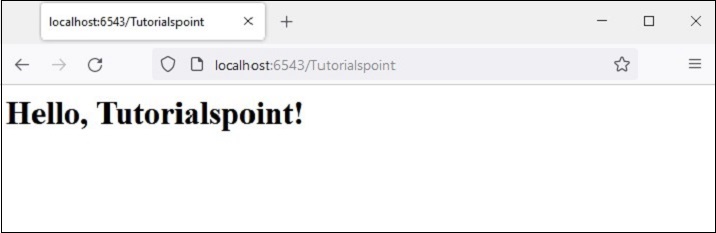
Run the server and visit http://localhost:6543/. The browser shows following result −
Every view must return a response object. The render_to_response() function is a shortcut function that actually returns a response object. This allows the hello_world view above to simply return the result of its call to render_to_response() directly.
On the other hand, pyramid.renderers.render() function renders a template to a string. We can manufacture a response object directly, and use that string as the body of the response.
Let us change the hello_world() view function as follows −
from pyramid.renderers import render

def hello_world(request):
   retval = render('templates/hello.jinja2',
   {'name':'Tutorialspoint'}, request=request)
   return Response(retval)
Remaining code being same, the browser also shows the same output as above.
Rendering via Configuration
As mentioned earlier, the content_type of HTTP response returned by Pyramid's view callable id text/plain. However, it can be altered to string, JSON or JSONP if the renderer parameter of the @view_config decorator is assigned with any of these values. Pyramid thus have following built-in renderers −
JSON
String
JSONP
Example
In the following example, the hello_world() view function is configured to render JSON response.
from pyramid.view import view_config

@view_config(route_name='hello',renderer='json')
def hello_world(request):
   return {'content':'Hello World!'}
Output
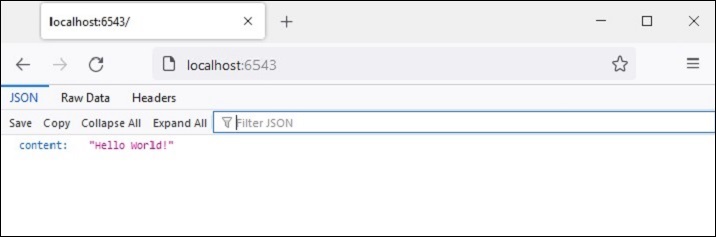
The setting of renderer type to JSON also sets the content_type header of the HTTP response to application/json. The browser displays the JSON response as in the following figure −
The renderer parameter of the @view_config() decorator can be set to a template web page (which must be present in the templates folder). The prerequisite conditions are that the appropriate Python binding of the template library must be installed, and the application configuration must include the binding.
We have already installed python_jinja2 package, so that we can use jinja2 template to be rendered by the hello_world() view function, decorated by @view_config() with renderer parameter.
The hello.jinja2 template HTML code is as follows −
<html>
   <body>
      <h1>Hello, {{ name }}!</h1>
   </body>
</html>
The decorated hello_world() function is written as −
from pyramid.view import view_config

@view_config(route_name='hello', renderer='templates/hello.jinja2')
def hello_world(request):
   return {'name':'Pyramid!'}
Example
In this case, the view function returns a dictionary object. It is made available to the template as the context data, that can be inserted in the HTML text with the help of template language syntax elements.
The complete code to render a jinja2 template is as follows −
from wsgiref.simple_server import make_server
from pyramid.config import Configurator
from pyramid.response import Response
from pyramid.view import view_config

@view_config(route_name='hello', renderer='templates/hello.jinja2')
def hello_world(request):
   return {'name':'Pyramid!'}

if __name__ == '__main__':
   with Configurator() as config:
      config.include('pyramid_jinja2')
      config.add_route('hello', '/')
      config.scan()
      app = config.make_wsgi_app()
   server = make_server('0.0.0.0', 6543, app)
   server.serve_forever()
Output
The template webpage with variable data supplied by the view function looks as below −
Add/Change Renderer
Templates are nothing but web pages interspersed with template language syntax. Even though Pyramid uses the default extension of a jinja2 template as ".jinja2", the established practice is to use the ".html" extension of web pages.
We can change the application configuration to let the .html extension be used in addition to ".jinja2". This is done by the add_jinja2_renderer.
config.add_jinja2_renderer(".html")
The hello.jinja2 template is now renamed as hello.html. To be able to use this template, let us change the view function definition to the following code −
from pyramid.view import view_config
@view_config(route_name='hello', renderer='templates/hello.html')
def hello_world(request):
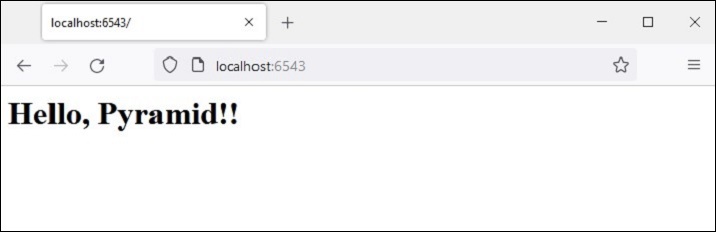
return {'name':'Pyramid!'}
Simultaneously, we modify the Configurator object's properties by adding the ".html" renderer.
if __name__ == '__main__':
   with Configurator() as config:
      config.include('pyramid_jinja2')
      config.add_jinja2_renderer(".html")
      config.add_route(hello, '/')
      config.scan()
      app = config.make_wsgi_app()
   server = make_server('0.0.0.0', 6543, app)
   server.serve_forever()
Template Context from matchdict
As explained earlier, if the URL pattern in the route configuration consists of one or more placeholder parameters, their values from the request URL are passed along with the request as a matchdict object, which in turn can be passed as context data to the template to be rendered.
For our next example, the hello.html - the jinja2 template remains the same.
<html>
   <body>
      <h1>Hello, {{ name }}!</h1>
   </body>
</html>
We know that the value for the context variable 'name' is passed by the view function. However, instead of passing a hardcoded value (as in the previous example), its value is fetched from the matchict object. This object is populated by the path parameters in the URL string.
from pyramid.view import view_config

@view_config(route_name='index', renderer='templates/hello.html')
def index(request):
   return {'name':request.matchdict['name']}
Example
The modified application code is given below −
from wsgiref.simple_server import make_server
from pyramid.config import Configurator
from pyramid.response import Response
from pyramid.view import view_config

@view_config(route_name='index', renderer='templates/hello.html')
def index(request):
   return {'name':request.matchdict['name']}
if __name__ == '__main__':
   with Configurator() as config:
      config.include('pyramid_jinja2')
      config.add_jinja2_renderer(".html")
      config.add_route('index', '/{name}')
      config.scan()
      app = config.make_wsgi_app()
   server = make_server('0.0.0.0', 6543, app)
   server.serve_forever()
Output
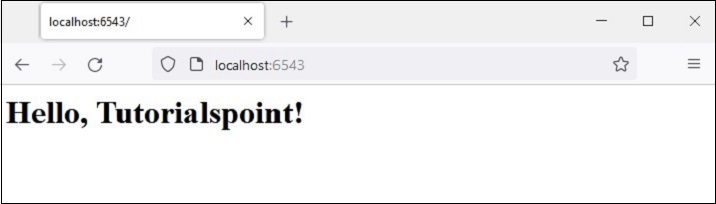
Start the server, open the browser and enter the URL http://localhost:6543/Tutorialspoint. The tailing string becomes the value of 'name' key in the matchdict. It is utilized by the jinja2 template and following output is rendered.
Conditionals and Loops in Template
The jinja2 template language allows conditional statements and looping constructs to be included in the HTML script. The jinja2 syntax for these programming elements is as follows −
Conditionals
{% if expr %}
HTML
{% else %}
HTML
{% endif %}
Loop
{% for var in iterable %}
HTML
{% endfor %}
It can be seen that the jinja2 syntax is very much similar to Python's if and for statements. Except that, jinja2 doesn't use the indentations to mark the blocks. Instead, for each if there has to be an endif statement. Similarly, for each for statement, there has to be a endfor statement.
Example
Following example demonstrates the use of template conditional and loop statements. First, the Pyramid code uses a students as a list of dictionary objects, each dictionary having id, name and percentage of a student. This list object is passed as a context to the marklist.html template
from wsgiref.simple_server import make_server
from pyramid.config import Configurator
from pyramid.response import Response
from pyramid.view import view_config

students = [
   {"id": 1, "name": "Ravi", "percent": 75},
   {"id": 2, "name": "Mona", "percent": 80},
   {"id": 3, "name": "Mathews", "percent": 45},
]

@view_config(route_name='index', renderer='templates/marklist.html')

def index(request):
   return {'students':students}
if __name__ == '__main__':
   with Configurator() as config:
      config.include('pyramid_jinja2')
      config.add_jinja2_renderer(".html")
      config.add_route('index', '/')
      config.scan()
   app = config.make_wsgi_app()
   server = make_server('0.0.0.0', 6543, app)
   server.serve_forever()
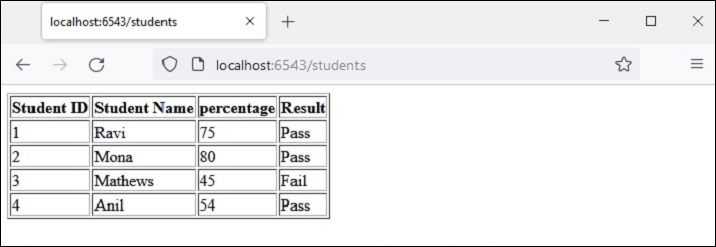
Save this program as marklist.py. Now, the following HTML script has to be save as marklist.html. It traverses the students list object received from the view function, and renders the student data in the form of a HTML table. The fourth column shows pass/fail result, using the jinja2 if statement syntax.
<html>
<body>
   <table border=1>
      <thead>
         <tr>
            <th>Student ID</th> <th>Student Name</th>
            <th>percentage</th>
            <th>Result</th>
         </tr>
      </thead>
      <tbody>
         {% for Student in students %}
            <tr>
               <td>{{ Student.id }}</td>
               <td>{{ Student.name }</td>
               <td>{{ Student.percent }}</td>
               <td>
                  {% if Student.percent>=50 %}
                  Pass
                  {% else %}
                  Fail
                  {% endif %}
               </td>
            </tr>
         {% endfor %}
      </tbody>
   </table>
</body>
</html>
Output
Run the marklist.py code. The http://localhost:6543/ link renders the following tabular result −

Python Pyramid - HTML Form Template
In this chapter, we shall see how Pyramid reads the data from HTML form. Let us save the following HTML script as myform.html. We shall use it for obtaining Template object and render it.
<html>
<body>
   <form method="POST" action="http://localhost:6543/students">
   <p>Student Id: <input type="text" name="id"/> </p>
   <p>student Name: <input type="text" name="name"/> </p>
   <p>Percentage: <input type="text" name="percent"/> </p>
   <p><input type="submit" value="Submit"> </p>
</body>
</html>
An "index" route added in Pyramid object's configuration is mapped to the following index() function, which renders the above HTML form −
@view_config(route_name='index', renderer='templates/myform.html')
def index(request):
   return {}
As we can see, the data entered by user is passed to /students URL by POST request. So, we shall add a 'students' route to match the /students pattern, and associate it with add() view function as follows −
@view_config(route_name='students', renderer='templates/marklist.html')
def add(request):
   student={'id':request.params['id'],
      'name':request.params['name'],
      'percent':int(request.params['percent'])} 9. Pyramid  HTML Form Template
   students.append(student)
   return {'students':students}
The data sent by POST request is available in the HTTP request object in the form of request.params object. It is a dictionary of HTML form attributes and their values as entered by the user. This data is parsed and appended to students list of dictionary objects. The updated students object is passed to the marklist.html template as a context data.
The marklist.html web template as the same as used in the previous example. It displays a table of student data along with the computed result column.
<html>
<body>
   <table border=1>
      <thead>
         <tr>
            <th>Student ID</th> <th>Student Name</th>
            <th>percentage</th>
            <th>Result</th>
         </tr>
      </thead>
      <tbody>
         {% for Student in students %}
            <tr>
               <td>{{ Student.id }}</td>
               <td>{{ Student.name }}</td>
               <td>{{ Student.percent }}</td>
               <td>
                  {% if Student.percent>=50 %}
                  Pass
                  {% else %}
                  Fail
                  {% endif %}
               </td>
            </tr>
         {% endfor %}
      </tbody>
   </table>
</body>
</html>
Example
The complete code containing views for rendering the HTML form, parsing the form data and generating a page showing the students marklist table is given below −
from wsgiref.simple_server import make_server
from pyramid.config import Configurator
from pyramid.response import Response
from pyramid.view import view_config

students = [
   {"id": 1, "name": "Ravi", "percent": 75},
   {"id": 2, "name": "Mona", "percent": 80},
   {"id": 3, "name": "Mathews", "percent": 45},
]

@view_config(route_name='index', renderer='templates/myform.html')
def index(request):
   return {}
@view_config(route_name='students', renderer='templates/marklist.html')
def add(request):
   student={'id':request.params['id'], 'name':request.params['name'],
'percent':int(request.params['percent'])}
   students.append(student)
   return {'students':students}

if __name__ == '__main__':
   with Configurator() as config:
      config.include('pyramid_jinja2')
      config.add_jinja2_renderer(".html")
      config.add_route('index', '/')
      config.add_route('students','/students')
      config.scan()
      app = config.make_wsgi_app()
   server = make_server('0.0.0.0', 6543, app)
   server.serve_forever()
Output
To start the server, run the above Python code from command line. In your browser, visit http://localhost:6543/ to get the form as shown below −
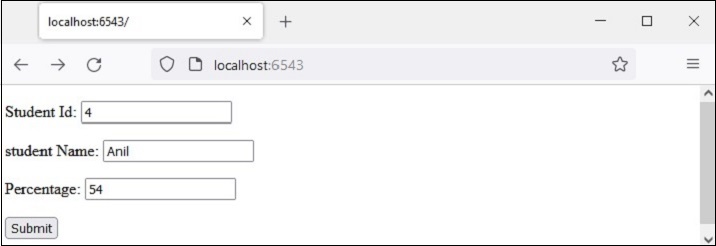
Enter a sample data as shown and press submit button. The browser is directed to /students URL, which in turn invokes the add() view. The result is a table of marklist showing the newly entered data of a new student.
Python Pyramid - Static Assets
Often it is required to include in the template response some resources that remain unchanged even if there is a certain dynamic data. Such resources are called static assets. Media files (.png, .jpg etc), JavaScript files to be used for executing some front end code, or stylesheets for formatting HTML (.css files) are the examples of static files.
Pyramid serves these static assets from a designated directory in the server's filesystem to the client's browser. The add_static_view() method of the Configurator object defines the name of the route and path for the folder containing the static files such as images, JavaScript, and CSS files.
As a convention, the 'static' directory is used to store the static assets and the add_static_view() is used as follows −
config.add_static_view(name='static', path='static')
Once the static route is defined, the path of static assets while using in HTML script can be obtained by request.static_url() method.
Static Image
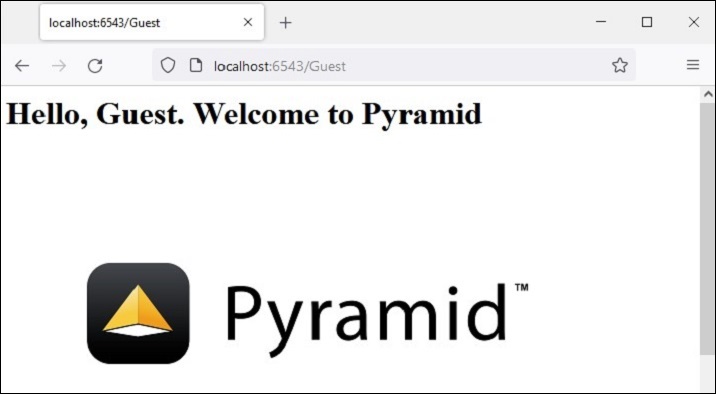
In the following example, Pyramid logo is to be rendered in the logo.html template. Hence, "pyramid.png" file is first placed in static folder. It is now available for using as src attribute of <img> tag in HTML code.
<html>
<body>
   <h1>Hello, {{ name }}. Welcome to Pyramid</h1>
   <img src="{{request.static_url('app:static/pyramid.png')}}">
</body>
</html>
Example
The application code updates the configurator with add_static_view(), and defines index() view renders the above template.
from wsgiref.simple_server import make_server
from pyramid.config import Configurator
from pyramid.response import Response
from pyramid.view import view_config

@view_config(route_name='index', renderer='templates/logo.html')

def index(request):
   return {'name':request.matchdict['name']}

if __name__ == '__main__':
   with Configurator() as config:
      config.include('pyramid_jinja2')
      config.add_jinja2_renderer(".html")
      config.add_route('index', '/{name}')
      config.add_static_view(name='static', path='app:static')
      config.scan()
      app = config.make_wsgi_app()
   server = make_server('0.0.0.0', 6543, app)
   server.serve_forever()
Output
Run the above code to start the server. Use http://localhost:6543/Guest as the URL in your browser. Here 'Guest' is the path parameter picked up by the view function in matchdict object and passed to the logo.html template as the context. The browser displays the Pyramid logo now.
Javascript as Static Asset
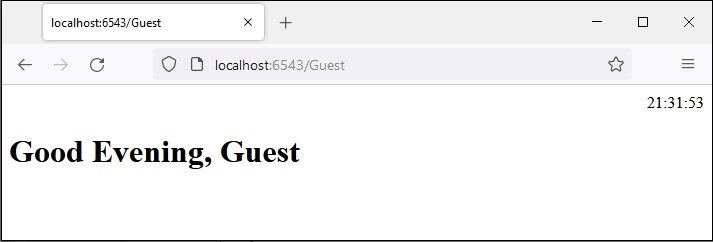
Here is another example of static file. A JavaScript code hello.js contains a definition of myfunction() to be executed on the onload event in following HTML script (templates\hello.html)
<html>
<head>
   <script src="{{request.static_url('app:static/hello.js')}}"></script>
</head>
<body onload="myFunction()">
   <div id="time" style="text-align:right; width="100%"></div>
   <h1><div id="ttl">{{ name }}</div></h1>
</body>
</html>
Example
The hello.js code saved in static folder is as follows −
function myFunction() {
   var today = new Date();
   var h = today.getHours();
   var m = today.getMinutes();
   var s = today.getSeconds();
   var msg="";
   if (h<12)
   {
      msg="Good Morning, ";
   }
   if (h>=12 && h<18)
   {
      msg="Good Afternoon, ";
   }
   if (h>=18)
   {
      msg="Good Evening, ";
   }
   var x=document.getElementById('ttl').innerHTML;
   document.getElementById('ttl').innerHTML = msg+x;
   document.getElementById('time').innerHTML = h + ":" + m + ":" + s;
}
Output
The function detects the value of current time and assigns appropriate value to msg variable (good morning, good afternoon or good evening) depending on the time of the day.
Save hello.js in static folder, hello.html in templates folder and restart the server. The browser should show the current time and corresponding message below it.
Python Pyramid - Request Object
The functionality of a view callable involves obtaining the request data from the WSGI environment and returning a certain HTTP response back to the client after processing. The view function receives the Request object as the argument.
Normally this object is not instantiated by the user. Instead, it encapsulates the WSGI environ dictionary. This request object represents "pyramid.request.Request class." It possesses a number of attributes and methods, using which the request data is processed by the view function.
Here are some of the attributes −
request.method − The HTTP request method used by the client to send the data, e.g., GET, POST
request.GET − This attribute is a multidict with all the variables in the query string.
request.POST − This attribute is available only if the request was a POST and it is a form submission. It is a multidict with all the variables in the request body.
request.params − A combined multidict of everything in request.GET and request.POST.
request.body − This attribute contains the entire request body as a string. This is useful when the request is a POST that is not a form submission, or a request like a PUT.
request.cookies − Contains all the cookies.
request.headers − A case-insensitive dictionary of all the HTTP headers.
In addition to the above HTTP specific environment attributes, Pyramid also adds certain special attributes.
request.url − Returns the full request URL with query string, e.g., http://localhost:6543/app?name=Ravi
request.host − The host information in the URL, e.g., localhost
request.host_url − This attribute returns the URL with the host, e.g., http://localhost:6543/
request.application_url − The URL of the application (without PATH_INFO), e.g., http://localhost:6543/app
request.path_url − Contains the URL of the application including the PATH_INFO, e.g., http://localhost:66543/app
request.path − Returns The URL including PATH_INFO without the host, e.g., "/app"
request.path_qs − the query string in the URL including PATH_INFO, e.g., "/app?name=Ravi"
request.query_string − Only the query string in the URL, e.g., "name=Ravi"
Python Pyramid - Response Object
The Response class is defined in pyramid.response module. An object of this class is returned by the view callable.
from pyramid.response import Response
def hell(request):
   return Response("Hello World")
The response object contains a status code (default is 200 OK), a list of response headers and the response body. Most HTTP response headers are available as properties. Following attributes are available for the Response object −
response.content_type − The content type is a string such as response.content_type = 'text/html'.
response.charset − It also informs encoding in response.text.
response.set_cookie − This attribute is used to set a cookie. The arguments needed to be given are name, value, and max_age.
response.delete_cookie − Delete a cookie from the client. Effectively it sets max_age to 0 and the cookie value to ''.
The pyramid.httpexceptions module defines classes to handle error responses such as 404 Not Found. These classes are in fact subclasses of the Response class. One such class is "pyramid.httpexceptions.HTTPNotFound". Its typical use is as follows −
from pyramid.httpexceptions import HTTPNotFound
from pyramid.config import view_config
@view_config(route='Hello')
def hello(request):
   response = HTTPNotFound("There is no such route defined")
   return response
We can use location property of Response class to redirect the client to another route. For example −
view_config(route_name='add', request_method='POST')
def add(request):
   #add a new object
   return HTTPFound(location='http://localhost:6543/')
Python Pyramid - Sessions
A session is a time interval between client logs into a server and it logs out of it. Session object is also a dictionary object containing key-value pairs of session variables and associated values. In Pyramid, it is available as an attribute of request object.
In order to handle session mechanism, the Pyramid Application object must be configured with a session factory that returns the session object. Pyramid core provides a basic session factory, which uses cookies to store session information.
Default Session Factory
The pyramid.session module defines SignedCookieSessionFactory class. Its object needs a secret key for digitally signing the session cookie information.
from pyramid.session import SignedCookieSessionFactory
my_session_factory = SignedCookieSessionFactory('abcQWE123!@#')
The set_session_factory() method of the Configurator class uses this factory object to set up the session.
config.set_session_factory(my_session_factory)
Once this is done, the session object is now available for implementation as request.session attribute. To add a session variable, use −
request.session['user'] = 'Admin'
To retrieve a session variable, use −
user=request.session['user']
To remove a session variable, use the pop() method.
request.session.pop('user')
Session Example
Described below is the usage of session variable in a Pyramid application. First, the login route (associated with login() view function) brings up a login form on the browser.
@view_config(route_name='login')
def login(request):
   html="""
   <html>
   <body>
      <form action='/add'> Enter User name :
         <input type='text' name='user'>
         <input type='submit' value='submit'>
      </form>
   </body>
   </html>
   """
return Response(html)
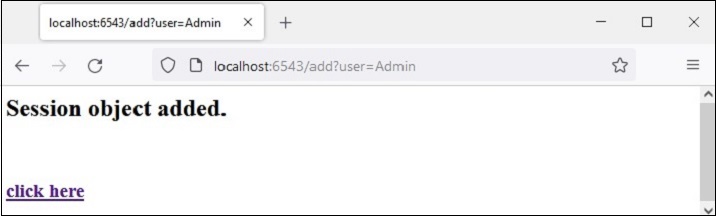
The add() function reads the 'user' form attribute and uses its value to add a session variable.
@view_config(route_name='addsession')
def add(request):
   request.session['user']=request.params['user']
   return Response("<h2>Session object added.</h2><br><h3><a href='/read'>click here</a></h3>")
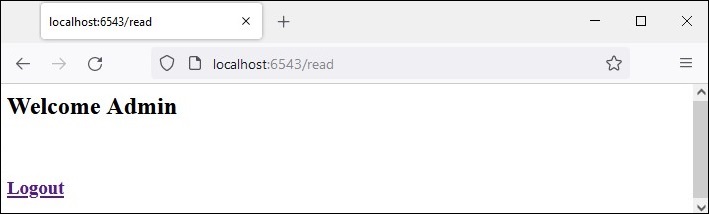
The read() view reads back the session variable data and displays a welcome message.
@view_config(route_name='readsession')
def read(request):
   user=request.session['user']
   response="<h2>Welcome {} </h2>".format(user)+"<br><h3><a href='/logout'>Logout</a></h3>"
   return Response(response)
These views along with the session factory are added in the application configuration.
config.set_session_factory(my_session_factory)
config.add_route('login','/')
config.add_route('logout','/logout')
config.add_route('addsession', '/add')
config.add_route('readsession', '/read')
config.scan('session')
Example
The complete code is given below −
from wsgiref.simple_server import make_server
from pyramid.config import Configurator
from pyramid.response import Response
from pyramid.view import view_config
from pyramid.session import SignedCookieSessionFactory
my_session_factory = SignedCookieSessionFactory('abcQWE123!@#')

@view_config(route_name='login')
def login(request):
   html="""
   <html>
   <body>
   <form action='/add'>
      Enter User name :
      <input type='text' name='user'>
      <input type='submit' value='submit'>
   </form>
   </body>
   </html>
"""
   return Response(html)
@view_config(route_name='addsession')
def add(request):
   request.session['user']=request.params['user']
   return Response("<h2>Session object added.</h2><br><h3><a href='/read'>click here</a></h3>")

@view_config(route_name='readsession')
def read(request):
   user=request.session['user']
   response="<h2>Welcome {} </h2>".format(user)+"<br><h3><a href='/logout'>Logout</a>>/<h3>"
   return Response(response)

@view_config(route_name='logout')
def logout(request):
   request.session.pop('user')
   response="<h2>You have been logged out </h2><br><h3><a href='/'>Login</a></h3>"
   return Response(response)

if __name__ == '__main__':
   with Configurator() as config:
      config.set_session_factory(my_session_factory)
      config.add_route('login','/')
      config.add_route('logout','/logout')
      config.add_route('addsession', '/add')
      config.add_route('readsession', '/read')
      config.scan('session')
      app = config.make_wsgi_app()
   server = make_server('0.0.0.0', 6543, app)
   server.serve_forever()
Save this script as main.py in a subfolder (called 'session') within the Pyramid virtual environment folder. Note that this subfolder must have an empty __init__.py file for it to be treated as a package.
Output
Run main.py and enter http://localhost:6543/ to open up the login form in the browser.
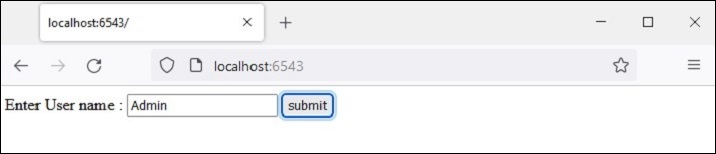
Enter the user name and press the "submit" button. The given name is saved as a 'user' session variable.
The 'click here' link reads back the session variable and displays welcome message.
The logout link pops the session variable and takes the browser back to the login page.
Python Pyramid - Events
A Pyramid application emits various events during the course of its lifetime. Although these events need not be used up normally, slightly advanced operations can be performed by properly handling these events.
An event broadcast by the Pyramid framework becomes usable only when you register it with a subscriber function. The emitted event must be used as the argument of the subscriber function.
def mysubscriber(event):
   print("new request")
However, a subscriber function becomes operational only when it is added to the application's configuration with the help of add_subscriber() method as shown below −
In the following snippet, the application is configured so that the subscriber function is invoked when it emits NewRequest object.
from pyramid.events import NewRequest
config.add_subscriber(mysubscriber, NewRequest)
There is also a @subscriber() decorator for configuring the event.
from pyramid.events import NewRequest
from pyramid.events import subscriber

@subscriber(NewRequest)
def mysubscriber(event):
   print ("new request")
As with the decortive view configuration, here also the config.scan() must be performed for the decorator to be effective.
As mentioned earlier, the Pyramid application emits a variety of event types. These event classes are available in pyramid.event module. They are listed below −
ApplicationCreated − This event is transmitted just when the config.make_wsgi_app() method of the Configurator class is called to return the WSGI application object.
NewRequest − An object of this event class is emitted every time the Pyramid application starts processing an incoming request. This object has a request attribute which is the request object as supplied by WSGI environ dictionary.
ContextFound − The application's router traverses all the routes and finds an appropriate match with the URL pattern. This is when the object of ContextFound class is instantiated.
BeforeTraversal − An instance of this class is emitted as an event after the Pyramid router has attempted to find a route object but before any traversal or view code is executed.
NewResponse − As the name suggests, this event is raised whenever any Pyramid view callable returns a response. This object has request and response attributes.
BeforeRender − An object of this type is transmitted as an event just before a renderer is invoked. The subscriber function to this event has access to the application's global data (which is in the form of a dict object) and can modify value of one or more keys.
Python Pyramid - Message Flashing
The mechanism of message flashing is used by web application frameworks to provide certain feedback to the user about his interaction with the application. The flashed messages are held in a queue by the session object.
Flash messaging mechanism makes it possible to create a message in one view and render it in a view function called next. As in the previous section, we must enable the session factory first to be able to handle the session. To add a message in the message queue, use flash() method of the session object.
request.session.flash('Hello World')
The session has pop_flash() and peek_flash() methods. The pop_flash() method removes the last added message from the queue. The peek_flash() method returns true if the queue has a message, false if it is empty.
Both these methods are used in a template web page to fetch one or messages from the queue and render it as a part of the response.
Message Flashing Example
The mechanism of message flashing is demonstrated by the example below. Here, the login() view code checks if it has been invoked by POST or GET method. If the method is GET, it renders the login form with username and password fields. The submitted form is submitted with POST method to the same URL.
When the POST method is detected, the view further checks the validity of the inputs and flashes appropriate messages to the session queue. These error flash messages are extracted by the login template itself, whereas after the success flash message is flashed, the client is redirected to the index() view to render the index template.
The two views in the application code are −
@view_config(route_name='login', renderer='templates/login.html')
def login(request):
if request.method == 'POST':
if request.POST['password']=='' or request.POST['username']=='':
request.session.flash('User name and password is required')
return HTTPFound(location=request.route_url('login'))
if len(request.POST['password'])in range(1,9):
request.session.flash('Weak password!')
if request.POST['username']not in ['admin', 'manager', 'supervisor']:
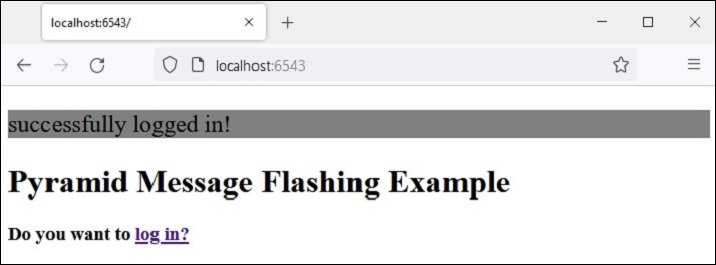
request.session.flash('successfully logged in!')
return HTTPFound(location=request.route_url('index'))
else:
request.session.flash('Reserved user ID Forbidden!')
return HTTPFound(location=request.route_url('login'))
return {}
@view_config(route_name='index', renderer='templates/index.html')
def index(request):
return {}
The login.html template has the following code −
<!doctype html>
<html>
<head>
   <style>
      p {background-color:grey; font-size: 150%}
   </style>
</head>
<body>
   <h1>Pyramid Message Flashing Example</h1>
   {% if request.session.peek_flash()%}
      <div id="flash">
         {% for message in request.session.pop_flash() %}
         <p>{{ message }}</p>
         {% endfor %}
      </div>
   {% endif %}
   <h3>Login Form</h3>
   <form action="" method="POST">
      <dl>
         <dt>Username:
            <dd><input type="text" name="username">
         <dt>Password:
         <dd><input type="password" name="password">
      </dl>
      <input type="submit" value="Login">
   </form>
</body>
</html>
Before the login form is displayed, the jinja2 template code traverses through the message queue, pops each message in the <div id='flash'> section.
Following is the script for index.html that flashes the success messages inserted by the login() view −
<!doctype html>
<html>
<head>
   <style>
      p {background-color:grey; font-size: 150%}
   </style>
</head>
<body>
   {% if request.session.peek_flash()%}
   <div id="flash">
   {% for message in request.session.pop_flash() %}
   <p>{{ message }}</p>
   {% endfor %}
   {% endif %}
   <h1>Pyramid Message Flashing Example</h1>
   <h3>Do you want to <a href = "/login">
   <b>log in?</b></a></h3>
</body>
</html>
Example
The application code for this example is main.py
from wsgiref.simple_server import make_server
from pyramid.config import Configurator
from pyramid.response import Response
from pyramid.view import view_config
from pyramid.session import SignedCookieSessionFactory
from pyramid.httpexceptions import HTTPFound

my_session_factory = SignedCookieSessionFactory(' abcQWE123!@#')
@view_config(route_name='login', renderer='templates/login.html')
def login(request):
   if request.method == 'POST':
      if request.POST['password']=='' or  request.POST['username']=='':
      request.session.flash('User name and password is required')
      return HTTPFound(location=request.route_url('login'))
   if len(request.POST['password'])in range(1,9):
      request.session.flash('Weak password!')
   if request.POST['username']not in ['admin', 'manager', 'supervisor']:
      request.session.flash('successfully logged in!')
      return HTTPFound(location=request.route_url('index'))
   else:
      request.session.flash('Reserved user ID Forbidden!')
      return HTTPFound(location=request.route_url('login'))
   return {}

@view_config(route_name='index', renderer='templates/index.html')
def index(request):
   return {}

if __name__ == '__main__':
   with Configurator() as config:
      config.set_session_factory(my_session_factory)
      config.include('pyramid_jinja2')
      config.add_jinja2_renderer(".html")
      config.add_route('login','/login')
      config.add_route('index','/')
      config.scan('flash')
      app = config.make_wsgi_app()
   server = make_server('0.0.0.0', 6543, app)
   server.serve_forever()
Save this program code as app.py in a flash subfolder in the virtual environment for Pyramid, putting a blank __init__.py in it. Store the two templates ("index.html" and "login.html") in flush\templates folder.
Output
Run the main.py and open the login form in the browser by clicking the http://localhost:6543/login link.
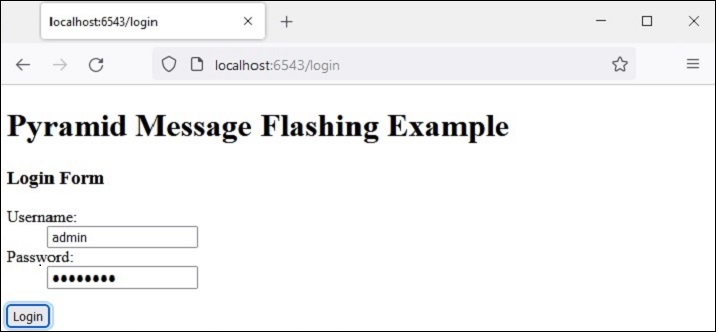
Try entering one of the reserved usernames 'admin', 'manager', or 'supervisor'. The error message will be flashed as shown below −

This time, enter acceptable credentials and see the result −
Python Pyramid - Using SQLAlchemy
In this chapter, we shall learn how to use a relational database as a back-end with the Pyramid web application. Python can interact with almost every relational database using corresponding DB-API compatible connector modules or drivers. However, we shall use SQLAlchemy library as an interface between Python code and a database (we are going to use SQLite database as Python has in-built support for it). SQLAlchemy is a popular SQL toolkit and Object Relational Mapper.
Object Relational Mapping is a programming technique for converting data between incompatible type systems in object-oriented programming languages. Usually, the type system used in an Object Oriented language like Python contains non-scalar types. However, data types in most of the database products such as Oracle, MySQL, etc., are of primitive types such as integers and strings.
In an ORM system, each class maps to a table in the underlying database. Instead of writing tedious database interfacing code yourself, an ORM takes care of these issues for you while you can focus on programming the logics of the system.
In order to use SQLALchemy, we need to first install the library using PIP installer.
pip install sqlalchemy
SQLAlchemy is designed to operate with a DBAPI implementation built for a particular database. It uses dialect system to communicate with various types of DBAPI implementations and databases. All dialects require that an appropriate DBAPI driver is installed.
The following are the dialects included −
Firebird
Microsoft SQL Server
MySQL
Oracle
PostgreSQL
SQLite
Sybase
Database Engine
Since we are going to use SQLite database, we need to create a database engine for our database called test.db. Import create_engine() function from the sqlalchemy module.
from sqlalchemy import create_engine
from sqlalchemy.dialects.sqlite import *
SQLALCHEMY_DATABASE_URL = "sqlite:///./test.db"
engine = create_engine(SQLALCHEMY_DATABASE_URL, connect_args = {"check_same_thread": False})
In order to interact with the database, we need to obtain its handle. A session object is the handle to database. Session class is defined using sessionmaker() - a configurable session factory method which is bound to the engine object.
from sqlalchemy.orm import sessionmaker, Session
session = sessionmaker(autocommit=False, autoflush=False, bind=engine)
Next, we need a declarative base class that stores a catalog of classes and mapped tables in the Declarative system.
from sqlalchemy.ext.declarative import declarative_base
Base = declarative_base()
Model Class
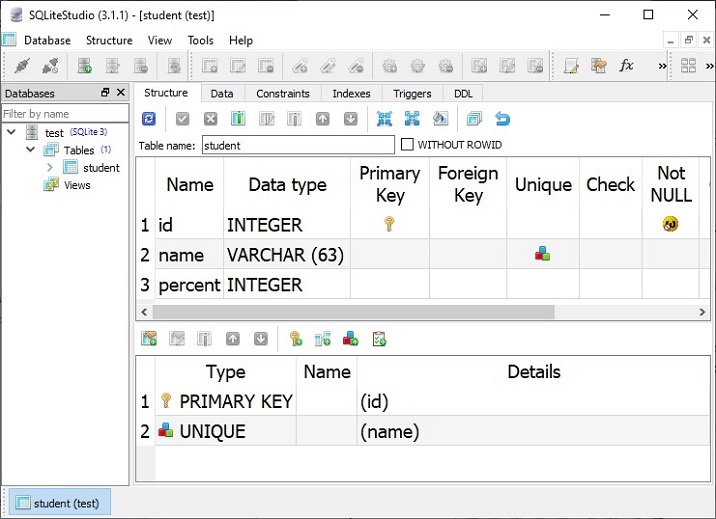
Students, a subclass of Base, is mapped to a students table in the database. Attributes in the Students class correspond to the data types of the columns in the target table. Note that the id attribute corresponds to the primary key in the book table.
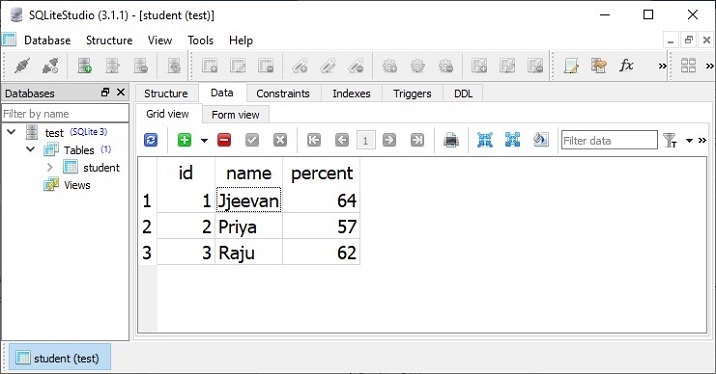
class Students(Base):
   __tablename__ = 'student'
   id = Column(Integer, primary_key=True, nullable=False)
   name = Column(String(63), unique=True)
   marks = Column(Integer)
Base.metadata.create_all(bind=engine)
The create_all() method creates the corresponding tables in the database. It can be confirmed by using a SQLite Visual tool such as SQLiteStudio.
We shall now define view functions for performing CRUD operations (i.e. add, display, modify and delete rows) on the student table in the above database.
Add a New Student Record
First, we shall create a HTML form template for the user to enter student data and define a view that renders the template. Here is the myform.html template
Example
<html>
<body>
   <form method="POST" action="http://localhost:6543/add">
   <p>Student Id: <input type="text" name="id"/> </p>
   <p>student Name: <input type="text" name="name"/> </p>
   <p>Percentage: <input type="text" name="percent"/> </p>
   <p><input type="submit" value="Submit"> </p>
</body>
</html>
In the Pyramid application code, define the index() view function to render the above form.
from wsgiref.simple_server import make_server
from pyramid.config import Configurator
from pyramid.response import Response
from pyramid.view import view_config

@view_config(route_name='index', renderer='templates/myform.html')
def index(request):
   return {}
In the application configuration, register the route with the "/new" pattern for this view as −
if __name__ == '__main__':
   with Configurator() as config:
      config.include('pyramid_jinja2')
      config.add_jinja2_renderer(".html")
      config.add_route('index', '/new')
      config.scan()
      app = config.make_wsgi_app()
   server = make_server('0.0.0.0', 6543, app)
   server.serve_forever()
As the HTML form in the above template is submitted to /add URL with POST action, we need to map this URL to add route and register add() view that parses the form data into an object of Students class. This object is added to the database session and the operation is finalized by calling its commit() method.
@view_config(route_name='add', request_method='POST')
def add(request):
   id=request.POST['id']
   name=request.POST['name']
   percent=int(request.POST['percent'])
   student=Students(id=id, name=name, percent=percent)
   session.add(student)
   session.commit()
   return HTTPFound(location='http://localhost:6543/')
Make sure that the add route is added in the configuration, mapped to /add URL pattern.
config.add_route('add','/add')
Output
If we start the server and open http://localhost:6543/new in the browser, the Entry form will be displayed as follows −
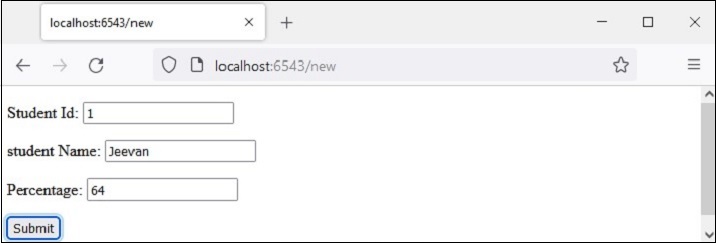
Fill the form and press the "submit" button. The add() view will be called and a new record will be added in the students table. Repeat the process a couple of times to add a few records. Here is a sample data −
Show List of All Records
All the objects of the Students model (corresponding to row in students table) are obtained by querying the model.
rows = session.query(Students).all()
Each row is converted into a dict object, all of them are appended to a list of dict objects, and returned as a context to the list.html template to be displayed in the form of HTML template. The process is performed by the showall() view function, associated with list route.
@view_config(route_name='list', renderer='templates/marklist.html')
def showall(request):
   rows = session.query(Students).all()
   students=[]
   for row in rows:
      students.append({"id":row.id, "name":row.name, "percent":row.percent})
   return{'students':students}
Example
The marklist.html template renders the Students list as a HTML table. Its HTML/jinja2 script is as follows −
<html>
<body>
<table border=1>
   <thead>
      <tr>
         <th>Student ID</th>
         <th>Student Name</th>
         <th>percentage</th>
         <th>Edit</th>
         <th>Delete</th>
      </tr>
   </thead>
   <tbody>
      {% for Student in students %}
         <tr>
         <td>{{ Student.id }}</td> <td>{{ Student.name }}</td>
         <td>{{ Student.percent }}</td>
         <td><a href="/show/{{ Student.id }}">edit</a></td>
         <td><a href="/delete/{{ Student.id }}">delete</a></td>
         </tr>
      {% endfor %}
   </tbody>
</table>
<h3><a href="http://localhost:6543/new">Add new</a></h3>
   </body>
</html>
Add the list route in the configuration and register it with '/' URL.
config.add_route('list', '/')
Output
Open http://localhost:6543/ in the browser after starting the server. The list of existing records in the students table will be displayed.

Notice the hyperlinks in the last two columns. For example, the "edit" link before "id=1" points to http://localhost:6543/show/1. These links are intended to execute update and delete operations.
Update Existing Record
In the /show/1 URL, there is a trailing path parameter. It is mapped to 'show' route in the configuration.
config.add_route('show', '/show/{id}')
This route invokes the show() function. It fetches the record corresponding to the given id parameter, populates the HTML form with its contents and lets the user to update values of name and/or percent fields.
@view_config(route_name='show', renderer='templates/showform.html')
def show(request):
   id=request.matchdict['id']
   row = session.query(Students).filter(Students.id == id).first()
   student={'id':row.id, 'name':row.name, 'percent':row.percent}
   return {'student':student}
Example
The HTML/jinja2 code of showform.html template is as follows −
<html>
<body>
   <form method="POST" action="http://localhost:6543/update">
   <p>Student Id: <input type="text" name="id" value="{{ student.id }} " readonly/> </p>
   <p>student Name: <input type="text" name="name" value="{{ student.name }}"/> </p>
   <p>Percentage: <input type="text" name="percent" value="{{ student.percent }}"/> </p>
   <p><input type="submit" value="Submit"> </p>
</body>
</html>
Output
Let us update the record with id=3. Click on corresponding Edit link to navigate to http://localhost:6543/show/3
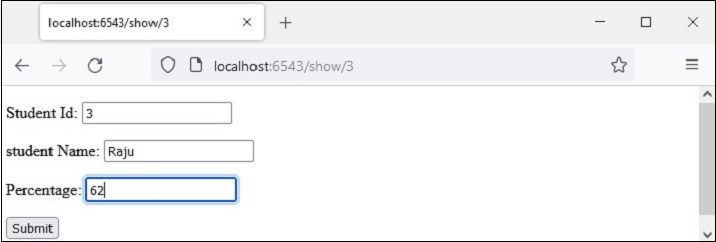
Change the value in marks text field and press submit. The form is redirected to /update URL and it invokes update() view. It fetches the submitted data and updates the corresponding object thereby the underlying row in students table is also updated.
@view_config(route_name='update', request_method='POST')
def update(request):
   id=int(request.POST['id'])
   student = session.query(Students).filter(Students.id == id).first()
   student.percent=int(request.POST['percent'])
   session.commit()
   return HTTPFound(location='http://localhost:6543/')
The return statement redirects the browser back to the '/' URL, which points to the list() function and shows the updated marklist.
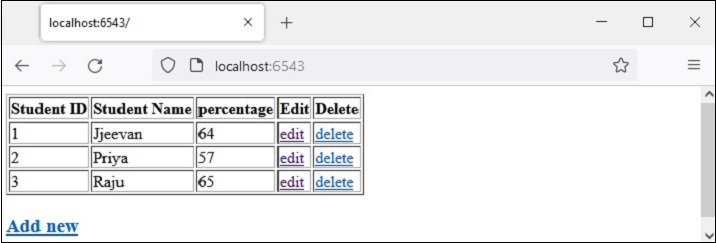
Make sure that the update route as added to the configuration before running.
config.add_route('update', '/update')
Delete a Record
To delete a record corresponding to a row in the marklist table, follow the Delete link in the last column. For example, clicking on Delete in 3rd row emits http://localhost:6543/delete/3 URL and invokes following view function −
@view_config(route_name='delete', renderer='templates/deleted.html')
def delete(request):
   id=request.matchdict['id']
   row = session.query(Students).filter(Students.id == id).delete()
   return {'message':'Redcord has been deleted'}
Example
The object corresponding to the path parameter parsed from the URL is deleted and the appropriate message is rendered by the following template - deleted.html −
<html>
<body>
   <h3>{{ message}}</h3>
   <br><br>
   <a href="http://localhost:6543/">Click here to refresh the mark list</a>
</body>
</html>
Obviously, the delete route has to be added in the application config registry.
config.add_route('delete', '/delete/{id}')
Output
The result of record delete action is as shown below −
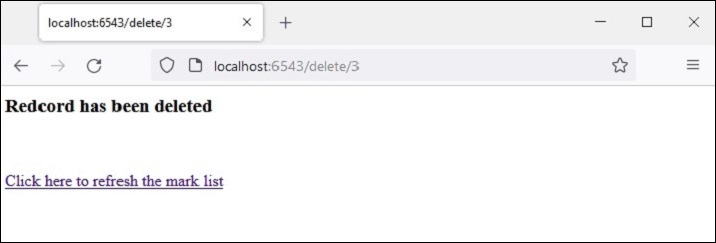
Take the following steps to perform the above explained activity −
Create a folder named as testapp in the Pyramid virtual environment
Inside testapp, create the templates folder.
Create a blank __init__.py inside testapp so that it becomes a package.
Put marklist.html, myform.html, showform.html and deleted.html files in "testapp\templates" folder. Codes of these files have been given above.
Save the following code as models.py in testapp.
from sqlalchemy.dialects.sqlite import *
from sqlalchemy.ext.declarative import declarative_base
from sqlalchemy import create_engine
from sqlalchemy.orm import sessionmaker
from sqlalchemy.orm import Session
from sqlalchemy import Column, Integer, String
SQLALCHEMY_DATABASE_URL = "sqlite:///./test.db"

Base = declarative_base()

class Students(Base):
      __tablename__ = 'student'
   id = Column(Integer, primary_key=True, nullable=False)
   name = Column(String(63), unique=True)
   percent = Column(Integer)

def getsession():
   engine = create_engine(
      SQLALCHEMY_DATABASE_URL, connect_args={"check_same_thread": False}
   )
   Base.metadata.create_all(bind=engine)
   Session = sessionmaker(bind = engine)
   session = Session()
   return session
Save the following code as views.py in testapp folder.
from pyramid.response import Response
from pyramid.view import view_config
from pyramid.httpexceptions import HTTPFound
from models import Students
from main import session

@view_config(route_name='list', renderer='templates/marklist.html')
def showall(request):
   rows = session.query(Students).all()
   students=[]
   for row in rows:
      students.append({"id":row.id, "name":row.name, "percent":row.percent})
      return{'students':students}

@view_config(route_name='index', renderer='templates/myform.html')
def index(request):
   return {}

@view_config(route_name='add', request_method='POST')
def add(request):
   id=request.POST['id']
   name=request.POST['name']
   percent=int(request.POST['percent'])
   student=Students(id=id, name=name, percent=percent)
   session.add(student)
   session.commit()
   return HTTPFound(location='http://localhost:6543/')

@view_config(route_name='update', request_method='POST')
def update(request):
   id=int(request.POST['id'])
   student = session.query(Students).filter(Students.id == id).first()
   student.percent=int(request.POST['percent'])
   session.commit()
   return HTTPFound(location='http://localhost:6543/')

@view_config(route_name='show', renderer='templates/showform.html')
def show(request):
   id=request.matchdict['id']
   row = session.query(Students).filter(Students.id == id).first()
   student={'id':row.id, 'name':row.name, 'percent':row.percent}
   return {'student':student}

@view_config(route_name='delete', renderer='templates/deleted.html')
def delete(request):
   id=request.matchdict['id']
   row = session.query(Students).filter(Students.id == id).delete()
   return {'message':'Redcord has been deleted'}
Save the following code as main.py in testapp folder.
from wsgiref.simple_server import make_server
from pyramid.config import Configurator
from models import getsession
session=getsession()

if __name__ == '__main__':
   with Configurator() as config:
      config.include('pyramid_jinja2')
      config.add_jinja2_renderer(".html")
      config.add_route('list', '/')
      config.add_route('index', '/new')
      config.add_route('add','/add')
      config.add_route('show', '/show/{id}')
      config.add_route('update', '/update')
      config.add_route('delete', '/delete/{id}')
      config.scan('testapp')
      app = config.make_wsgi_app()
   server = make_server('0.0.0.0', 6543, app)
   server.serve_forever()
Run main.py from the command prompt.
Python main.py
Use http://localhost:6543/ URL in the browser window. A table with only the headings and no records will be displayed.
Follow Add new link below the table to add records.
Click the "Edit" link in the table to update a record.
Clink the "Delete" link in the table to delete selected record.
Python Pyramid - Cookiecutter
We have so far built the Pyramid application by manually performing the route configuration, adding the views and using the templates. Cookiecutter offers a convenient alternative to generate a Pyramid project structure. It is a command-line utility that uses certain predefined project templates. The project can then be fine-tuned to accommodate specific requirements that the user may have.
The Python project created by Cookiecutter is a Python package. The default application logic can be further customized. The project structure so created is extremely extensible and is easy to distribute.
The Cookiecutter utility is developed by Audrey Feldroy. It works on Python versions >=3.7. The project templates in Python, JavaScript, Ruby, CoffeeScript, languages or RST, Markdown, CSS, HTML scripts can be used to generate a project. Github hosts a number of pre-built project templates, any of which can be used.
The project built from cookiecutter template is a cross-platform package. Cookiecutter project generation is completely automated and you don't have to write any code for it. Once the cookiecutter command is invoked, it reads the template being used and prompts the user to choose appropriate values for the settings parameters. To begin with, install Cookiecutter with PIP installer.
pip install cookiecutter
To verify if Cookiecutter is correctly installed, run
>>> import cookiecutter
>>> cookiecutter.__version__
'1.7.3'
Python Pyramid - Creating A Project
It is assumed that a Pyramid virtual environment is up and running, and Cookiecutter is installed in it. The easiest way to create a Cookiecutter project is to use a pre-built starter template as per the following command −
cookiecutter gh:Pylons/pyramid-cookiecutter-starter --checkout 2.0-branch
The template is downloaded and the user is asked about his choice of name of the project −
project_name [Pyramid Scaffold]: testproj
repo_name [testproj]:
Then choose the template language.
Select template_language −
1 - jinja2
2 - chameleon
3 - mako
Choose from 1, 2, 3 [1]: 1
Since we are familiar with jinja2, give 1 as the choice. Next, use SQLALchemy as the backend.
Select backend:
1 - none
2 - sqlalchemy
3 - zodb
Choose from 1, 2, 3 [1]: 2
Inside the testproj folder, following file structure is created −
 development.ini
 MANIFEST.in
 production.ini
 pytest.ini
 README.txt
 setup.py
 testing.ini

testproj
  pshell.py
  routes.py
  __init__.py

 alembic
   env.py
   script.py.mako

  versions
  README.txt

 models
  meta.py
  mymodel.py
  __init__.py

 scripts
  initialize_db.py
  __init__.py

 static
  pyramid-16x16.png
  pyramid.png
  theme.css

 templates
  404.jinja2
  layout.jinja2
  mytemplate.jinja2

 views
 default.py
 notfound.py
 __init__.py

tests
    conftest.py
    test_functional.py
    test_views.py
    __init__.py
The outer testproj folder has an inner testproj package subfolder and tests package. The inner testproj subfolder is a package having models and scripts, subpackages, and static as well as templates folders.
Next, initialize and upgrade the database using Alembic.
# Generate your first revision.
alembic -c development.ini revision --autogenerate -m "init"
# Upgrade to that revision.
alembic -c development.ini upgrade head
Alembic is a lightweight database migration tool for usage with the SQLAlchemy Database Toolkit for Python. The outer project folder will now show a testproj.sqlite database.
The development.ini file provides a default data for the database. Populate the database with it by the following command.
initialize_testproj_db development.ini
The Cookiecutter utility also generates the test suite in the tests package. They are based on PyTest package. Go ahead and see if the tests pass.
Pytest
================ test session starts ======================
platform win32 -- Python 3.10.1, pytest-7.1.2, pluggy-1.0.0
rootdir: F:\pyram-env\testproj, configfile: pytest.ini, testpaths: testproj, tests
plugins: cov-3.0.0
collected 5 items

tests\test_functional.py .. [ 40%]
tests\test_views.py ... [100%]
=============== 5 passed, 20 warnings in 6.66s ===============
Cookiecutter uses the Waitress server. The Pyramid application is served on localhost's port 6543 by following command −
pserve development.ini
Starting server in PID 67700.
2022-06-19 23:43:51,308 INFO [waitress:485][MainThread] Serving on http://[::1]:6543
2022-06-19 23:43:51,308 INFO [waitress:485][MainThread] Serving on http://127.0.0.1:6543
Open the browser and visit http://localhost:6543/ in it. The homepage of the newly created project will be displayed as follows −
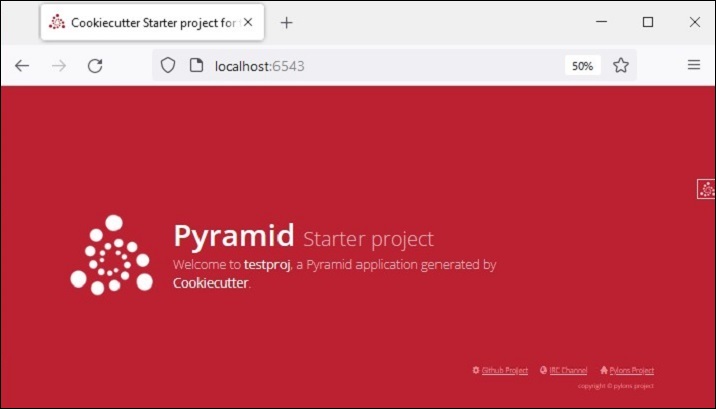
Debug Toolbar
You can find a smaller Pyramid logo at the top right of the homepage. Click on it to open a new tab and a debug toolbar that provides lots of useful information about the project.
For example, the SQLAlchemy tab under the history heading shows the SQLAlchemy queries showing the structure of the model created from the default data in development.ini.
The Global heading again shows tabs such as Introspection, Routes, etc. as shown below. Click the "Routes" tab to see the routes and their matching patterns defined in the application's configuration.
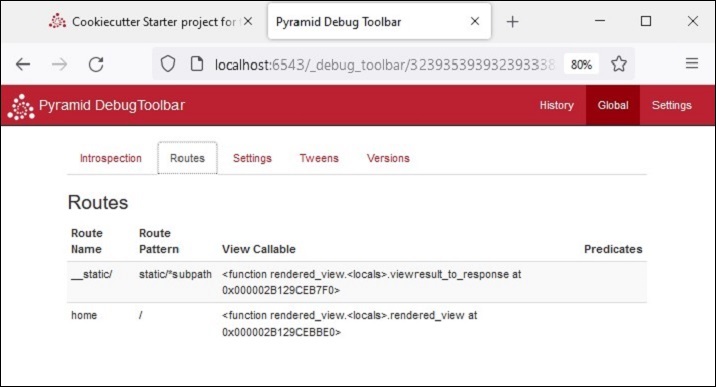
Python Pyramid - Project Structure
As mentioned earlier, the outer testproj folder contains testproj and test packages. In addition, it has other files used to describe, run, and test the application. These files are −
MANIFEST.in contains list of files to be included in a source distribution of the package.
development.ini is a PasteDeploy configuration file that can be used to execute your application during development.
production.ini is a PasteDeploy configuration file that can be used to execute your application in a production configuration.
pytest.ini is a configuration file for running tests.
setup.py is the standard Setuptools setup.py file used to test and distribute the application.
testing.ini is a configuration file used to execute the application's tests.
The ".ini" files are the configurations used by Cookiecutter utility to generate the Pyramid application structure. These filesuse a system called PasteDeploy, which has been developed by Ian Bicking. This library is installed automatically along with Pyramid.
Although a Pyramid application can be developed without PasteDeploy support, it gives a standardized way of starting, debugging and testing the application.
The predefined settings are read from the configuration files (with .ini extension). These files contain mainly the application configuration settings, server settings and logging settings.
development.ini
As shown earlier, the Pyramid application built with Cookiecutter is invoked by the following command −
pserve development.ini
The development.ini contains the PasteDeploy configuration specifications of the application. The configuration specifications in this file are having various sections such as [app:main], [server:main], [loggers] etc.
The most important section id [app:main]. It specifies the starting point of the application.
[app:main]
use = egg:testproj

pyramid.reload_templates = true
pyramid.debug_authorization = false
pyramid.debug_notfound = false
pyramid.debug_routematch = false
pyramid.default_locale_name = en
pyramid.includes = pyramid_debugtoolbar

sqlalchemy.url = sqlite:///%(here)s/testproj.sqlite

retry.attempts = 3
The very first entry "use = egg:testproj" indicates the name of the Pyramid WSGI application object main. It is declared in the __init__.py file of the textproj package (inside the testproj project folder). This section contains other startup time configuration settings.
For instance, the "pyramid.includes" setting specifies the packages to be included in the runtime. In the above example, the debugtoolbar package is included so that the debug panel gets activated when the Pyramid logo is clicked. We have seen its functioning in the earlier section.
We also see that the URL of the database to be used in this application has also been specified.
The [server:main] section specifies the configuration of a WSGI server which listens on TCP port 6543. It is configured to listen on localhost only (127.0.0.1).
[server:main]
use = egg:waitress#main
listen = localhost:6543
Other various logging related sections use Python's logging library. These ".ini" file sections are passed to the logging module's config file configuration engine.
production.ini
This file used to serve the application instead of the "development.ini" when the application is deployed in the production mode. Both these files are similar. However, in "production.ini", the debug toolbar is disabled, the reload options are disabled and turns off the debugging options.
Here's a stripped-down version of typical "production.ini" file −
[app:main]
use = egg:testproj
pyramid.reload_templates = false
pyramid.debug_authorization = false
pyramid.debug_notfound = false
pyramid.debug_routematch = false
pyramid.default_locale_name = en
sqlalchemy.url = sqlite:///%(here)s/testproj.sqlite
retry.attempts = 3
[pshell]
setup = testproj.pshell.setup
[alembic]
script_location = testproj/alembic
file_template = %%(year)d%%(month).2d%%(day).2d_%%(rev)s
[server:main]
use = egg:waitress#main
listen = *:6543
[loggers]
keys = root, testproj, sqlalchemy, alembic
[handlers]
keys = console
[formatters]
keys = generic
[logger_root]
level = WARN
handlers = console
[logger_testproj]
level = WARN
handlers =
qualname = testproj
[logger_sqlalchemy]
level = WARN
handlers =
qualname = sqlalchemy.engine
[logger_alembic]
level = WARN
handlers =
qualname = alembic
[handler_console]
class = StreamHandler
args = (sys.stderr,)
level = NOTSET
formatter = generic
[formatter_generic]
format = %(asctime)s %(levelname)-5.5s [%(name)s:%(lineno)s][%(threadName)s] %(message)s
Python Pyramid - Package Structure
The Cookiecutter utility automatically creates a package folder inside the parent project folder of the same name. The package folder consists of the following files and subfolders.
__init__.py
A folder needs __init__.py file for it to be treated as a Python package. The testproj package also has this file, which essentially declares the Pyramid WSGI application project for the development.ini to use it as the entry point.
The application object is returned by the main() function. It configures the application registry by including the template library chosen at the time of running cookiecutter, including the routes module and adding the views to the configurator by scanning the existing package. Following Python code is auto generated as __init__.py file.
from pyramid.config import Configurator
def main(global_config, **settings):
   """ This function returns a Pyramid WSGI application.
   """
   with Configurator(settings=settings) as config:
      config.include('pyramid_jinja2')
      config.include('.routes')
      config.include('.models')
      config.scan()
   return config.make_wsgi_app()
routes.py
The Cookiecutter utility automatically generates a Python script having a function called includeme(). It adds a static route and a home route pointing to '/' URL pattern.
def includeme(config):
   config.add_static_view('static', 'static', cache_max_age=3600)
   config.add_route('home', '/')
These routes are added to the application configuration by the main() function in __init__.py file explained above.
Views Package
The project package (in our case testproj package) contains this views subpackage - a folder containing a blank __init__.py, a Python module called default.py that contains definition a view function named my_view(). It sends the name of the project as a context to a pre-built template mytemplate.jinja2
from pyramid.view import view_config
from pyramid.response import Response
from sqlalchemy.exc import SQLAlchemyError
from .. import models

@view_config(route_name='home', renderer='testproj:templates/mytemplate.jinja2')
def my_view(request):
   try:
      query = request.dbsession.query(models.MyModel)
      one = query.filter(models.MyModel.name == 'one').one()
   except SQLAlchemyError:
      return Response(db_err_msg, content_type='text/plain', status=500)
   return {'one': one, 'project': 'testproj'}

db_err_msg = """\
Pyramid is having a problem using your SQL database.
....
"""
The default.py scripts also imports definition of mymodel in models subpackage. This views package also defines a notfound view in notfound.py file.
from pyramid.view import notfound_view_config
@notfound_view_config(renderer='testproj:templates/404.jinja2')
def notfound_view(request):
   request.response.status = 404
   return {}
Static Folder
This folder under the testproj package folder contains Pyramid logo files and theme.CSS for the homepage.
Templates Folder
We know that the web templates need to be stored in templates folder. This subfolder contains jinja2 templates. Here we have a base template named as layout.jinja2 and it is inherited by mytemplate.jinja2 to be rendered by my_view() view function.
{% extends "layout.jinja2" %}

{% block content %}
<div class="content">
   <h1><span class="font-semi-bold">Pyramid</span> <span class="smaller">Starter project</span></h1>
   <p class="lead">Welcome to <span class="font-normal">{{project}}</span>, a Pyramid application generated by<br><span class="font-normal">Cookiecutter</span>.</p>
</div>
{% endblock content %}
Models Package
This subpackage under the tesptproj package folder holds mymodel.py that has the definition of SQLAlchemy model named as MyModel.
from sqlalchemy import (
   Column,
   Index,
   Integer,
   Text,
)

from .meta import Base
class MyModel(Base):
   __tablename__ = 'models'
   id = Column(Integer, primary_key=True)
   name = Column(Text)
   value = Column(Integer)
Index('my_index', MyModel.name, unique=True, mysql_length=255)
The meta.py declares an object of Declarative Base class in SQLAlchemy.
from sqlalchemy.ext.declarative import declarative_base
from sqlalchemy.schema import MetaData

NAMING_CONVENTION = {
   "ix": "ix_%(column_0_label)s",
   "uq": "uq_%(table_name)s_%(column_0_name)s",
   "ck": "ck_%(table_name)s_%(constraint_name)s",
   "fk": "fk_%(table_name)s_%(column_0_name)s_%(referred_table_name)s",
   "pk": "pk_%(table_name)s"
}
metadata = MetaData(naming_convention=NAMING_CONVENTION)
Base = declarative_base(metadata=metadata)
Python Pyramid - Creating A Project Manually
The Cookiecutter utility uses pre-defined project templates to auto-generate the project and package structure. For complex projects, it saves a lot of manual effort in properly organizing various project components.
However, a Pyramid project can be built manually without having to use Cookiecutter. In this section, we shall see how a Pyramid project named Hello is built in following easy steps.
setup.py
Create a project directory within Pyramid virtual environment.
md hello
cd hello
And save the following script as setup.py
from setuptools import setup

requires = [
   'pyramid',
   'waitress',
]
setup(
   name='hello',
   install_requires=requires,
   entry_points={
      'paste.app_factory': [
         'main = hello:main'
      ],
   },
)
As mentioned earlier, this is a Setuptools setup file that defines requirements for installing dependencies for your package.
Run the following command to install the project and generate the 'egg' in the name hello.egg-info.
pip3 install -e.
development.ini
Pyramid uses PasteDeploy configuration file mainly to specify the main application object, and the server configuration. We are going to use the application object in the egg info of hello package, and the Waitress server, listening on port 5643 of the localhost. Hence, save the following snippet as development.ini file.
[app:main]
use = egg:hello

[server:main]
use = egg:waitress#main
listen = localhost:6543
__init__.py
Finally, the application code resides in this file which is also essential for the hello folder to be recognised as a package.
The code is a basic Hello World Pyramid application code having hello_world() view. The main() function registers this view with hello route having '/' URL pattern, and returns the application object given by make_wsgi_app() method of Configurator.
from pyramid.config import Configurator
from pyramid.response import Response
def hello_world(request):
   return Response('<body><h1>Hello World!</h1></body>')
def main(global_config, **settings):
   config = Configurator(settings=settings)
   config.add_route('hello', '/')
   config.add_view(hello_world, route_name='hello')
   return config.make_wsgi_app()
Finally, serve the application with the help of pserve command.
pserve development.ini --reload
Python Pyramid - Command Line Pyramid
The Pyramid library has a scripts subpackage, and it contains a number of Python scripts that are made available to control and inspect a Pyramid application. These modules can be used both as an importable module as well as from command prompt. Hence, they are often called as command line scripts.
These command line scripts are −
pserve − serves a web application that uses a PasteDeploy configuration file.
pviews − Displaying Matching Views for a Given URL.
pshell − The Interactive Shell.
proutes − Displaying All Application Routes.
ptweens − Displaying "Tweens".
prequest − Invoking a Request.
pdistreport − Showing All Installed Distributions and Their Versions.
All these command line scripts use the PasteDeploy configuration file (development.ini).
pserve
This is the most important script. The Pyramid application configured in the "development.ini" [app:main] section is served with the help of the chosen server (Waitress) and the mentioned host and port (localhost:6543).
Assuming that the Pyramid project (testproj) is created in the folder of the same name in the Pyramid virtual environment, the following command starts listening to incoming browser requests −
Env>..\scripts\pserve development.ini
The pserve module (as also the other Pyramid command-line scripts) can be run as an argument of Python interpreter in the command prompt.
Env>python -m pyramid.scripts.pserve development.ini
Starting server in PID 1716.
2022-06-23 14:13:51,492 INFO [waitress:485][MainThread] Serving on http://[::1]:6543
2022-06-23 14:13:51,492 INFO [waitress:485][MainThread] Serving on http://127.0.0.1:6543
To make pserve utility more flexible, the following command line parameters can be used −
config_uri − The URI to the configuration file.
-n <name> − Load the named application (default main).
-s <server_type> − Use the named server.
--server-name <section_name> − Use the named server as defined in the configuration file (default: main)
--reload − Use auto-restart file monitor.
-b − Open a web browser to the server url.
The application is served at http://localhost:6543 in which case, the access is restricted such that only a browser running on the same machine. If you want to let the other machines on the same network, then edit the "development.ini" file, and replace the listen value in the [server:main] section as shown below −
[server:main]
use = egg:waitress#main
listen = *:6543
The setting *:6543 is equivalent to 0.0.0.0:6543 [::]:6543, as a result, the application responds to requests on all IP addresses possessed by your system, not just requests to localhost.
The --reload option in the pserve command line causes the application to be reloaded automatically whenever the running code is modified.
Start the application with --reload option.
pserve development.ini --reload
Starting monitor for PID 36224.
Starting server in PID 36224.
Serving on http://localhost:6543
Serving on http://localhost:6543
If any change to the project's .py files or .ini files is made, the server restart automatically −
testproj/development.ini changed; reloading ...
Gracefully killing the server.
Starting monitor for PID 36286.
Starting server in PID 36286.
Serving on http://localhost:6543
Serving on http://localhost:6543
pviews
The pviews command line script is used in the command terminal window to print a summary of matching routes and views for a given URL. The pviews command accepts two arguments. The first argument is the path to your application's ".ini" file and section name inside it. This should be of the format config_file#section_name (default value is main). The second argument is the URL to test for matching views.
Let us pviews command with the development.ini file in our testproj project built earlier with Cookiecutter.
Env>..\scripts\pviews development.ini /
URL = /
   context: <pyramid.traversal.DefaultRootFactory object at 0x000001DD39BF1DE0>
   view name:
   Route:
   ------
   route name: home
   route pattern: /
   route path: /
   subpath:

      View:
      -----
      testproj.views.default.my_view
The output shows the requested URL at the top and below which all the matching views are displayed with their view configuration details. In this example only one view matches, so there is just a single View section.
pshell
The pshell script makes it possible to interact with the Pyramid application's environment from Python prompt. This shell uses the PasteDeploy configuration file i.e. development.ini as a command line argument (like the other Pyramid scripts) and opens up Python interactive shell.
Env>..\scripts\pshell development.ini
Python 3.10.1 (tags/v3.10.1:2cd268a, Dec 6 2021, 19:10:37) [MSC v.1929 64 bit (AMD64)] on win32
Type "help" for more information.

Environment:
   app                    The WSGI application.
   dbsession              <sqlalchemy.orm.session.Session object at 0x0000020E9F1452D0>
   models                 <module 'testproj.models' from 'f:\\pyram-env\\testproj\\testproj\\models\\__init__.py'>
   registry               Active Pyramid registry.
   request                Active request object.
   root                   Root of the default resource tree.
   root_factory           Default root factory used to create `root`.
   tm                     Single-thread implementation of `~transaction.interfaces.ITransactionManager`.

>>>
The script reads the configuration and the objects declared in it are made available as Python objects to interact with. We can inspect their behaviour from the Python prompt.
>>> root
<pyramid.traversal.DefaultRootFactory object at 0x0000020E9E2507F0>
>>> registry
<Registry testproj>
The registry settings are read from "development.ini" into a dictionary. We can traverse its contents using the for loop −
>>> for k,v in registry.settings.items():
... print (k,":",v)
...
pyramid.reload_templates : True
pyramid.debug_authorization : False
pyramid.debug_notfound : False
pyramid.debug_routematch : False
pyramid.default_locale_name : en
pyramid.includes :
pyramid_debugtoolbar
sqlalchemy.url : sqlite:///\testproj/testproj.sqlite
retry.attempts : 3
tm.manager_hook : <function explicit_manager at 0x000001D9E64E4550>
It is even possible to interact with the database with the help of SQLAlchemy model declared in models.py.
The application database is initialized in the beginning when we first complete the cookiecutter steps. We find a models table in the "testproj.sqlite" database with one record in it.
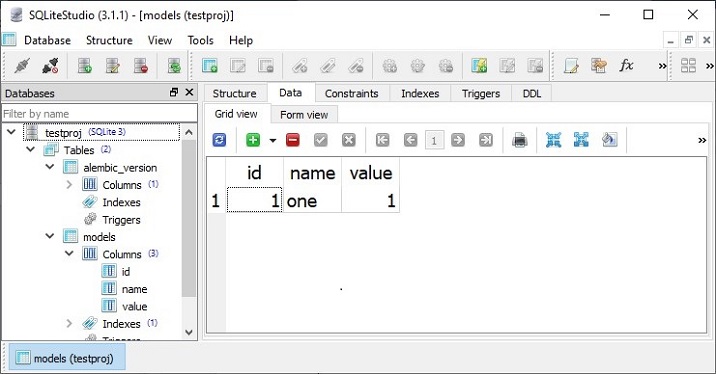
We now access this table from the Python prompt as under −
>>> m=models.MyModel

>>> obj=dbsession.query(m).get(1)
>>> obj
<testproj.models.mymodel.MyModel object at 0x0000020E9FD96DA0>
>>> obj.name
'one'
Let us adda new row in the models table. First declare an object of the MyModel class, and add it in the dbsession.
>>> tm.begin()
>>> obj=models.MyModel(id=2, name='two', value=2)
>>> dbsession.add(obj)
>>> tm.commit()
Pyramid uses a transaction manger object tm which is declared in pyramid_tm package. To confirm that a new record is added, retrieve it back.
>>> obj=dbsession.query(models.MyModel).get(2)
>>> obj.name
'two'
This can also be confirmed by actually looking at the models table of the database in a SQLite GUI tool.
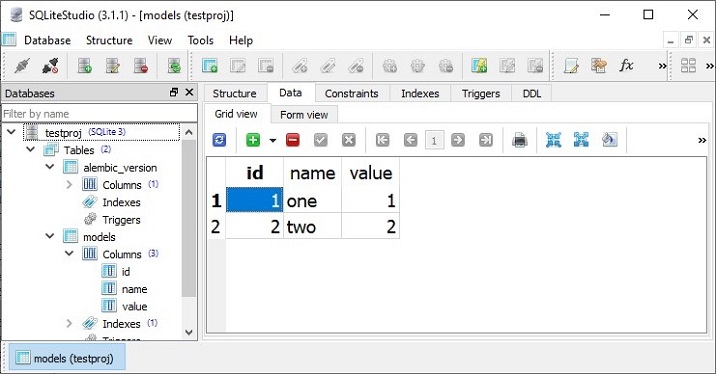
prequest
The prequest utility lets you to test the response of a URL pattern without actually starting the server. The command needs the configuration file and the URL path as the command line arguments. For example −
Env>prequest development.ini /
The command produces the raw HTML response of the Cookiecutter homepage that we have seen earlier.
There are a couple of command line switches that can be used. The -d option displays the status and headers returned by the server. To override the default GET request method, we can use -m option.
proutes
This command line Pyramid script displays all the routes added to your application's registry. It accepts just one argument i.e. the configuration file (development.ini)
Following route configuration of the testproj package is displayed by the proutes command −
Env>proutes development.ini
Name                       Pattern                                                        View
----                       -------                                                        ----
__static/                  /static/*subpath                                               testproj:static/
home                       /                                                              testproj.views.default.my_view
debugtoolbar               /_debug_toolbar/*subpath                                       <unknown>
__/_debug_toolbar/static/  /_debug_toolbar/static/*subpath pyramid_debugtoolbar:static/
Python Pyramid - Testing
Writing test scripts which ensure that your code works correctly is considered as a good programming practice. Python ecosystem had a number of testing frameworks, including unittest which is bundled in the standard library. Pytest is a popular testing library. It is a preferred library for Pyramid projects.
We shall use the hello package that we developed earlier while demonstrating the use of PasteDeploy configuration.
First, ensure that the Pyramid environment has PyTest package installed.
pip3 install pytest
Open the setup.py file in hello package and modify it by adding the lines shown in bold.
from setuptools import setup

requires = [
   'pyramid',
   'waitress',
]
dev_requires = ['pytest',]
setup(
   name='hello',
   install_requires=requires,
   extras_require={
      'dev': dev_requires,
   },
   entry_points={
      'paste.app_factory': [
         'main = hello:main'
      ],
   },
)
Here, Pytest is added as the project dependency whenever it is installed (or reinstalled) using following command −
pip3 install -e ".[dev]
Store the following Python code as testing.py in hello package.
import unittest
from pyramid import testing
class HelloTests(unittest.TestCase):
   def test_hello_world(self):
      from . import hello_world
      request = testing.DummyRequest()
      response = hello_world(request)
      self.assertEqual(response.status_code, 200)
To run the tests, use following Pytest command. The output of the test is shown below −
Env\hello>pytest tests.py
========================== test session starts ==========================
platform win32 -- Python 3.10.1, pytest-7.1.2, pluggy-1.0.0
rootdir: E:\tp-pyramid\hello
collected 1 item

tests.py.
   [100%]

=========================== 1 passed in 1.12s ===========================
To check if the test fails, induce an error in the test function and run again.
(tp-pyramid) E:\tp-pyramid\hello>pytest tests.py
========================== test session starts ==========================
collected 1 item

tests.py F
[100%]
=============================== FAILURES ================================
______________________ HelloTests.test_hello_world ______________________
self = <hello.tests.HelloTests testMethod=test_hello_world>
   def test_hello_world(self):
      from . import hello_world
      request = testing.DummyRequest()
      response = hello_world(request)
>     self.assertEqual(response.status_code, 404)
E     AssertionError: 200 != 404

tests.py:13: AssertionError
======================== short test summary info ========================
FAILED tests.py::HelloTests::test_hello_world - AssertionError: 200 != 404
=========================== 1 failed in 1.53s ===========================
Functional Testing
Although Unit tests are popularly used in test-driven development (TDD)approach, for web applications, WebTest is a Python package that does functional testing. We can simulate a full HTTP request against a WSGI application, then test the information in the response.
Example
Let us use the hello project that we had used in the earlier example. Open the setup.py and add WebTest as the project dependency.
from setuptools import setup

requires = [
   'pyramid',
   'waitress',
]
dev_requires = ['pytest','webtest',]
setup(
   name='hello',
   install_requires=requires,
   extras_require={
      'dev': dev_requires,
   },
   entry_points={
      'paste.app_factory': [
         'main = hello:main'
      ],
   },
)
Reinstall the hello package and its new dependency for development mode.
Env\hello>..\scripts\pip3 install -e ".[dev]"
Include a functional test in tests.py file
import unittest
from pyramid import testing

class HelloTests(unittest.TestCase):

   def test_hello_world(self):
      from . import hello_world
      request = testing.DummyRequest()
      response = hello_world(request)
      self.assertEqual(response.status_code, 200)
class HelloFunctionalTests(unittest.TestCase):
   def setUp(self):
      from . import main
      app = main({})
      from webtest import TestApp
      self.testapp = TestApp(app)
   def test_hello_world(self):
      res = self.testapp.get('/', status=200)
      self.assertIn(b'<h1>Hello World!</h1>', res.body)
Output
Finally run Pytest as per the following command −
Env\hello>pytest tests.py
========================== test session starts ==========================
platform win32 -- Python 3.10.1, pytest-7.1.2, pluggy-1.0.0
rootdir: E:\tp-pyramid\hello
collected 2 items
tests.py .. [100%]

=========================== 2 passed in 2.37s ===========================
Tests in Cookiecutter Project
The CookieCutter utility auto-generates the tests package containing functional tests and unit tests. We had earlier used Cookiecutter to build Pyramid project named testproj. In this project, we find tests folder.
Example
The test_functional py contains the following test functions −
from testproj import models

def test_my_view_success(testapp, dbsession):
   model = models.MyModel(name='one', value=55)
   dbsession.add(model)
   dbsession.flush()
   res = testapp.get('/', status=200)
   assert res.body

def test_notfound(testapp):
   res = testapp.get('/badurl', status=404)
   assert res.status_code == 404
The test_views.py defines following test functions to test the views −
from testproj import models
from testproj.views.default import my_view
from testproj.views.notfound import notfound_view

def test_my_view_failure(app_request):
info = my_view(app_request)
assert info.status_int == 500

def test_my_view_success(app_request, dbsession):
   model = models.MyModel(name='one', value=55)
   dbsession.add(model)
   dbsession.flush()
   info = my_view(app_request)
   assert app_request.response.status_int == 200
   assert info['one'].name == 'one'
   assert info['project'] == 'testproj'
def test_notfound_view(app_request):
   info = notfound_view(app_request)
   assert app_request.response.status_int == 404
   assert info == {}
Output
These tests are run by the following command −
Env\testproj>Pytest
========================== test session starts ==========================
platform win32 -- Python 3.10.1, pytest-7.1.2, pluggy-1.0.0
rootdir: Env\testproj, configfile: pytest.ini, testpaths: testproj, tests
plugins: cov-3.0.0
collected 5 items

tests\test_functional.py .. [ 40%]
tests\test_views.py ... [100%]
=============== 5 passed, 20 warnings in 6.66s ===============
Python Pyramid - Logging
In order to collect useful information about the application, Pyramid uses the logging module from Python's standard library. It proves useful in development as well as production mode to detect problems if any, during the running of the application. The application log can include your own messages integrated with messages from third-party modules.
The logged messages have following predefined types (in the order of decreasing severity) −
- CRITICAL
- ERROR
- WARNING
- INFO
- DEBUG
- NOTSET
By default, he logging messages are redirected to sys.stderr stream. To start collecting logging messages, we need to declare a Logger object.
import logging
log = logging.getLogger(__name__)
Log messages can now be generated with logger methods corresponding to the desired logging levels. To generate a message which can prove useful for debugging the application, use log.debug() message with appropriate message string.
A Pyramid application based on PasteDeploy configuration makes it very easy to enable incorporate logging support. The PasteDEploy files (development.ini as well as production.ini) use the ConfigParser format used in the logging module's configuration parameters. The logging related sections in development.ini are passed to the logging module's configuration process when it is invoked by pserve command.
Various logger sections in the configuration file specify the keys, formats and the logger levels for the application objects.
Following logging related sections are declared in a typical "development.ini" file −
# Begin logging configuration
[loggers]
keys = root, hello
[logger_hello]
level = DEBUG
handlers =
qualname = hello
[handlers]
keys = console
[formatters]
keys = generic
[logger_root]

#level = INFO
level=DEBUG
handlers = console
[handler_console]
class = StreamHandler
args = (sys.stderr,)
level = NOTSET
formatter = generic
[formatter_generic]
format = %(asctime)s %(levelname)-5.5s [%(name)s][%(threadName)s] %(message)s

# End logging configuration
Let us add these sections in the development.ini file of our Hello application in the previous chapter.
Example
Next, declare the Logger object and put a debug message in the hello_world() few function. Here's the __init__.py code −
from pyramid.config import Configurator
from pyramid.response import Response
from pyramid.view import view_config
import logging

log = logging.getLogger(__name__)

from pyramid.renderers import render_to_response

def hello_world(request):
   log.debug('In hello view')
   return render_to_response('templates/hello.html',
{'name':request.matchdict['name']},request=request)

def main(global_config, **settings):
   config = Configurator(settings=settings)
   config.include('pyramid_jinja2')
   config.add_jinja2_renderer(".html")
   config.add_route('hello', '/{name}')
   config.add_view(hello_world, route_name='hello')
   return config.make_wsgi_app()
The hello_world() view renders the following hello.html template −
<html>
   <body>
      <h1>Hello, {{ name }}!</h1>
   </body>
</html>
Run the application as usual −
pserve development.ini
When http://localhost:6543/Tutorialpoint URL is entered in the browser, the command window echoes following debug message −
Starting monitor for PID 11176.
Starting server in PID 8472.
2022-06-26 01:22:47,032 INFO [waitress][MainThread] Serving on http://[::1]:6543
2022-06-26 01:22:47,032 INFO [waitress][MainThread] Serving on http://127.0.0.1:6543
2022-06-26 01:22:47,418 DEBUG [hello][waitress-1] In hello view
Output
Since the debug toolbar is enabled in the configuration, it is displayed in the browser −
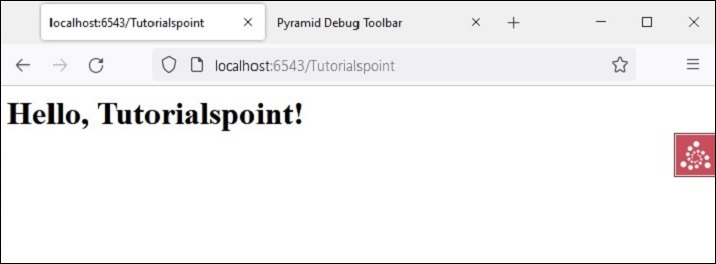
The debug message is also displayed on the logging tab of the debug toolbar as shown below −
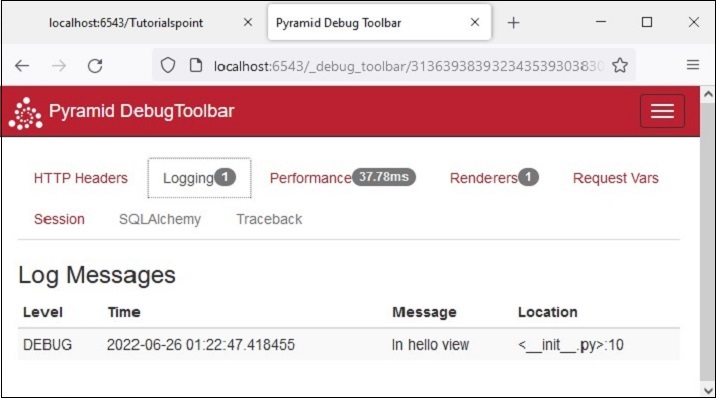
Python Pyramid - Security
Pyramid's declarative security system determines the identity of the current user and verifies if the user has access to certain resources. The security policy can prevent the user from invoking a view. Before any view is invoked, the authorization system uses the credentials in the request to determine if access will be allowed.
The security policy is defined as a class that controls the user access with the help of following methods defined in pyramid.security module −
forget(request) − This method returns header tuples suitable for 'forgetting' the set of credentials possessed by the currently authenticated user. It is generally used within the body of a view function.
remember(request, userid) − This method returns a sequence of header tuples on the request's response. They are suitable for 'remembering' a set of credentials such as userid using the current security policy. Common usage might look like so within the body of a view function.
The authenticated user's access is controlled by the objects of Allowed and Denied classes in this module.
To implement the functionality of identity, remember and forget mechanism, Pyramid provides the following helper classes defined in the pyramid.authentication module −
SessionAuthenticationHelper − Store the userid in the session.
AuthTktCookieHelper − Store the userid with an "auth ticket" cookie.
We can also use extract_http_basic_credentials() function to retrieve user credentials using HTTP Basic Auth.
To retrieve the userid from REMOTE_USER in the WSGI environment, the request.environ.get('REMOTE_USER') can be used.
Example
Let us now learn how to implement the security policy with the help of following example. The "development.ini" for this example is as follows −
[app:main]
use = egg:tutorial
pyramid.reload_templates = true
pyramid.includes = pyramid_debugtoolbar
hello.secret = a12b

[server:main]
use = egg:waitress#main
listen = localhost:6543
We then write the security policy class in the following Python code saved as security.py −
from pyramid.authentication import AuthTktCookieHelper
USERS = {'admin': 'admin', 'manager': 'manager'}
class SecurityPolicy:
   def __init__(self, secret):
      self.authtkt = AuthTktCookieHelper(secret=secret)
   def identity(self, request):
      identity = self.authtkt.identify(request)
      if identity is not None and identity['userid'] in USERS:
      return identity
   def authenticated_userid(self, request):
      identity = self.identity(request)
      if identity is not None:
         return identity['userid']
   def remember(self, request, userid, **kw):
      return self.authtkt.remember(request, userid, **kw)
   def forget(self, request, **kw):
      return self.authtkt.forget(request, **kw)
The __init__.py file in our package folder defines following configuration. The security policy class defined above is added in the configuration with set_security_policy() method of Configurator class. Three routes - home, login and logout are added to the configuration.
from pyramid.config import Configurator
from .security import SecurityPolicy

def main(global_config, **settings):
   config = Configurator(settings=settings)
   config.include('pyramid_chameleon')
   config.set_security_policy(
      SecurityPolicy(
         secret=settings['hello.secret'],
      ),
   )
   config.add_route('home', '/')
   config.add_route('login', '/login')
   config.add_route('logout', '/logout')
   config.scan('.views')
   return config.make_wsgi_app()
Three views corresponding to the above routes are defined in views.py.
from pyramid.httpexceptions import HTTPFound
from pyramid.security import remember, forget

from pyramid.view import view_config, view_defaults
from .security import USERS

@view_defaults(renderer='home.pt')
class HelloViews:
   def __init__(self, request):
      self.request = request
      self.logged_in = request.authenticated_userid
   @view_config(route_name='home')
   def home(self):
      return {'name': 'Welcome'}
   @view_config(route_name='login', renderer='login.pt')
   def login(self):
      request = self.request
      login_url = request.route_url('login')
      referrer = request.url
      if referrer == login_url:
         referrer = '/'
      came_from = request.params.get('came_from', referrer)
      message = ''
      login = ''
      password = ''
      if 'form.submitted' in request.params:
         login = request.params['login']
         password = request.params['password']
         pw = USERS.get(login)
         if pw == password:
            headers = remember(request, login)
            return HTTPFound(location=came_from, headers=headers)
         message = 'Failed login'
         return dict(
            name='Login', message=message,
            url=request.application_url + '/login',
            came_from=came_from,
            login=login, password=password,)

   @view_config(route_name='logout')
   def logout(self):
      request = self.request
      headers = forget(request)
      url = request.route_url('home')
      return HTTPFound(location=url, headers=headers)
The login view renders the login form. When the user Id and password entered by the user are verified against the list of USERS, the details are 'remembered'. On the other hand, the logout view releases these details by 'forgetting'.
The home view renders the following chameleon template - home.pt
<!DOCTYPE html>
<html lang="en">
<body>
   <div>
      <a tal:condition="view.logged_in is None" href="${request.application_url}/login">Log In</a>
      <a tal:condition="view.logged_in is not None" href="${request.application_url}/logout">Logout</a>
   </div>
   <h1>Hello. ${name}</h1>
</body>
</html>
Following is the chameleon template login.pt for login view.
<!DOCTYPE html>
<html lang="en">
<body>
   <h1>Login</h1>
   <span tal:replace="message"/>

   <form action="${url}" method="post">
      <input type="hidden" name="came_from" value="${came_from}"/>
      <label for="login">Username</label>
      <input type="text" id="login" name="login" value="${login}"/><br/>
      <label for="password">Password</label>
      <input type="password" id="password" name="password" value="${password}"/><br/>
      <input type="submit" name="form.submitted" value="Log In"/>
   </form>
</body>
</html>
The development.ini and setup.py are placed in the outer project folder, while, the __init__.py, views.py, security.py and the templates home.pt as well as login.pt should be saved under the package folder named hello.
Install the package with the following command −
Env\hello>pip3 install -e.
Start the server with the pserve utility.
pserve development.ini
Output
Open the browser and visit http://localhost:6543/ link.

Click the "Log In" link to open the login form −
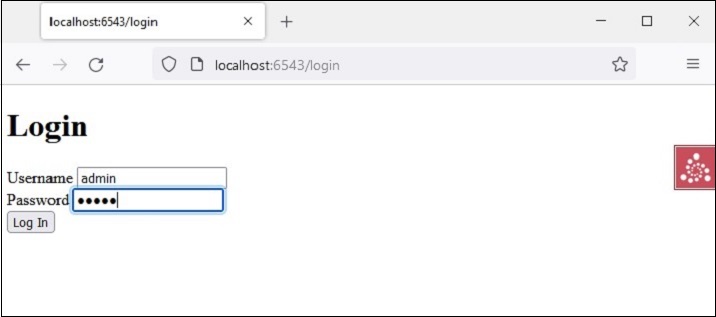
The home view page comes back with the link changed to logout as the credentials are remembered.
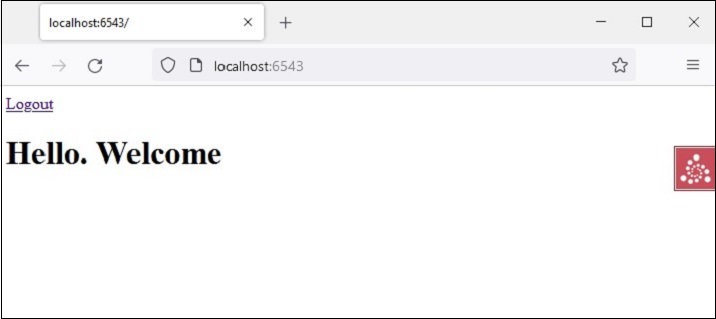
Clicking the "logout" link will result in forgetting the credentials and the default home page will be shown.
Python Pyramid - Deployment
The examples of Pyramid applications developed so far in this tutorial have been executed on the local machine. To make it accessible publicly, it must be deployed on a Production server capable of WSGI standards.
Many WSGI compatible http servers are available for this purpose. For example −
- waitress
- paste.httpserver
- CherryPy
- uWSGI
- gevent
- mod_wsgi
We have discussed how we can use Waitress server to host a Pyramid application. It can be served on ports 80 (HTTP) and 443 (HTTPS) of a machine having a public IP address.
mod_wsgi
Apache server is a popular open source HTTP server software, distributed by Apache Software Foundation. It powers most of the web servers across internet. The mod_wsgi (developed by Graham Dumpleton) is an Apache module that provides a WSGI interface for deploying Python based web applications on Apache.
In this section, the step by step procedure to deploy a Pyramid application on the Apache server is explained. Here, we'll use XAMPP, a popular open source Apache distribution. It can be downloaded from https://www.apachefriends.org/download.html.
The mod_wsgi module is installed with PIP installer. Before installing, set the MOD_WSGI_APACHE_ROOTDIR environment variable to the directory in which Apache executable is located.
C:\Python310\Scripts>set MOD_WSGI_APACHE_ROOTDIR=C:/xampp/apache
C:\Python310\Scripts>pip install mod_wsgi
Next, run the following command in the command terminal.
C:\Python310\Scripts>mod_wsgi-express module-config
LoadFile "C:/Python310/python310.dll"
LoadModule wsgi_module "C:/Python310/lib/site-packages/mod_wsgi/server/mod_wsgi.cp310-win_amd64.pyd"
WSGIPythonHome "C:/Python310"
These are mod_wsgi module settings to be incorporated Apache's configuration file. Open httpd.conf file of your XAMPP installation and copy the output of the above command line in it.
Next, create a virtual host configuration for our application. Apache stores virtual host information in httpd-vhosts.conf file which is found in C:\XAMPP\Apache\conf\extra\ folder. Open the file and add following lines in it −
<VirtualHost *>
   ServerName localhost:6543
   WSGIScriptAlias / e:/pyramid-env/hello/production.ini
   <Directory e:/pyramid-env/hello>
      Order deny,allow
      Allow from all
      Require all granted
   </Directory>
</VirtualHost>
Here, it is assumed that a hello Pyramid project is built using the Cookiecutter utility. The PasteDeploy configuration file to be used in production environment is used here.
This virtual host configuration needs to be incorporated in Apache's httpd.conf file. This is done by adding following lines in it −
# Virtual hosts
   Include conf/extra/httpd-vhosts.conf
We now have to save the following code as pyramid.wsgi file that returns the Pyramid WSGI application object.
from pyramid.paster import get_app, setup_logging
ini_path = 'e:/pyramid-env/hello/production.ini'
setup_logging(ini_path)
application = get_app(ini_path, 'main')
After performing the above mentioned procedure, restart the XAMPP server and we should be able to run the Pyramid application on the Apache server.
Deploy on Uvicorn
Uvicorn is an ASGI compatible server (ASGI stands for Asynchronous Gateway Interface). Since Pyramid is a WSGI based web framework, we need to convert the WSGI application object to ASGI object, with the help of WsgiToAsgi() function defined in asgiref.wsgi module.
from asgiref.wsgi import WsgiToAsgi
from pyramid.config import Configurator
from pyramid.response import Response

def hello_world(request):
   return Response("Hello")

with Configurator() as config:
   config.add_route("hello", "/")
   config.add_view(hello_world, route_name="hello")
   wsgi_app = config.make_wsgi_app()

app = WsgiToAsgi(wsgi_app)
Save the above code as app.py. Install Uvicorn with pip utility.
pip3 install uvicorn
Run the Pyramid application in ASGI mode.
uvicorn app:app
Similarly, it can be served using daphne server.
daphne app:app
