- Python Network Programming - Home
- Python Network Introduction
- Python Networking - Environment Setup
- Python Networking - Internet Protocol
- Python Networking - IP Address
- Python Networking - DNS Lookup
- Python Networking - Routing
- Python Networking - HTTP Requests
- Python Networking - HTTP Response
- Python Networking - HTTP Headers
- Python Networking - Custom HTTP Requests
- Python Networking - Request Status Codes
- Python Networking - HTTP Authentication
- Python Networking - HTTP Data Download
- Python Networking - Connection Re-use
- Python Networking - Network Interface
- Python Networking - Sockets Programming
- Python Networking - HTTP Client
- Python Networking - HTTP Server
- Python Networking - Building URLs
- Python Networking - WebForm Submission
- Python Networking - Databases and SQL
- Python Networking - Telnet
- Python Networking - Email Messages
- Python Networking - SMTP
- Python Networking - POP3
- Python Networking - IMAP
- Python Networking - SSH
- Python Networking - FTP
- Python Networking - SFTP
- Python Networking - Web Servers
- Python Networking - Uploading Data
- Python Networking - Proxy Server
- Python Networking - Directory Listing
- Python Networking - Remote Procedure Call
- Python Networking - RPC JSON Server
- Python Networking - Google Maps
- Python Networking - RSS Feed
Python Network Programming Resources
Python Network - Quick Guide
Python Network - Introduction
As pythons versatility as a programming language grown over the years, we find that python is very suitable in the world of network programming too. With growth in cloud computing , network programming has become even a more hot topic and python has a big role to play. Below are the few important reasons for pythons use as a preferred language for network Programming.
Socket programming
Sockets are the links through which the client and servers communicate with each other. For example when a browser is opened a socket is automatically created to connect with the server. Python has a socket module which an be used to implement various socket functionalities like binding an address or starting a listener port. Socket programming is fundamental to computer networking and python handles it well.
Client programming
The client is the computer which requests for information and waits for the response. Python programs can be written to validate many client-side actions like parsing a URL, sending parameters with the URL while submitting a request, connect to a alternate URL if access to one URL becomes unsuccessful etc. These programs are run in the client programs and handle all the communication needs with the server even without using a browser. For example you can provide an URL to the python program for downloading a file and it will get done by the program itself without taking help from the browser program.
Building web servers
It is possible to create simple web servers which are good enough to run websites using python as a programming language. Python already has some inbuilt web servers which can be tweaked to achieve some additional functionalities needed.
The SimpleHTTPServer module provides the functionalities of a web server out of the box and you can start running it from the local python installation. In python 3 it is named as http.serverCherryPy and Tornado are examples of webservers written in python which run as good as non python well known web servers like Apache or Ngnix.
Web Scrapping
One of the important reasons python became famous is the its dominance among the languages used for scrapping the web. Its data structure and network access abilities makes it ideal for visiting webpages and download their data automatically. And if there is some API connectivity available for the target website, then python will handle it even more easily through its program structures.
Web Frame works
Web Frame works makes application development easy and fast by offering pre-defined structures and modularity. The developer has to do minimal coding to leverage those existing libraries and customize a little to achieve the goal. Django and Flask are two famous ones which have seen much commercial use even though they are opensource.
Getting Geo Locations
Python has libraries which handle geographical data. It can find name of the business addresses if the latitude and longitude is known and vice versa. Of course it takes help of other map providers data like google maps. Pythons capability for networking truly extends even to different geographic boundaries !
Python Network - Environment Setup
Python 3 is available for Windows, Mac OS and most of the flavors of Linux operating system. Even though Python 2 is available for many other OSs, Python 3 support either has not been made available for them or has been dropped.
Local Environment Setup
Open a terminal window and type "python" to find out if it is already installed and which version is installed.
Getting Python
Windows platform
Binaries of latest version of Python 3 (Python 3.14.2) are available on this download page
The following different installation options are available.
- Windows x86-64 embeddable zip file
- Windows x86-64 executable installer
- Windows x86-64 web-based installer
- Windows x86 embeddable zip file
- Windows x86 executable installer
- Windows x86 web-based installer
Note − In order to install Python 3.14.2, minimum OS requirements are Windows 7 with SP1. For versions 3.0 to 3.4.x Windows XP is acceptable.
Linux platform
Different flavors of Linux use different package managers for installation of new packages.
On Ubuntu Linux, Python 3 is installed using the following command from the terminal.
$sudo apt-get install python3-minimal
Installation from source
Download Gzipped source tarball from Python's download URL − https://www.python.org/ftp/python/3.14.2/Python-3.14.2.tgz
Extract the tarball
tar xvfz Python-3.14.2.tgz
Configure and Install:
cd Python-3.14.2
./configure --prefix = /opt/python3.14.2
make
sudo make install
Mac OS
Download Mac OS installers from this URL − https://www.python.org/downloads/mac-osx/
- Mac OS X 64-bit/32-bit installer − python-3.14.2-macosx10.6.pkg
- Mac OS X 32-bit i386/PPC installer − python-3.14.2-macosx10.5.pkg
Double click this package file and follow the wizard instructions to install.
The most up-to-date and current source code, binaries, documentation, news, etc., is available on the official website of Python −
Python Official Website − https://www.python.org/
You can download Python documentation from the following site. The documentation is available in HTML, PDF and PostScript formats.
Python Documentation Website − www.python.org/doc/
Setting up PATH
Programs and other executable files can be in many directories. Hence, the operating systems provide a search path that lists the directories that it searches for executables.
The important features are −
The path is stored in an environment variable, which is a named string maintained by the operating system. This variable contains information available to the command shell and other programs.
The path variable is named as PATH in Unix or Path in Windows (Unix is case-sensitive; Windows is not).
In Mac OS, the installer handles the path details. To invoke the Python interpreter from any particular directory, you must add the Python directory to your path.
Setting Path at Unix/Linux
To add the Python directory to the path for a particular session in Unix −
In the csh shell − type setenv PATH "$PATH:/usr/local/bin/python3" and press Enter.
In the bash shell (Linux) − type export PYTHONPATH=/usr/local/bin/python3.4 and press Enter.
In the sh or ksh shell − type PATH="$PATH:/usr/local/bin/python3" and press Enter.
Note − /usr/local/bin/python3 is the path of the Python directory.
Setting Path at Windows
To add the Python directory to the path for a particular session in Windows −
At the command prompt − type path %path%;C:\Python and press Enter.
Note − C:\Python is the path of the Python directory
Running Python
There are three different ways to start Python −
Interactive Interpreter
You can start Python from Unix, DOS, or any other system that provides you a command-line interpreter or shell window.
Enter python the command line.
Start coding right away in the interactive interpreter.
$py             # Unix/Linux

or

py%             # Unix/Linux

or

C:>py           # Windows/DOS
Integrated Development Environment
You can run Python from a Graphical User Interface (GUI) environment as well, if you have a GUI application on your system that supports Python.
Unix − IDLE is the very first Unix IDE for Python.
Windows − PythonWin is the first Windows interface for Python and is an IDE with a GUI.
Macintosh − The Macintosh version of Python along with the IDLE IDE is available from the main website, downloadable as either MacBinary or BinHex'd files.
If you are not able to set up the environment properly, then you can take the help of your system admin. Make sure the Python environment is properly set up and working perfectly fine.
Note − All the examples given in subsequent chapters are executed with Python 3.14.2 version available on Windows 7 and Ubuntu Linux.
We have already set up Python Programming environment online, so that you can execute all the available examples online while you are learning theory. Feel free to modify any example and execute it online.
Python Network - Internet Protocol
The Internet Protocol is designed to implement a uniform system of addresses on all of the Internet-connected computers everywhere and to make it possible for packets to travel from one end of the Internet to the other. A program like the web browser should be able to connect to a host anywhere without ever knowing which maze of network devices each packet is traversing on its journey. There are various categories of internet protocols. Thes protocols are created to serve the needs of different types of data communication between different computers in the internet.
Python has several modules to handle each of these communication scenarios. The methods and functions in these modules can do the simplest job of just validating a URL or also the complex job of handling the cookies and sessions. In this chapter we will look at the most prominent python modules used for internet protocols.
Internet Protocols
| Protocol | Python Module Name | Description |
|---|---|---|
| HTTP | urllib.request | Opening the HTTP URL |
| HTTP | urllib.response | Create a reponse object for a url request |
| HTTP | urllib.parse | To break Uniform Resource Locator (URL) strings up in components like (addressing scheme, network location, path etc.), |
| HTTP | urllib.robotparser | It finds out whether or not a particular user agent can fetch a URL on the Web site that published the robots.txt file. |
| FTP | ftplib | implements the client side of the FTP protocol. You can use this to write Python programs that perform a variety of automated FTP jobs, such as mirroring other FTP servers. |
| POP | poplib | This module defines a class, POP3, which encapsulates a connection to a POP3 server to read messages from a email server |
| IMAP | imaplib | This module defines three classes, IMAP4, IMAP4_SSL and IMAP4_stream, which encapsulate a connection to an IMAP4 server to read emails. |
| SMTP | smtplib | The smtplib module defines an SMTP client session object that can be used to send mail to any Internet machine with an SMTP listner deamon. |
| Telnet | telnet | This module provides a Telnet class that implements the Telnet protocol to access a server thorugh teleent. |
Each of them is discussed in detail in the subsequent chapters.
Python Network - IP Address
IP Address (Internet Protocol) is a fundamental networking concept that provides address assignation capability in a network. The python module ipaddress is used extensively to validate and categorize IP address to IPV4 and IPV6 type. It can also be used to do comparison of the IP address values as well as IP address arithmetic for manipulating the ip addresses.
Validate the IPV4 Address
The ip_address function validates the IPV4 address. If the range of values is beyond 0 to 255, then it throws an error.
main.py
import ipaddress

print (ipaddress.ip_address(u'192.168.0.255'))
print (ipaddress.ip_address(u'192.168.0.256'))
Output
When we run the above program, we get the following output −
192.168.0.255
ValueError: u'192.168.0.256' does not appear to be an IPv4 or IPv6 address
Validate the IPV6 Address
The ip_address function validates the IPV6 address. If the range of values is beyond 0 to ffff, then it throws an error.
import ipaddress

print (ipaddress.ip_address(u'FFFF:9999:2:FDE:257:0:2FAE:112D'))

#invalid IPV6 address
print (ipaddress.ip_address(u'FFFF:10000:2:FDE:257:0:2FAE:112D'))
Output
When we run the above program, we get the following output −
ffff:9999:2:fde:257:0:2fae:112d
ValueError: u'FFFF:10000:2:FDE:257:0:2FAE:112D' does not appear to be an IPv4 or IPv6 address
Check the type of IP Address
We can supply the IP address of various formats and the module will be able to recognize the valid formats. It will also indicate which category of IP address it is.
main.py
import ipaddress

print(type(ipaddress.ip_address(u'192.168.0.255')))

print(type(ipaddress.ip_address(u'2001:db8::')))

print(ipaddress.ip_address(u'192.168.0.255'))

print(ipaddress.ip_network(u'192.168.0.0/28'))
Output
When we run the above program, we get the following output −
<class 'ipaddress.IPv4Address'>
<class 'ipaddress.IPv6Address'>
192.168.0.255
192.168.0.0/28
Comparison of IP Addresses
We can make a logical comparison of the IP addresses finding out if they are equal or not. We can also compare if one IP address is greater than the other in its value.
main.py
import ipaddress

print (ipaddress.IPv4Address(u'192.168.0.2') > ipaddress.IPv4Address(u'192.168.0.1'))
print (ipaddress.IPv4Address(u'192.168.0.2') == ipaddress.IPv4Address(u'192.168.0.1'))
print (ipaddress.IPv4Address(u'192.168.0.2') != ipaddress.IPv4Address(u'192.168.0.1'))
Output
When we run the above program, we get the following output −
True
False
True
IP Addresses Arithmetic
We can also apply arithmetic operations to manipulate IP addresses. We can add or subtract integers to an IP address. If after addition the value of the last octet goes beyond 255 then the previous octet gets incremented to accommodate the value. If the extra value can not be absorbed by any of the previous octet then a value error is raised.
main.py
import ipaddress

print (ipaddress.IPv4Address(u'192.168.0.2')+1)

print (ipaddress.IPv4Address(u'192.168.0.253')-3)

# Increases the previous octet by value 1.
print (ipaddress.IPv4Address(u'192.168.10.253')+3)

# Throws Value error
print (ipaddress.IPv4Address(u'255.255.255.255')+1)
Output
When we run the above program, we get the following output −
192.168.0.3
192.168.0.250
192.168.11.0
AddressValueError: 4294967296 (>= 2**32) is not permitted as an IPv4 address
Python Network - DNS Lookup
The IP addresses when translated to human readable formats or words become known as domain names. The translation of domain names to IP address is managed by the python module dnspython.This module also provides methods to find out CNAME and MX records.
Finding 'A' Record
In the below program we find the ip address for the domain using the dns.resolver method. Usually this mapping between IP address and domain name is also known as 'A' record.
main.py
import dns.resolver

result = dns.resolver.resolve('tutorialspoint.com', 'A')
for ipval in result:
    print('IP', ipval.to_text())
Output
When we run the above program, we get the following output −
IP 135.181.223.254
Finding MX Record
A MX record also called mail exchanger record is a resource record in the Domain Name System that specifies a mail server responsible for accepting email messages on behalf of a recipient's domain. It also sets the preference value used to prioritizing mail delivery if multiple mail servers are available. Similar to above programs we can find the value for MX record using the 'MX' parameter in the query method.
main.py
import dns.resolver

result = dns.resolver.resolve('tutorialspoint.com', 'MX')
for exdata in result:
    print(' MX Record:', exdata.exchange)
Output
When we run the above program, we get the following output −
 MX Record: alt2.aspmx.l.google.com.
 MX Record: aspmx.l.google.com.
 MX Record: alt4.aspmx.l.google.com.
 MX Record: alt3.aspmx.l.google.com.
 MX Record: alt1.aspmx.l.google.com.
The above is a sample output and not the exact one.
Python Network - Routing
Routing is the mechanism of mapping the URL directly to the code that creates the webpage. It helps in better management of the structure of the webpage and increases the performance of the site considerably and further enhancements or modifications become really straight forward. In python routing is implemented in most of the web frame works. We will see the examples from flask web framework in this chapter.
Install Flask
pip3 install flask
Collecting flask
  Downloading flask-3.1.3-py3-none-any.whl.metadata (3.2 kB)
...
Installing collected packages: werkzeug, itsdangerous, blinker, flask
Successfully installed blinker-1.9.0 flask-3.1.3 itsdangerous-2.2.0 werkzeug-3.1.6
Routing in Flask
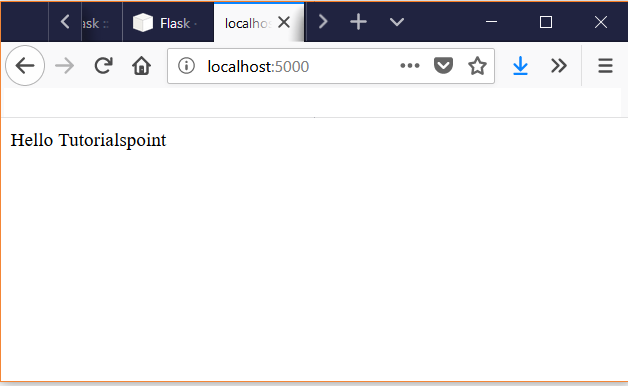
The route() decorator in Flask is used to bind an URL to a function. As a result when the URL is mentioned in the browser, the function is executed to give the result. Here, URL '/hello' rule is bound to the hello_world() function. As a result, if a user visits http://localhost:5000/ URL, the output of the hello_world() function will be rendered in the browser.
main.py
from flask import Flask
app = Flask(__name__)

@app.route('/')
def hello_world():
   return 'Hello Tutorialspoint'

if __name__ == '__main__':
   app.run()
Output
When we run the above program, we get the following output −
 * Serving Flask app "flask_route" (lazy loading)
 * Environment: production
   WARNING: Do not use the development server in a production environment.
   Use a production WSGI server instead.
 * Debug mode: off
 * Running on http://127.0.0.1:5000/ (Press CTRL+C to quit)
127.0.0.1 - - [06/Aug/2018 08:48:45] "GET / HTTP/1.1" 200 -
127.0.0.1 - - [06/Aug/2018 08:48:46] "GET /favicon.ico HTTP/1.1" 404 -
127.0.0.1 - - [06/Aug/2018 08:48:46] "GET /favicon.ico HTTP/1.1" 404 -
We open the browser and point to the URL http://localhost:5000/ to see the result of the function being executed.
Using URL Variables
We can pass on URL variables using route to build URLS on the fly. For this we use the url_for() function which accepts name of the function as the first argument and the rest of the arguments as variable part of the URL rule.
In the below example we pass the function names as arguments to the url_for function and print out the result when those lines are executed.
main.py
from flask import Flask, url_for
app = Flask(__name__)

@app.route('/')
def index(): pass

@app.route('/login')
def login(): pass

@app.route('/user/<username>')
def profile(username): pass

with app.test_request_context():
    print url_for('index')
    print url_for('index', _external=True)
    print url_for('login')
    print url_for('login', next='/')
    print url_for('profile', username='Tutorials Point')
</username>
Output
When we run the above program, we get the following output −
/
http://localhost/
/login
/login?next=%2F
/user/Tutorials%20Point
Redirects
We can use the redirect function to redirect the user to another URL using routing. We mention the new URL as a return value of the function whihc should redirect the user. This is helpful when we temporarily divert the users to a different page when we are modifying an existing webpage.
main.py
from flask import Flask, abort, redirect, url_for
app = Flask(__name__)

@app.route('/')
def index():
    return redirect(url_for('login'))

@app.route('/login')
def login():
    abort(401)
#    this_is_never_executed()
When the above code is executed, the base URL goes to login page which uses the abort function so that the code for login page is never executed.
Python Network - HTTP Requests
The http or Hyper Text Transfer Protocol works on client server model. Usually the web browser is the client and the computer hosting the website is the server. IN python we use the requests module for creating the http requests. It is a very powerful module which can handle many aspects of http communication beyond the simple request and response data. It can handle authentication, compression/decompression, chunked requests etc.
An HTTP client sends an HTTP request to a server in the form of a request message which includes following format:
- A Request-line
- Zero or more header (General|Request|Entity) fields followed by CRLF
- An empty line (i.e., a line with nothing preceding the CRLF) indicating the end of the header fields
- Optionally a message-body
The following sections explain each of the entities used in an HTTP request message.
Request-Line
The Request-Line begins with a method token, followed by the Request-URI and the protocol version, and ending with CRLF. The elements are separated by space SP characters.
Request-Line = Method SP Request-URI SP HTTP-Version CRLF
Let's discuss each of the parts mentioned in the Request-Line.
Request Method
The request method indicates the method to be performed on the resource identified by the given Request-URI. The method is case-sensitive and should always be mentioned in uppercase. The following table lists all the supported methods in HTTP/1.1.
| S.N. | Method and Description |
|---|---|
| 1 | GET The GET method is used to retrieve information from the given server using a given URI. Requests using GET should only retrieve data and should have no other effect on the data. |
| 2 | HEAD Same as GET, but it transfers the status line and the header section only. |
| 3 | POST A POST request is used to send data to the server, for example, customer information, file upload, etc. using HTML forms. |
| 4 | PUT Replaces all the current representations of the target resource with the uploaded content. |
| 5 | DELETE Removes all the current representations of the target resource given by URI. |
| 6 | CONNECT Establishes a tunnel to the server identified by a given URI. |
| 7 | OPTIONS Describe the communication options for the target resource. |
| 8 | TRACE Performs a message loop back test along with the path to the target resource. |
Request-URI
The Request-URI is a Uniform Resource Identifier and identifies the resource upon which to apply the request. Following are the most commonly used forms to specify an URI:
Request-URI = "*" | absoluteURI | abs_path | authority
| S.N. | Method and Description |
|---|---|
| 1 | The asterisk * is used when an HTTP request does not apply to a particular resource, but to the server itself, and is only allowed when the method used does not necessarily apply to a resource. For example: OPTIONS * HTTP/1.1 |
| 2 | The absoluteURI is used when an HTTP request is being made to a proxy. The proxy is requested to forward the request or service from a valid cache, and return the response. For example: GET http://www.w3.org/pub/WWW/TheProject.html HTTP/1.1 |
| 3 | The most common form of Request-URI is that used to identify a resource on an origin server or gateway. For example, a client wishing to retrieve a resource directly from the origin server would create a TCP connection to port 80 of the host "www.w3.org" and send the following lines: GET /pub/WWW/TheProject.html HTTP/1.1 Host: www.w3.org Note that the absolute path cannot be empty; if none is present in the original URI, it MUST be given as "/" (the server root). |
Using Python requests
We will use the module requests for learning about http request.
pip3 install requests
In the below example we see a case of simple GET request annd print out the result of the response. We choose to print only the first 300 characters.
main.py
# How to make http request
import requests as req
r = req.get('https://www.tutorialspoint.com/python/')
print(r.text)
Output
When we run the above program, we get the following output −
<!DOCTYPE html>
<!--[if IE 8]><html class="ie ie8"> <![endif]-->
<!--[if IE 9]><html class="ie ie9"> <![endif]-->
<!--[if gt IE 9]><!-->	<html> <!--<![endif]-->
<head>
<!-- Basic -->
<meta charset="utf-8">
<title>Python Tutorial</title>
<meta name="description" content="Python Tutorial
...
Python Network - HTTP Response
The http or Hyper Text Transfer Protocol works on client server model. Usually the web browser is the client and the computer hosting the website is the server. Upon receiving a request from client the server generates a response and sends it back to the client in certain format.
After receiving and interpreting a request message, a server responds with an HTTP response message:
- A Status-line
- Zero or more header (General|Response|Entity) fields followed by CRLF
- An empty line (i.e., a line with nothing preceding the CRLF) indicating the end of the header fields
- Optionally a message-body
The following sections explain each of the entities used in an HTTP response message.
Message Status-Line
A Status-Line consists of the protocol version followed by a numeric status code and its associated textual phrase. The elements are separated by space SP characters.
Status-Line = HTTP-Version SP Status-Code SP Reason-Phrase CRLF
HTTP Version
A server supporting HTTP version 1.1 will return the following version information:
HTTP-Version = HTTP/1.1
Status Code
The Status-Code element is a 3-digit integer where first digit of the Status-Code defines the class of response and the last two digits do not have any categorization role. There are 5 values for the first digit:
| S.N. | Code and Description |
|---|---|
| 1 | 1xx: Informational It means the request was received and the process is continuing. |
| 2 | 2xx: Success It means the action was successfully received, understood, and accepted. |
| 3 | 3xx: Redirection It means further action must be taken in order to complete the request. |
| 4 | 4xx: Client Error It means the request contains incorrect syntax or cannot be fulfilled. |
| 5 | 5xx: Server Error It means the server failed to fulfill an apparently valid request. |
HTTP status codes are extensible and HTTP applications are not required to understand the meaning of all registered status codes.
Using Python Requests
In the below python program we use the urllib3 module to make a http GET request and receive the response containing the data. It also provides the response code which is also managed by the functions in the module. The PoolManager object handles all of the details of connection pooling and also handles the thread safety.
main.py
import urllib3
http = urllib3.PoolManager()

resp = http.request('GET', 'https://tutorialspoint.com/robots.txt')
print(resp.data)

# get the status of the response
print(resp.status)
Output
When we run the above program, we get the following output −
User-agent: *
Disallow: /tmp
Disallow: /logs
Disallow: /rate/*
Disallow: /cgi-bin/*
Disallow: /videotutorials/video_course_view.php?*
Disallow: /videotutorials/course_view.php?*
Disallow: /videos/*
Disallow: /*/*_question_bank/*
Disallow: //*/*/*/*/src/*

200
Python Network - HTTP Headers
The request and response between client and server involves header and body in the message. Headers contain protocol specific information that appear at the beginning of the raw message that is sent over TCP connection. The body of the message is separated from headers using a blank line.
Example of Headers
The headers in the http response can be categorized into following types. Below is a description of the header and an example.
Cache-Control
The Cache-Control general-header field is used to specify directives that MUST be obeyed by all the caching system. The syntax is as follows:
Cache-Control : cache-request-directive|cache-response-directive
An HTTP client or server can use the Cache-control general header to specify parameters for the cache or to request certain kinds of documents from the cache. The caching directives are specified in a comma-separated list. For example:
Cache-control: no-cache
Connection
The Connection general-header field allows the sender to specify options that are desired for that particular connection and must not be communicated by proxies over further connections. Following is the simple syntax for using connection header:
Connection : "Connection"
HTTP/1.1 defines the "close" connection option for the sender to signal that the connection will be closed after completion of the response. For example:
Connection: close
By default, HTTP 1.1 uses persistent connections, where the connection does not automatically close after a transaction. HTTP 1.0, on the other hand, does not have persistent connections by default. If a 1.0 client wishes to use persistent connections, it uses the keep-alive parameter as follows:
Connection: keep-alive
Date
All HTTP date/time stamps MUST be represented in Greenwich Mean Time (GMT), without exception. HTTP applications are allowed to use any of the following three representations of date/time stamps:
Sun, 06 Nov 1994 08:49:37 GMT  ; RFC 822, updated by RFC 1123
Sunday, 06-Nov-94 08:49:37 GMT ; RFC 850, obsoleted by RFC 1036
Sun Nov  6 08:49:37 1994       ; ANSI C's asctime() format
Transfer-Encoding
The Transfer-Encoding general-header field indicates what type of transformation has been applied to the message body in order to safely transfer it between the sender and the recipient. This is not the same as content-encoding because transfer-encodings are a property of the message, not of the entity-body. The syntax of Transfer-Encoding header field is as follows:
Transfer-Encoding: chunked
All transfer-coding values are case-insensitive.
Upgrade
The Upgrade general-header allows the client to specify what additional communication protocols it supports and would like to use if the server finds it appropriate to switch protocols. For example:
Upgrade: HTTP/2.0, SHTTP/1.3, IRC/6.9, RTA/x11
The Upgrade header field is intended to provide a simple mechanism for transition from HTTP/1.1 to some other, incompatible protocol.
Via
The Via general-header must be used by gateways and proxies to indicate the intermediate protocols and recipients. For example, a request message could be sent from an HTTP/1.0 user agent to an internal proxy code-named "fred", which uses HTTP/1.1 to forward the request to a public proxy at nowhere.com, which completes the request by forwarding it to the origin server at www.ics.uci.edu. The request received by www.ics.uci.edu would then have the following Via header field:
Via: 1.0 fred, 1.1 nowhere.com (Apache/1.1)
The Upgrade header field is intended to provide a simple mechanism for transition from HTTP/1.1 to some other, incompatible protocol.
Warning
The Warning general-header is used to carry additional information about the status or transformation of a message which might not be reflected in the message. A response may carry more than one Warning header.
Warning : warn-code SP warn-agent SP warn-text SP warn-date
Example
In the below example we use the urllib3 module to get a response using urlopen. Next we apply the info() method to get the header information for that response.
import urllib3
http = urllib3.PoolManager()

response = http.request('GET', 'https://tutorialspoint.com/robots.txt')
html = response.info()
print(html)
Output
When we run the above program, we get the following output −
HTTPHeaderDict({'Content-Type': 'text/plain', 'Content-Length': '850',
...
})
Python Network - Custom HTTP Requests
The Hypertext Transfer Protocol (HTTP) is a protocol used to enable communications between clients and servers. It works as a request-response protocol between a client and server. The requesting device is known as the client and the device that sends the response is known as server.
The urllib is the traditional python library which is used in python programs to handle the http requests. But now there is urllib3 which does more than what urllib used to do. We import the urllib3 library to see how python can use it to make a http request and receive a response. We can customize the type of request by choosing the request method.
pip3 install urllib3
Example
In the below example we use the PoolManager() object which takes care of the connection details of the http request. Next we use the request() object to make a http request with the POST method. Finally we also use the json library to print the received values in json format.
main.py
import urllib3
import json

http = urllib3.PoolManager()
r = http.request(
    'POST',
    'http://httpbin.org/post',
    fields={'field': 'value'})
print(json.loads(r.data.decode('utf-8'))['form'])
Output
When we run the above program, we get the following output −
{field': value'}
URL Using a Query
We can also pass query parameters to build custom URLs. In the below example the request method uses the values in the query string to complete the URL which can be further used by another function in the python program.
main.py
import requests

query = {'q': 'river', 'order': 'popular', 'min_width': '800', 'min_height': '600'}
req = requests.get('https://pixabay.com/en/photos/', params=query)

print(req.url)
Output
When we run the above program, we get the following output −
https://pixabay.com/en/photos/?q=river&min_width=800&min_height=600&order=popular
Python Network - Status Codes
After receiving and interpreting a request message, a server responds with an HTTP response message. The response message has a Status-Code. It is a 3-digit integer where first digit of the Status-Code defines the class of response and the last two digits do not have any categorization role. There are 5 values for the first digit:
Status Codes
| S.N. | Code and Description |
|---|---|
| 1 | 1xx: Informational It means the request was received and the process is continuing. |
| 2 | 2xx: Success It means the action was successfully received, understood, and accepted. |
| 3 | 3xx: Redirection It means further action must be taken in order to complete the request. |
| 4 | 4xx: Client Error It means the request contains incorrect syntax or cannot be fulfilled. |
| 5 | 5xx: Server Error It means the server failed to fulfill an apparently valid request. |
Successful Response
In the below example we access a file from a url and the response is successful. So the status code returned is 200.
main.py
import urllib3
http = urllib3.PoolManager()

resp = http.request('GET', 'https://tutorialspoint.com/robots.txt')
print(resp.data)

# get the status of the response
print(resp.status)
Output
When we run the above program, we get the following output −
b'# This file is being served by CloudFront, please check listed behaviours.
...
Disallow: /listtutorials/
...
200
Unsuccessful Response
In the below example we access a file from a url which does not exist. The response is unsuccessful. So the status code returned is 404.
main.py
import urllib3
http = urllib3.PoolManager()

resp = http.request('GET', 'http://tutorialspoint.com/robot.txt')
print(resp.data)

# get the status of the response
print(resp.status)
Output
When we run the above program, we get the following output −
b'<...
<head>\n<title>404 Not Found</title>
...
404
Python Network - Http Authentication
Authentication is the process of determining if the request has come from a valid user who has the required privileges to use the system. In the world of computer networking this is a very vital requirement as many systems keep interacting with each other and proper mechanism needs to ensure that only valid interactions happen between these programs.
The python module names requests has in-built feature to call various APIs provided by the serving web apps along with the user credentials. These credentials have to be embedded in the calling program. If the APIs verify it successfully then a valid login happens.
Installing Requests
We install the required python module named requests for running the authentication program.
pip3 install requests requests_oauthlib
Authenticating to Github
Below we see a simple authentication mechanism involving only the username and the password. A successful response indicates valid login.
main.py
import requests
r = requests.get('https://api.github.com/user', auth=('user', 'pass'))
print(r)
Output
When we run the above program, we get the following output −
<Response [401]>
Authenticating to Twitter
We can also run a program to use twitter's api and make a successful login by using the following code. We use the OAuth1 method available in the requests module to process the parameters required by Twitter API. As we can see the requests module is capable of handling more complex authentication mechanism involving keys and tokens rather than just the username and password mechanism.
main.py
import requests
from requests_oauthlib import OAuth1

url = 'https://api.twitter.com/1.1/account/verify_credentials.json'
auth = OAuth1('YOUR_APP_KEY', 'YOUR_APP_SECRET',
              'USER_OAUTH_TOKEN', 'USER_OAUTH_TOKEN_SECRET')

requests.get(url, auth=auth)
Output
When we run the above program, we get the following output −
{
  "errors": [
    {
      "code": 215,
      "message": "Bad Authentication data."
    }
  ]
}
But using the proper values for OAuth1 parameters you get a successful response.
Python Network - Http Data Download
We can download data from a serer using python's module which handle ftp or File Transfer Protocol. We can also read the data and later save it to the local system.
We need to install the module ftplib to acheive this.
pip3 install ftplib
Fetching the Files
We can fetch a specific file by using the getfile method. This method moves a copy of the file from the remote system to the local system from where the ftp connection was initiated.
main.py
import ftplib
import sys

def getFile(ftp, filename):
    try:
        ftp.retrbinary("RETR " + filename ,open(filename, 'wb').write)
    except:
        print "Error"


ftp = ftplib.FTP("ftp.nluug.nl")
ftp.login("anonymous", "ftplib-example-1")

ftp.cwd('/pub/')          #change directory to /pub/
getFile(ftp,'README.nluug')

ftp.quit()
When we run the above program, we find the file README.nlug to be present in the local system from where the connection was initiated.
Reading the Data
In the below example we use the module urllib2 to read the required portion of the data which we can copy and save it to local system.
When we run the above program, we get the following output −
main.py
import urllib3
http = urllib3.PoolManager()

response = http.request('GET','https://www.tutorialspoint.com/python')
print(response.status)
print(response.data.decode("utf-8"))
Output
When we run the above program, we get the following output −
200
<!DOCTYPE html>
<html lang="en-US">
<head>
<title>Python Tutorial</title>
<meta charset="utf-8">
...
Python Network - Connection Re-Use
When a client makes a valid request to a server, a temporary connection is established between them to complete the sending and receiving process. But there are scenarios where the connection needs to be kept alive as there is need of automatic requests and responses between the programs which are communicating. Take for example an interactive webpage. After the webpage is loaded there is a need of submitting a form data or downloading further CSS and JavaScript components. The connection needs to be kept alive for faster performance and an unbroken communication between the client and the server.
Python provides urllib3 module which had methods to take care of connection reuse between a client and a server. In the below example we create a connection and make multiple requests by passing different parameters with the GET request. We receive multiple responses but we also count the number of connection that has been used in the process. As we see the number of connection does not change implying the reuse of the connection.
Example - Reusing Connections
main.py
from urllib3 import HTTPConnectionPool

pool = HTTPConnectionPool('ajax.googleapis.com', maxsize=1)
r = pool.request('GET', '/ajax/services/search/web', fields={'q': 'python', 'v': '1.0'})
print('Response Status:', r.status)

# Header of the response
print('Header: ',r.headers['content-type'])

# Content of the response
print('Python: ',len(r.data))

r = pool.request('GET', '/ajax/services/search/web', fields={'q': 'php', 'v': '1.0'})

# Content of the response
print('php: ',len(r.data))

print('Number of Connections: ',pool.num_connections)

print('Number of requests: ',pool.num_requests)
Output
When we run the above program, we get the following output −
Response Status: 404
Header:  text/html; charset=UTF-8
Python:  1585
php:  1585
Number of Connections:  1
Number of requests:  2
Python Network - Interfaces
When we have multiple interfaces in a machine we need to keep track of their names, status etc. In Python we can list the interfaces and their status.
Example
In the below example we use the python module netifaces which gives the details of the interfaces and their status. The methods used are very simple and straight forward.
main.py
import netifaces

print (netifaces.interfaces())


print (netifaces.ifaddresses('lo'))

print (netifaces.AF_LINK)

addrs = netifaces.ifaddresses('ens33')
print(addrs[netifaces.AF_INET])


print(addrs[netifaces.AF_LINK])
Output
When we run the above program, we get the following output −
# Result

['lo', 'ens33']
{17: [{'peer': '00:00:00:00:00:00', 'addr': '00:00:00:00:00:00'}],
2: [{'peer': '127.0.0.1', 'addr': '127.0.0.1', 'netmask': '255.0.0.0'}],

10: [{'addr': '::1', 'netmask': 'ffff:ffff:ffff:ffff:ffff:ffff:ffff:ffff/128'}]}

17

[{'netmask': '255.255.255.0', 'addr': '192.168.232.128', 'broadcast': '192.168.232.255'}]
[{'addr': '00:0c:29:ea:13:0a', 'broadcast': 'ff:ff:ff:ff:ff:ff'}]
Python Network - Sockets Programming
Python provides two levels of access to network services. At a low level, you can access the basic socket support in the underlying operating system, which allows you to implement clients and servers for both connection-oriented and connectionless protocols.
Python also has libraries that provide higher-level access to specific application-level network protocols, such as FTP, HTTP, and so on.
Sockets are the endpoints of a bidirectional communications channel. Sockets may communicate within a process, between processes on the same machine, or between processes on different continents. We use the socket module in python to create and use sockets.
Sockets have their own vocabulary −
| Sr.No. | Term & Description |
|---|---|
| 1 | Domain The family of protocols that is used as the transport mechanism. These values are constants such as AF_INET, PF_INET, PF_UNIX, PF_X25, and so on. |
| 2 | type The type of communications between the two endpoints, typically SOCK_STREAM for connection-oriented protocols and SOCK_DGRAM for connectionless protocols. |
| 3 | protocol Typically zero, this may be used to identify a variant of a protocol within a domain and type. |
| 4 | hostname The identifier of a network interface −
|
| 5 | port Each server listens for clients calling on one or more ports. A port may be a Fixnum port number, a string containing a port number, or the name of a service. |
The socket Module
To create a socket, you must use the socket.socket() function available in socket module, which has the general syntax −
s = socket.socket (socket_family, socket_type, protocol=0)
Here is the description of the parameters −
socket_family − This is either AF_UNIX or AF_INET, as explained earlier.
socket_type − This is either SOCK_STREAM or SOCK_DGRAM.
protocol − This is usually left out, defaulting to 0.
Once you have socket object, then you can use required functions to create your client or server program.
Server Socket Methods
| Sr.No. | Method & Description |
|---|---|
| 1 | s.bind() This method binds address (hostname, port number pair) to socket. |
| 2 | s.listen() This method sets up and start TCP listener. |
| 3 | s.accept() This passively accept TCP client connection, waiting until connection arrives (blocking). |
Client Socket Methods
| Sr.No. | Method & Description |
|---|---|
| 1 | s.connect() This method actively initiates TCP server connection. |
General Socket Methods
| Sr.No. | Method & Description |
|---|---|
| 1 | s.recv() This method receives TCP message |
| 2 | s.send() This method transmits TCP message |
| 3 | s.recvfrom() This method receives UDP message |
| 4 | s.sendto() This method transmits UDP message |
| 5 | s.close() This method closes socket |
| 6 | socket.gethostname() Returns the hostname. |
A Simple Server
To write Internet servers, we use the socket function available in socket module to create a socket object. A socket object is then used to call other functions to setup a socket server.
Now call bind(hostname, port) function to specify a port for your service on the given host.
Next, call the accept method of the returned object. This method waits until a client connects to the port you specified, and then returns a connection object that represents the connection to that client.
server.py
import socket               # Import socket module

s = socket.socket()         # Create a socket object
host = socket.gethostname() # Get local machine name
port = 12345                # Reserve a port for your service.
s.bind((host, port))        # Bind to the port

s.listen(5)                 # Now wait for client connection.
while True:
   c, addr = s.accept()     # Establish connection with client.
   print('Got connection from', addr)
   c.send('Thank you for connecting'.encode())
   c.close()                # Close the connection
A Simple Client
Let us write a very simple client program which opens a connection to a given port 12345 and given host. This is very simple to create a socket client using Python's socket module function.
The socket.connect(hosname, port ) opens a TCP connection to hostname on the port. Once you have a socket open, you can read from it like any IO object. When done, remember to close it, as you would close a file.
The following code is a very simple client that connects to a given host and port, reads any available data from the socket, and then exits −
client.py
import socket               # Import socket module

s = socket.socket()         # Create a socket object
host = socket.gethostname() # Get local machine name
port = 12345                # Reserve a port for your service.

s.connect((host, port))
print(s.recv(1024).decode('utf-8'))
s.close                     # Close the socket when done
Now run this server.py in background and then run above client.py to see the result.
# Following would start a server in background.
$ py server.py
Once server is started run client in another window as follows −
$ py client.py
This would produce following result −
Got connection from ('127.0.0.1', 48437)
Thank you for connecting
Socket with Public URL
In the below example we use few methods from the socket module to find the address information of server and host name details.
main.py
import socket
from pprint import pprint

# get server address
addrinfo = socket.getaddrinfo('tutorialspoint.com', 'www')

pprint(addrinfo)

# get server hostname
print(socket.gethostname())
Output
When we run the above program, we get the following output −
[(<AddressFamily.AF_INET: 2>,
  <SocketKind.SOCK_STREAM: 1>,
  0,
  '',
  ('135.181.223.254', 80))]
Home
Python Network - Http Client
In the http protocol, the request from the client reaches the server and fetches some data and metadata assuming it is a valid request. We can analyze this response from the server using various functions available in the python requests module. Here the below python programs run in the client side and display the result of the response sent by the server.
Get Initial Response
In the below program the get method from requests module fetches the data from a server and it is printed in plain text format.
main.py
import requests
r = requests.get('https://httpbin.org/')
print(r.text)
Output
When we run the above program, we get the following output −
<!DOCTYPE html>
<html lang="en">

<head>
    <meta charset="UTF-8">
    <title>httpbin.org</title>
...
Get Session Object Response
The Session object allows you to persist certain parameters across requests. It also persists cookies across all requests made from the Session instance. If youre making several requests to the same host, the underlying TCP connection will be reused.
main.py
import requests
s = requests.Session()

s.get('http://httpbin.org/cookies/set/sessioncookie/31251425')
r = s.get('http://httpbin.org/cookies')

print(r.text)
Output
When we run the above program, we get the following output −
{
  "cookies": {
    "sessioncookie": "31251425"
  }
}
Handling Error
In case some error is raised because of issue in processing the request by the server, the python program can gracefully handle the exception raised using the timeout parameter as shown below. The program will wait for the defined value of the timeout error and then raise the time out error.
requests.get('http://github.com', timeout=10.001)
Python Network - Http Server
Python standard library comes with a in-built webserver which can be invoked for simple web client server communication. The port number can be assigned programmatically and the web server is accessed through this port. Though it is not a full featured web server which can parse many kinds of file, it can parse simple static html files and serve them by responding them with required response codes.
The below program starts a simple web server and opens it up at port 8001. The successful running of the server is indicated by the response code of 200 as shown in the program output.
main.py
import http.server
import socketserver

PORT = 8001

handler = http.server.SimpleHTTPRequestHandler

httpd = socketserver.TCPServer(("", PORT), handler)

print("serving at port", PORT)
httpd.serve_forever()
Output
When we run the above program, we get the following output −
serving at port 8001
Serving a localhost
If we decide to make the python server as a local host serving only the local host, then we can use the following programm to do that.
main.py
import sys
from http.server import BaseHTTPRequestHandler,HTTPServer,SimpleHTTPRequestHandler

HandlerClass = SimpleHTTPRequestHandler
ServerClass  = HTTPServer
Protocol     = "HTTP/1.0"

if sys.argv[1:]:
    port = int(sys.argv[1])
else:
    port = 8000
server_address = ('127.0.0.1', port)

HandlerClass.protocol_version = Protocol
httpd = ServerClass(server_address, HandlerClass)

sa = httpd.socket.getsockname()
print("Serving HTTP on", sa[0], "port", sa[1], "...")
httpd.serve_forever()
When we run the above program, we get the following output −
Serving HTTP on 127.0.0.1 port 8000 ...
Python Network - Building Urls
The requests module can help us build the URLS and manipulate the URL value dynamically. Any sub-directory of the URL can be fetched programmatically and then some part of it can be substituted with new values to build new URLs.
Build_URL
The below example uses urljoin to fetch the different subfolders in the URL path. The urljoin method is used to add new values to the base URL.
main.py
from requests.compat import urljoin
base='https://stackoverflow.com/questions/3764291'
print(urljoin(base,'.'))
print(urljoin(base,'..'))
print(urljoin(base,'...'))
print(urljoin(base,'/3764299/'))
url_query = urljoin(base,'?vers=1.0')
print(url_query)
url_sec = urljoin(url_query,'#section-5.4')
print(url_sec)
Output
When we run the above program, we get the following output −
https://stackoverflow.com/questions/
https://stackoverflow.com/
https://stackoverflow.com/questions/...
https://stackoverflow.com/3764299/
https://stackoverflow.com/questions/3764291?vers=1.0
https://stackoverflow.com/questions/3764291?vers=1.0#section-5.4
Split the URLS
Spliting Urls
The URLs can also be split into many parts beyond the main address. The additional parameters which are used for a specific query or tags attached to the URL are separated by using the urlparse method as shown below.
main.py
from requests.compat import urlparse
url1 = 'https://docs.python.org/2/py-modindex.html#cap-f'
url2='https://docs.python.org/2/search.html?q=urlparse'
print(urlparse(url1))
print(urlparse(url2))
Output
When we run the above program, we get the following output −
ParseResult(scheme='https', netloc='docs.python.org', path='/2/py-modindex.html', params='', query='', fragment='cap-f')
ParseResult(scheme='https', netloc='docs.python.org', path='/2/search.html', params='', query='q=urlparse', fragment='')
Python Network - Webform Submission
Often the interaction with a webpage needs some data to be submitted to the server through the forms present in the html page. These webforms are typically used for processes like signing up for a new account or supplying some information like name or roll number to retrieve the result of an examination. The requests module handles this gracefully using the POST method with the required parameters.
Example - Signing Up
In the below example we use the sign up form of a website by supplying the userid and password value. After the submission of the values we print(the response.
main.py
import requests

ID_USERNAME = 'signup-user-name'
ID_PASSWORD = 'signup-user-password'
USERNAME = 'username'
PASSWORD = 'yourpassword'
SIGNUP_URL = 'http://codepad.org/login'
def submit_form():
    """Submit a form"""
    payload = {ID_USERNAME : USERNAME, ID_PASSWORD : PASSWORD,}

    resp = requests.get(SIGNUP_URL)
    print("Response to GET request: %s" %resp.content)

    resp = requests.post(SIGNUP_URL, payload)
    print("Headers from a POST request response: %s" %resp.headers)

if __name__ == '__main__':
    submit_form()
Output
When we run the above program, we get the following output −
Response to GET request: <!DOCTYPE html>
<html>

<head>

    <meta http-equiv="content-type" content="text/html; charset=UTF-8">
    <meta HTTP-EQUIV="Pragma" CONTENT="no-cache">
    <meta HTTP-EQUIV="Expires" CONTENT="-1">

    <title>Login - codepad</title>


    <link href="/main.css" media="screen" rel="stylesheet" type="text/css" />
    <style type="text/css">


    </style>
    <script src='https://www.google.com/recaptcha/api.js'></script>
    <script>
       function onRecaptcha(token) {
         document.getElementById("editor-form").submit();
       }
    </script>
</head>


    <body >

	.....................
	.....................
Python Network - Database and SQL
The Python programming language has powerful features for database programming. Python supports various databases like SQLite, MySQL, Oracle, Sybase, PostgreSQL, etc. Python also supports Data Definition Language (DDL), Data Manipulation Language (DML) and Data Query Statements. The Python standard for database interfaces is the Python DB-API. Most Python database interfaces adhere to this standard.
Here is the list of available Python database interfaces: Python Database Interfaces and APIs. You must download a separate DB API module for each database you need to access.
In this chapter we will see the use of SQLite database in python programming language. It is done by using pythons inbuilt, sqlite3 module. You should first create a connection object that represents the database and then create some cursor objects to execute SQL statements.
Connect To Database
Following Python code shows how to connect to an existing database. If the database does not exist, then it will be created and finally a database object will be returned.
main.py
import sqlite3

conn = sqlite3.connect('test.db')

print("Open database successfully");
Output
Here, you can also supply database name as the special name :memory: to create a database in RAM. Now, let's run the above program to create our database test.db in the current directory. You can change your path as per your requirement. Keep the above code in sqlite.py file and execute it as shown below. If the database is successfully created, then it will display the following message.
$chmod +x sqlite.py
$./sqlite.py
Open database successfully
Create a Table
Following Python program will be used to create a table in the previously created database.
main.py
import sqlite3

conn = sqlite3.connect('test.db')
print("Opened database successfully")

conn.execute('''CREATE TABLE COMPANY
         (ID INT PRIMARY KEY     NOT NULL,
         NAME           TEXT    NOT NULL,
         AGE            INT     NOT NULL,
         ADDRESS        CHAR(50),
         SALARY         REAL);''')
print("Table created successfully")

conn.close()
Output
When the above program is executed, it will create the COMPANY table in your test.db and it will display the following messages −
Opened database successfully
Table created successfully
Insert Operation
Following Python program shows how to create records in the COMPANY table created in the above example.
main.py
import sqlite3

conn = sqlite3.connect('test.db')
print("Opened database successfully")

conn.execute("INSERT INTO COMPANY (ID,NAME,AGE,ADDRESS,SALARY) \
      VALUES (1, 'Paul', 32, 'California', 20000.00 )");

conn.execute("INSERT INTO COMPANY (ID,NAME,AGE,ADDRESS,SALARY) \
      VALUES (2, 'Allen', 25, 'Texas', 15000.00 )");

conn.execute("INSERT INTO COMPANY (ID,NAME,AGE,ADDRESS,SALARY) \
      VALUES (3, 'Teddy', 23, 'Norway', 20000.00 )");

conn.execute("INSERT INTO COMPANY (ID,NAME,AGE,ADDRESS,SALARY) \
      VALUES (4, 'Mark', 25, 'Rich-Mond ', 65000.00 )");

conn.commit()
print("Records created successfully")
conn.close()
Output
When the above program is executed, it will create the given records in the COMPANY table and it will display the following two lines −
Opened database successfully
Records created successfully
Select Operation
Following Python program shows how to fetch and display records from the COMPANY table created in the above example.
import sqlite3

conn = sqlite3.connect('test.db')
print("Opened database successfully")

cursor = conn.execute("SELECT id, name, address, salary from COMPANY")
for row in cursor:
   print("ID = ", row[0])
   print("NAME = ", row[1])
   print("ADDRESS = ", row[2])
   print("SALARY = ", row[3], "\n")

print("Operation done successfully")
conn.close()
Output
When the above program is executed, it will produce the following result.
Opened database successfully
ID = 1
NAME = Paul
ADDRESS = California
SALARY = 20000.0

ID = 2
NAME = Allen
ADDRESS = Texas
SALARY = 15000.0

ID = 3
NAME = Teddy
ADDRESS = Norway
SALARY = 20000.0

ID = 4
NAME = Mark
ADDRESS = Rich-Mond
SALARY = 65000.0

Operation done successfully
Update Operation
Following Python code shows how to use UPDATE statement to update any record and then fetch and display the updated records from the COMPANY table.
main.py
import sqlite3

conn = sqlite3.connect('test.db')
print("Opened database successfully")

conn.execute("UPDATE COMPANY set SALARY = 25000.00 where ID = 1")
conn.commit
print("Total number of rows updated :", conn.total_changes)

cursor = conn.execute("SELECT id, name, address, salary from COMPANY")
for row in cursor:
   print("ID = ", row[0])
   print("NAME = ", row[1])
   print("ADDRESS = ", row[2])
   print("SALARY = ", row[3], "\n")

print("Operation done successfully")
conn.close()
Output
When the above program is executed, it will produce the following result.
Opened database successfully
Total number of rows updated : 1
ID = 1
NAME = Paul
ADDRESS = California
SALARY = 25000.0

ID = 2
NAME = Allen
ADDRESS = Texas
SALARY = 15000.0

ID = 3
NAME = Teddy
ADDRESS = Norway
SALARY = 20000.0

ID = 4
NAME = Mark
ADDRESS = Rich-Mond
SALARY = 65000.0

Operation done successfully
Delete Operation
Following Python code shows how to use DELETE statement to delete any record and then fetch and display the remaining records from the COMPANY table.
main.py
import sqlite3

conn = sqlite3.connect('test.db')
print("Opened database successfully")

conn.execute("DELETE from COMPANY where ID = 2;")
conn.commit()
print("Total number of rows deleted :", conn.total_changes)

cursor = conn.execute("SELECT id, name, address, salary from COMPANY")
for row in cursor:
   print("ID = ", row[0])
   print("NAME = ", row[1])
   print("ADDRESS = ", row[2])
   print("SALARY = ", row[3], "\n")

print "Operation done successfully";
conn.close()
Output
When the above program is executed, it will produce the following result.
Opened database successfully
Total number of rows deleted : 1
ID = 1
NAME = Paul
ADDRESS = California
SALARY = 20000.0

ID = 3
NAME = Teddy
ADDRESS = Norway
SALARY = 20000.0

ID = 4
NAME = Mark
ADDRESS = Rich-Mond
SALARY = 65000.0

Operation done successfully
Python Network - Telnet
Telnet is a type of network protocol which allows a user in one computer to logon to another computer which also belongs to the same network. The telnet command is used along with the host name and then the user credentials are entered. Upon successful login the remote user can access the applications and data in a way similar to the regular user of the system. Of course some privileges can be controlled by the administrator of the system who sets up and maintains the system.
In Python telnet is implemented by the module telnetlib which has the Telnet class which has the required methods to establish the connection. In the below example we also use the getpass module to handle the password prompt as part of the login process. Also we assume the connection is made to a unix host. The various methods from telnetlib. Telnet class used in the program are explained below.
Telnet.read_until − Read until a given string, expected, is encountered or until timeout seconds have passed.
Telnet.write − Write a string to the socket, doubling any IAC characters. This can block if the connection is blocked. May raise socket.error if the connection is closed.
Telnet.read_all() − Read all data until EOF; block until connection closed.
Example - Using Telnet Programming
import getpass
import telnetlib

HOST = "http://localhost:8000/"
user = raw_input("Enter your remote account: ")
password = getpass.getpass()

tn = telnetlib.Telnet(HOST)

tn.read_until("login: ")
tn.write(user + "\n")
if password:
    tn.read_until("Password: ")
    tn.write(password + "\n")

tn.write("ls\n")
tn.write("exit\n")

print(tn.read_all())
Output
When we run the above program, we get the following output −
- lrwxrwxrwx    1 0        0               1 Nov 13  2012 ftp -> .
- lrwxrwxrwx    1 0        0               3 Nov 13  2012 mirror -> pub
- drwxr-xr-x   23 0        0            4096 Nov 27  2017 pub
- drwxr-sr-x   88 0        450          4096 May 04 19:30 site
- drwxr-xr-x    9 0        0            4096 Jan 23  2014 vol
Please note that this output is specific to the remote computer whose details are submitted when the program is run.
Python Network - Email Messages
Email is a service which allows us to send the message in electronic mode over the internet. It offers an efficient, inexpensive and real time mean of distributing information among people.
E-Mail Address
Each user of email is assigned a unique name for his email account. This name is known as E-mail address. Different users can send and receive messages according to the e-mail address.
E-mail is generally of the form username@domainname. For example, webmaster@tutorialspoint.com is an e-mail address where webmaster is username and tutorialspoint.com is domain name.
The username and the domain name are separated by @ (at) symbol.
E-mail addresses are not case sensitive.
Spaces are not allowed in e-mail address.
The first five lines of an E-mail message is called E-mail header. The header part comprises of following fields:
From
Date
To
Subject
CC
BCC
From
The From field indicates the senders address i.e. who sent the e-mail.
Date
The Date field indicates the date when the e-mail was sent.
To
The To field indicates the recipients address i.e. to whom the e-mail is sent.
Subject
The Subject field indicates the purpose of e-mail. It should be precise and to the point.
CC
CC stands for Carbon copy. It includes those recipient addresses whom we want to keep informed but not exactly the intended recipient.
BCC
BCC stands for Black Carbon Copy. It is used when we do not want one or more of the recipients to know that someone else was copied on the message.
Greeting
Greeting is the opening of the actual message. Eg. Hi Sir or Hi Guys etc.
Text
It represents the actual content of the message.
Signature
This is the final part of an e-mail message. It includes Name of Sender, Address, and Contact Number.
Python has EmailMessage class which can be used build email messages. This class has the required methods to customize different parts of the email message like - the TO and FROM tags, the Subject Line as well as the content of the email.
Example - Creating an Email Message
In the below example we create an email message with all the necessary parts of an email. Once we print out the content of the message we can see the complete email.
main.py
import email.message, email.policy, email.utils, sys
text = """Welcome to TutorialsPoint - Simple Easy Learning"""

message = email.message.EmailMessage(email.policy.SMTP)
message['To'] = 'you@yourdomain.com'
message['From'] = 'Learn'
message['Subject'] = 'A mail To you'
message['Date'] = email.utils.formatdate(localtime=True)
message['Message-ID'] = email.utils.make_msgid()
message.set_content(text)
sys.stdout.buffer.write(message.as_bytes())
Output
When we run the above program, we get the following output −
To: you@yourdomain.com
From: Learn
Subject: A mail To you
Date: Mon, 23 Feb 2026 11:11:06 +0530
Message-ID: <177182526623.22732.14174498509677970986@Home>
Content-Type: text/plain; charset="utf-8"
Content-Transfer-Encoding: 7bit
MIME-Version: 1.0

Welcome to TutorialsPoint - Simple Easy Learning
Python Network - SMTP
Simple Mail Transfer Protocol (SMTP) is a protocol, which handles sending an e-mail and routing e-mail between mail servers.
Python provides smtplib module, which defines an SMTP client session object that can be used to send mails to any Internet machine with an SMTP or ESMTP listener daemon.
An SMTP object has an instance method called sendmail, which is typically used to do the work of mailing a message. It takes three parameters −
The sender − A string with the address of the sender.
The receivers − A list of strings, one for each recipient.
The message − A message as a string formatted as specified in the various RFCs.
Example - Sending an Email
Here is a simple way to send one e-mail using Python script. Try it once −
import smtplib

sender = 'from@fromdomain.com'
receivers = ['to@todomain.com']

message = """From: From Person <from@fromdomain.com>
To: To Person <to@todomain.com>
Subject: SMTP e-mail test

This is a test e-mail message.
"""

try:
   smtpObj = smtplib.SMTP('localhost')
   smtpObj.sendmail(sender, receivers, message)
   print("Successfully sent email")
except SMTPException:
   print("Error: unable to send email")
Here, you have placed a basic e-mail in message, using a triple quote, taking care to format the headers correctly. An e-mail requires a From, To, and a Subject header, separated from the body of the e-mail with a blank line.
To send the mail you use smtpObj to connect to the SMTP server on the local machine. Then use the sendmail method along with the message, the from address, and the destination address as parameters (even though the from and to addresses are within the e-mail itself, these are not always used to route the mail).
If you are not running an SMTP server on your local machine, you can use smtplib client to communicate with a remote SMTP server. Unless you are using a webmail service (such as gmail or Yahoo! Mail), your e-mail provider must have provided you with the outgoing mail server details that you can supply them, as follows −
mail = smtplib.SMTP('smtp.gmail.com', 587)
Example - Sending an HTML e-mail using Python
When you send a text message using Python, then all the content is treated as simple text. Even if you include HTML tags in a text message, it is displayed as simple text and HTML tags will not be formatted according to the HTML syntax. However, Python provides an option to send an HTML message as actual HTML message.
While sending an e-mail message, you can specify a Mime version, content type and the character set to send an HTML e-mail.
Following is an example to send the HTML content as an e-mail. Try it once −
main.py
import smtplib

message = """From: From Person <from@fromdomain.com>
To: To Person <to@todomain.com>
MIME-Version: 1.0
Content-type: text/html
Subject: SMTP HTML e-mail test

This is an e-mail message to be sent in HTML format

<b>This is HTML message.</b>
<h1>This is headline.</h1>
"""

try:
   smtpObj = smtplib.SMTP('localhost')
   smtpObj.sendmail(sender, receivers, message)
   print("Successfully sent email")
except SMTPException:
   print("Error: unable to send email")
Python Network - POP3
The pop3 protocol is an email protocol to download messages from the email-server. These messages can be stored in the local machine.
Key Points
POP is an application layer internet standard protocol.
Since POP supports offline access to the messages, thus requires less internet usage time.
POP does not allow search facility.
In order to access the messaged, it is necessary to download them.
It allows only one mailbox to be created on server.
It is not suitable for accessing non mail data.
POP commands are generally abbreviated into codes of three or four letters. Eg. STAT.
POP Commands
The following table describes some of the POP commands:
| S.N. | Command Description |
|---|---|
| 1 | LOGIN This command opens the connection. |
| 2 | STAT It is used to display number of messages currently in the mailbox. |
| 3 | LIST It is used to get the summary of messages where each message summary is shown. |
| 4 | RETR This command helps to select a mailbox to access the messages. |
| 5 | DELE It is used to delete a message. |
| 6 | RSET It is used to reset the session to its initial state. |
| 7 | QUIT It is used to log off the session. |
Example - Using POP3 with Gmail
Pyhtons poplib module provides classes named pop() and pop3_SSL() which are used to achieve this requirement. We supply the hostname and port number as argument. In the below example we connect to a gmail server and retrieve the messages after supplying the login credentials.
main.py
import  poplib

user = 'username'
# Connect to the mail box
Mailbox = poplib.POP3_SSL('pop.googlemail.com', '995')
Mailbox.user(user)
Mailbox.pass_('password')
NumofMessages = len(Mailbox.list()[1])
for i in range(NumofMessages):
    for msg in Mailbox.retr(i+1)[1]:
        print msg
Mailbox.quit()
The messages are retrieved when the above program is run.
Python Network - IMAP
IMAP is an email retrieval protocol which does not download the emails. It just reads them and displays them. This is very useful in low bandwidth condition. Pythons client side library called imaplib is used for accessing emails over imap protocol.
IMAP stands for Internet Mail Access Protocol. It was first proposed in 1986.
Key Points
IMAP allows the client program to manipulate the e-mail message on the server without downloading them on the local computer.
The e-mail is hold and maintained by the remote server.
It enables us to take any action such as downloading, delete the mail without reading the mail.It enables us to create, manipulate and delete remote message folders called mail boxes.
IMAP enables the users to search the e-mails.
It allows concurrent access to multiple mailboxes on multiple mail servers.
IMAP Commands
The following table describes some of the IMAP commands:
| S.N. | Command Description |
|---|---|
| 1 | IMAP_LOGIN This command opens the connection. |
| 2 | CAPABILITY This command requests for listing the capabilities that the server supports. |
| 3 | NOOP This command is used as a periodic poll for new messages or message status updates during a period of inactivity. |
| 4 | SELECT This command helps to select a mailbox to access the messages. |
| 5 | EXAMINE It is same as SELECT command except no change to the mailbox is permitted. |
| 6 | CREATE It is used to create mailbox with a specified name. |
| 7 | DELETE It is used to permanently delete a mailbox with a given name. |
| 8 | RENAME It is used to change the name of a mailbox. |
| 9 | LOGOUT This command informs the server that client is done with the session. The server must send BYE untagged response before the OK response and then close the network connection. |
Example
In the below example we login to a gmail server with user credentials. Then we choose to display the messages in the inbox. A for loop is used to display the fetched messages one by one and finally the connection is closed.
main.py
import imaplib
import pprint

imap_host = 'imap.gmail.com'
imap_user = 'username@gmail.com'
imap_pass = 'password'

# connect to host using SSL
imap = imaplib.IMAP4_SSL(imap_host)

## login to server
imap.login(imap_user, imap_pass)

imap.select('Inbox')

tmp, data = imap.search(None, 'ALL')
for num in data[0].split():
	tmp, data = imap.fetch(num, '(RFC822)')
	print('Message: {0}\n'.format(num))
	pprint.pprint(data[0][1])
	break
imap.close()
Depending on the mail box configuration, mail is displayed.
Python Network - SSH
SSH or Secure Socket Shell, is a network protocol that provides a secure way to access a remote computer. Secure Shell provides strong authentication and secure encrypted data communications between two computers connecting over an insecure network such as the Internet. SSH is widely used by network administrators for managing systems and applications remotely, allowing them to log in to another computer over a network, execute commands and move files from one computer to another.
Key Points
AS cloud servers become more affordable, SSH is the most commonly used tool to perform various tasks on cloud server. We need it for −
- Setup a web server for a client's website
- Deploy source code to a production server
In python SSH is implemented by using the python library called fabric. It can be used to issue commands remotely over SSH.
Example
In the below example we connect to a host and issue the command to identify the host type. We capture the result in and display it as a formatted text.
main.py
from fabric import Connection
result = Connection('xyz.com').run('uname -s')
msg = "Ran {.command!r} on {.connection.host}, got stdout:\n{.stdout}"
print(msg.format(result))
Output
When we run the above program, we get the following output −
Linux
This is a sample result which will depend on the server.
Python Network - FTP
FTP or File Transfer Protocol is a well-known network protocol used to transfer files between computers in a network. It is created on client server architecture and can be used along with user authentication. It can also be used without authentication but that will be less secure. FTP connection which maintains a current working directory and other flags, and each transfer requires a secondary connection through which the data is transferred. Most common web browsers can retrieve files hosted on FTP servers.
The Methods in FTP class
In python we use the module ftplib which has the below required methods to list the files as we will transfer the files.
| Method | Description |
|---|---|
| pwd() | Current working directory. |
| cwd() | Change current working directory to path. |
| dir([path[,...[,cb]]) | Displays directory listing of path. Optional call-back cb passed to retrlines(). |
| storlines(cmd, f) | Uploads text file using given FTP cmd - for example, STOR file name. |
| storbinary(cmd,f[, bs=8192]) | Similar to storlines() but is used for binary files. |
| delete(path) | Deletes remote file located at path. |
| mkd(directory) | Creates remote directory. |
| exception ftplib.error_temp | Exception raised when an error code signifying a temporary error (response codes in the range 400499) is received.. |
| exception ftplib.error_perm | Exception raised when an error code signifying a permanent error (response codes in the range 500599) is received.. |
| connect(host[, port[, timeout]]) | Connects to the given host and port. The default port number is 21, as specified by the FTP protocol.. |
| quit() | Closes connection and quits. |
Below are the examples of some of the above methods.
Listing the Files
The below example uses anonymous login to the ftp server and lists the content of the current directory. It treates through the name of the files and directories and stores them as a list. Then prints them out.
main.py
import ftplib

ftp = ftplib.FTP("ftp.nluug.nl")
ftp.login("anonymous", "ftplib-example-1")

data = []

ftp.dir(data.append)

ftp.quit()

for line in data:
    print("-", line)
Output
When we run the above program, we get the following output −
- drwxr-xr-x   24 0        0              49 Jun 17  2025 pub
- drwxr-sr-x   83 0        450           140 Jan 19  2025 site
- drwxr-xr-x    7 0        0               7 Oct 03  2024 vol
Changing the Directory
The below program uses the cwd method available in the ftplib module to change the directory and then fetch the required content.
main.py
import ftplib

ftp = ftplib.FTP("ftp.nluug.nl")
ftp.login("anonymous", "ftplib-example-1")

data = []

ftp.cwd('/pub/')          #change directory to /pub/
ftp.dir(data.append)

ftp.quit()

for line in data:
    print("-", line)
Output
When we run the above program, we get the following output −
- lrwxrwxrwx    1 5010     450            14 Nov 02  2007 FreeBSD -> os/BSD/FreeBSD
- lrwxrwxrwx    1 5010     450            20 Nov 02  2007 ImageMagick -> graphics/ImageMagick
- lrwxrwxrwx    1 5010     450            13 Nov 02  2007 NetBSD -> os/BSD/NetBSD
- lrwxrwxrwx    1 5010     450            14 Nov 02  2007 OpenBSD -> os/BSD/OpenBSD
...
Fetching the Files
After getting the list of files as shown above, we can fetch a specific file by using the getfile method. This method moves a copy of the file from the remote system to the local system from where the ftp connection was initiated.
main.py
import ftplib
import sys

def getFile(ftp, filename):
    try:
        ftp.retrbinary("RETR " + filename ,open(filename, 'wb').write)
    except:
        print("Error")


ftp = ftplib.FTP("ftp.nluug.nl")
ftp.login("anonymous", "ftplib-example-1")

ftp.cwd('/pub/')          # change directory to /pub/
getFile(ftp,'README.nluug')

ftp.quit()
Output
When we run the above program, we find the file README.nlug to be present in the local system from where the connection was initiated.
Python Network - SFTP
SFTP is also known as the SSH File Transfer Protocol. It is a network protocol that provides file access, file transfer, and file management over any reliable data stream. The program is run over a secure channel, such as SSH, that the server has already authenticated the client, and that the identity of the client user is available to the protocol.
The pysftp module is a simple interface to SFTP. The module offers high level abstractions and task based routines to handle the SFTP needs. So we install the module into our python environment with the below command.
Install pysftp library
Run the following command go install the library.
pip install pysftp
Example - Uploading files using sftp
In the below example we login to a remote server using sftp and then get and put some file in that directory.
main.py
import pysftp

with pysftp.Connection('hostname', username='me', password='secret') as sftp:

    with sftp.cd('/allcode'):           # temporarily chdir to allcode
        sftp.put('/pycode/filename')  	# upload file to allcode/pycode on remote
        sftp.get('remote_file')         # get a remote file
Output
When we run the above code we are able to see the list of files present in the allcode directory and also put and get some file in that directory.
Python Network - Web Servers
Python is versatile enough to create many types of applications ans programs that drive the internet or other computer networks. One important aspect of internet is the web servers that are at the root of the client server model. In this chapter we will see few web servers which are created uaing pure python language.
Gunicorn
Gunicorn is a stand-alone web server which has a central master process tasked with managing the initiated worker processes of differing types. These worker processes then handle and deal with the requests directly. And all this can be configured and adapted to suit the diverse needs of production scenarios.
Important Features
- It supports WSGI and can be used with any WSGI running Python application and framework
- It can also be used as a drop-in replacement for Paster (ex: Pyramid), Django's Development Server, web2py, etc
- Offers the choice of various worker types/configurations and automatic worker process management
- HTTP/1.0 and HTTP/1.1 (Keep-Alive) support through synchronous and asynchronous workers
- Comes with SSL support
- Extensible with hooks
CherryPy WSGI Server
CherryPy is a self contained web framework as it can run on its own without the need of additional software. It has its own WSGI, HTTP/1.1-compliant web server. As it is a WSGI server, it can be used to serve any other WSGI Python application as well, without being bound to CherryPy's application development framework.
Important Features
- It can run any Python web applications running on WSGI.
- It can handle static files and it can just be used to serve files and folders alone.
- It is thread-pooled.
- It comes with support for SSL.
- It is an easy to adapt, easy to use pure-Python alternative which is robust and reliable.
Twisted Web
It is a web server that comes with the Twisted networking library. Whereas Twisted itself is "an event-driven networking engine", the Twisted Web server runs on WSGI and it is capable of powering other Python web applications.
Important Features
- It runs WSGI Python applications
- It can act like a Python web server framework, allowing you to program it with the language for custom HTTP serving purposes
- It offers simple and fast prototyping ability through Python Scrips (.rpy) which are executed upon HTTP requests
- It comes with proxy and reverse-proxy capabilities
- It supports Virtual Hosts
- It can even serve Perl, PHP et cetera
Python Network - Uploading Data
We can upload data to a serer using python's module which handle ftp or File Transfer Protocol.
We need to install the module ftplib to acheive this.
pip install ftplib
Using ftplib
In the below example we use FTP method to connect to the server and then supply the user credentials. Next we mention the name of the file and the storbinary method to send and store the file in the server.
import ftplib

ftp = ftplib.FTP("127.0.0.1")
ftp.login("username", "password")
file = open('index.html','rb')
ftp.storbinary("STOR " + file, open(file, "rb"))
file.close()
ftp.quit()
When we run the above program, we observer that a copy of the file has been created in the server.
Using ftpreety
Similar to ftplib we can use ftpreety to connect securely to a remote server and upload file. We can aslo download file using ftpreety. The below program illustraits the same.
main.py
from ftpretty import ftpretty

# Mention the host
host = "127.0.0.1"

# Supply the credentials
user = "username"
pass = "password"
f = ftpretty(host, user, pass )

# Get a file, save it locally
f.get('someremote/file/on/server.txt', '/tmp/localcopy/server.txt')

# Put a local file to a remote location
# non-existent subdirectories will be created automatically
f.put('/tmp/localcopy/data.txt', 'someremote/file/on/server.txt')
Output
When we run the above program, we observer that a copy of the file has been created in the server.
Python Network - Proxy Server
Proxy servers are used to browse to some website through another server so that the browsing remains anonymous. It can also be used to bypass the blocking of specific IP addresses.
We use the requst method from the urllib3 module to access the website by passing the proxy server address as a parameter.
Example
In the below example we use a proxy address to access the website twitter.con for anonymous access. The response status of OK proves the successful access through a proxy server.
main.py
import urllib3
URL = 'https://www.twitter.com'
PROXY_ADDRESS = 'http://265.24.11.6:8080/'
http = urllib3.ProxyManager(PROXY_ADDRESS)

if __name__ == '__main__':
    resp = http.request('GET', URL)
print("Proxy server returns response headers: %s " %resp.headers)
Output
When we run the above program, we get the following output −
Proxy server returns response headers: cache-control: no-cache,
no-store, must-revalidate, pre-check=0, post-check=0
content-length: 145960
content-type: text/html;charset=utf-8
date: Mon, 02 Jul 2018 02:06:19 GMT
expires: Tue, 31 Mar 1981 05:00:00 GMT
last-modified: Mon, 02 Jul 2018 02:06:19 GMT
pragma: no-cache
server: tsa_n
set-cookie: fm=0; Expires=Mon, 02 Jul 2018 02:06:10 GMT; Path=/; Domain=.twitter.com; Secure; HTTPOnly
set-cookie: _twitter_sess=BAh7CSIKZmxhc2hJQzonQWN0aW9uQ29udHJvbGxlcjo6Rmxhc
2g6OkZsYXNo%250ASGFzaHsABjoKQHVzZWR7ADoPY3JlYXRlZF9hdGwrC
AifvVhkAToMY3NyZl9p%250AZCIlNzlhY2ZhMzdmNGFkYTU0ZTRmMDkxO
DRhNWNiYzI0MDI6B2lkIiUyZTgy%250AOTAyYjY4NTBkMzE3YzNjYTQwN
zZjZDhhYjZhMQ%253D%253D--6807256d74a01129a7b0dcf383f56f16
9fb8a66c; Path=/; Domain=.twitter.com; Secure; HTTPOnly
set-cookie: personalization_id="v1_iDacJdPWUx3e81f8UErWTA==";
Expires=Wed, 01 Jul 2020 02:06:19 GMT; Path=/; Domain=.twitter.com
set-cookie: guest_id=v1%3A153049717939764273;
Expires=Wed, 01 Jul 2020 02:06:19 GMT; Path=/; Domain=.twitter.com
set-cookie: ct0=50c8b59b09322825cd750ea082e43bdc;
Expires=Mon, 02 Jul 2018 08:06:19 GMT; Path=/; Domain=.twitter.com; Secure
status: 200 OK
strict-transport-security: max-age=631138519
x-connection-hash: 89dfbab81abc35dd8f618509c6171bd3
x-content-type-options: nosniff
x-frame-options: SAMEORIGIN
x-response-time: 312
x-transaction: 007b998000f86eaf
x-twitter-response-tags: BouncerCompliant
x-ua-compatible: IE=edge,chrome=1
x-xss-protection: 1; mode=block; report=https://twitter.com/i/xss_report
Python Network - Directory Listing
Python can be used to get the list of content from a directory. We can make program to list the content of directory which is in the same machine where python is running. We can also login to the remote system and list the content from the remote directory.
Listing Local Directory
In the below example we use the listdir() method to get the content of the current directory. To also indicate the type of the content like file or directory, we use more functions to evaluate the nature of the content.
main.py
import os
for  name in os.listdir('.'):
   if os.path.isfile(name):
      print('file: ', name)
   elif os.path.isdir(name):
      print('dir: ', name)
   elif os.path.islink(name):
      print('link: ', name)
   else:
      print('unknown', name)
Output
When we run the above program, we get the following output −
file: abcl.htm
dir: allbooks
link: ulink
Please note the content above is specific to the system where the python program was run. The result will vary depending on the system and its content.
Listing Remote Directory
We can list the content of the remote directory by using ftp to access the remote system. Once the connection is established we can use commands that will list the directory contents in a way similar to the listing of local directories.
from ftplib import FTP
def main():
    ftp = FTP('ftp.ibiblio.org')
    ftp.login()
    ftp.cwd('pub/academic/biology/') # change to some other subject
    entries = ftp.nlst()
    ftp.quit()

    print(len(entries), "entries:")
    for entry in sorted(entries):
        print(entry)

if __name__ == '__main__':
    main()
Output
When we run the above program, we get the following output −
(6, 'entries:')
INDEX
README
acedb
dna-mutations
ecology+evolution
molbio
Python Network - Remote Procedure Call
Remote Procedure Call (RPC) system enables you to call a function available on a remote server using the same syntax which is used when calling a function in a local library. This is useful in two situations.
- You can utilize the processing power from multiple machines using rpc without changing the code for making the call to the programs located in the remote systems.
- The data needed for the processing is available only in the remote system.
So in python we can treat one machine as a server and another machine as a client which will make a call to the server to run the remote procedure. In our example we will take the localhost and use it as both a server and client.
Running a Server
The python language comes with an in-built server which we can run as a local server. The script to run this server is located under the bin folder of python installation and named as classic.py. We can run it in the python prompt and check its running as a local server.
py bin/classic.py
When we run the above program, we get the following output −
INFO:SLAVE/18812:server started on [127.0.0.1]:18812
Running a Client
Next we run the client using the rpyc module to execute a remote procedure call. In the below example we execute the print function in the remote server.
client.py
import rpyc
conn = rpyc.classic.connect("localhost")
conn.execute("print('Hello from Tutorialspoint')")
Output
When we run the above program, we get the following output −
Hello from Tutorialspoint
Expression Evaluation through RPC
Using the above code examples we can use pythons in-built functions for execution and evaluation of expressions through rpc.
main.py
import rpyc
conn = rpyc.classic.connect("localhost")
conn.execute('import math')
conn.eval('2*math.pi')
Output
When we run the above program, we get the following output −
6.283185307179586
Python Network - RPC JSON Server
JSON or JavaScript Object Notation is a lightweight data-interchange format. It is easy for humans to read and write. It is easy for machines to parse and generate. The RPC call made based on JSON is able to send data in a much compact and efficient manner than the normal XML based RPC call. The python module jsonrpclib is able to create a simple JSON based server and client.
Example
In the below example we create a simple JSON server and create a function in it. This function breaks a bigger list into smaller lists mentioning the length of the argument as well as the argument itself.
main.py
# server program
from jsonrpclib.SimpleJSONRPCServer import SimpleJSONRPCServer

def findlen(*args):

	res = []
	for arg in args:
		try:
			lenval = len(arg)
		except TypeError:
			lenval = None
		res.append((lenval, arg))
	return res

def main():
	server = SimpleJSONRPCServer(('localhost', 1006))
	server.register_function(findlen)
	print("Start server")
	server.serve_forever()
if __name__ == '__main__':
    main()
client.py
# Call by client
from jsonrpclib import Server
def main():
    conn = Server('http://localhost:1006')
    print(conn.findlen(('a','x','d','z'), 11,
	{'Mt. Abu': 1602, 'Mt. Nanda': 3001,
	'Mt. Kirubu': 102, 'Mt.Nish': 5710}))
if __name__ == '__main__':
    main()
Output
When we run the above program, we get the following output −
[[4, [u'a', u'x', u'd', u'z']],
[None, 11], [4, {u'Mt. Abu': 1602, u'Mt.
Kirubu': 102, u'Mt. Nanda': 3001, u'Mt.Nish': 5710}]]
Python Network - Google Maps
Python provides modules which can be used to translate addresses available in google map directly to geographic coordinates. It is helpful in finding business addresses and locating the closeness of different addresses.
We use a module named pygeocoder which provides the functionalities to receive addresses and geocodes. This module is installed through pip using the following command.
Installing pygeocoder
pip3 install pygeocoder
Finding Business Address
We submit a business name as input and the program gives the complete address as the output. The module uses data from google maps in the background to retrieve the result.
main.py
from pygeocoder import Geocoder

api_key = "YOUR API KEY"

geocoder = Geocoder(api_key)

business_name = "Workafella Business Centre - Hitec city"
print("Searching %s" %business_name)

results = geocoder.geocode(business_name)
for result in results:
    print(result)
Output
When we run the above program, we get the following output −
Searching Workafella Business Centre - Hitec city
Western pearl building 1st floor, Hitech City Rd,
Opposite HDFC Bank, Kondapur, Hyderabad, Telangana 500084, India
Python Network - RSS Feed
RSS (Rich Site Summary) is a format for delivering regularly changing web content. Many news-related sites, weblogs and other online publishers syndicate their content as an RSS Feed to whoever wants it. In python we take help of the below package to read and process these feeds.
pip3 install feedparser
Feed Structure
In the below example we get the structure of the feed so that we can analyze further about which parts of the feed we want to process.
main.py
import feedparser
NewsFeed = feedparser.parse("https://timesofindia.indiatimes.com/rssfeedstopstories.cms")
entry = NewsFeed.entries[1]

print entry.keys()
Output
When we run the above program, we get the following output −
dict_keys(['title', 'title_detail', 'summary', 'summary_detail',
'links', 'link', 'id', 'guidislink', 'published', 'published_parsed',
'authors', 'author', 'author_detail'])
Feed Title and Posts
Reading Title of Feed
In the below example we read the title and head of the rss feed.
main.py
import feedparser

NewsFeed = feedparser.parse("https://timesofindia.indiatimes.com/rssfeedstopstories.cms")

print('Number of RSS posts :', len(NewsFeed.entries))

entry = NewsFeed.entries[1]
print('Post Title :',entry.title)
Output
When we run the above program we get the following output −
Number of RSS posts : 45
Post Title : 'Provided logistics' for 'shirtless' protest:
Why Delhi Police arrested youth Congress chief
Feed Details
Based on above entry structure we can derive the necessary details from the feed using python program as shown below. As entry is a dictionary we utilize its keys to produce the values needed.
main.py
import feedparser

NewsFeed = feedparser.parse("https://timesofindia.indiatimes.com/rssfeedstopstories.cms")

entry = NewsFeed.entries[1]

print(entry.published)
print("******")
print(entry.summary)
print("------News Link--------")
print(entry.link)
Output
When we run the above program we get the following output −
Tue, 24 Feb 2026 11:15:29 +0530
******
Delhi Police arrested Indian Youth Congress chief Uday Bhanu Chib and seven
others for a shirtless protest at Bharat Mandapam during the AI Summit.
The Youth Congress condemned the arrests as "an undeclared emergency,"
while Congress spokesperson Pawan Khera criticized the government's
reaction to peaceful dissent. Protesters displayed anti-PM slogans.
------News Link--------
...
