- Puppet - Overview
- Puppet - Architecture
- Puppet - Installation
- Puppet - Configuration
- Puppet - Environment Conf
- Puppet - Master
- Puppet - Agent Setup
- Puppet - SSL Sign Certificate Setup
- Installing & Configuring r10K
- Puppet - Validating Setup
- Puppet - Coding Style
- Puppet - Manifest Files
- Puppet - Module
- Puppet - File Server
- Puppet - Facter & Facts
- Advanced Puppet
- Puppet - Resource
- Puppet - Resource Abstraction Layer
- Puppet - Template
- Puppet - Classes
- Puppet - Function
- Puppet - Custom Functions
- Puppet - Environment
- Puppet - Type & Provider
- Puppet - RESTful API
- Puppet - Live Project
- Puppet Useful Resources
- Puppet - Quick Guide
- Puppet - Useful Resources
- Puppet - Discussion
Puppet - Quick Guide
Puppet - Overview
Puppet is a configuration management tool developed by Puppet Labs in order to automate infrastructure management and configuration. Puppet is a very powerful tool which helps in the concept of Infrastructure as code. This tool is written in Ruby DSL language that helps in converting a complete infrastructure in code format, which can be easily managed and configured.
Puppet follows the client-server model, where one machine in any cluster acts as the server, known as puppet master and the other acts as a client known as a slave on nodes. Puppet has the capability to manage any system from scratch, starting from initial configuration till the end-of-life of any particular machine.
Features of Puppet System
Following are the most important features of Puppet.
Idempotency
Puppet supports Idempotency which makes it unique. Similar to Chef, in Puppet, one can safely run the same set of configuration multiple times on the same machine. In this flow, Puppet checks for the current status of the target machine and will only make changes when there is any specific change in the configuration.
Idempotency helps in managing any particular machine throughout its lifecycle starting from the creation of machine, configurational changes in the machine, till the end-of-life. Puppet Idempotency feature is very helpful in keeping the machine updated for years rather than rebuilding the same machine multiple times, when there is any configurational change.
Cross-platform
In Puppet, with the help of Resource Abstraction Layer (RAL) which uses Puppet resources, one can target the specified configuration of system without worrying about the implementation details and how the configuration command will work inside the system, which are defined in the underlying configuration file.
Puppet − Workflow
Puppet uses the following workflow to apply configuration on the system.
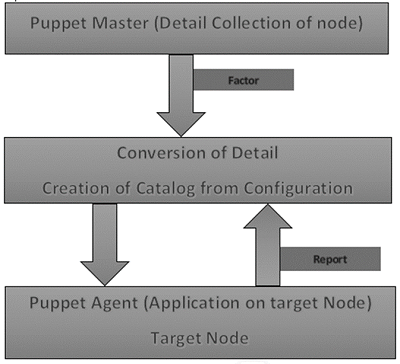
In Puppet, the first thing what the Puppet master does is to collect the details of the target machine. Using the factor which is present on all Puppet nodes (similar to Ohai in Chef) it gets all the machine level configuration details. These details are collected and sent back to the Puppet master.
Then the puppet master compares the retrieved configuration with defined configuration details, and with the defined configuration it creates a catalog and sends it to the targeted Puppet agents.
The Puppet agent then applies those configurations to get the system into a desired state.
Finally, once one has the target node in a desired state, it sends a report back to the Puppet master, which helps the Puppet master in understanding where the current state of the system is, as defined in the catalog.
Puppet − Key Components
Following are the key components of Puppet.
Puppet Resources
Puppet resources are the key components for modeling any particular machine. These resources have their own implementation model. Puppet uses the same model to get any particular resource in the desired state.
Providers
Providers are basically fulfillers of any particular resource used in Puppet. For example, the package type apt-get and yum both are valid for package management. Sometimes, more than one provider would be available on a particular platform. Though each platform always have a default provider.
Manifest
Manifest is a collection of resources which are coupled inside the function or classes to configure any target system. They contain a set of Ruby code in order to configure a system.
Modules
Module is the key building block of Puppet, which can be defined as a collection of resources, files, templates, etc. They can be easily distributed among different kinds of OS being defined that they are of the same flavor. As they can be easily distributed, one module can be used multiple times with the same configuration.
Templates
Templates use Ruby expressions to define the customized content and variable input. They are used to develop custom content. Templates are defined in manifests and are copied to a location on the system. For example, if one wants to define httpd with a customizable port, then it can be done using the following expression.
Listen <% = @httpd_port %>
The httpd_port variable in this case is defined in the manifest that references this template.
Static Files
Static files can be defined as a general file which are sometimes required to perform specific tasks. They can be simply copied from one location to another using Puppet. All static files are located inside the files directory of any module. Any manipulation of the file in a manifest is done using the file resource.
Puppet - Architecture
Following is the diagrammatic representation of Puppet architecture.
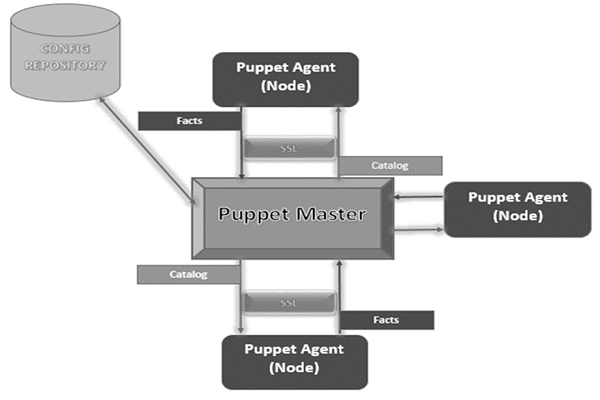
Puppet Master
Puppet Master is the key mechanism which handles all the configuration related stuff. It applies the configuration to nodes using the Puppet agent.
Puppet Agent
Puppet Agents are the actual working machines which are managed by the Puppet master. They have the Puppet agent daemon service running inside them.
Config Repository
This is the repo where all nodes and server-related configurations are saved and pulled when required.
Facts
Facts are the details related to the node or the master machine, which are basically used for analyzing the current status of any node. On the basis of facts, changes are done on any target machine. There are pre-defined and custom facts in Puppet.
Catalog
All the manifest files or configuration which are written in Puppet are first converted to a compiled format called catalog and later those catalogs are applied on the target machine.
Puppet - Installation
Puppet works on the client server architecture, wherein we call the server as the Puppet master and the client as the Puppet node. This setup is achieved by installing Puppet on both the client and well as on all the server machines.
For most of the platforms, Puppet can be installed via the package manager of choice. However, for few platforms it can be done by installing the tarball or RubyGems.
Prerequisites
Factor is the only pre-requisite that does not come along with Ohai which is present in Chef.
Standard OS Library
We need to have standard set of library of any underlying OS. Remaining all the system comes along with Ruby 1.8.2 + versions. Following is the list of library items, which an OS should consist of.
- base64
- cgi
- digest/md5
- etc
- fileutils
- ipaddr
- openssl
- strscan
- syslog
- uri
- webrick
- webrick/https
- xmlrpc
Facter Installation
As discussed, the facter does not come along with the standard edition of Ruby. So, in order to get the facter in the target system one needs to install it manually from the source as the facter library is a pre-requisite of Puppet.
This package is available for multiple platforms however just to be on the safer side it can be installed using tarball, which helps in getting the latest version.
First, download the tarball from the official site of Puppet using the wget utility.
$ wget http://puppetlabs.com/downloads/facter/facter-latest.tgz ------: 1
Next, un-tar the tar file. Get inside the untarred directory using the CD command. Finally, install the facter using install.rb file present inside the facter directory.
$ gzip -d -c facter-latest.tgz | tar xf - -----: 2
$ cd facter-* ------: 3
$ sudo ruby install.rb # or become root and run install.rb -----:4
Installing Puppet from the Source
First, install the Puppet tarball from the Puppet site using wget. Then, extract the tarball to a target location. Move inside the created directory using the CD command. Using install.rb file, install Puppet on the underlying server.
# get the latest tarball
$ wget http://puppetlabs.com/downloads/puppet/puppet-latest.tgz -----: 1

# untar and install it
$ gzip -d -c puppet-latest.tgz | tar xf - ----: 2
$ cd puppet-* ------: 3
$ sudo ruby install.rb # or become root and run install.rb -------: 4
Installing Puppet and Facter Using Ruby Gem
# Installing Facter
$ wget http://puppetlabs.com/downloads/gems/facter-1.5.7.gem
$ sudo gem install facter-1.5.7.gem

# Installing Puppet
$ wget http://puppetlabs.com/downloads/gems/puppet-0.25.1.gem
$ sudo gem install puppet-0.25.1.gem
Puppet - Configuration
Once we have Puppet installed on the system, the next step is to configure it to perform certain initial operations.
Open Firewall Ports on Machines
To make the Puppet server manage the clients server centrally, one needs to open a specified port on all the machines, i.e. 8140 can be used if it is not in use in any of the machines which we are trying to configure. We need to enable both TCP and UDP communication on all the machines.
Configuration File
The main configuration file for Puppet is etc/puppet/puppet.conf. All the configuration files get created in a package-based configuration of Puppet. Most of the configuration which is required to configure Puppet is kept in these files and once the Puppet run takes place, it picks up those configurations automatically. However, for some specific tasks such as configuring a web server or an external Certificate Authority (CA), Puppet has separate configuration for files and settings.
Server configuration files are located in conf.d directory which is also known as the Puppet master. These files are by default located under /etc/puppetlabs/puppetserver/conf.d path. These config files are in HOCON format, which keeps the basic structure of JSON but it is more readable. When the Puppet startup takes place it picks up all .cong files from conf.d directory and uses them for making any configurational changes. Any changes in these files only takes place when the server is restarted.
List File and Settings File
- global.conf
- webserver.conf
- web-routes.conf
- puppetserver.conf
- auth.conf
- master.conf (deprecated)
- ca.conf (deprecated)
There are different configuration files in Puppet which are specific to each component in Puppet.
Puppet.conf
Puppet.conf file is Puppets main configuration file. Puppet uses the same configuration file to configure all the required Puppet command and services. All Puppet related settings such as the definition of Puppet master, Puppet agent, Puppet apply and certificates are defined in this file. Puppet can refer them as per requirement.
The config file resembles a standard ini file wherein the settings can go into the specific application section of the main section.
Main Config Section
[main]
certname = Test1.vipin.com
server = TestingSrv
environment = production
runinterval = 1h
Puppet Master Config File
[main]
certname = puppetmaster.vipin.com
server = MasterSrv
environment = production
runinterval = 1h
strict_variables = true
[master]

dns_alt_names = MasterSrv,brcleprod01.vipin.com,puppet,puppet.test.com
reports = puppetdb
storeconfigs_backend = puppetdb
storeconfigs = true
environment_timeout = unlimited
Detail Overview
In Puppet configuration, the file which is going to be used has multiple configuration sections wherein each section has different kinds of multiple number of settings.
Config Section
Puppet configuration file mainly consists of the following config sections.
Main − This is known as the global section which is used by all the commands and services in Puppet. One defines the default values in the main section which can be overridden by any section present in puppet.conf file.
Master − This section is referred by Puppet master service and Puppet cert command.
Agent − This section is referred by Puppet agent service.
User − It is mostly used by Puppet apply command as well as many of the less common commands.
[main]
certname = PuppetTestmaster1.example.com
Key Components of Config File
Following are the key components of Config file.
Comment Lines
In Puppet, any comment line starts with (#) sign. This may intend with any amount of space. We can have a partial comment as well within the same line.
# This is a comment.
Testing = true #this is also a comment in same line
Settings Lines
Settings line must consist of −
- Any amount of leading space (optional)
- Name of the settings
- An equals = to sign, which may be surrounded by any number of space
- A value for the setting
Setting Variables
In most of the cases, the value of settings will be a single word but in some special cases, there are few special values.
Paths
In configuration file settings, take a list of directories. While defining these directories, one should keep in mind that they should be separated by the system path separator character, which is (:) in *nix platforms and semicolons (;) on Windows.
# *nix version:
environmentpath = $codedir/special_environments:$codedir/environments
# Windows version:
environmentpath = $codedir/environments;C:\ProgramData\PuppetLabs\code\environment
In the definition, the file directory which is listed first is scanned and then later moves to the other directory in the list, if it doesnt find one.
Files and Directories
All the settings that take a single file or directory can accept an optional hash of permissions. When the server is starting up, Puppet will enforce those files or directories in the list.
ssldir = $vardir/ssl {owner = service, mode = 0771}
In the above code, the allowed hash are owner, group, and mode. There are only two valid values of the owner and group keys.
Puppet - Environment Conf
In Puppet, all environments have the environment.conf file. This file can override several default settings whenever the master is serving any of the nodes or all the nodes assigned to that particular environment.
Location
In Puppet, for all the environments which are defined, environment.conf file is located at the top level of its home environment, very next to the manifest and modules directors. Considering an example, if your environment is in default directories (Vipin/testing/environment), then test environments config file is located at Vipin/testing/environments/test/environment.conf.
Example
# /etc/testingdir/code/environments/test/environment.conf
# Puppet Enterprise requires $basemodulepath; see note below under modulepath".
modulepath = site:dist:modules:$basemodulepath
# Use our custom script to get a git commit for the current state of the code:
config_version = get_environment_commit.sh
Format
All the configuration files in Puppet uses the same INI-like format in the same way. environment.conf file follow the same INI-like format as others do like puppet.conf file. The only difference between environment.conf and puppet.conf is environment.conf file cannot contain the [main] section. All settings in the environment.conf file must be outside any config section.
Relative Path in Values
Most of the allowed settings accept file path or list of path as the value. If any of the paths are relevant path, they start without a leading slash or drive letter they will be mostly resolved relative to that environments main directory.
Interpolation in Values
Environment.conf settings file is capable of using values of other settings as variable. There are multiple useful variables which could be interpolated into the environment.conf file. Here is a list of few important variables −
$basemodulepath − Useful for including directories in the module path settings. Puppet enterprise user should usually include this value of modulepath since the Puppet engine uses module in the basemodulepath.
$environment − Useful as a command line argument to your config_version script. You can interpolate this variable only in the config_version setting.
$codedir − Useful for locating files.
Allowed Settings
By default, Puppet environment.conf file is only allowed to override four settings in the configuration as listed.
- Modulepath
- Manifest
- Config_version
- Environment_timeout
Modulepath
This is one of the key settings in environment.conf file. All the directors defined in modulepath are by default loaded by Puppet. This is the path location from where Puppet loads its modules. One needs to explicitly set this up. If this above setting is not set, the default modulepath of any environment in Puppet will be −
<MODULES DIRECTORY FROM ENVIRONMENT>:$basemodulepath
Manifest
This is used to define the main manifest file, which Puppet master will use while booting up and compiling the catalog out of the defined manifest which is going to be used to configure the environment. In this, we can define a single file, a list of files, or even a directory consisting of multiple manifest files which needs to be evaluated and compiled in a defined alphabetical sequence.
One needs to explicitly define this setting in the environment.conf file. If not, then Puppet will use environments default manifest directory as its main manifest.
Config_version
Config_version can be defined as a definite version used to identify catalogs and events. When Puppet compiles any manifest file by default, it adds a config version to the generated catalogs as well as to the reports which gets generated when the Puppet master applies any defined catalog on Puppet nodes. Puppet runs a script to perform all the above steps and uses all the generated output as Config_version.
Environment Timeout
It is used to get the details about the amount of time which Puppet should use to load data for a given environment. If the value is defined in puppet.conf file, then these values will override the default timeout value.
Sample environment.conf File
[master]
   manifest =  $confdir/environments/$environment/manifests/site.pp
   modulepath =  $confdir/environments/$environment/modules
In the above code $confdir is the path of the directory, where environment configuration files are located. $environment is the name of the environment for which the configuration is being done.
Production Ready environment config File
# The environment configuration file
# The main manifest directory or file where Puppet starts to evaluate code
# This is the default value. Works with just a site.pp file or any other
manifest = manifests/
# The directories added to the module path, looked in first match first used order:
# modules - Directory for external modules, populated by r10k based on Puppetfile
# $basemodulepath - As from: puppet config print basemodulepath
modulepath = site:modules:$basemodulepath
# Set the cache timeout for this environment.
# This overrides what is set directly in puppet.conf for the whole Puppet server
# environment_timeout = unlimited
# With caching you need to flush the cache whenever new Puppet code is deployed
# This can also be done manually running: bin/puppet_flush_environment_cache.sh
# To disable catalog caching:
environment_timeout = 0
# Here we pass to one in the control repo the Puppet environment (and git branch)
# to get title and essential info of the last git commit
config_version = 'bin/config_script.sh $environment'
Puppet - Master
In Puppet, the client server architecture of Puppet master is considered as the controlling authority of the entire setup. Puppet master acts as the server in the setup and controls all the activities on all the nodes.
For any server which needs to act as Puppet master, it should have Puppet server software running. This server software is the key component of controlling all the activities on nodes. In this setup, one key point to remember is to have a super user access to all the machines that one is going to use in the setup. Following are the steps to setup Puppet master.
Prerequisites
Private Network DNS − Forward and backward should be configured, wherein each server should have a unique hostname. If one does not have the DNS configured, then one can use a private network for communication with the infrastructure.
Firewall Open Port − Puppet master should be open on a particular port so that it can listen to the incoming requests on a particular port. We can use any port which is open on the firewall.
Creating Puppet Master Server
Puppet master that we are creating is going to be on CentOS 7 × 64 machine using Puppet as the host name. The minimum system configuration for the creation of Puppet master is two CPU core and 1GB of memory. Configuration may have bigger size as well depending on the number of nodes we are going to manage with this master. In the infrastructure, is bigger than it is configured using 2 GB RAM.
| Host Name | Role | Private FQDN |
|---|---|---|
| Brcleprod001 | Puppet master | bnrcleprod001.brcl.com |
Next, one needs to generate Puppet master SSL certificate and the name of the master machine will be copied in the configuration file of all the nodes.
Installing NTP
Since Puppet master is the central authority for agent nodes in any given setup, it is one of the key responsibility of the Puppet master to maintain accurate system time to avoid potential configuration problems, which can arise when it issues agent certificates to nodes.
If the time conflict issue arises, then certificates can appear expired if there are time discrepancies between the master and the node. Network time protocol is one of the key mechanisms to avoid such kind of problems.
Listing Available Time Zones
$ timedatectl list-timezones
The above command will provide a whole list of available time zones. It will provide regions with time zone availability.
Following command can be used to set the required time zone on the machine.
$ sudo timedatectl set-timezone India/Delhi
Install NTP on the Puppet server machine using the yum utility of CentOS machine.
$ sudo yum -y install ntp
Sync NTP with the system time which we have set in the above commands.
$ sudo ntpdate pool.ntp.org
In common practice, we will update the NTP configuration to use common pools which is available nearer to the machine datacenters. For this, we need to edit ntp.conf file under /etc.
$ sudo vi /etc/ntp.conf
Add the time server from the NTP pool time zones available. Following is how the ntp.conf file looks like.
brcleprod001.brcl.pool.ntp.org
brcleprod002.brcl.pool.ntp.org
brcleprod003.brcl.pool.ntp.org
brcleprod004.brcl.pool.ntp.org
Save the configuration. Start the server and enable the daemon.
$ sudo systemctl restart ntpd
$ sudo systemctl enable ntpd
Setup Puppet Server Software
Puppet server software is a software which runs on the Puppet master machine. It is the machine which pushes configurations to other machines running the Puppet agent software.
Enable official Puppet labs collection repository using the following command.
$ sudo rpm -ivh https://yum.puppetlabs.com/puppetlabs-release-pc1-el7.noarch.rpm
Install puppetserver package.
$ sudo yum -y install puppetserver
Configure Memory Allocation on the Puppet Server
As we have discussed, by default, the Puppet server gets configured on 2GB RAM machine. One can customize the setup according to the free memory available on the machine and how many nodes the server will manage.
Edit the puppet server configuration on the vi mode
$ sudo vi /etc/sysconfig/puppetserver
Find the JAVA_ARGS and use the Xms and Xms options to set the memory allocation.
We will allocate 3GB of space
JAVA_ARGS="-Xms3g -Xmx3g"
Once done, save and exit from the edit mode.
After all the above setup is complete, we are ready to start the Puppet server on the master machine with the following command.
$ sudo systemctl start puppetserver
Next, we will do the setup so that the puppet server starts whenever the master server boots.
$ sudo systemctl enable puppetserver
Puppet.conf Master Section
[master]
autosign = $confdir/autosign.conf { mode = 664 }
reports = foreman
external_nodes = /etc/puppet/node.rb
node_terminus = exec
ca = true
ssldir = /var/lib/puppet/ssl
certname = sat6.example.com
strict_variables = false
manifest =
/etc/puppet/environments/$environment/manifests/site.pp
modulepath = /etc/puppet/environments/$environment/modules
config_version =
Puppet - Agent Setup
Puppet agent is a software application, provided by Puppet labs, which runs on any node in Puppet cluster. If one wants to manage any server using the Puppet master, the Puppet agent software needs to be installed on that particular server. In general, the Puppet agent will be installed on all the machines excluding the Puppet master machine on any given infrastructure. Puppet agent software has the capability to run on most of the Linux, UNIX, and Windows machines. In the following examples, we are using CentOS machine installation Puppet agent software on it.
Step 1 − Enable the official Puppet labs collection repository with the following command.
$ sudo rpm -ivh https://yum.puppetlabs.com/puppetlabs-release-pc1-el7.noarch.rpm
Step 2 − Install the Puppet agent package.
$ sudo yum -y install puppet-agent
Step 3 − Once the Puppet agent is installed, enable it with the following command.
$ sudo /opt/puppetlabs/bin/puppet resource service puppet ensure=running enable = true
One key feature of the Puppet agent is, for the first time when the Puppet agent starts running, it generates a SSL certificate and sends it to the Puppet master which is going to manage it for signing and approval. Once the Puppet master approves the agents certificate signature request, it will be able to communicate and manage the agent node.
Note − One needs to repeat the above steps on all the nodes which needs to be configured and managed any a given Puppet master.
Puppet - SSL Sign Certificate Setup
When the Puppet agent software runs for the first time on any Puppet node, it generates a certificate and sends the certificate signing request to the Puppet master. Before the Puppet server is able to communicate and control the agent nodes, it must sign that particular agent nodes certificate. In the following sections, we will describe how to sign and check for the signing request.
List Current Certificate Requests
On the Puppet master, run the following command to see all unsigned certificate requests.
$ sudo /opt/puppetlabs/bin/puppet cert list
As we have just set up a new agent node, we will see one request for approval. Following will be the output.
"Brcleprod004.brcl.com" (SHA259)
15:90:C2:FB:ED:69:A4:F7:B1:87:0B:BF:F7:ll:
B5:1C:33:F7:76:67:F3:F6:45:AE:07:4B:F 6:E3:ss:04:11:8d
It does not contain any + (sign) in the beginning, which indicates that the certificate is still not signed.
Sign a Request
In order to sign the new certificate request which was generated when the Puppet agent run took place on the new node, the Puppet cert sign command would be used, with the host name of the certificate, which was generated by the newly configured node that needs to be signed. As we have Brcleprod004.brcl.coms certificate, we will use the following command.
$ sudo /opt/puppetlabs/bin/puppet cert sign Brcleprod004.brcl.com
Following will be the output.
Notice: Signed certificate request for Brcle004.brcl.com
Notice: Removing file Puppet::SSL::CertificateRequest Brcle004.brcl.com at
'/etc/puppetlabs/puppet/ssl/ca/requests/Brcle004.brcl.com.pem'
The puppet sever can now communicate to the node, where the sign certificate belongs.
$ sudo /opt/puppetlabs/bin/puppet cert sign --all
Revoking the Host from the Puppet Setup
There are conditions on configuration of kernel rebuild when it needs to removing the host from the setup and adding it again. These are those conditions which cannot be managed by the Puppet itself. It could be done using the following command.
$ sudo /opt/puppetlabs/bin/puppet cert clean hostname
Viewing All Signed Requests
The following command will generate a list of signed certificates with + (sign) which indicates that the request is approved.
$ sudo /opt/puppetlabs/bin/puppet cert list --all
Following will be its output.
+ "puppet" (SHA256) 5A:71:E6:06:D8:0F:44:4D:70:F0:
BE:51:72:15:97:68:D9:67:16:41:B0:38:9A:F2:B2:6C:B
B:33:7E:0F:D4:53 (alt names: "DNS:puppet", "DNS:Brcle004.nyc3.example.com")

+ "Brcle004.brcl.com" (SHA259) F5:DC:68:24:63:E6:F1:9E:C5:FE:F5:
1A:90:93:DF:19:F2:28:8B:D7:BD:D2:6A:83:07:BA:F E:24:11:24:54:6A

+ " Brcle004.brcl.com" (SHA259) CB:CB:CA:48:E0:DF:06:6A:7D:75:E6:CB:22:BE:35:5A:9A:B3
Once the above is done, we have our infrastructure ready in which the Puppet master is now capable of managing newly added nodes.
Puppet - Installing and Configuring r10K
In Puppet, we have a code management tool known as r10k that helps in managing environment configurations related to different kind of environments that we can configure in Puppet such as development, testing, and production. This helps in storing environment-related configuration in the source code repository. Using the source control repo branches, r10k creates environments on Puppet master machine installs and updates environment using modules present in the repo.
Gem file can be used to install r10k on any machine but for modularity and in order to get the latest version, we will use rpm and rpm package manager. Following is an example for the same.
$ urlgrabber -o /etc/yum.repos.d/timhughes-r10k-epel-6.repo
https://copr.fedoraproject.org/coprs/timhughes/yum -y install rubygem-r10k
Configure environment in /etc/puppet/puppet.conf
[main]
environmentpath = $confdir/environments
Create a Configuration File for r10k Config
cat <<EOF >/etc/r10k.yaml
# The location to use for storing cached Git repos
:cachedir: '/var/cache/r10k'
# A list of git repositories to create
:sources:
# This will clone the git repository and instantiate an environment per
# branch in /etc/puppet/environments
:opstree:
#remote: 'https://github.com/fullstack-puppet/fullstackpuppet-environment.git'
remote: '/var/lib/git/fullstackpuppet-environment.git'
basedir: '/etc/puppet/environments'
EOF
Installing Puppet Manifest and Module
r10k deploy environment -pv
As we need to continue updating the environment in every 15 minutes, we will create a cron job for the same.
cat << EOF > /etc/cron.d/r10k.conf
SHELL = /bin/bash
PATH = /sbin:/bin:/usr/sbin:/usr/bin
H/15 * * * * root r10k deploy environment -p
EOF
Testing Installation
In order to test if everything works as accepted, one needs to compile the Puppet manifest for Puppet module. Run the following command and get a YAML output as the result.
curl --cert /etc/puppet/ssl/certs/puppet.corp.guest.pem \
--key /etc/puppet/ssl/private_keys/puppet.corp.guest.pem \
--cacert /etc/puppet/ssl/ca/ca_crt.pem \
-H 'Accept: yaml' \
https://puppet.corp.guest:8140/production/catalog/puppet.corp.guest
Puppet - Validating Puppet Setup
In Puppet, the setup can be tested locally. Hence, once we have set up Puppet master and node, its time to validate the setup locally. We need to have Vagrant and Vagrant box installed locally, which helps in testing the setup locally.
Setting Up the Virtual Machine
As we are testing the setup locally, we do not actually require a running Puppet master. This means without actually running the Puppet master on the server, we can simply use Puppet to apply command for Puppet setup validation. Puppet apply command will apply changes from local/etc/puppet depending on the virtual machines hostname in the configuration file.
First step which we need to perform in order to test the setup is to build the following Vagrantfile and start a machine and mount the /etc/puppet folder into place. All the files which are required will be place inside the version control system with the following structure.
Directory Structure
- manifests
   \- site.pp
- modules
   \- your modules
- test
   \- update-puppet.sh
   \- Vagrantfile
- puppet.conf
Vagrant File
# -*- mode: ruby -*-
# vi: set ft = ruby :
Vagrant.configure("2") do |config|
   config.vm.box = "precise32"
   config.vm.box_url = "http://files.vagrantup.com/precise64.box"
   config.vm.provider :virtualbox do |vb|
      vb.customize ["modifyvm", :id, "--memory", 1028, "--cpus", 2]
   end

   # Mount our repo onto /etc/puppet
   config.vm.synced_folder "../", "/etc/puppet"

   # Run our Puppet shell script
   config.vm.provision "shell" do |s|
      s.path = "update-puppet.sh"
   end

   config.vm.hostname = "localdev.example.com"
end
In the above code, we have used Shell provisioner in which we are trying to run a Shell script named update-puppet.sh. The script is present in the same directory where the Vagrant file is located and the content of the script are listed below.
!/bin/bash
echo "Puppet version is $(puppet --version)"
if [ $( puppet --version) != "3.4.1" ]; then
   echo "Updating puppet"
   apt-get install --yes lsb-release
   DISTRIB_CODENAME = $(lsb_release --codename --short)
   DEB = "puppetlabs-release-${DISTRIB_CODENAME}.deb"
   DEB_PROVIDES="/etc/apt/sources.list.d/puppetlabs.list"

   if [ ! -e $DEB_PROVIDES ]
   then
      wget -q http://apt.puppetlabs.com/$DEB
      sudo dpkg -i $DEB
   fi
sudo apt-get update
   sudo apt-get install -o Dpkg::Options:: = "--force-confold"
   --force-yes -y puppet
else
   echo "Puppet is up to date!"
fi
Further processing, the user needs to create a manifest file inside Manifests directory with the name site.pp which will install some software on VM.
node 'brclelocal03.brcl.com' {
   package { ['vim','git'] :
      ensure => latest
   }
}
echo "Running puppet"
sudo puppet apply /etc/puppet/manifests/site.pp
Once the user has the above script ready with the required Vagrant file configuration, the user can cd to the test directory and run the vagrant up command. This will boot a new VM, Later, install Puppet and then run it using the Shell script.
Following will be the output.
Notice: Compiled catalog for localdev.example.com in environment production in 0.09 seconds
Notice: /Stage[main]/Main/Node[brclelocal03.brcl.com]/Package[git]/ensure: created
Notice: /Stage[main]/Main/Node[brcllocal03.brcl.com]/Package[vim]/ensure: ensure changed 'purged' to 'latest'
Validating Multiple Machine Configuration
If we need to test the configuration of multiple machines locally, it can be simply done by making a change in Vagrant configuration file.
New Configured Vagrant File
config.vm.define "brclelocal003" do |brclelocal003|
   brclelocal03.vm.hostname = "brclelocal003.brcl.com"
end

config.vm.define "production" do |production|
   production.vm.hostname = "brcleprod004.brcl.com"
end
Lets assume we have a new production server, which needs SSL utility installed. We just need to extend the old manifest with the following configuration.
node 'brcleprod004.brcl.com' inherits 'brcleloacl003.brcl.com' {
   package { ['SSL'] :
      ensure => latest
   }
}
After making configurational changes in the manifest file, we just need to move to the test directory and run the basic vagrant up command which will bring up both brclelocal003.brcl.com and brcleprod004.brcl.com machine. In our case, we are trying to bring up production machine which could be done by running the vagrant up production command. The will create a new machine with the name production as defined in Vagrant file and it will have SSL package installed in it.
Puppet - Coding Style
In Puppet, the coding style defines all the standards which one needs to follow while trying to convert the infrastructure on the machine configuration into a code. Puppet works and performs all its defined tasks using resources.
Puppets language definition helps in specifying all the resources in a structured way, which is required to manage any target machine that needs to be managed. Puppet uses Ruby as its encoding language, which has multiple inbuilt features that makes it very easy to get things done with a simple configuration on the code side.
Fundamental Units
Puppet uses multiple fundamental coding styles which is easy to understand and manage. Following is a list of few.
Resources
In Puppet, resources are known as fundamental modeling unit which are used to manage or modify any target system. Resources cover all the aspects of a system such as file, service, and package. Puppet comes with an in-built capability wherein it allows the users or developers to develop custom resources, which help in managing any particular unit of a machine
In Puppet, all the resources are aggregated together either by using define or classes. These aggregation features help in organizing a module. Following is a sample resource which consists of multiple types, a title, and a list of attributes with which Puppet can support multiple attributes. Each resource in Puppet has its own default value, which could be overridden when required.
Sample Puppet Resource for File
In the following command, we are trying to specify a permission for a particular file.
file {
   '/etc/passwd':
   owner => superuser,
   group => superuser,
   mode => 644,
}
Whenever the above command gets executed on any machine, it will verify that the passwd file in the system is configured as described. The file before: colon is the title of resource, which can be referred as resource in other parts of Puppet configuration.
Specifying Local Name in Addition to the Title
file { 'sshdconfig':
   name => $operaSystem ? {
      solaris => '/usr/local/etc/ssh/sshd_config',
      default => '/etc/ssh/sshd_config',
   },
   owner => superuser,
   group => superuser,
   mode => 644,
}
By using the title, which is always the same it is very easy to refer file resource in configuration without having to repeat the OS related logic.
Another example could be using a service that depends on a file.
service { 'sshd':
   subscribe => File[sshdconfig],
}
With this dependency, the sshd service will always restart once the sshdconfig file changes. The point to be remember here is File[sshdconfig] is a declaration as File as in lower case but if we change it to FILE[sshdconfig] then it would have been a reference.
One fundamental point that one needs to keep in mind while declaring a resource is, it can be declared only once per config file. Repeating declaration of the same resource more than once will cause an error. Through this fundamental concept, Puppet makes sure that the configuration is well modeled.
We even have the capability to manage resource dependency which helps is managing multiple relationships.
service { 'sshd':
   require => File['sshdconfig', 'sshconfig', 'authorized_keys']
}
Metaparameters
Metaparameters are known as global parameters in Puppet. One of the key features of metaparameter is, it works with any type of resource in Puppet.
Resource Default
When one needs to define a default resource attribute value, Puppet provides a set of syntax to archive it, using a capitalized resource specification that has no title.
For example, if we want to set the default path of all the executable it can be done with the following command.
Exec { path => '/usr/bin:/bin:/usr/sbin:/sbin' }
exec { 'echo Testing mataparamaters.': }
In the above command, the first statement Exec will set the default value for exec resource. Exec resource requires a fully qualified path or a path which looks like an executable. With this, one can define a single default path for the entire configuration. Defaults work with any resource type in Puppet.
Defaults are not global values, however, they only affect the scope in which they are defined or the very next variable to it. If one wants to define default for a complete configuration, then we define the default and the class in the very next section.
Resource Collections
Aggregation is method of collecting things together. Puppet supports a very powerful concept of aggregation. In Puppet, aggregation is used for grouping resource which is the fundamental unit of Puppet together. This concept of aggregation in Puppet is achieved by using two powerful methods known as classes and definition.
Classes and Definition
Classes are responsible for modeling the fundamental aspects of node. They can say node is a web server and this particular node is one of them. In Puppet, programming classes are singleton and they can get evaluated once per node.
Definition on the other hand can be used many times on a single node. They work similarly as one has created his own Puppet type using the language. They are created to be used multiple times with different input each time. This means one can pass variable values into the definition.
Difference between Class and Definition
The only key difference between a class and definition is while defining the building structure and allocating resources, class gets evaluated only once per node, wherein on the other hand, a definition is used multiple times on the same single node.
Classes
Classes in Puppet are introduced using the class keyword and the content of that particular class is wrapped inside the curly braces as shown in the following example.
class unix {
   file {
      '/etc/passwd':
      owner => 'superuser',
      group => 'superuser',
      mode => 644;
      '/etc/shadow':
      owner => 'vipin',
      group => 'vipin',
      mode => 440;
   }
}
In the following example, we have used some short hand which is similar to the above.
class unix {
   file {
      '/etc/passwd':
      owner => 'superuser',
      group => 'superuser',
      mode => 644;
   }

   file {'/etc/shadow':
      owner => 'vipin',
      group => 'vipin',
      mode => 440;
   }
}
Inheritance in Puppet Classes
In Puppet, the OOP concept of inheritance is supported by default wherein classes can extend the functionality of previous without copying and pasting the complete code bit again in newly created class. Inheritance allows the subclass to override the resource settings defined in the parent class. One key thing to keep in mind while using inheritance is, a class can only inherit features from only one parent class, not more than one.
class superclass inherits testsubclass {
   File['/etc/passwd'] { group => wheel }
   File['/etc/shadow'] { group => wheel }
}
If there is a need to undo some logic specified in a parent class, we can use undef command.
class superclass inherits testsubcalss {
   File['/etc/passwd'] { group => undef }
}
Alternative Way of Using Inheritance
class tomcat {
   service { 'tomcat': require => Package['httpd'] }
}
class open-ssl inherits tomcat {
   Service[tomcat] { require +> File['tomcat.pem'] }
}
Nested Class in Puppet
Puppet supports the concept of nesting of classes in which it allows to use nested classes which means one class inside the other. This helps in achieving modularity and scoping.
class testclass {
   class nested {
      file {
         '/etc/passwd':
         owner => 'superuser',
         group => 'superuser',
         mode => 644;
      }
   }
}
class anotherclass {
   include myclass::nested
}
Parameterized Classes
In Puppet, classes can extend their functionality to allow the passing of parameters into a class.
To pass a parameter in a class, one can use the following construct −
class tomcat($version) {
   ... class contents ...
}
One key point to remember in Puppet is, classes with parameters are not added using the include function, rather the resulting class can be added as a definition.
node webserver {
   class { tomcat: version => "1.2.12" }
}
Default Values As Parameters in Class
class tomcat($version = "1.2.12",$home = "/var/www") {
   ... class contents ...
}
Run Stages
Puppet supports the concept of run stage, which means the user can add multiple number of stages as per the requirement in order to manage any particular resource or multiple resources. This feature is very helpful when the user wants to develop a complex catalog. In a complex catalog, one has large number of resources which needs to be compiled while keeping in mind that the dependencies among the resources defined should not be impacted.
Run Stage is very helpful in managing resource dependencies. This can be done by adding classes in defined stages wherein a particular class contains a collection of resources. With run stage, Puppet guarantees that the defined stages will run in a specified predictable order every time the catalog runs and gets applied on any Puppet node.
In order to use this, one needs to declare additional stages beyond the already present stages and then Puppet can be configured to manage each stage in a specified order using the same resource relationship syntax before require -> and +>. The relationship will then guarantee the order of classes associated with each stage.
Declaring Additional Stages with Puppet Declarative Syntax
stage { "first": before => Stage[main] }
stage { "last": require => Stage[main] }
Once the stages have been declared, a class may be associated with the stage other than the main using the stage.
class {
   "apt-keys": stage => first;
   "sendmail": stage => main;
   "apache": stage => last;
}
All resources associated with class apt-key will run first. All the resources in Sendmail will be the main class and the resources associated with Apache will be the last stage.
Definitions
In Puppet, collection of resources in any manifest file is done either by classes or definitions. Definitions are very much similar to a class in Puppet however they are introduced with a define keyword (not class) and they support argument not inheritance. They can run on the same system multiple times with different parameters.
For example, if one wants to create a definition that controls the source code repositories where one is trying to create multiple repositories on the same system, then one can use the definition not class.
define perforce_repo($path) {
   exec {
      "/usr/bin/svnadmin create $path/$title":
      unless => "/bin/test -d $path",
   }
}
svn_repo { puppet_repo: path => '/var/svn_puppet' }
svn_repo { other_repo: path => '/var/svn_other' }
The key point to be noted here is how a variable can be used with a definition. We use ($) dollar sign variable. In the above, we have used $title. Definitions can have both a $title and $name with which the name and the title can be represented. By default, $title and $name are set to the same value, but one can set a title attribute and pass different name as a parameter. $title and $name only works in definition, not in class or other resource.
Modules
A module can be defined as a collection of all the configurations which would be used by the Puppet master to apply configurational changes on any particular Puppet node (agent). They are also known as portable collection of different kind of configurations, which are required to perform a specific task. For example, a module might contain all the resources required to configure Postfix and Apache.
Nodes
Nodes are very simple remaining step which is how we match what we defined (this is what a webserver looks like) to what machines are chosen to fulfill those instructions.
Node definition exactly looks like classes, including the supporting inheritance, however they are special such that when a node (a managed computer running a puppet client) connects to the Puppet master daemon, its name will be looked in the defined list of nodes. The information defined will be evaluated for node, and then the node will send that configuration.
Node name can be a short host name or the fully qualified domain name (FQDN).
node 'www.vipin.com' {
   include common
   include apache, squid
}
The above definition creates a node called www.vipin.com and includes the common, Apache and Squid classe
We can send the same configuration to different nodes by separating each with comma.
node 'www.testing.com', 'www.testing2.com', 'www3.testing.com' {
   include testing
   include tomcat, squid
}
Regular Expression for Matching Nodes
node /^www\d+$/ {
   include testing
}
Node Inheritance
Node supports a limited inheritance model. Like classes, nodes can only inherit from one other node.
node 'www.testing2.com' inherits 'www.testing.com' {
   include loadbalancer
}
In the above code, www.testing2.com inherits all the functionalities from www.testing.com in addition to an additional loadbalancer class.
Advanced Supported Features
Quoting − In most of the cases, we dont need to quote a string in Puppet. Any alpha numeric string starting with a letter is to be left without quoting. However, it is always a best practice to quote a string for any non-negative values.
Variable Interpolation with Quotes
So far we have mentioned variable in terms of definition. If one needs to use those variables with a string, use double quotes, not single quotes. Single quotes string will not do any variable interpolation, double quotes string will do. The variable can be bracketed in {} which makes them easier to use together and easier to understand.
$value = "${one}${two}"
As a best practice, one should use single quotes for all the strings that do not require string interpolation.
Capitalization
Capitalization is a process which is used for referencing, inheritance, and setting default attributes of a particular resource. There are basically two fundamental ways of using it.
Referencing − It is the way of referencing an already created resource. It is mainly used for dependency purposes, one has to capitalize the name of the resource. Example, require => file [sshdconfig]
Inheritance − When overriding the setting for parent class from subclass, use the upper case version of the resource name. Using the lower case version will result in an error.
Setting Default Attribute Value − Using the capitalized resource with no title works to set the default of the resource.
Arrays
Puppet allows the use of arrays in multiple areas [One, two, three].
Several type members, such as alias in the host definition accepts arrays in their values. A host resource with multiple aliases will look like something as follows.
host { 'one.vipin.com':
   alias => [ 'satu', 'dua', 'tiga' ],
   ip => '192.168.100.1',
   ensure => present,
}
The above code will add a host one.brcletest.com to the host list with three aliases satu dua tiga. If one wants to add multiple resources to one resource, it can be done as shown in the following example.
resource { 'baz':
   require => [ Package['rpm'], File['testfile'] ],
}
Variables
Puppet supports multiple variables like most of the other programming languages. Puppet variables are denoted with $.
$content = 'some content\n'
file { '/tmp/testing': content => $content }
As stated earlier Puppet is a declarative language, which means that its scope and assignment rules are different than the imperative language. The primary difference is that one cannot change the variable within a single scope, because they rely on order in the file to determine the value of a variable. Order does not matter in the declarative language.
$user = root
file {
   '/etc/passwd':
   owner => $user,
}

$user = bin
   file {
      '/bin':
      owner => $user,
      recurse => true,
   }
Variable Scope
Variable scope defines if all the variables which are defined are valid. As with the latest features, Puppet is currently dynamically scoped which in Puppet terms means that all the variables which are defined gets evaluated on their scope rather than the location which they are defined.
$test = 'top'
class Testclass {
   exec { "/bin/echo $test": logoutput => true }
}

class Secondtestclass {
   $test = 'other'
   include myclass
}

include Secondtestclass
Qualified Variable
Puppet supports the use of qualified variables inside a class or a definition. This is very helpful when the user wishes to use the same variable in other classes, which he has defined or is going to define.
class testclass {
   $test = 'content'
}

class secondtestclass {
   $other = $myclass::test
}
In the above code, the value of $other variable evaluates the content.
Conditionals
Conditions are situations when the user wishes to execute a set of statement or code when the defined condition or the required condition is satisfied. Puppet supports two types of conditions.
The selector condition which can only be used within the defined resources to pick the correct value of the machine.
Statement conditions are more widely used conditions in manifest which helps in including additional classes which the user wishes to include in the same manifest file. Define a distinct set of resources within a class, or make other structural decisions.
Selectors
Selectors are useful when the user wishes to specify a resource attribute and variables which are different from the default values based on the facts or other variables. In Puppet, the selector index works like a multivalued three-way operator. Selectors are also capable of defining the custom default values in no values, which are defined in manifest and matches the condition.
$owner = $Sysoperenv ? {
   sunos => 'adm',
   redhat => 'bin',
   default => undef,
}
In later versions of Puppet 0.25.0 selectors can be used as regular expressions.
$owner = $Sysoperenv ? {
   /(Linux|Ubuntu)/ => 'bin',
   default => undef,
}
In the above example, the selector $Sysoperenv value matches either Linux or Ubuntu, then the bin will be the selected result, otherwise the user will be set as undefined.
Statement Condition
Statement condition is other type of conditional statement in Puppet which is very much similar to switch case condition in Shell script. In this, a multiple set of case statements are defined and the given input values are matched against each condition.
The case statement which matches the given input condition gets executed. This case statement condition does not have any return value. In Puppet, a very common use case for condition statement is running a set of code bit based on the underlying operating system.
case $ Sysoperenv {
   sunos: { include solaris }
   redhat: { include redhat }
   default: { include generic}
}
Case Statement can also specify multiple conditions by separating them with a comma.
case $Sysoperenv {
   development,testing: { include development } testing,production: { include production }
   default: { include generic }
}
If-Else Statement
Puppet supports the concept of condition-based operation. In order to achieve it, If/else statement provides branching options based on the return value of the condition. As shown in the following example −
if $Filename {
   file { '/some/file': ensure => present }
} else {
   file { '/some/other/file': ensure => present }
}
The latest version of Puppet supports variable expression in which the if statement can also branch based on the value of an expression.
if $machine == 'production' {
   include ssl
} else {
   include nginx
}
In order to achieve more diversity in code and perform complex conditional operations, Puppet supports nested if/else statement as shown in the following code.
if $ machine == 'production' {
   include ssl
} elsif $ machine == 'testing' {
   include nginx
} else {
   include openssl
}
Virtual Resource
Virtual resources are those that are not sent to the client unless realized.
Following is the syntax of using virtual resource in Puppet.
@user { vipin: ensure => present }
In the above example, the user vipin is defined virtually to realize the definition one can use in the collection.
User <| title == vipin |>
Comments
Comments are used in any code bit to make an additional node about a set of lines of code and its functionality. In Puppet, there are currently two types of supported comments.
- Unix shell style comments. They can be on their own line or the next line.
- Multi-line c-style comments.
Following is an example of shell style comment.
# this is a comment
Following is an example of multiline comment.
/*
This is a comment
*/
Operator Precedence
The Puppet operator precedence conforms to the standard precedence in most systems, from the highest to the lowest.
Following is the list of expressions
- ! = not
- / = times and divide
- - + = minus, plus
- << >> = left shift and right shift
- == != = not equal, equal
- >= <= > < = greater equal, less or equal, greater than, less than
Comparison Expression
Comparison expression are used when the user wants to execute a set of statements when the given condition is satisfied. Comparison expressions include tests for equality using the == expression.
if $environment == 'development' {
   include openssl
} else {
   include ssl
}
Not Equal Example
if $environment != 'development' {
   $otherenvironment = 'testing'
} else {
   $otherenvironment = 'production'
}
Arithmetic Expression
$one = 1
$one_thirty = 1.30
$two = 2.034e-2 $result = ((( $two + 2) / $one_thirty) + 4 * 5.45) -
   (6 << ($two + 4)) + (0×800 + -9)
Boolean Expression
Boolean expressions are possible using or, and, & not.
$one = 1
$two = 2
$var = ( $one < $two ) and ( $one + 1 == $two )
Regular Expression
Puppet supports regular expression matching using =~ (match) and !~ (not-match).
if $website =~ /^www(\d+)\./ {
   notice('Welcome web server #$1')
}
Like case and selector regex match creates limited scope variable for each regex.
exec { "Test":
   command => "/bin/echo now we dont have openssl installed on machine > /tmp/test.txt",
   unless => "/bin/which php"
}
Similarly, we can use unless, unless execute the command all the time, except the command under unless exits successfully.
exec { "Test":
   command => "/bin/echo now we dont have openssl installed on machine > /tmp/test.txt",
   unless => "/bin/which php"
}
Working with Templates
Templates are used when one wishes to have a pre-defined structure which is going be used across multiple modules in Puppet and those modules are going to be distributed on multiple machines. The first step in order to use template is to create one that renders the template content with template methods.
file { "/etc/tomcat/sites-available/default.conf":
   ensure => "present",
   content => template("tomcat/vhost.erb")
}
Puppet makes few assumptions when dealing with local files in order to enforce organization and modularity. Puppet looks for vhost.erb template inside the folder apache/templates, inside the modules directory.
Defining and Triggering Services
In Puppet, it has a resource called service which is capable of managing the life cycle of all the services running on any particular machine or environment. Service resources are used to make sure services are initialized and enabled. They are also used for service restart.
For example, in the previous template of tomcat that we have where we set the apache virtual host. If one wants to make sure apache is restarted after a virtual host change, we need to create a service resource for the apache service using the following command.
service { 'tomcat':
   ensure => running,
   enable => true
}
When defining the resources, we need to include the notify option in order to trigger the restart.
file { "/etc/tomcat/sites-available/default.conf":
   ensure => "present",
   content => template("vhost.erb"),
   notify => Service['tomcat']
}
Puppet - Manifest Files
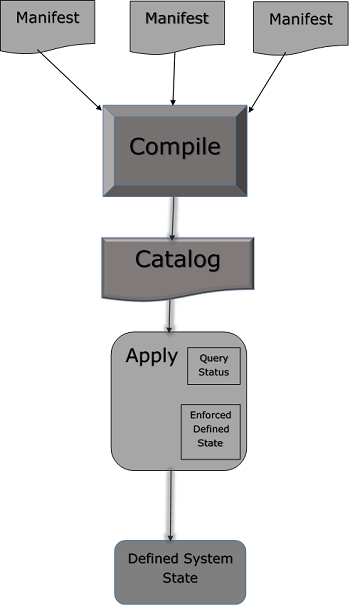
In Puppet, all the programs which are written using Ruby programming language and saved with an extension of .pp are called manifests. In general terms, all Puppet programs which are built with an intension of creating or managing any target host machine is called a manifest. All the programs written in Puppet follow Puppet coding style.
The core of Puppet is the way resources are declared and how these resources are representing their state. In any manifest, the user can have a collection of different kind of resources which are grouped together using class and definition.
In some cases, Puppet manifest can even have a conditional statement in order to achieve a desired state. However, ultimately it all comes down to make sure that all the resources are defined and used in the right way and the defined manifest when applied after getting converted to a catalog is capable of performing the task for which it was designed.
Manifest File Workflow
Puppet manifest consists of the following components −
Files (these are plain files where Puppet has nothing to do with them, just to pick them up and place them in the target location)
Resources
Templates (these can be used to construct configuration files on the node).
Nodes (all the definition related to a client node is defined here)
Classes
Points to Note
In Puppet, all manifest files use Ruby as their encoding language and get saved with .pp extension.
"Import" statement in many manifest are used for loading files when Puppet starts.
In order to import all files contained in a directory, you can use the import statement in another way like import 'clients/*'. This will import all .pp files inside that directory.
Writing Manifests
Working with Variables
While writing a manifest, the user can define a new variable or use an existing variable at any point in a manifest. Puppet supports different kind of variables but few of them are frequently used such as strings and array of string. Apart from them, other formats are also supported.
String Variable Example
$package = "vim"

package {  $package:
   ensure => "installed"
}
Using Loops
Loops are used when one wishes to go through multiple iterations on a same set of code till a defined condition is met. They are also used to do repetitive tasks with different set of values. Creating 10 tasks for 10 different things. One can create a single task and use a loop to repeat the task with different packages one wants to install.
Most commonly an array is used to repeat a test with different values.
$packages = ['vim', 'git', 'curl']

package { $packages:
   ensure => "installed"
}
Using Conditionals
Puppet supports most of the conditional structure which can be found in traditional programming languages. Condition can be used to dynamically define whether to perform a particular task or a set of code should get executed. Like if/else and case statements. Additionally, conditions like execute will also support attributes that works like condition, but only accepts a command output as a condition.
if $OperatingSystem != 'Linux' {
   warning('This manifest is not supported on this other OS apart from linux.')
} else {
   notify { 'the OS is Linux. We are good to go!': }
}
Puppet - Module
In Puppet, a module can be defined as a collection of resources, classes, files, definition, and templates. Puppet supports easy re-distribution of modules, which is very helpful in modularity of code as one can write a specified generic module and can use it multiple times with very few simple code changes. For example, this will enable default site configuration under /etc/puppet, with modules shipped by Puppet proper in /etc/share/puppet.
Module Configuration
In any Puppet module, we have two partitions which help in defining the structure of code and controlling the denominates.
The search path of modules is configured using colon-separated list of directories in the puppetmasterd or masterd, the later section of Puppets master configuration file with the modulepath parameter.
[puppetmasterd]
...
modulepath = /var/lib/puppet/modules:/data/puppet/modules
Access control settings for the file server modules in fileserver.conf, the path configuration for that module is always ignored, and specifying a path will produce a warning.
The search path can be added at the runtime by setting the PUPPETLAB environment variable which must also be colon-separated list of variables.
Modules Source
Puppet supports a different location for storing modules. Any module can be stored in different file system of any particular machine. However, all the paths where modules are stored must be specified in configuration variable known as modulepath which is in general, a path variable where Puppet scans for all module directories and loads them up when it is booting up.
A reasonable default path can be configured as −
/etc/puppet/modules:/usr/share/puppet:/var/lib/modules.
Alternatively, the /etc/puppet directory could be established as a special anonymous module, which is always searched first.
Module Naming
Puppet follows the same naming standards of a particular module wherein the module name must be normal words, matching [-\\w+] (letter, word, number, underscore and dashes) and not containing the namespace separator: : or /. While it might be allowed regarding module hierarchies, for new modules it cannot be nested.
Module Internal Organization
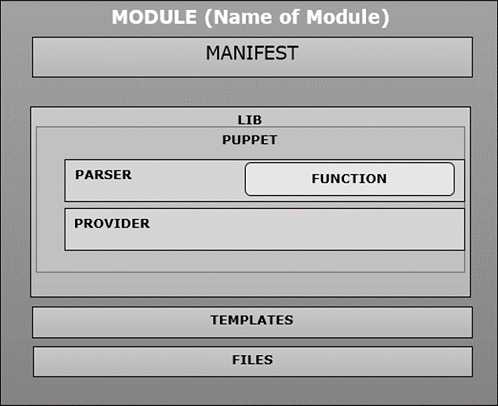
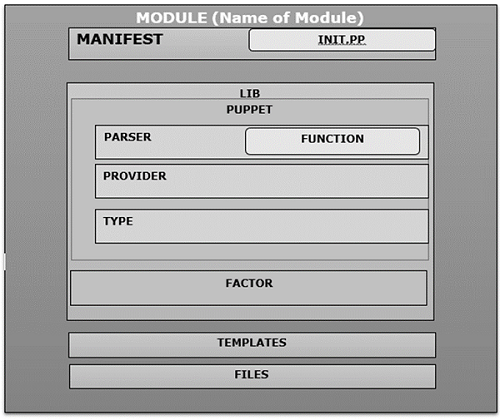
When the user creates a new module in Puppet, it follows the same structure and contains manifest, distributed file, plugins, and templates arranged in a specific directory structure as shown in the following code.
MODULE_PATH/
   downcased_module_name/
      files/
      manifests/
         init.pp
      lib/
         puppet/
            parser/
               functions
            provider/
            type/
         facter/
      templates/
      README
Whenever a module is created, it contains init.pp manifest file at the specified fix location inside manifests directory. This manifest file is a default file which executes first in any particular module and contains a collection of all the classes associated with that particular module. Additional .pp file can be added directly under the manifests folder. If we are adding additional .pp files, they should be named after the class.
One of the key feature achieved by using modules is code sharing. A module by nature should be self-contained which means one should be able to include any module from anywhere and drop it onto the module path, which gets loaded when Puppet boots up. With the help of modules, one gets modularity in Puppet infrastructure coding.
Example
Consider an autofs module that installs a fixed auto.homes map and generates the auto.master from templates.
class autofs {
   package { autofs: ensure => latest }
   service { autofs: ensure => running }

   file { "/etc/auto.homes":
      source => "puppet://$servername/modules/autofs/auto.homes"
   }
   file { "/etc/auto.master":
      content => template("autofs/auto.master.erb")
   }
}
The file system will have the following files.
MODULE_PATH/
autofs/
manifests/
init.pp
files/
auto.homes
templates/
auto.master.erb
Module Lookup
Puppet follows a pre-defined structure wherein it contains multiple directories and subdirectories in a defined structure. These directories contain different kind of files which are required by a module to perform certain actions. A little behind-the-scenes magic makes sure that the right file is associated with the right context. All module searches are within the modulepath, a colon-separated list of directories.
For file references on the fileserver, a similar reference is used so that a reference to puppet: //$servername/modules/autofs/auto.homes resolves to the file autofs/files/auto.homes in the modules path.
To make a module usable with both the command line client and a puppet master, one can use a URL of the from puppet:///path. i.e. a URL without an explicit server name. Such URL is treated slightly different by Puppet and puppetd. Puppet searches for serverless URL in the local file system.
Template files are searched in a manner similar to manifest and files: a mention of template (autofs/auto.master.erb) will make the puppetmaster first look for a file in $templatedir/autofs/auto.master.erb and then autofs/templates/auto.master.erb on the module path. With Puppet versions of everything under the Puppet, it is available to use. This is called module auto loading. Puppet will attempt to auto-load classes and definitions from the module.
Puppet - File Server
Puppet follows the concept of client and server where one machine in a setup works as the server machine with Puppet server software running on it and the remaining works as the client with Puppet agent software running on it. This feature of the file server helps in copying the files around multiple machines. This feature of file serving function in Puppet comes as a part of central Puppet daemon. Puppetmasterd and the client function plays a key role in sourcing file attributes as the file object.
class { 'java':
   package               => 'jdk-8u25-linux-x64',
   java_alternative      => 'jdk1.8.0_25',
   java_alternative_path => '/usr/java/jdk1.8.0_25/jre/bin/java'
}
As in the above code snippet, Puppets file serving functions abstracts the local filesystem topology by supporting the file service module. We will specify the file serving module in the following manner.
puppet://server/modules/module_name/sudoers
File Format
In Puppet directory structure, by default the file server configuration is located under /etc/puppet/fileserver.config directory, if the user wishes to change this default configuration file path, it can be done using the new config flag to puppetmasterd. The configuration file resembles INI files but is not exactly the same.
[module]
path /path/to/files
allow *.domain.com
deny *.wireless.domain.com
As shown in the above code snippet, all the three options are represented in the configuration file. The module name somewhat goes in the brackets. The path is the only required option. Default security option is to deny all the access, so if no allow lines are specified, the module which will be configured will be available to anyone.
The path can contain any or all of the %d, %h and %H which are dynamically replaced by its domain name, its host name, and fully qualified host name. All are taken from the clients SSL certificate (so be careful if one has a mismatch in hostname and certificate name). This is useful is creating modules where the files of each client are kept completely separately. Example, for private host keys.
[private]
path /data/private/%h
allow *
In the above code snippet, the code is trying to search for file /private/file.txt from the client client1.vipin.com. It will look for it in /data/private/client1/file.txt, while the same request for client2.vipin.com will try to retrieve the file /data/private/client2/file.txt on the file server.
Security
Puppet supports the two basic concepts of securing file on the Puppet file server. This is achieved by allowing access to specific files and denying access to the ones which are not required. By default, Puppet does not allow access to any of the files. It needs to be defined explicitly. The format which can be used in the files to allow or deny access is by using IP address, name, or global allow.
If the client is not connected to the Puppet file server directly, for example using a reverse proxy and Mongrel, then the file server will see all the connections as coming from the proxy server and not the Puppet client. In the above cases, restricting the host name on the base of hostname is the best practice.
One key point to be noted while defining the file structure is, all the deny statements are parsed before the allow statement. Hence, if any deny statement matches a host, then that host will be denied and if no allow statement is written in the upcoming files, then the host will be denied. This feature helps in setting priority of any particular site.
Host Name
In any file server configuration, file hostname can be specified in two ways either by using a complete hostname or specifying an entire domain name using the * wildcard as shown in the following example.
[export]
path /usr
allow brcleprod001.brcl.com
allow *.brcl.com
deny brcleprod002.brcl.com
IP Address
In any file server configuration, the file address can be specified as similar to the host names, using either complete IP address or wildcard address. One can also use CIDR system notation.
[export]
path /usr
allow 127.0.0.1
allow 172.223.30.*
allow 172.223.30.0/24
Global Allow
Global allow is used when the user wants that everyone can access a particular module. To do this, a single wildcard helps in letting everyone access the module.
[export]
path /export
allow *
Puppet - Facter & Facts
Puppet supports holding multiple values as an environment variable. This feature is supported in Puppet by using facter. In Puppet, facter is a standalone tool that holds the environment level variable. In can be considered similar to env variable of Bash or Linux. Sometimes there can be an overlap between the information stored in facts and environment variable of the machine. In Puppet, the key-value pair is known as fact. Each resource has its own facts and in Puppet the user has the leverage to build their own custom facts.
# facter
Facter command can be used to list all the different environment variables and its associated values. These collection of facts comes with facter out-of-the-box and are referred to as core facts. One can add custom facts to the collection.
If one wants to view only one variable. It can be done using the following command.
# facter {Variable Name}

Example
[root@puppetmaster ~]# facter virtual
virtualbox
The reason why facter is important for Puppet is that facter and facts are available throughout Puppet code as global variable, which means it can be used in the code at any point of time without any other reference.
Example to Test
[root@puppetmaster modules]# tree brcle_account
brcle_account
 manifests   init.pp [root@puppetmaster modules]# cat brcle_account/manifests/init.pp
class brcle_account {
   user { 'G01063908':
      ensure => 'present',
      uid => '121',
      shell => '/bin/bash',
      home => '/home/G01063908',
   }

   file {'/tmp/userfile.txt':
      ensure => file,
      content => "the value for the 'OperatingSystem' fact is: $OperatingSystem \n",
   }
}
Testing It
[root@puppetmaster modules]# puppet agent --test
Notice: /Stage[main]/Activemq::Service/Service[activemq]/ensure:
ensure changed 'stopped' to 'running'
Info: /Stage[main]/Activemq::Service/Service[activemq]:
Unscheduling refresh on Service[activemq]

Notice: Finished catalog run in 4.09 seconds
[root@puppetmaster modules]# cat /tmp/testfile.txt
the value for the 'OperatingSystem' fact is: Linux

[root@puppetmaster modules]# facter OperatingSystem
Linux
As we can notice in the above code snippet, we havent defined the OperatingSystem. We have just replaced the value with soft coded value $OperatingSystem as normal variable.
In Puppet, there are three types of fact that can be used and defined −
- Core Facts
- Custom Facts
- External Facts
Core facts are defined at the top level and accessible to all at any point in the code.
Puppet Facts
Just before an agent requests for a catalog from the master, the agent first compiles a complete list of information available in itself in the form of a key value pair. The information on the agent is gathered by a tool called facter and each key-value pair is referred as a fact. Following is a common output of facts on an agent.
[root@puppetagent1 ~]# facter
architecture => x86_64
augeasversion => 1.0.0
bios_release_date => 13/09/2012
bios_vendor => innotek GmbH
bios_version => VirtualBox
blockdevice_sda_model => VBOX HARDDISK
blockdevice_sda_size => 22020587520
blockdevice_sda_vendor => ATA
blockdevice_sr0_model => CD-ROM
blockdevice_sr0_size => 1073741312
blockdevice_sr0_vendor => VBOX
blockdevices => sda,sr0
boardmanufacturer => Oracle Corporation
boardproductname => VirtualBox
boardserialnumber => 0

domain => codingbee.dyndns.org
facterversion => 2.1.0
filesystems => ext4,iso9660
fqdn => puppetagent1.codingbee.dyndns.org
hardwareisa => x86_64
hardwaremodel => x86_64
hostname => puppetagent1
id => root
interfaces => eth0,lo
ipaddress => 172.228.24.01
ipaddress_eth0 => 172.228.24.01
ipaddress_lo => 127.0.0.1
is_virtual => true
kernel => Linux
kernelmajversion => 2.6
kernelrelease => 2.6.32-431.23.3.el6.x86_64
kernelversion => 2.6.32
lsbdistcodename => Final
lsbdistdescription => CentOS release 6.5 (Final)
lsbdistid => CentOS
lsbdistrelease => 6.5
lsbmajdistrelease => 6
lsbrelease => :base-4.0-amd64:base-4.0-noarch:core-4.0-amd64:core-4.0noarch:graphics-4.0-amd64:
graphics-4.0-noarch:printing-4.0-amd64:printing-4.0noarch
macaddress => 05:00:22:47:H9:77
macaddress_eth0 => 05:00:22:47:H9:77
manufacturer => innotek GmbH
memoryfree => 125.86 GB
memoryfree_mb => 805.86
memorysize => 500 GB
memorysize_mb => 996.14
mtu_eth0 => 1500
mtu_lo => 16436
netmask => 255.255.255.0
netmask_eth0 => 255.255.255.0

network_lo => 127.0.0.0
operatingsystem => CentOS
operatingsystemmajrelease => 6
operatingsystemrelease => 6.5
osfamily => RedHat
partitions => {"sda1"=>{
"uuid"=>"d74a4fa8-0883-4873-8db0-b09d91e2ee8d", "size" =>"1024000",
"mount" => "/boot", "filesystem" => "ext4"}, "sda2"=>{"size" => "41981952",
"filesystem" => "LVM2_member"}
}
path => /usr/lib64/qt3.3/bin:/usr/local/sbin:/usr/local/bin:/sbin:/bin:/usr/sbin:/usr/bin:/root/bin
physicalprocessorcount => 1
processor0 => Intel(R) Core(TM) i7 CPU         920  @ 2.67GHz
processor1 => Intel(R) Core(TM) i7 CPU         920  @ 2.67GHz
processor2 => Intel(R) Core(TM) i7 CPU         920  @ 2.67GHz
processorcount => 3
productname => VirtualBox
ps => ps -ef
puppetversion => 3.6.2
rubysitedir => /usr/lib/ruby/site_ruby/1.8
rubyversion => 1.8.7
selinux => true
selinux_config_mode => enforcing
selinux_config_policy => targeted
selinux_current_mode => enforcing
selinux_enforced => true
selinux_policyversion => 24
serialnumber => 0
sshdsakey => AAAAB3NzaC1kc3MAAACBAK5fYwRM3UtOs8zBCtRTjuHLw56p94X/E0UZBZwFR3q7
WH0x5+MNsjfmdCxKvpY/WlIIUcFJzvlfjXm4qDaTYalbzSZJMT266njNbw5WwLJcJ74KdW92ds76pjgm
CsjAh+R9YnyKCEE35GsYjGH7whw0gl/rZVrjvWYKQDOmJA2dAAAAFQCoYABgjpv3EkTWgjLIMnxA0Gfud
QAAAIBM4U6/nerfn6Qvt43FC2iybvwVo8ufixJl5YSEhs92uzsW6jiw68aaZ32q095/gEqYzeF7a2knr
OpASgO9xXqStYKg8ExWQVaVGFTR1NwqhZvz0oRSbrN3h3tHgknoKETRAg/imZQ2P6tppAoQZ8wpuLrXU
CyhgJGZ04Phv8hinAAAAIBN4xaycuK0mdH/YdcgcLiSn8cjgtiETVzDYa+jF
swapfree => 3.55 GB
swapfree_mb => 2015.99
swapsize => 3.55 GB
swapsize_mb => 2015.99
timezone => GMT
type => Other
uniqueid => a8c0af01
uptime => 45:012 hours
uptime_days => 0
uptime_hours => 6
uptime_seconds => 21865
uuid => BD8B9D85-1BFD-4015-A633-BF71D9A6A741
virtual => virtualbox
In the above code, we can see some of the data overlap with few of the information available in bash env variable. Puppet directly does not use the data, instead it makes use of facter data, Facter data is treated as global variable.
The facts are then available as top level variable and the Puppet master can use them to compile the Puppet catalog for the requesting agent. Facters are called in manifest as normal variable with $ prefix.
Example
if ($OperatingSystem == "Linux") {
   $message = "This machine OS is of the type $OperatingSystem \n"
} else {
   $message = "This machine is unknown \n"
}

file { "/tmp/machineOperatingSystem.txt":
   ensure => file,
   content => "$message"
}
The above manifest file only bothers about a single file called machineOperatingSystem.txt, where the content of this file is deducted by the fact called OperatingSystem.
[root@puppetagent1 /]# facter OperatingSystem
Linux

[root@puppetagent1 /]# puppet apply /tmp/ostype.pp
Notice: Compiled catalog for puppetagent1.codingbee.dyndns.org
in environment production in 0.07 seconds
Notice: /Stage[main]/Main/File[/tmp/machineOperatingSystem.txt]/ensure:
defined content as '{md5}f59dc5797d5402b1122c28c6da54d073'
Notice: Finished catalog run in 0.04 seconds

[root@puppetagent1 /]# cat /tmp/machinetype.txt
This machine OS is of the type Linux
Custom Facts
All the above facts that we have seen are the core facts of the machine. One can add this custom facts to the node in the following ways −
- Using the export FACTER Syntax
- Using the $LOAD_PATH settings
- FACTERLIB
- Pluginsync
Using the export FACTER Syntax
One can manually add the facts using the export FACTER_{facts name} syntax.
Example
[root@puppetagent1 facter]# export FACTER_tallest_mountain="Everest"
[root@puppetagent1 facter]# facter tallest_mountain Everest
Using the $LOAD_PATH Settings
In Ruby, $LOAD_PATH is equivalent to Bash special parameter. Although it is similar to bash $PATH variable, in real facts $LOAD_PATH is not an environment variable, instead it is a pre-defined variable.
$LOAD_PATH has a synonym $:. This variable is an array to search and load the values.
[root@puppetagent1 ~]# ruby -e 'puts $LOAD_PATH'
# note you have to use single quotes.
/usr/lib/ruby/site_ruby/1.6
/usr/lib64/ruby/site_ruby/1.6
/usr/lib64/ruby/site_ruby/1.6/x86_64-linux
/usr/lib/ruby/site_ruby
/usr/lib64/ruby/site_ruby
/usr/lib64/site_ruby/1.6
/usr/lib64/site_ruby/1.6/x86_64-linux
/usr/lib64/site_ruby
/usr/lib/ruby/1.6
/usr/lib64/ruby/1.6
/usr/lib64/ruby/1.6/x86_64-linux
Lets take an example of creating a directory facter and adding a .pp file and appending a content to it.
[root@puppetagent1 ~]# cd /usr/lib/ruby/site_ruby/
[root@puppetagent1 site_ruby]# mkdir facter
[root@puppetagent1 site_ruby]# cd facter/
[root@puppetagent1 facter]# ls
[root@puppetagent1 facter]# touch newadded_facts.rb
Add the following content to the custom_facts.rb file.
[root@puppetagent1 facter]# cat newadded_facts.rb
Facter.add('tallest_mountain') do
   setcode "echo Everest"
end
Facter works in the method of scanning through all the folder listed in $LOAD_PATH, and looks for a director called facter. Once it finds that particular folder, it will load them anywhere in the folder structure. If it finds this folder then it looks for any Ruby file in that facter folder and loads all the defined facts about any particular configuration in the memory.
Using FACTERLIB
In Puppet, FACTERLIB works very much similar to $LOAD_PATH but with only one key difference that, it is a OS level environment parameter rather than a Ruby special variable. By default, the environment variable may not be set.
[root@puppetagent1 facter]# env | grep "FACTERLIB"
[root@puppetagent1 facter]#
To test FACTERLIB, we need to perform the following steps.
Create a folder called test_facts in the following structure.
[root@puppetagent1 tmp]# tree /tmp/test_facts/
/tmp/some_facts/
 vipin
    longest_river.rb
 testing
    longest_wall.rb
Add the following contents to the .rb files.
[root@puppetagent1 vipin]# cat longest_river.rb
Facter.add('longest_river') do
   setcode "echo Nile"
end

[root@puppetagent1 testing]# cat longest_wall.rb
Facter.add('longest_wall') do
   setcode "echo 'China Wall'"
end
Use the export statement.
[root@puppetagent1 /]# export
FACTERLIB = "/tmp/some_facts/river:/tmp/some_facts/wall"
[root@puppetagent1 /]# env | grep "FACTERLIB"
FACTERLIB = /tmp/some_facts/river:/tmp/some_facts/wall
Test the new facter.
[root@puppetagent1 /]# facter longest_river
Nile
[root@puppetagent1 /]# facter longest_wall
China Wall
External Facts
External facts are very useful when the user wishes to apply some new facts created at the provisioning time. External facts are one of the key ways of applying metadata to a VM at its provisioning stage (e.g. using vSphere, OpenStack, AWS, etc.)
All the metadata and its details created can be used by Puppet to determine what details should be present in the catalog, which is going to be applied.
Creating an External Fact
On the agent machine, we need to create a directory as mentioned below.
$ mkdir -p /etc/facter/facts.d
Create a Shell script in the directory with the following content.
$ ls -l /etc/facter/facts.d
total 4
-rwxrwxrwx. 1 root root 65 Sep 18 13:11 external-factstest.sh
$ cat /etc/facter/facts.d/external-factstest.sh
#!/bin/bash
echo "hostgroup = dev"
echo "environment = development"
Change the permission of the script file.
$ chmod u+x /etc/facter/facts.d/external-facts.sh
Once done, we can now see the variable present with the key/value pair.
$ facter hostgroup
dev
$ facter environment
development
One can write custom facts in Puppet. As a reference, use the following link from the Puppet site.
https://docs.puppet.com/facter/latest/fact_overview.html#writing-structured-facts
Puppet - Resource
Resources are one of the key fundamental units of Puppet used to design and build any particular infrastructure or a machine. They are mainly used for modeling and maintaining system configurations. Puppet has multiple type of resources, which can be used to define the system architecture or the user has the leverage to build and define a new resource.
The block of Puppet code in manifest file or any other file is called a resource declaration. The block of code is written in a language called Declarative Modelling Language (DML). Following is an example of how it looks like.
user { 'vipin':
   ensure => present,
   uid    => '552',
   shell  => '/bin/bash',
   home   => '/home/vipin',
}
In Puppet, resource declaration for any particular resource type is done in code block. In the following example, the user is made up of mainly four pre-defined parameters.
Resource Type − In the above code snippet, it is the user.
Resource Parameter − In the above code snippet, it is Vipin.
Attributes − In the above code snippet, it is ensure, uid, shell, home.
Values − These are the values that correspond to each property.
Each resource type has its own way of defining definitions and parameters, and the user has the privilege to pick and choose the way he wants his resource to look like.
Resource Type
There are different types of resources available in Puppet which have their own way of functionality. These resource types can be viewed using the describe command along with the -list option.
[root@puppetmaster ~]# puppet describe --list
These are the types known to puppet:
augeas          - Apply a change or an array of changes to the  ...
computer        - Computer object management using DirectorySer ...
cron            - Installs and manages cron jobs
exec            - Executes external commands
file            - Manages files, including their content, owner ...
filebucket      - A repository for storing and retrieving file  ...
group           - Manage groups
host            - Installs and manages host entries
interface       - This represents a router or switch interface
k5login         - Manage the .k5login file for a user
macauthorization - Manage the Mac OS X authorization database
mailalias       - .. no documentation ..
maillist        - Manage email lists
mcx             - MCX object management using DirectoryService  ...
mount           - Manages mounted filesystems, including puttin ...
nagios_command  - The Nagios type command
nagios_contact  - The Nagios type contact
nagios_contactgroup - The Nagios type contactgroup
nagios_host     - The Nagios type host
nagios_hostdependency - The Nagios type hostdependency
nagios_hostescalation - The Nagios type hostescalation
nagios_hostextinfo - The Nagios type hostextinfo
nagios_hostgroup - The Nagios type hostgroup

nagios_service  - The Nagios type service
nagios_servicedependency - The Nagios type servicedependency
nagios_serviceescalation - The Nagios type serviceescalation
nagios_serviceextinfo - The Nagios type serviceextinfo
nagios_servicegroup - The Nagios type servicegroup
nagios_timeperiod - The Nagios type timeperiod
notify          - .. no documentation ..
package         - Manage packages
resources       - This is a metatype that can manage other reso ...
router          - .. no documentation ..
schedule        - Define schedules for Puppet
scheduled_task  - Installs and manages Windows Scheduled Tasks
selboolean      - Manages SELinux booleans on systems with SELi ...
service         - Manage running services
ssh_authorized_key - Manages SSH authorized keys
sshkey          - Installs and manages ssh host keys
stage           - A resource type for creating new run stages
tidy            - Remove unwanted files based on specific crite ...
user            - Manage users
vlan            - .. no documentation ..
whit            - Whits are internal artifacts of Puppet's curr ...
yumrepo         - The client-side description of a yum reposito ...
zfs             - Manage zfs
zone            - Manages Solaris zones
zpool           - Manage zpools
Resource Title
In the above code snippet, we have resource title as vipin which is unique for each resource used in the same file of the code. This is a unique title for this user resource type. We cannot have a resource with the same name because it will cause conflicts.
Resource command can be used to view the list of all the resources using type user.
[root@puppetmaster ~]# puppet resource user
user { 'abrt':
   ensure           => 'present',
   gid              => '173',
   home             => '/etc/abrt',
   password         => '!!',
   password_max_age => '-1',
   password_min_age => '-1',
   shell            => '/sbin/nologin',
   uid              => '173',
}

user { 'admin':
   ensure           => 'present',
   comment          => 'admin',
   gid              => '444',
   groups           => ['sys', 'admin'],
   home             => '/var/admin',
   password         => '*',
   password_max_age => '99999',
   password_min_age => '0',
   shell            => '/sbin/nologin',
   uid              => '55',
}

user { 'tomcat':
   ensure           => 'present',
   comment          => 'tomcat',
   gid              => '100',
   home             => '/var/www',
   password         => '!!',
   password_max_age => '-1',
   password_min_age => '-1',
   shell            => '/sbin/nologin',
   uid              => '100',
}
Listing the Resources of a Particular User
[root@puppetmaster ~]# puppet resource user tomcat
user { 'apache':
   ensure           => 'present',
   comment          => 'tomcat',
   gid              => '100',
   home             => '/var/www',
   password         => '!!',
   password_max_age => '-1',
   password_min_age => '-1',
   shell            => '/sbin/nologin',
   uid              => '100,
}
Attributes & Values
The main body of any resource is made up of a collection of attribute-value pairs. Here one can specify the values for a given resources property. Each resource type has its own set of attributes that can be configured with the key-value pairs.
Describe the sub-command that can be used to get more details about a particular resources attribute. In the following example, we have the details about the user resource along with all its configurable attributes.
[root@puppetmaster ~]# puppet describe user
user
====
Manage users.  This type is mostly built to manage system users,
so it is lacking some features useful for managing normal users.

This resource type uses the prescribed native tools for creating groups
and generally uses POSIX APIs for retrieving information about them.
It does not directly modify /etc/passwd or anything.

**Autorequires:** If Puppet is managing the user's primary group
(as provided in the gid attribute),
the user resource will autorequire that group.
If Puppet is managing any role accounts corresponding to the user's roles,
the user resource will autorequire those role accounts.

Parameters
----------
- **allowdupe**
   Whether to allow duplicate UIDs. Defaults to false.
   Valid values are true, false, yes, no.

- **attribute_membership**
   Whether specified attribute value pairs should be treated as the
   **complete list** (inclusive) or the **minimum list** (minimum) of
   attribute/value pairs for the user. Defaults to minimum.
   Valid values are inclusive, minimum.

- **auths**
   The auths the user has.  Multiple auths should be
   specified as an array.
   Requires features manages_solaris_rbac.

- **comment**
   A description of the user.  Generally the user's full name.

- **ensure**
   The basic state that the object should be in.
   Valid values are present, absent, role.

- **expiry**
   The expiry date for this user. Must be provided in
   a zero-padded YYYY-MM-DD format --- e.g. 2010-02-19.
   If you want to make sure the user account does never
   expire, you can pass the special value absent.
   Valid values are absent. Values can match /^\d{4}-\d{2}-\d{2}$/.
   Requires features manages_expiry.

- **forcelocal**
   Forces the mangement of local accounts when accounts are also
   being managed by some other NSS

- **gid**
   The user's primary group. Can be specified numerically or by name.
   This attribute is not supported on Windows systems; use the groups
   attribute instead. (On Windows, designating a primary group is only
   meaningful for domain accounts, which Puppet does not currently manage.)

- **groups**
   The groups to which the user belongs. The primary group should
   not be listed, and groups should be identified by name rather than by
   GID.  Multiple groups should be specified as an array.

- **home**
   The home directory of the user.  The directory must be created
   separately and is not currently checked for existence.

- **ia_load_module**
   The name of the I&A module to use to manage this user.
   Requires features manages_aix_lam.

- **iterations**
   This is the number of iterations of a chained computation of the
   password hash (http://en.wikipedia.org/wiki/PBKDF2).  This parameter
   is used in OS X. This field is required for managing passwords on OS X
   >= 10.8.
   Requires features manages_password_salt.

- **key_membership**

- **managehome**
   Whether to manage the home directory when managing the user.
   This will create the home directory when ensure => present, and
   delete the home directory when ensure => absent. Defaults to false.
   Valid values are true, false, yes, no.

- **membership**
   Whether specified groups should be considered the **complete list**
   (inclusive) or the **minimum list** (minimum) of groups to which
   the user belongs. Defaults to minimum.
   Valid values are inclusive, minimum.

- **name**
   The user name. While naming limitations vary by operating system,
   it is advisable to restrict names to the lowest common denominator,
   which is a maximum of 8 characters beginning with a letter.
   Note that Puppet considers user names to be case-sensitive, regardless
   of the platform's own rules; be sure to always use the same case when
   referring to a given user.

- **password**
   The user's password, in whatever encrypted format the local
   system requires.
   * Most modern Unix-like systems use salted SHA1 password hashes. You can use
      Puppet's built-in sha1 function to generate a hash from a password.
   * Mac OS X 10.5 and 10.6 also use salted SHA1 hashes.

Windows API
   for setting the password hash.
   [stdlib]: https://github.com/puppetlabs/puppetlabs-stdlib/
   Be sure to enclose any value that includes a dollar sign ($) in single
   quotes (') to avoid accidental variable interpolation.
   Requires features manages_passwords.

- **password_max_age**
   The maximum number of days a password may be used before it must be changed.
   Requires features manages_password_age.

- **password_min_age**
   The minimum number of days a password must be used before it may be changed.
   Requires features manages_password_age.

- **profile_membership**
   Whether specified roles should be treated as the **complete list**
   (inclusive) or the **minimum list** (minimum) of roles
   of which the user is a member. Defaults to minimum.
   Valid values are inclusive, minimum.

- **profiles**
   The profiles the user has.  Multiple profiles should be
   specified as an array.
   Requires features manages_solaris_rbac.

- **project**
   The name of the project associated with a user.
   Requires features manages_solaris_rbac.

- **uid**
   The user ID; must be specified numerically. If no user ID is
   specified when creating a new user, then one will be chosen
   automatically. This will likely result in the same user having
   different UIDs on different systems, which is not recommended. This is
   especially noteworthy when managing the same user on both Darwin and
   other platforms, since Puppet does UID generation on Darwin, but
   the underlying tools do so on other platforms.
   On Windows, this property is read-only and will return the user's
   security identifier (SID).
Puppet - Resource Abstraction Layer
In Puppet, Resource Abstraction Layer (RAL) can be considered as the core conceptualized model on which the whole infrastructure and Puppet setup works. In RAL, each alphabet has its own significant meaning which is defined as follows.
Resource [R]
A resource can be considered as all the resources which are used to model any configuration in Puppet. They are basically in-built resources which are by default present in Puppet. They can be considered as a set of resources belonging to a pre-defined resource type. They are similar to OOP concept in any other programming language wherein the object is an instance of class. In Puppet, its resource is an instance of a resource type.
Abstraction [A]
Abstraction can be considered as a key feature where the resources are defined independently from the target OS. In other words, while writing any manifest file the user need not worry about the target machine or the OS, which is present on that particular machine. In abstraction, resources give enough information about what needs to exist on the Puppet agent.
Puppet will take care of all the functionalities or magic happening behind the scene. Regardless of the resources and OS, Puppet will take care of implementing the configuration on the target machine, wherein the user need not worry how Puppet does behind the scenes.
In abstraction, Puppet separates out the resources from its implementation. This platformspecific configuration exists from providers. We can use multiple subcommands along with its providers.
Layer [L]
It is possible that one defines an entire machine setup and configuration in terms of collection of resources, and it can be viewed and managed via Puppets CLI interface.
Example for User Resource Type
[root@puppetmaster ~]# puppet describe user --providers
user
====
Manage users.
This type is mostly built to manage systemusers,
so it is lacking some features useful for managing normalusers.
This resource type uses the prescribed native tools for
creating groups and generally uses POSIX APIs for retrieving informationabout them.
It does not directly modify '/etc/passwd' or anything.

- **comment**
   A description of the user.  Generally the user's full name.

- **ensure**
   The basic state that the object should be in.
   Valid values are 'present', 'absent', 'role'.

- **expiry**
   The expiry date for this user.
   Must be provided in a zero-padded YYYY-MM-DD format --- e.g. 2010-02-19.
   If you want to make sure the user account does never expire,
   you can pass the special value 'absent'.
   Valid values are 'absent'.
   Values can match '/^\d{4}-\d{2}-\d{2}$/'.
   Requires features manages_expiry.

- **forcelocal**
   Forces the management of local accounts when accounts are also
   being managed by some other NSS
   Valid values are 'true', 'false', 'yes', 'no'.
   Requires features libuser.

- **gid**
   The user's primary group.  Can be specified numerically or by name.
   This attribute is not supported on Windows systems; use the groups
   attribute instead. (On Windows, designating a primary group is only
   meaningful for domain accounts, which Puppet does not currently manage.)

- **groups**
   The groups to which the user belongs. The primary group should
   not be listed, and groups should be identified by name rather than by
   GID. Multiple groups should be specified as an array.

- **home**
   The home directory of the user.  The directory must be created
   separately and is not currently checked for existence.

- **ia_load_module**
   The name of the I&A module to use to manage this user.
   Requires features manages_aix_lam.

- **iterations**
   This is the number of iterations of a chained computation of the
   password hash (http://en.wikipedia.org/wiki/PBKDF2).
   This parameter is used in OS X.
   This field is required for managing passwords on OS X >= 10.8.

- **key_membership**
   Whether specified key/value pairs should be considered the
   **complete list** ('inclusive') or the **minimum list** ('minimum') of
   the user's attributes. Defaults to 'minimum'.
   Valid values are 'inclusive', 'minimum'.

- **keys**
   Specify user attributes in an array of key = value pairs.
   Requires features manages_solaris_rbac.

- **managehome**
   Whether to manage the home directory when managing the user.
   This will create the home directory when 'ensure => present', and
   delete the home directory when ensure => absent. Defaults to false.
   Valid values are true, false, yes, no.

- **membership**
   Whether specified groups should be considered the **complete list**
   (inclusive) or the **minimum list** (minimum) of groups to which
   the user belongs. Defaults to minimum.
   Valid values are inclusive, minimum.

- **name**
   The user name. While naming limitations vary by operating system,
   it is advisable to restrict names to the lowest common denominator.

- **password**
   The user's password, in whatever encrypted format the local system requires.
   * Most modern Unix-like systems use salted SHA1 password hashes. You can use
      Puppet's built-in sha1 function to generate a hash from a password.
   * Mac OS X 10.5 and 10.6 also use salted SHA1 hashes.
   * Mac OS X 10.7 (Lion) uses salted SHA512 hashes.
   The Puppet Labs [stdlib][] module contains a str2saltedsha512
   function which can generate password hashes for Lion.
   * Mac OS X 10.8 and higher use salted SHA512 PBKDF2 hashes.
   When managing passwords on these systems the salt and iterations properties
   need to be specified as well as the password.
   [stdlib]: https://github.com/puppetlabs/puppetlabs-stdlib/
   Be sure to enclose any value that includes a dollar sign ($) in single
   quotes (') to avoid accidental variable interpolation.
   Requires features manages_passwords.

- **password_max_age**
   The maximum number of days a password may be used before it must be changed.
Requires features manages_password_age.

- **password_min_age**
   The minimum number of days a password must be used before it may be changed.
Requires features manages_password_age.

- **profile_membership**
   Whether specified roles should be treated as the **complete list**
   (inclusive) or the **minimum list** (minimum) of roles
   of which the user is a member. Defaults to minimum.
   Valid values are inclusive, minimum.

- **profiles**
   The profiles the user has.  Multiple profiles should be
   specified as an array.
Requires features manages_solaris_rbac.

- **project**
   The name of the project associated with a user.
   Requires features manages_solaris_rbac.

- **purge_ssh_keys**
   Purge ssh keys authorized for the user
   if they are not managed via ssh_authorized_keys.
   When true, looks for keys in .ssh/authorized_keys in the user's home directory.
   Possible values are true, false, or an array of
   paths to file to search for authorized keys.
   If a path starts with ~ or %h, this token is replaced with the user's home directory.
   Valid values are true, false.

- **role_membership**
   Whether specified roles should be considered the **complete list**
   (inclusive) or the **minimum list** (minimum) of roles the user has.
   Defaults to minimum.
Valid values are inclusive, minimum.

- **roles**
   The roles the user has.  Multiple roles should be
   specified as an array.
Requires features manages_solaris_rbac.

- **salt**
   This is the 32 byte salt used to generate the PBKDF2 password used in
   OS X. This field is required for managing passwords on OS X >= 10.8.
   Requires features manages_password_salt.

- **shell**
   The user's login shell.  The shell must exist and be
   executable.
   This attribute cannot be managed on Windows systems.
   Requires features manages_shell.

- **system**
   Whether the user is a system user, according to the OS's criteria;
   on most platforms, a UID less than or equal to 500 indicates a system
   user. Defaults to false.
   Valid values are true, false, yes, no.

- **uid**
   The user ID; must be specified numerically. If no user ID is
   specified when creating a new user, then one will be chosen
   automatically. This will likely result in the same user having
   different UIDs on different systems, which is not recommended.
   This is especially noteworthy when managing the same user on both Darwin and
   other platforms, since Puppet does UID generation on Darwin, but
   the underlying tools do so on other platforms.
   On Windows, this property is read-only and will return the user's
   security identifier (SID).

Providers
---------

- **aix**
   User management for AIX.
   * Required binaries: '/bin/chpasswd', '/usr/bin/chuser',
   '/usr/bin/mkuser', '/usr/sbin/lsgroup', '/usr/sbin/lsuser',
   '/usr/sbin/rmuser'.
   * Default for operatingsystem == aix.
   * Supported features: manages_aix_lam, manages_expiry,
   manages_homedir, manages_password_age, manages_passwords,
   manages_shell.

- **directoryservice**
   User management on OS X.
   * Required binaries: /usr/bin/dscacheutil, /usr/bin/dscl,
   /usr/bin/dsimport, /usr/bin/plutil, /usr/bin/uuidgen.
   * Default for operatingsystem == darwin.
   * Supported features: manages_password_salt, manages_passwords,
   manages_shell.

- **hpuxuseradd**
   User management for HP-UX. This provider uses the undocumented -F
   switch to HP-UX's special usermod binary to work around the fact that
   its standard usermod cannot make changes while the user is logged in.
   * Required binaries: /usr/sam/lbin/useradd.sam,
   /usr/sam/lbin/userdel.sam, /usr/sam/lbin/usermod.sam.
   * Default for operatingsystem == hp-ux.
   * Supported features: allows_duplicates, manages_homedir,
   manages_passwords.

- **ldap**
   User management via LDAP.
   This provider requires that you have valid values for all of the
   LDAP-related settings in puppet.conf, including ldapbase.
   You will almost definitely need settings for ldapuser and ldappassword in order
   for your clients to write to LDAP.
* Supported features: manages_passwords, manages_shell.

- **pw**
   User management via pw on FreeBSD and DragonFly BSD.
   * Required binaries: pw.
   * Default for operatingsystem == freebsd, dragonfly.
   * Supported features: allows_duplicates, manages_expiry,
   manages_homedir, manages_passwords, manages_shell.

- **user_role_add**
   User and role management on Solaris, via useradd and roleadd.
   * Required binaries: passwd, roleadd, roledel, rolemod,
   useradd, userdel, usermod.
   * Default for osfamily == solaris.
   * Supported features: allows_duplicates, manages_homedir,
   manages_password_age, manages_passwords, manages_solaris_rbac.

- **useradd**
   User management via useradd and its ilk.  Note that you will need to
   install Ruby's shadow password library (often known as ruby-libshadow)
   if you wish to manage user passwords.
   * Required binaries: chage, luseradd, useradd, userdel, usermod.
   * Supported features: allows_duplicates, libuser, manages_expiry,
   manages_homedir, manages_password_age, manages_passwords,
   manages_shell, system_users.

- **windows_adsi**
   Local user management for Windows.
   * Default for 'operatingsystem' == 'windows'.
   * Supported features: 'manages_homedir', 'manages_passwords'.
Testing Resource
In Puppet, testing a resource directly indicates that one needs to first apply resources which one wants to use to configures a target node, so that the state of the machine changes accordingly.
For testing we are going to apply the resource locally. As we have a resource predefined above with user = vipin. One way of applying a resource is by CLI. This can be done by re-writing the complete resource into a single command and then passing it to a resource sub command.
puppet resource user vipin ensure = present uid = '505'
shell = '/bin/bash' home = '/home/vipin'
Test the applied resource.
[root@puppetmaster ~]# cat /etc/passwd | grep "vipin"
vipin:x:505:501::/home/vipin:/bin/bash
The above output shows that the resource is applied to the system and we have a new user created with the name of Vipin. It is advisable that you test this on your own as all the above codes are tested and are working codes.
Puppet - Template
Templating is a method of getting things in a standard format, which can be used in multiple locations. In Puppet, templating and templates are supported using erb which comes as a part of standard Ruby library, which can be used on other projects apart from Ruby like in Ruby on Rails projects. As a standard practice, one needs to have a basic understanding of Ruby. Templating is very helpful when the user is trying to manage content of a template file. Templates plays a key role when configurations cannot be managed by a built-in Puppet type.
Evaluating Templates
Templates are evaluated using simple functions.
$value = template ("testtemplate.erb")
One can specify the full path of a template or one can pull all templates in Puppets templatedir, which is usually located at /var/puppet/templates. One can find the directory location by running the puppet -configprint templatedir.
Templates are always evaluated by the parser, not the client which means that if one is using puppetmasterd, then the template only needs to be on the server and one never needs to download them to the client. Theres no difference on how the client sees between using a template and specifying all the content of a file as a string. This clearly indicates that client-specific variables are learned first by puppetmasterd during the puppet startup phase.
Using Templates
Following is an example of generating the tomcat configuration for testing sites.
define testingsite($cgidir, $tracdir) {
   file { "testing-$name":
   path => "/etc/tomcat/testing/$name.conf",
   owner => superuser,
   group => superuser,
   mode => 644,
   require => File[tomcatconf],
   content => template("testsite.erb"),
   notify => Service[tomcat]
}
   symlink { "testsym-$name":
      path => "$cgidir/$name.cgi",
      ensure => "/usr/share/test/cgi-bin/test.cgi"
   }
}
Following is the template definition.
<Location "/cgi-bin/ <%= name %>.cgi">
   SetEnv TEST_ENV "/export/svn/test/<%= name %>"
</Location>

# You need something like this to authenticate users
<Location "/cgi-bin/<%= name %>.cgi/login">
   AuthType Basic
   AuthName "Test"
   AuthUserFile /etc/tomcat/auth/svn
   Require valid-user
</Location>
This pushes each template file into a separate file and then one needs to just tell Apache to load these configuration files.
Include /etc/apache2/trac/[^.#]*
Combining Templates
Two templates can be easily combined using the following command.
template('/path/to/template1','/path/to/template2')
Iteration in Templates
Puppet template also supports array iteration. If the variable one is accessing is an array, then one can iterate over it.
$values = [val1, val2, otherval]
We can have templates like the following.
<% values.each do |val| -%>
Some stuff with <%= val %>
<% end -%>
The above command will produce the following result.
Some stuff with val1
Some stuff with val2
Some stuff with otherval
Conditions in Templates
The erb templating supports conditionals. The following construct is a quick and easy way to conditionally put a content in a file.
<% if broadcast != "NONE" %> broadcast <%= broadcast %> <% end %>
Templates and Variables
One can use templates to fill in variables in addition to filling out the file content.
testvariable = template('/var/puppet/template/testvar')
Undefined Variable
If one needs to check if the variable is defined before using it, the following command works.
<% if has_variable?("myvar") then %>
myvar has <%= myvar %> value
<% end %>
Out of Scope Variable
One can look for out of scope variable explicitly with the lookupvar function.
<%= scope.lookupvar('apache::user') %>
Sample Project Template
<#Autogenerated by puppet. Do not edit.
[default]
#Default priority (lower value means higher priority)
priority = <%= @priority %>
#Different types of backup. Will be done in the same order as specified here.
#Valid options: rdiff-backup, mysql, command
backups = <% if @backup_rdiff %>rdiff-backup,
<% end %><% if @backup_mysql %>mysql,
<% end %><% if @backup_command %>command<% end %>
<% if @backup_rdiff -%>

[rdiff-backup]

<% if @rdiff_global_exclude_file -%>
   global-exclude-file = <%= @rdiff_global_exclude_file %>
<% end -%>
   <% if @rdiff_user -%>
      user = <%= @rdiff_user %>
<% end -%>
<% if @rdiff_path -%>
   path = <%= @rdiff_path %>
<% end -%>

#Optional extra parameters for rdiff-backup

extra-parameters = <%= @rdiff_extra_parameters %>

#How long backups are going to be kept
keep = <%= @rdiff_keep %>
<% end -%>
<% if @backup_mysql -%>%= scope.lookupvar('apache::user') %>

[mysql]

#ssh user to connect for running the backup
sshuser =  <%= @mysql_sshuser %>

#ssh private key to be used
   sshkey = <%= @backup_home %>/<%= @mysql_sshkey %>
   <% end -%>
<% if @backup_command -%>
[command]

#Run a specific command on the backup server after the backup has finished

command = <%= @command_to_execute %>
<% end -%>
Puppet - Classes
Puppet classes are defined as a collection of resources, which are grouped together in order to get a target node or machine in a desired state. These classes are defined inside Puppet manifest files which is located inside Puppet modules. The main purpose of using a class is to reduce the same code repetition inside any manifest file or any other Puppet code.
Following is an example of Puppet class.
[root@puppetmaster manifests]# cat site.pp
class f3backup (
   $backup_home   = '/backup',
   $backup_server = 'default',
   $myname        = $::fqdn,
   $ensure        = 'directory',
) {
   include '::f3backup::common'
   if ( $myname == '' or $myname == undef ) {
      fail('myname must not be empty')
   }
   @@file { "${backup_home}/f3backup/${myname}":
      # To support 'absent', though force will be needed
      ensure => $ensure,
      owner  => 'backup',
      group  => 'backup',
      mode   => '0644',
      tag    => "f3backup-${backup_server}",
   }
}
In the above example, we have two clients where the user needs to exist. As can be noticed we have repeated the same resource twice. One way of not doing the same task in combining the two nodes.
[root@puppetmaster manifests]# cat site.pp
node 'Brcleprod001','Brcleprod002' {
   user { 'vipin':
      ensure => present,
      uid    => '101',
      shell  => '/bin/bash',
      home   => '/home/homer',
   }
}
Merging nodes in this fashion to perform the configuration is not a good practice. This can be simply achieved by creating a class and including the created class in nodes which is shown as follows.
class vipin_g01063908 {
   user { 'g01063908':
      ensure => present,
      uid    => '101',
      shell  => '/bin/bash',
      home   => '/home/g01063908',
   }
}
node 'Brcleprod001' {
   class {vipin_g01063908:}
}
node 'Brcleprod002' {
   class {vipin_g01063908:}
}
The point to be noticed is how the class structure looks like and how we added a new resource using the class keyword. Each syntax in Puppet has its own feature. Hence, the syntax one picks depend on the conditions.
Parameterized Class
As in the above example, we have seen how to create a class and include it in a node. Now there are situations when we need to have different configurations on each node such as when one needs to have different users on each node using the same class. This feature is provided in Puppet using parameterized class. The configuration for a new class will look as shown in the following example.
[root@puppetmaster ~]# cat /etc/puppet/manifests/site.pp
class user_account ($username){
   user { $username:
      ensure => present,
      uid    => '101',
      shell  => '/bin/bash',
      home   => "/home/$username",
   }
}
node 'Brcleprod002' {
   class { user_account:
      username => "G01063908",
   }
}
node 'Brcleprod002' {
   class {user_account:
      username => "G01063909",
   }
}
When we apply the above site.pp manifest on nodes, then the output for each node will look like the following.
Brcleprod001
[root@puppetagent1 ~]# puppet agent --test
Info: Retrieving pluginfacts
Info: Retrieving plugin
Info: Caching catalog for puppetagent1.testing.dyndns.org
Info: Applying configuration version '1419452655'

Notice: /Stage[main]/User_account/User[homer]/ensure: created
Notice: Finished catalog run in 0.15 seconds
[root@brcleprod001 ~]# cat /etc/passwd | grep "vipin"
G01063908:x:101:501::/home/G01063909:/bin/bash
Brcleprod002
[root@Brcleprod002 ~]# puppet agent --test
Info: Retrieving pluginfacts
Info: Retrieving plugin
Info: Caching catalog for puppetagent2.testing.dyndns.org
Info: Applying configuration version '1419452725'

Notice: /Stage[main]/User_account/User[bart]/ensure: created
Notice: Finished catalog run in 0.19 seconds
[root@puppetagent2 ~]# cat /etc/passwd | grep "varsha"
G01063909:x:101:501::/home/G01063909:/bin/bash
One can also set the default value of a class parameter as shown in the following code.
[root@puppetmaster ~]# cat /etc/puppet/manifests/site.pp
class user_account ($username = g01063908'){
   user { $username:
      ensure => present,
      uid    => '101',
      shell  => '/bin/bash',
      home   => "/home/$username",
   }
}
node 'Brcleprod001' {
   class {user_account:}
}
node 'Brcleprod002' {
   class {user_account:
      username => "g01063909",
   }
}
Puppet - Function
Puppet supports functions as any other programming language since the base development language of Puppet is Ruby. It supports two types of functions known with the name of statement and rvalue functions.
Statements stand on their own and they do not have any return type. They are used for performing standalone tasks like importing other Puppet modules in the new manifest file.
Rvalue returns values and can only be used when the statement requires a value, such as an assignment or a case statement.
The key behind the execution of function in Puppet is, it only executes on Puppet master and they do not execute on the client or the Puppet agent. Therefore, they only have access to the commands and data available on the Puppet master. There are different kind of functions which are already present and even the user has the privilege to create custom functions as per requirement. Few inbuilt functions are listed below.
File Function
File function of the file resource is to load a module in Puppet and return the desired output in the form of a string. The arguments that it looks for is, the <module name>/<file> reference, which helps in loading the module from Puppet modules file directory.
Like script/tesingscript.sh will load the files from <module name>/script/files/testingscript.sh. Function has the capability to read and accept an absolute path, which helps in loading the file from anywhere on the disk.
Include Function
In Puppet, the include function is very much similar to the include function in any other programming language. It is used for declaration of one or more classes, which results in evaluating all the resources present inside those classes and finally add them to a catalog. The way it works is, include function accepts a class name, list of classes or a comma separated list of class names.
One thing to keep in mind while using an include statement is, it can be used multiple times in a class but has the limitation of including a single class only once. If the included class accepts a parameter, the include function will automatically look up values for them using <class name>::<parameter name> as the lookup key.
Include function does not cause a class to be contained in the class when they are declared, for that we need to use a contained function. It even does not create a dependency in the declared class and classes surrounding it.
In include function, only the full name of a class is allowed, relative names are not allowed.
Defined Function
In Puppet, the defined function helps in determining where a given class or resource type is defined and returns a Boolean value or not. One can also use define to determine whether a specific resource is defined or the variable defined has a value. Key point to keep in mind while using the defined function is, this function takes at least one string argument, which can be a class name, type name, resource reference, or variable reference of the form $name.
Define function checks for both native and defined function type, including types provided by modules. Type and class are matched by their names. The function matches the resource deceleration by using the resource reference.
Define Function Matches
# Matching resource types
defined("file")
defined("customtype")

# Matching defines and classes
defined("testing")
defined("testing::java")

# Matching variables
defined('$name')

# Matching declared resources
defined(File['/tmp/file'])
Puppet - Custom Functions
As described in the previous chapter, function provides the user with a privilege of developing custom functions. Puppet can extend its interpretation power by using custom functions. Custom function helps in increasing and extending the power of Puppet modules and manifest files.
Writing Custom Function
There are few things which one needs to keep in mind before writing a function.
In Puppet, functions are executed by compilers which means all the functions run on Puppet master and they dont need to deal with any of the Puppet client for the same. Functions can only interact with agents, provided information is in the form of facts.
The Puppet master catches custom functions which means that one needs to restart the Puppet master, if one does some changes in Puppet function.
Function will be executed on the server which means any file that the function needs should be present on the server, and one cant do anything if the function requires direct access to the client machine.
There are completely two different type of functions available, one is the Rvalue function which returns the value and the statement function which does not return anything.
The name of the file containing function should be the same as the name of the function in the file. Otherwise, it will not get loaded automatically.
Location to Put Custom Function
All the custom functions are implemented as separate .rb files and are distributed among modules. One needs to put custom functions in lib/puppet/parser/function. Functions can be loaded from .rb file from the following locations.
- $libdir/puppet/parser/functions
- puppet/parser/functions sub-directories in your Ruby $LOAD_PATH
Creating a New Function
New functions are created or defined using the newfunction method inside the puppet::parser::Functions module. One needs to pass the function name as a symbol to newfunction method and the code to run as a block. The following example is a function, which is used to write a string to the file inside the /user directory.
module Puppet::Parser::Functions
   newfunction(:write_line_to_file) do |args|
      filename = args[0]
      str = args[1]
      File.open(filename, 'a') {|fd| fd.puts str }
   end
end
Once the user has the function declared, it can be used in the manifest file as shown below.
write_line_to_file('/user/vipin.txt, "Hello vipin!")
Puppet - Environment
In software development and delivery model, there are different kind of testing environments which are used for testing a particular product or a service. As a standard practice, there are mainly three kind of environments as development, testing and production, wherein each of them have their own set configuration.
Puppet supports the management of multiple environment along the same line as Ruby on Rails. The key factor behind the creation of these environments is providing an easy mechanism for managing at different levels of SLA agreement. In some cases, the machine always needs to be up without any tolerance and use of old software. Wherein other environments are up-to-date and are used for testing purposes. They are used for upgrades for more important machines.
Puppet recommends to stick with the standard production, testing, and development environment configuration, however, here it even provides the user with a leverage of creating custom environments as per requirement.
Environment Goal
The main goal of setup split by an environment, is that Puppet can have different sources for modules and manifests. One can then test the changes in configuration in the testing environment without impacting the production nodes. These environments can also be used to deploy infrastructure on different sources of network.
Using the Environment on Puppet Master
The point of an environment is to test which manifest, module, template of the file needs to be send to the client. Thus, Puppet must be configured to provide environment-specific source for these information.
Puppet environments are implemented simply by adding the pre-environment sections to the servers puppet.conf and choosing different configuration source for each environment. These pre-environment sections are then used in preference to the main section.
[main]
manifest = /usr/testing/puppet/site.pp
modulepath = /usr/testing/puppet/modules
[development]
manifest = /usr/testing/puppet/development/site.pp
modulepath = /usr/testing/puppet/development/modules
In the above code, any client in the development environment will use the site.pp manifest file located in the directory /usr/share/puppet/development and Puppet will search for any module in /usr/share/puppet/development/modules directory.
Running Puppet with or without any environment would default to site.pp file and the directory specified in the manifest and modulepath values in the main configuration section.
There are only few configurations which actually makes sense to be configured preenvironment, and all of those parameters revolve around specifying what files to use to compile a clients configuration.
Following are the parameters.
Modulepath − In Puppet, as a basic standard mode its best to have a standard module directory that all environment share and then a pre-environment directory where the custom module can be stored. Module path is the location where Puppet looks for all the environment related configuration files.
Templatedir − Template directory is the location where all the versions of related templates are saved. The module should be preferred to these settings, however it allows one to have different versions of a given template in each environment.
Manifest − This defines which configuration to use as entrypoint script.
With multiple modules, Puppets help in getting the modularity for configurations. One can use multiple environments in Puppet which works much better if one relies largely on modules. It is easier to migrate changes to environments by encapsulating changes in the module. File server uses an environment specific module path; if one does file serving from modules, instead of separate mounted directories, this environment will be able to get environment-specific files and finally the current environment will also be available in $environment variable within the manifest file.
Setting the Clients Environment
All the configurations related to environment configuration are done on puppet.conf file. To specify which environment the Puppet client should use, one can specify a value for the environment configuration variable in clients puppet.conf file.
[puppetd]
environment = Testing
The above definition in configuration file defines which environment the configuration file is in our case it is testing.
One can also specify this on the command line using −
#puppetd -environment = testing
Alternatively, Puppet also supports the use of dynamic values in environment configuration. Rather than defining the static values, the developer has a leverage to create custom facts that creates client environment based upon some other client attributes or an external data source. The preferred way of doing it is using a custom tool. These tools are capable of specifying a nodes environment and are generally much better at specifying node information.
Puppet Search Path
Puppet uses a simple search path to determine which configuration needs to be applied on the target machine. In the same way, search path in Puppet is very useful when it is trying to pick up appropriate values which needs to be applied. There are multiple locations as listed below where Puppet searches for the values which needs to be applied.
- Value specified in the command line
- Values specified in an environment-specific section
- Values specified in an executable-specific section
- Values specified in the main section
Puppet - Type and Provider
Puppet types are used for individual configuration management. Puppet has different types like a service type, package type, provider type, etc. Wherein each type has providers. The provider handles the configuration on different platforms or tools. For example, the package type has aptitude, yum, rpm, and DGM providers. There are a lot of types and Puppet covers a good spectrum configuration management item that needs to be managed.
Puppet uses Ruby as its base language. All Puppet types and providers present are written in Ruby language. As it follows the standard encoding format, one can simply create them as shown in the example for repo which manages repositories. Here, we will create type repo and providers svn and git. The first part of the repo type is type itself. The types are usually stored in lib/puppet/type. For this, we will create a file called repo.rb.
$ touch repo.rb
Add the following content in the file.
Puppet::Type.newtype(:repo) do
@doc = "Manage repos"
   Ensurable
   newparam(:source) do
      desc "The repo source"

      validate do |value|
         if value =~ /^git/
            resource[:provider] = :git
         else
            resource[:provider] = :svn
         end
      end
      isnamevar
   end

   newparam(:path) do
      desc "Destination path"
      validate do |value|
         unless value =~ /^\/[a-z0-9]+/
            raise ArgumentError , "%s is not a valid file path" % value
         end
      end
   end
end
In the above script, we have created a block "Puppet::Type.newtype(:repo) do" which creates a new type with the name repo. Then, we have @doc which helps in adding whatever level of details one wants to add. The next statement is Ensurable; it creates a basic ensure property. Puppet type uses ensure property to determine the state of configuration item.
Example
service { "sshd":
   ensure => present,
}
The ensure statement tells Puppet to except three method: create, destroy, and exist in the provider. These methods provide the following features −
- A command to create a resource
- A command to delete a resource
- A command to check the existence of a resource
All we then need to do is specify these methods and their contents. Puppet creates the supporting infrastructure around them.
Next, we define a new parameter called source.
newparam(:source) do
   desc "The repo source"
   validate do |value|
      if value =~ /^git/
         resource[:provider] = :git
      else
         resource[:provider] = :svn
      end
   end
   isnamevar
end
The source will tell the repo type where to retrieve/clone/checkout the source repository. In this, we are also using a hook called validate. In the provider section, we have defined git and svn which check for the validity of the repository we have defined.
Finally, in the code we have defined one more parameter called path.
newparam(:path) do
   desc "Destination path"
   validate do |value|
      unless value =~ /^\/[a-z0-9]+/
         raise ArgumentError , "%s is not a valid file path" % value
      end
This is the value type which specifies where to put the new code that is retrieved. Here, again use the validate hook to create a block that checks the value of appropriateness.
Subversion Provider Use Case
Lets start with the subversion provider using the above created type.
require 'fileutils'
Puppet::Type.type(:repo).provide(:svn) do
   desc "SVN Support"

   commands :svncmd => "svn"
   commands :svnadmin => "svnadmin"

   def create
      svncmd "checkout", resource[:name], resource[:path]
   end

   def destroy
      FileUtils.rm_rf resource[:path]
   end

   def exists?
      File.directory? resource[:path]
   end
end
In the above code, we have upfront defined that we need fileutils library, require 'fileutils' which we are going to use method from.
Next, we have defined the provider as block Puppet::Type.type(:repo).provide(:svn) do which tells Puppet that this is the provider for type called repo.
Then, we have added desc which allows to add some documentation to the provider. We have also defined the command that this provider will use. In the next line, we are checking the features of resource like create, delete, and exist.
Creating a Resource
Once all the above is done, we will create a resource which will be used in our classes and manifest files as shown in the following code.
repo { "wp":
   source => "http://g01063908.git.brcl.org/trunk/",
   path => "/var/www/wp",
   ensure => present,
}
Puppet - RESTful API
Puppet uses RESTful APIs as the communication channel between both Puppet master and Puppet agents. Following is the basic URL to access this RESTful API.
https://brcleprod001:8140/{environment}/{resource}/{key}
https://brcleprod001:8139/{environment}/{resource}/{key}
REST API Security
Puppet usually takes care of security and SSL certificate management. However, if one wishes to use the RESTful API outside the cluster one needs to manage the certificate on their own, when trying to connect to a machine. The security policy for Puppet can be configured through the rest authconfig file.
Testing REST API
Curl utility can be used as a basic utility to rest RESTful API connectivity. Following is an example of how we can retrieve the catalog of node using REST API curl command.
curl --cert /etc/puppet/ssl/certs/brcleprod001.pem --key
   /etc/puppet/ssl/private_keys/brcleprod001.pem
In the following set of commands we are just setting the SSL certificate, which will be different depending on where the SSL directory is and the name of the node being used. For example, lets look at the following command.
curl --insecure -H 'Accept: yaml'
https://brcleprod002:8140/production/catalog/brcleprod001
In the above command, we just send a header specifying the format or formats we want back and a RESTful URL for generating a catalog of brcleprod001 in production environment, will generate a the following output.
--- &id001 !ruby/object:Puppet::Resource::Catalog
aliases: {}
applying: false
classes: []
...
Lets assume another example, where we want to get the CA certificate back from Puppet master. It doesnt require to be authenticated with own signed SSL certificate since that is something which is required before being authenticated.
curl --insecure -H 'Accept: s' https://brcleprod001:8140/production/certificate/ca

-----BEGIN CERTIFICATE-----
MIICHTCCAYagAwIBAgIBATANBgkqhkiG9w0BAQUFADAXMRUwEwYDVQQDDAxwdXBw
Puppet Master and Agent Shared API Reference
GET /certificate/{ca, other}

curl -k -H "Accept: s" https://brcelprod001:8140/production/certificate/ca
curl -k -H "Accept: s" https://brcleprod002:8139/production/certificate/brcleprod002
Puppet Master API Reference
Authenticated Resources (Valid, signed certificate required).
Catalogs
GET /{environment}/catalog/{node certificate name}

curl -k -H "Accept: pson" https://brcelprod001:8140/production/catalog/myclient
Certificate Revocation List
GET /certificate_revocation_list/ca

curl -k -H "Accept: s" https://brcleprod001:8140/production/certificate/ca
Certificate Request
GET /{environment}/certificate_requests/{anything} GET
/{environment}/certificate_request/{node certificate name}

curl -k -H "Accept: yaml" https://brcelprod001:8140/production/certificate_requests/all
curl -k -H "Accept: yaml" https://brcleprod001:8140/production/certificate_request/puppetclient
Reports Submit a Report
PUT /{environment}/report/{node certificate name}
curl -k -X PUT -H "Content-Type: text/yaml" -d "{key:value}" https://brcleprod002:8139/production
Node − Facts Regarding a Specific Node
GET /{environment}/node/{node certificate name}

curl -k -H "Accept: yaml" https://brcleprod002:8140/production/node/puppetclient
Status − Used for Testing
GET /{environment}/status/{anything}

curl -k -H "Accept: pson" https://brcleprod002:8140/production/certificate_request/puppetclient
Puppet Agent API Reference
When a new agent is set up on any machine, by default Puppet agent does not listen to HTTP request. It needs to be enabled in Puppet by adding listen=true in puppet.conf file. This will enable Puppet agents to listen to HTTP request when the Puppet agent is starting up.
Facts
GET /{environment}/facts/{anything}

curl -k -H "Accept: yaml" https://brcelprod002:8139/production/facts/{anything}
Run − Causes the client to update like puppetturn or puppet kick.
PUT  /{environment}/run/{node certificate name}

curl -k -X PUT -H "Content-Type: text/pson" -d "{}"
https://brcleprod002:8139/production/run/{anything}
Puppet - Live Project
In order to perform the live testing of applying configuration and manifests on Puppet node, we will use a live working demo. This can be directly copied and pasted to test how the configuration works. If the user wishes to use the same set of code, he needs to have the same naming convention as shown in code snippets as follows.
Lets start with the creation of a new module.
Creating a New Module
The first step in testing and applying the httpd configuration is by creating a module. In order to do this, the user needs to change his working directory to Puppet module directory and create a basic module structure. The structure creation can be done manually or by using Puppet to create boilerplate for the module.
# cd /etc/puppet/modules
# puppet module generate Live-module
Note − Puppet module generate command requires that the module-name takes the format of [username]-[module] to comply with Puppet forge specifications.
The new module contains some basic files, including a manifest directory. The directory already contains a manifest named init.pp, which is modules main manifest file. This is an empty class declaration for the module.
class live-module {
}
The module also contains a test directory containing a manifest called init.pp. This test manifest contains reference to the live-module class within manifest/init.pp:
include live-module
Puppet will use this test module to test the manifest. Now we are ready to add the configuration to the module.
Installing a HTTP Server
Puppet module will install the necessary packages to run http server. This requires a resource definition that defines the configuration of httpd packages.
In the modules manifest directory, create a new manifest file called httpd.pp
# touch test-module/manifests/httpd.pp
This manifest will contain all HTTP configuration for our module. For separation purpose, we will keep the httpd.pp file separate from init.pp manifest file
We need to put the following code in httpd.pp manifest file.
class test-module::httpd {
   package { 'httpd':
      ensure => installed,
   }
}
This code defines a subclass of test-module called httpd, then defines a package resource declaration for the httpd package. The ensure => installed attribute checks if the required package is installed. If not installed, Puppet uses yum utility to install it. Next, is to include this subclass in our main manifest file. We need to edit init.pp manifest.
class test-module {
   include test-module::httpd
}
Now, its the time to test the module which could be done as follows
# puppet apply test-module/tests/init.pp --noop
The puppet apply command applies the configuration present in manifest file on the target system. Here, we are using test init.pp which refers to main init.pp. The noop performs the dry run of the configuration, which only shows the output but actually does not do anything.
Following is the output.
Notice: Compiled catalog for puppet.example.com in environment
production in 0.59 seconds

Notice: /Stage[main]/test-module::Httpd/Package[httpd]/ensure:
current_value absent, should be present (noop)

Notice: Class[test-module::Httpd]: Would have triggered 'refresh' from 1
events

Notice: Stage[main]: Would have triggered 'refresh' from 1 events
Notice: Finished catalog run in 0.67 seconds
The highlight line is the result of the ensure => installed attribute. The current_value absent means that Puppet has detected the httpd package is installed. Without the noop option, Puppet will install the httpd package.
Running the httpd Server
After installing the httpd servers, we need to start the service using other resource deceleration: Service
We need to edit the httpd.pp manifest file and edit the following content.
class test-module::httpd {
   package { 'httpd':
      ensure => installed,
   }
   service { 'httpd':
      ensure => running,
      enable => true,
      require => Package["httpd"],
   }
}
Following is the list of targets that we have achieved from the above code.
The ensure => running status checks if the service is running, if not then it enables it.
The enable => true attribute sets the service to run when the system boots up.
The require => Package["httpd"] attribute defines an ordering relationship between one resource deceleration and other. In the above case, it ensures that the httpd service starts after the http package is installed. This creates a dependency between the service and the respective package.
Run the puppet apply command to test the changes again.
# puppet apply test-module/tests/init.pp --noop
Notice: Compiled catalog for puppet.example.com in environment
production in 0.56 seconds

Notice: /Stage[main]/test-module::Httpd/Package[httpd]/ensure:
current_value absent, should be present (noop)

Notice: /Stage[main]/test-module::Httpd/Service[httpd]/ensure:
current_value stopped, should be running (noop)

Notice: Class[test-module::Httpd]: Would have triggered 'refresh' from 2
events

Notice: Stage[main]: Would have triggered 'refresh' from 1 events
Notice: Finished catalog run in 0.41 seconds
Configuring httpd Server
Once the above steps are completed, we will have HTTP server installed and enabled. The next step is to provide some configuration to the server. By default, httpd provides some default configurations in /etc/httpd/conf/httpd.conf which provides a webhost port 80. We will add some additional host to provide some user-specific facilities to the web-host.
A template will be used to provide additional port as it requires a variable input. We will create a directory called template and add a file called test-server.config.erb in the new director and add the following content.
Listen <%= @httpd_port %>
NameVirtualHost *:<% = @httpd_port %>

<VirtualHost *:<% = @httpd_port %>>
   DocumentRoot /var/www/testserver/
   ServerName <% = @fqdn %>

   <Directory "/var/www/testserver/">
      Options All Indexes FollowSymLinks
      Order allow,deny
      Allow from all
   </Directory>
</VirtualHost>
The above template follows the standard apache-tomcat server configuration format. The only difference is the use of Ruby escape character to inject variables from the module. We have FQDN which stores fully qualified domain name of the system. This is known as the system fact.
System facts are collected from each system prior to generating each respective systems puppet catalog. Puppet uses the facter command to get this information and one can use facter to get other details regarding the system. We need to add the highlight lines in httpd.pp manifest file.
class test-module::httpd {
   package { 'httpd':
      ensure => installed,
   }
   service { 'httpd':
      ensure => running,
      enable => true,
      require => Package["httpd"],
   }
   file {'/etc/httpd/conf.d/testserver.conf':
      notify => Service["httpd"],
      ensure => file,
      require => Package["httpd"],
      content => template("test-module/testserver.conf.erb"),
   }
   file { "/var/www/myserver":
      ensure => "directory",
   }
}
This helps in achieving the following things −
This adds a file resource declaration for the server configuration file (/etc/httpd/conf.d/test-server.conf). The content of this file is the test-serverconf.erb template that was created earlier. We also check the httpd package installed before adding this file.
This adds the second file resource declaration which creates a directory (/var/www/test-server) for the web server.
Next, we add the relationship between the configuration file and the https service using the notify => Service["httpd"]attribute. This checks if there are any configuration file changes. If there is, then Puppet restarts the service.
Next is to include the httpd_port in the main manifest file. For this, we need to end the main init.pp manifest file and include the following content.
class test-module (
   $http_port = 80
) {
   include test-module::httpd
}
This sets the httpd port to the default value of 80. Next is to run the Puppet apply command.
Following will be the output.
# puppet apply test-module/tests/init.pp --noop
Warning: Config file /etc/puppet/hiera.yaml not found, using Hiera
defaults

Notice: Compiled catalog for puppet.example.com in environment
production in 0.84 seconds

Notice: /Stage[main]/test-module::Httpd/File[/var/www/myserver]/ensure:
current_value absent, should be directory (noop)

Notice: /Stage[main]/test-module::Httpd/Package[httpd]/ensure:
current_value absent, should be present (noop)

Notice:
/Stage[main]/test-module::Httpd/File[/etc/httpd/conf.d/myserver.conf]/ensure:
current_value absent, should be file (noop)

Notice: /Stage[main]/test-module::Httpd/Service[httpd]/ensure:
current_value stopped, should be running (noop)

Notice: Class[test-module::Httpd]: Would have triggered 'refresh' from 4
events

Notice: Stage[main]: Would have triggered 'refresh' from 1 events
Notice: Finished catalog run in 0.51 seconds
Configuring the Firewall
In order to communicate with the server one requires an open port. The problem here is that different kind of operating systems use different methods of controlling the firewall. In case of Linux, versions below 6 use iptables and version 7 use firewalld.
This decision of using an appropriate service is somewhat handled by Puppet using the system facts and its logic. For this, we need to first check the OS and then run the appropriate firewall command.
In order to achieve this, we need to add the following code snippet inside testmodule::http class.
if $operatingsystemmajrelease <= 6 {
   exec { 'iptables':
      command => "iptables -I INPUT 1 -p tcp -m multiport --ports
      ${httpd_port} -m comment --comment 'Custom HTTP Web Host' -j ACCEPT &&
      iptables-save > /etc/sysconfig/iptables",
      path => "/sbin",
      refreshonly => true,
      subscribe => Package['httpd'],
   }
   service { 'iptables':
      ensure => running,
      enable => true,
      hasrestart => true,
      subscribe => Exec['iptables'],
   }
}  elsif $operatingsystemmajrelease == 7 {
   exec { 'firewall-cmd':
      command => "firewall-cmd --zone=public --addport = $ {
      httpd_port}/tcp --permanent",
      path => "/usr/bin/",
      refreshonly => true,
      subscribe => Package['httpd'],
   }
   service { 'firewalld':
      ensure => running,
      enable => true,
      hasrestart => true,
      subscribe => Exec['firewall-cmd'],
   }
}
The above code performs the following −
Using the operatingsystemmajrelease determines whether the OS which is used is version 6 or 7.
If the version is 6, then it runs all the required configuration commands to configure Linux 6 version.
If OS version is 7, then it runs all the required commands required to configure the firewall.
The code snippet for both the OS contains a logic which ensures that the configuration runs only after the http package is installed.
Finally, run the Puppet apply command.
# puppet apply test-module/tests/init.pp --noop
Warning: Config file /etc/puppet/hiera.yaml not found, using Hiera
defaults

Notice: Compiled catalog for puppet.example.com in environment
production in 0.82 seconds

Notice: /Stage[main]/test-module::Httpd/Exec[iptables]/returns:
current_value notrun, should be 0 (noop)

Notice: /Stage[main]/test-module::Httpd/Service[iptables]: Would have
triggered 'refresh' from 1 events
Configuring the SELinux
As we are working on a Linux machine which is version 7 and above, hence we need to configure it to make a http communication. SELinux restricts non-standard access to the HTTP server by default. If we define a custom port, then we need to configure the SELinux to provide access to that port.
Puppet contains some resource type to manage SELinux functions, such as Booleans and modules. Here, we need to execute semanage command to manage port settings. This tools is a part of policycoreutils-python package, which is not installed on red-hat servers by default. In order to achieve the above, we need to add the following code inside the test-module::http class.
exec { 'semanage-port':
   command => "semanage port -a -t http_port_t -p tcp ${httpd_port}",
   path => "/usr/sbin",
   require => Package['policycoreutils-python'],
   before => Service ['httpd'],
   subscribe => Package['httpd'],
   refreshonly => true,
}

package { 'policycoreutils-python':
   ensure => installed,
}
The above code performs the following −
The require => Package['policycoreutils-python'] ensures that we have the required python module installed.
Puppet uses semanage to open the port using the httpd_port as a veriable.
The before => service ensures to execute this command before httpd service starts. If HTTPD starts before SELinux command, then SELinux the service request and the service request fails.
Finally, run the Puppet apply command
# puppet apply test-module/tests/init.pp --noop
...
Notice: /Stage[main]/test-module::Httpd/Package[policycoreutilspython]/
ensure: current_value absent, should be present (noop)
...
Notice: /Stage[main]/test-module::Httpd/Exec[semanage-port]/returns:
current_value notrun, should be 0 (noop)
...
Notice: /Stage[main]/test-module::Httpd/Service[httpd]/ensure:
current_value stopped, should be running (noop)
Puppet installs the python module first and then configures the port access and finally starts the httpd service.
Copying HTML Files in the Web Host
With the above steps we have completed the http server configuration. Now, we have a platform ready to install a web-based application, which Puppet can also configure. To test, we will copy some sample html index web pages to the server.
Create an index.html file inside the files directory.
<html>
   <head>
      <title>Congratulations</title>
   <head>

   <body>
      <h1>Congratulations</h1>
      <p>Your puppet module has correctly applied your configuration.</p>
   </body>
</html>
Create a manifest app.pp inside the manifest directory and add the following content.
class test-module::app {
   file { "/var/www/test-server/index.html":
      ensure => file,
      mode => 755,
      owner => root,
      group => root,
      source => "puppet:///modules/test-module/index.html",
      require => Class["test-module::httpd"],
   }
}
This new class contains a single resource deceleration. This copies a file from the modules file directory to the web server and sets its permissions. The required attribute ensures the test-module::http class completes the configuration successfully before one applies test-module::app.
Finally, we need to include a new manifest in our main init.pp manifest.
class test-module (
   $http_port = 80
) {
   include test-module::httpd
   include test-module::app
}
Now, run the apply command to actually test what is happening. Following will be the output.
# puppet apply test-module/tests/init.pp --noop
Warning: Config file /etc/puppet/hiera.yaml not found, using Hiera
defaults

Notice: Compiled catalog for brcelprod001.brcle.com in environment
production in 0.66 seconds

Notice: /Stage[main]/Test-module::Httpd/Exec[iptables]/returns:
current_value notrun, should be 0 (noop)

Notice: /Stage[main]/Test-module::Httpd/Package[policycoreutilspython]/
ensure: current_value absent, should be present (noop)

Notice: /Stage[main]/Test-module::Httpd/Service[iptables]: Would have
triggered 'refresh' from 1 events

Notice: /Stage[main]/Test-module::Httpd/File[/var/www/myserver]/ensure:
current_value absent, should be directory (noop)

Notice: /Stage[main]/Test-module::Httpd/Package[httpd]/ensure:
current_value absent, should be present (noop)

Notice:
/Stage[main]/Test-module::Httpd/File[/etc/httpd/conf.d/myserver.conf]/ensur
e: current_value absent, should be file (noop)

Notice: /Stage[main]/Test-module::Httpd/Exec[semanage-port]/returns:
current_value notrun, should be 0 (noop)

Notice: /Stage[main]/Test-module::Httpd/Service[httpd]/ensure:
current_value stopped, should be running (noop)

Notice: Class[test-module::Httpd]: Would have triggered 'refresh' from 8
Notice:
/Stage[main]/test-module::App/File[/var/www/myserver/index.html]/ensur:
current_value absent, should be file (noop)

Notice: Class[test-module::App]: Would have triggered 'refresh' from 1
Notice: Stage[main]: Would have triggered 'refresh' from 2 events Notice:
Finished catalog run in 0.74 seconds
The highlighted line shows the result of index.html file being copied to the web-host.
Finalizing the Module
With all the above steps, our new module that we created is ready to use. If we want to create an archive of the module, it can be done using the following command.
# puppet module build test-module
