- Power BI - Home
- Power BI - Introduction
- Power BI - Installation Steps
- Power BI - Architecture
- Power BI Desktop
- Power BI - Desktop
- Power BI - Desktop Window
- Power BI Service
- Power BI - Window Supported Browsers
- Power BI - Generating Reports
- Power BI Desktop Service
- Power BI - Desktop vs Service
- Power BI - Supported Data Sources
- Power BI - Comparison Tools
- Power Query Editor
- Power Query Editor - Introduction
- Power Query Editor - Data Discrepancy
- Power Query Editor - Merge Queries (Part 1)
- Power Query Editor - Merge Queries (Part 2)
- Power BI - Develop Star Schema
- Data Modeling Concepts
- Power BI - Data Modeling
- Power BI - Manage Relationships
- Power BI - Cardinality
- Power BI - Dashboard Options
- Power BI Report Visualizations
- Power BI - Visualization Options
- Power BI - Visualization Charts
- Power BI - Stacked Bar Chart
- Power BI - Stacked Column Chart
- Power BI - Clustered Chart
- Power BI - 100% Stacked Chart
- Power BI - Area Chart and Stacked Area Chart
- Power BI - Line and Stacked Column Chart
- Power BI - Line and Clustered Column Chart
- Power BI - Ribbon Chart
- Power BI - Table and Matrix Visuals
- Power BI Map Visualizations
- Power BI - Creating Map Visualizations
- Power BI - ArcGIS Map
- Power BI Miscellaneous
- Power BI - Waterfall Charts
- Funnel Charts and Radial Gauge Chart
- Power BI - Scatter Chart
- Power BI - Pie Chart and Donut Chart
- Power BI - Card and Slicer Visualization
- Power BI - KPI Visual
- Power BI - Smart Narrative Visual
- Power BI - Decomposition Tree
- Power BI - Paginated Report
- Power BI - Python Script & R Script
- Power BI - Multi-row Card
- Power BI - Power Apps & Power Automate
- Power BI - Excel Integration
- Power BI Dashboard
- Power BI - Sharing Dashboards
- Power BI Sales Production Dashboard
- Power BI - HR Analytics Dashboard
- Power BI - Customer Analytics Dashboard
- Power BI - DAX Basics
- Power BI - Administration Role
- Power BI - DAX Functions
- Power BI - DAX Text Functions
- Power BI - DAX Date Functions
- Power BI - DAX Logical Functions
- Power BI - DAX Counting Functions
- Power BI - Depreciation Functions
- Power BI - DAX Information Functions
Sharing Power BI Dashboards
A dashboard is considered a data visualization tool that permits you a glance at current performance by showing metrics and key performance indicators (KPIs) in an organized format.
Dashboards organize and combine metrics and data into a single report. They show metrics for the entire company or a specific division and might be tailored for a particular position.
Exploring Different Datasets
Power BI tool provides so many options to explore the datasets. When you are working on your BI report or dashboards, you can use Power BI to look for quick insights. Navigate to the datasets section on the left side of the tool UI, click the 3 dots (...), and click Get Insights.
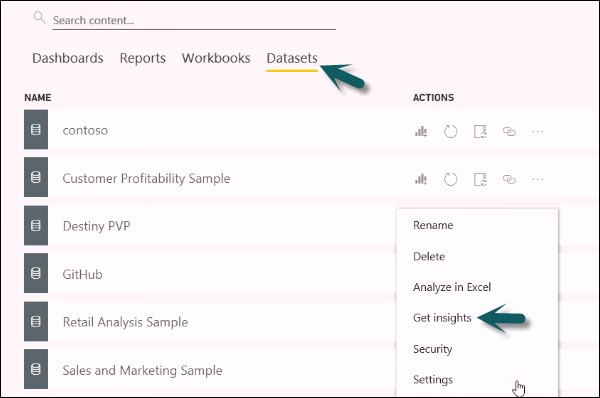
When you select the "Get insights" option, it runs all the algorithms in your dataset and once it is complete, you get a notification that insight is ready for your dataset.

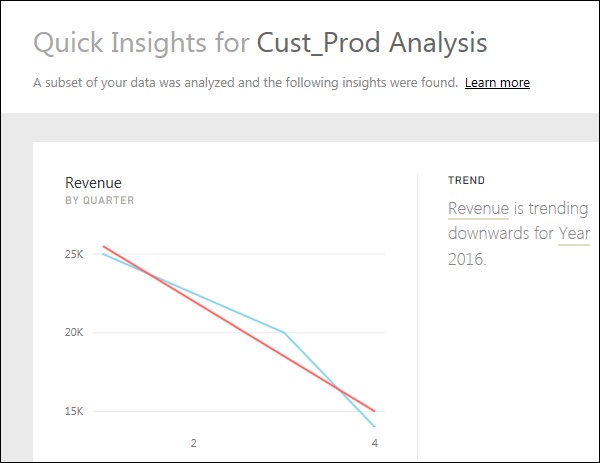
You can click the "View insights" option and the tool will show you all chart representations of your data insights. You can any time go to this option and check the insights option in your dataset.
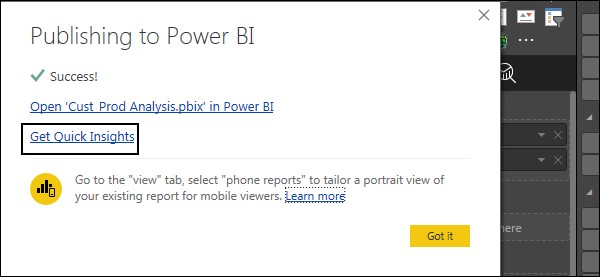
When you publish a report to Power BI service, you also get an option of Quick Insight on the first page.
Creating Dashboards
In Power BI, you can create a dashboard by pinning visualizations from BI reports that are published using Power BI desktop. All the visualizations that are created using Power BI service are also available for pinning to create dashboards.
In Power BI, if you want to pin a visual, open the BI report on the Power BI service. At the top of the visual, select the pin icon.
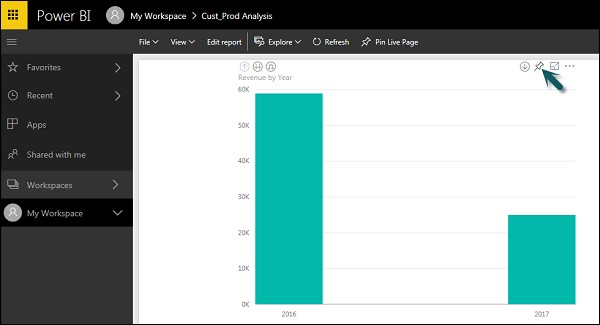
When you use the Pin option as shown as shown in the above screenshot, a new dialog box appears as shown in the following screenshot. It asks you to create a new dashboard or select an existing dashboard to put the visual from the dropdown list. If you don't have an existing dashboard, then this option is greyed out.
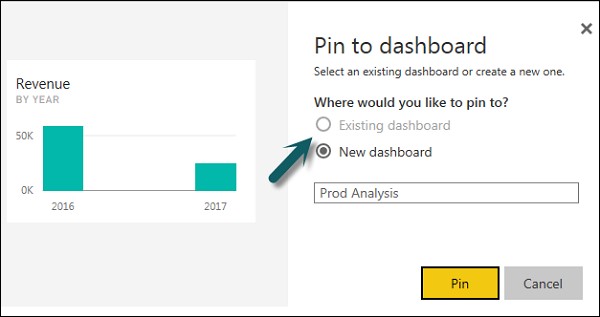
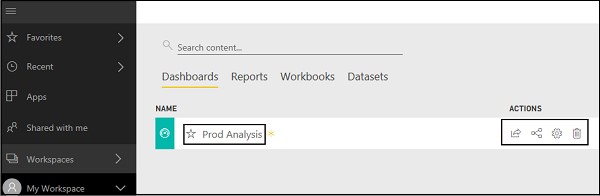
Once you click the Pin button, you will get a confirmation that your visualization is "Pinned" to the dashboard. You can click My Workspace and check the dashboard.
Once your dashboard is created, you can use different options to configure the dashboard.
Sharing Dashboards
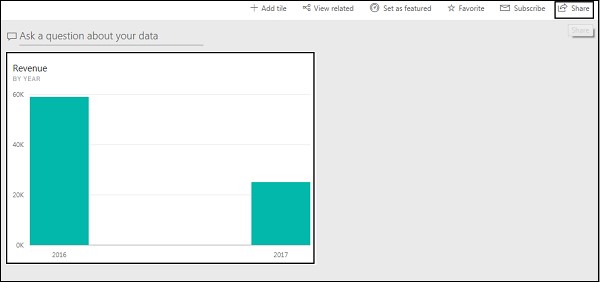
When you publish your BI report to the Power BI service, you can share reports and dashboards with other users in your organization. Sharing a dashboard is very easy in Power BI.
You have to open the dashboard in Power BI service and click the Share option at the top right corner of the screen.
The sharing feature is only available with the Power BI Pro version. You can also use the 60-day free trial for Power BI Pro as shown in the following screenshot.
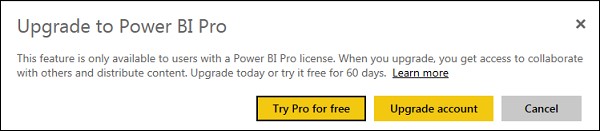
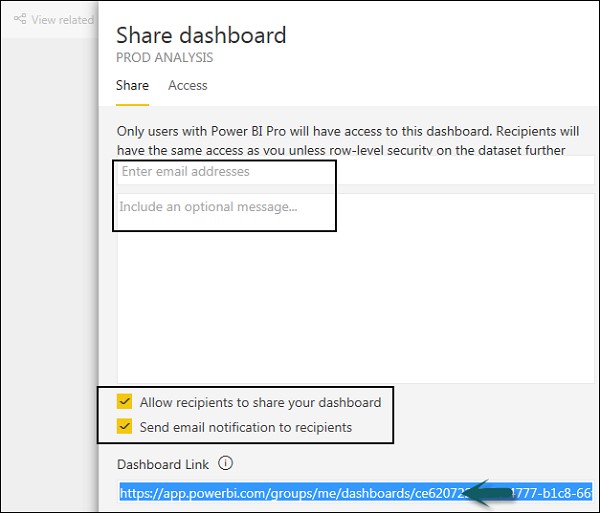
Click the Try Pro for free to start a trial. Select the Start Trial and Finish, and you will get a confirmation that 60-days trial has started. When you click the Share dashboard, you will get options in a new window. You have to enter the email Id of the user with whom you want to share this dashboard.
You can allow recipients to share the dashboard with other users or send email notifications. You can also provide a direct URL to users and they can access the dashboard directly.
Dashboard - Key Components
The key components for the various domains like Retail, production, Marketing, and Finance may change in the Dashboard. The designation of employees like Finance Manager, Senior Software manager, CFO, and Cyber Security has different responsibilities and roles and their KPI can be showcased through the Dashboard.
The three types of Dashboards are specified in the next few chapters −
- Sales Production Dashboard
- Human Resources Analytics Dashboard
- Customer Analytics Dashboard
