- Home
- Introduction
- Environment Setup
- Data Structures
- Building Blocks
- Object Oriented Shortcuts
- Inheritance and Ploymorphism
- Python Design Pattern
- Advanced Features
- Files and Strings
- Exception and Exception Classes
- Object Serialization
- Python Libraries
Object Oriented Python - Object Serialization
In the context of data storage, serialization is the process of translating data structures or object state into a format that can be stored (for example, in a file or memory buffer) or transmitted and reconstructed later.
In serialization, an object is transformed into a format that can be stored, so as to be able to deserialize it later and recreate the original object from the serialized format.
Pickle
Pickling is the process whereby a Python object hierarchy is converted into a byte stream (usually not human readable) to be written to a file, this is also known as Serialization. Unpickling is the reverse operation, whereby a byte stream is converted back into a working Python object hierarchy.
Pickle is operationally simplest way to store the object. The Python Pickle module is an object-oriented way to store objects directly in a special storage format.
What can it do?
- Pickle can store and reproduce dictionaries and lists very easily.
- Stores object attributes and restores them back to the same State.
What pickle cant do?
- It does not save an objects code. Only its attributes values.
- It cannot store file handles or connection sockets.
In short we can say, pickling is a way to store and retrieve data variables into and out from files where variables can be lists, classes, etc.
To Pickle something you must −
- import pickle
- Write a variable to file, something like
pickle.dump(mystring, outfile, protocol),
where 3rd argument protocol is optional To unpickling something you must −
Import pickle
Write a variable to a file, something like
myString = pickle.load(inputfile)
Methods
The pickle interface provides four different methods.
dump() − The dump() method serializes to an open file (file-like object).
dumps() − Serializes to a string
load() − Deserializes from an open-like object.
loads() − Deserializes from a string.
Based on above procedure, below is an example of pickling.
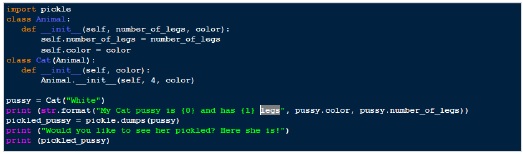
Output
My Cat pussy is White and has 4 legs
Would you like to see her pickled? Here she is!
b'\x80\x03c__main__\nCat\nq\x00)\x81q\x01}q\x02(X\x0e\x00\x00\x00number_of_legsq\x03K\x04X\x05\x00\x00\x00colorq\x04X\x05\x00\x00\x00Whiteq\x05ub.'
So, in the example above, we have created an instance of a Cat class and then weve pickled it, transforming our Cat instance into a simple array of bytes.
This way we can easily store the bytes array on a binary file or in a database field and restore it back to its original form from our storage support in a later time.
Also if you want to create a file with a pickled object, you can use the dump() method ( instead of the dumps*()* one) passing also an opened binary file and the pickling result will be stored in the file automatically.
[.]
binary_file = open(my_pickled_Pussy.bin', mode='wb')
my_pickled_Pussy = pickle.dump(Pussy, binary_file)
binary_file.close()
Unpickling
The process that takes a binary array and converts it to an object hierarchy is called unpickling.
The unpickling process is done by using the load() function of the pickle module and returns a complete object hierarchy from a simple bytes array.
Lets use the load function in our previous example.
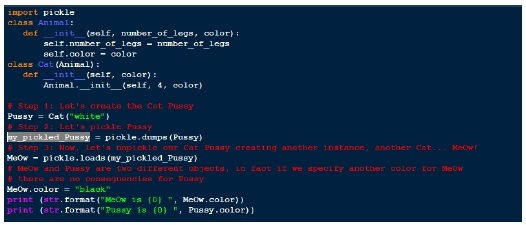
Output
MeOw is black
Pussy is white
JSON
JSON(JavaScript Object Notation) has been part of the Python standard library is a lightweight data-interchange format. It is easy for humans to read and write. It is easy to parse and generate.
Because of its simplicity, JSON is a way by which we store and exchange data, which is accomplished through its JSON syntax, and is used in many web applications. As it is in human readable format, and this may be one of the reasons for using it in data transmission, in addition to its effectiveness when working with APIs.
An example of JSON-formatted data is as follow −
{"EmployID": 40203, "Name": "Zack", "Age":54, "isEmployed": True}
Python makes it simple to work with Json files. The module sused for this purpose is the JSON module. This module should be included (built-in) within your Python installation.
So lets see how can we convert Python dictionary to JSON and write it to a text file.
JSON to Python
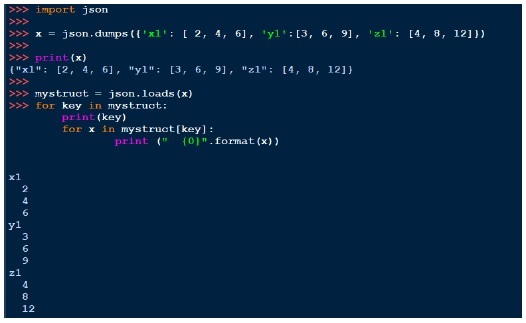
Reading JSON means converting JSON into a Python value (object). The json library parses JSON into a dictionary or list in Python. In order to do that, we use the loads() function (load from a string), as follow −

Output

Below is one sample json file,
data1.json
{"menu": {
   "id": "file",
   "value": "File",
   "popup": {
      "menuitem": [
         {"value": "New", "onclick": "CreateNewDoc()"},
         {"value": "Open", "onclick": "OpenDoc()"},
         {"value": "Close", "onclick": "CloseDoc()"}
      ]
   }
}}
Above content (Data1.json) looks like a conventional dictionary. We can use pickle to store this file but the output of it is not human readable form.
JSON(Java Script Object Notification) is a very simple format and thats one of the reason for its popularity. Now lets look into json output through below program.
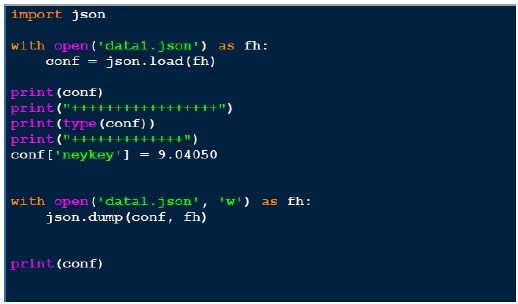
Output
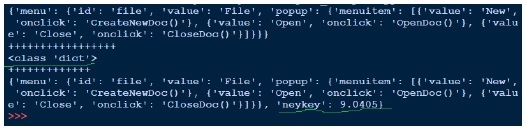
Above we open the json file (data1.json) for reading, obtain the file handler and pass on to json.load and getting back the object. When we try to print the output of the object, its same as the json file. Although the type of the object is dictionary, it comes out as a Python object. Writing to the json is simple as we saw this pickle. Above we load the json file, add another key value pair and writing it back to the same json file. Now if we see out data1.json, it looks different .i.e. not in the same format as we see previously.
To make our Output looks same (human readable format), add the couple of arguments into our last line of the program,
json.dump(conf, fh, indent = 4, separators = (,, : ))
Similarly like pickle, we can print the string with dumps and load with loads. Below is an example of that,
YAML
YAML may be the most human friendly data serialization standard for all programming languages.
Python yaml module is called pyaml
YAML is an alternative to JSON −
Human readable code − YAML is the most human readable format so much so that even its front-page content is displayed in YAML to make this point.
Compact code − In YAML we use whitespace indentation to denote structure not brackets.
Syntax for relational data − For internal references we use anchors (&) and aliases (*).
One of the area where it is used widely is for viewing/editing of data structures − for example configuration files, dumping during debugging and document headers.
Installing YAML
As yaml is not a built-in module, we need to install it manually. Best way to install yaml on windows machine is through pip. Run below command on your windows terminal to install yaml,
pip install pyaml (Windows machine)
sudo pip install pyaml (*nix and Mac)
On running above command, screen will display something like below based on whats the current latest version.
Collecting pyaml
Using cached pyaml-17.12.1-py2.py3-none-any.whl
Collecting PyYAML (from pyaml)
Using cached PyYAML-3.12.tar.gz
Installing collected packages: PyYAML, pyaml
Running setup.py install for PyYAML ... done
Successfully installed PyYAML-3.12 pyaml-17.12.1
To test it, go to the Python shell and import the yaml module, import yaml, if no error is found, then we can say installation is successful.
After installing pyaml, lets look at below code,
script_yaml1.py
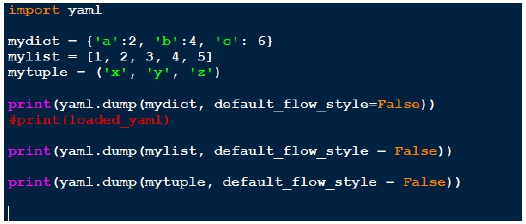
Above we created three different data structure, dictionary, list and tuple. On each of the structure, we do yaml.dump. Important point is how the output is displayed on the screen.
Output
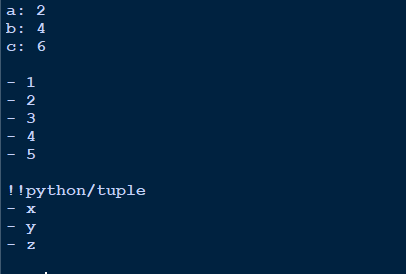
Dictionary output looks clean .ie. key: value.
White space to separate different objects.
List is notated with dash (-)
Tuple is indicated first with !!Python/tuple and then in the same format as lists.
Loading a yaml file
So lets say I have one yaml file, which contains,
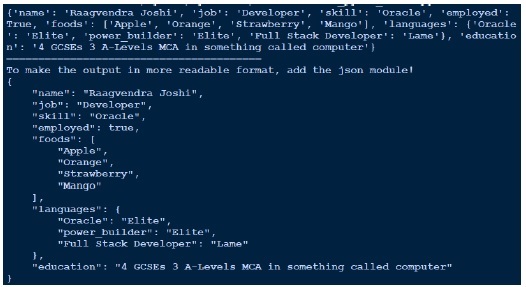
---
# An employee record
name: Raagvendra Joshi
job: Developer
skill: Oracle
employed: True
foods:
   - Apple
   - Orange
   - Strawberry
   - Mango
languages:
   Oracle: Elite
   power_builder: Elite
   Full Stack Developer: Lame
education:
   4 GCSEs
   3 A-Levels
   MCA in something called com
Now lets write a code to load this yaml file through yaml.load function. Below is code for the same.
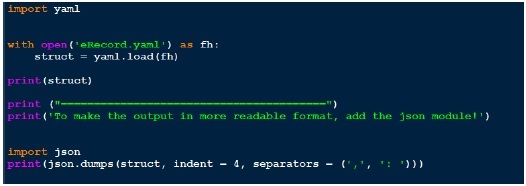
As the output doesnt looks that much readable, I prettify it by using json in the end. Compare the output we got and the actual yaml file we have.
Output
One of the most important aspect of software development is debugging. In this section well see different ways of Python debugging either with built-in debugger or third party debuggers.
PDB The Python Debugger
The module PDB supports setting breakpoints. A breakpoint is an intentional pause of the program, where you can get more information about the programs state.
To set a breakpoint, insert the line
pdb.set_trace()
Example
pdb_example1.py
import pdb
x = 9
y = 7
pdb.set_trace()
total = x + y
pdb.set_trace()
We have inserted a few breakpoints in this program. The program will pause at each breakpoint (pdb.set_trace()). To view a variables contents simply type the variable name.
c:\Python\Python361>Python pdb_example1.py
> c:\Python\Python361\pdb_example1.py(8)<module>()
-> total = x + y
(Pdb) x
9
(Pdb) y
7
(Pdb) total
*** NameError: name 'total' is not defined
(Pdb)
Press c or continue to go on with the programs execution until the next breakpoint.
(Pdb) c
--Return--
> c:\Python\Python361\pdb_example1.py(8)<module>()->None
-> total = x + y
(Pdb) total
16
Eventually, you will need to debug much bigger programs programs that use subroutines. And sometimes, the problem that youre trying to find will lie inside a subroutine. Consider the following program.
import pdb
def squar(x, y):
   out_squared = x^2 + y^2
   return out_squared
if __name__ == "__main__":
   #pdb.set_trace()
   print (squar(4, 5))
Now on running the above program,
c:\Python\Python361>Python pdb_example2.py
> c:\Python\Python361\pdb_example2.py(10)<module>()
-> print (squar(4, 5))
(Pdb)
We can use ? to get help, but the arrow indicates the line thats about to be executed. At this point its helpful to hit s to s to step into that line.
(Pdb) s
--Call--
>c:\Python\Python361\pdb_example2.py(3)squar()
-> def squar(x, y):
This is a call to a function. If you want an overview of where you are in your code, try l −
(Pdb) l
1 import pdb
2
3 def squar(x, y):
4 -> out_squared = x^2 + y^2
5
6 return out_squared
7
8 if __name__ == "__main__":
9 pdb.set_trace()
10 print (squar(4, 5))
[EOF]
(Pdb)
You can hit n to advance to the next line. At this point you are inside the out_squared method and you have access to the variable declared inside the function .i.e. x and y.
(Pdb) x
4
(Pdb) y
5
(Pdb) x^2
6
(Pdb) y^2
7
(Pdb) x**2
16
(Pdb) y**2
25
(Pdb)
So we can see the ^ operator is not what we wanted instead we need to use ** operator to do squares.
This way we can debug our program inside the functions/methods.
Logging
The logging module has been a part of Pythons Standard Library since Python version 2.3. As its a built-in module all Python module can participate in logging, so that our application log can include your own message integrated with messages from third party module. It provides a lot of flexibility and functionality.
Benefits of Logging
Diagnostic logging − It records events related to the applications operation.
Audit logging − It records events for business analysis.
Messages are written and logged at levels of severity &minu
DEBUG (debug()) − diagnostic messages for development.
INFO (info()) − standard progress messages.
WARNING (warning()) − detected a non-serious issue.
ERROR (error()) − encountered an error, possibly serious.
CRITICAL (critical()) − usually a fatal error (program stops).
Lets looks into below simple program,
import logging

logging.basicConfig(level=logging.INFO)

logging.debug('this message will be ignored') # This will not print
logging.info('This should be logged') # it'll print
logging.warning('And this, too') # It'll print
Above we are logging messages on severity level. First we import the module, call basicConfig and set the logging level. Level we set above is INFO. Then we have three different statement: debug statement, info statement and a warning statement.
Output of logging1.py
INFO:root:This should be logged
WARNING:root:And this, too
As the info statement is below debug statement, we are not able to see the debug message. To get the debug statement too in the Output terminal, all we need to change is the basicConfig level.
logging.basicConfig(level = logging.DEBUG)
And in the Output we can see,
DEBUG:root:this message will be ignored
INFO:root:This should be logged
WARNING:root:And this, too
Also the default behavior means if we dont set any logging level is warning. Just comment out the second line from the above program and run the code.
#logging.basicConfig(level = logging.DEBUG)
Output
WARNING:root:And this, too
Python built in logging level are actually integers.
>>> import logging
>>>
>>> logging.DEBUG
10
>>> logging.CRITICAL
50
>>> logging.WARNING
30
>>> logging.INFO
20
>>> logging.ERROR
40
>>>
We can also save the log messages into the file.
logging.basicConfig(level = logging.DEBUG, filename = 'logging.log')
Now all log messages will go the file (logging.log) in your current working directory instead of the screen. This is a much better approach as it lets us to do post analysis of the messages we got.
We can also set the date stamp with our log message.
logging.basicConfig(level=logging.DEBUG, format = '%(asctime)s %(levelname)s:%(message)s')
Output will get something like,
2018-03-08 19:30:00,066 DEBUG:this message will be ignored
2018-03-08 19:30:00,176 INFO:This should be logged
2018-03-08 19:30:00,201 WARNING:And this, too
Benchmarking
Benchmarking or profiling is basically to test how fast is your code executes and where the bottlenecks are? The main reason to do this is for optimization.
timeit
Python comes with a in-built module called timeit. You can use it to time small code snippets. The timeit module uses platform-specific time functions so that you will get the most accurate timings possible.
So, it allows us to compare two shipment of code taken by each and then optimize the scripts to given better performance.
The timeit module has a command line interface, but it can also be imported.
There are two ways to call a script. Lets use the script first, for that run the below code and see the Output.
import timeit
print ( 'by index: ', timeit.timeit(stmt = "mydict['c']", setup = "mydict = {'a':5, 'b':10, 'c':15}", number = 1000000))
print ( 'by get: ', timeit.timeit(stmt = 'mydict.get("c")', setup = 'mydict = {"a":5, "b":10, "c":15}', number = 1000000))
Output
by index: 0.1809192126703489
by get: 0.6088525265034692
Above we use two different method .i.e. by subscript and get to access the dictionary key value. We execute statement 1 million times as it executes too fast for a very small data. Now we can see the index access much faster as compared to the get. We can run the code multiply times and there will be slight variation in the time execution to get the better understanding.
Another way is to run the above test in the command line. Lets do it,
c:\Python\Python361>Python -m timeit -n 1000000 -s "mydict = {'a': 5, 'b':10, 'c':15}" "mydict['c']"
1000000 loops, best of 3: 0.187 usec per loop

c:\Python\Python361>Python -m timeit -n 1000000 -s "mydict = {'a': 5, 'b':10, 'c':15}" "mydict.get('c')"
1000000 loops, best of 3: 0.659 usec per loop
Above output may vary based on your system hardware and what all applications are running currently in your system.
Below we can use the timeit module, if we want to call to a function. As we can add multiple statement inside the function to test.
import timeit

def testme(this_dict, key):
   return this_dict[key]

print (timeit.timeit("testme(mydict, key)", setup = "from __main__ import testme; mydict = {'a':9, 'b':18, 'c':27}; key = 'c'", number = 1000000))
Output
0.7713474590139164
