- KnockoutJS - Home
- KnockoutJS - Overview
- KnockoutJS - Environment Setup
- KnockoutJS - Application
- KnockoutJS - MVVM Framework
- KnockoutJS - Observables
- Computed Observables
- KnockoutJS - Declarative Bindings
- KnockoutJS - Dependency Tracking
- KnockoutJS - Templating
- KnockoutJS - Components
KnockoutJS - Quick Guide
KnockoutJS - Overview
KnockoutJS is basically a library written in JavaScript, based on MVVM pattern that helps developers build rich and responsive websites. The model separates the application's Model (stored data), View (UI) and View Model (JavaScript Representation of model).
KnockoutJS was developed and is maintained as an open source project by Steve Sanderson, a Microsoft employee on July 5, 2010. KO is an abbreviation used for KnockoutJS. KO supports all mainstream browsers - IE 6+, Firefox 3.5+, Chrome, Opera, Safari (desktop/mobile).
Features of KnockoutJS
Here is a list of some of the most prominent features of KnockoutJS −
Declarative Binding − HTML DOM elements are connected to the model through data-bind attribute using a very simple syntax. It is made easy to achieve responsiveness using this feature.
Automatic UI Refresh − Any changes made to view the model data are reflected in the UI automatically and vice-versa. No need of writing extra code.
Dependency Tracking − Relationship between KO attributes and KO library functions/components is transparent. Automatically tracks data changes in KO attribute and updates respective affected areas.
Templating − Templates are a simple and convenient way to build complex UI structures - with the possibility of repeating or nesting blocks - as a function of view model data.
Extensible − Extends custom behavior very easily.
Why Use KnockoutJS?
KnockoutJS library provides an easy and clean way to handle complex data-driven interfaces. One can create self-updating UIs for Javascript objects.
It is pure JavaScript Library and works with any web framework. It's not a replacement of JQuery but can work as a supplement providing smart features.
KnockoutJS library file is very small and lightweight.
KnockoutJS is independent of any other framework. It is compatible with other client or server side technologies.
Most important of all KnockoutJS is open source and hence free for use.
KnockoutJS is fully documented. The official site has full documentation including API docs, live examples, and interactive tutorials.
KnockoutJS - Environment Setup
It is very easy to use KnockoutJS. Simply refer the JavaScript file using <script> tag in HTML pages.
Knockout.js can be accessed in the following ways −
You can download production build of Knockout.js from its official website
A page as in the following image will be displayed. Click on download link and you will get the latest knockout.js file.

Now refer the file as shown in the following code.
<script type = 'text/javascript' src = 'knockout-3.3.0.js'></script>
Update the src attribute to match the location where the downloaded files are kept.
You can refer to the KnockoutJS library from CDNs −
You can refer KnockoutJS library from Microsoft Ajax CDN in your code as follows −
<script src = "https://ajax.aspnetcdn.com/ajax/knockout/knockout-3.1.0.js"
   type = "text/javascript"></script>
Alternatively you can refer to a minified version of KnockoutJS library from CDNJS as follows −
<script src = "https://cdnjs.cloudflare.com/ajax/libs/knockout/3.3.0/knockout-min.js"
   type = "text/javascript"></script>
Note − In all the chapters for this tutorial, we have referred to CDN version of the KnockoutJS library.
Example
KnockoutJS is based on Model-View-ViewModel (MVVM) pattern. We will study this pattern in depth in chapter KnockoutJS - MVVM Framework. First let's take a look at a simple example of KnockoutJS.
<!DOCTYPE html>
   <head>
      <title>KnockoutJS Simple Example</title>
      <script src = "https://ajax.aspnetcdn.com/ajax/knockout/knockout-3.1.0.js"
         type = "text/javascript"></script>
   </head>

   <body>
      <!-- This is called "view" of HTML markup that defines the appearance of UI -->

      <p>First String: <input data-bind = "value: firstString" /></p>
      <p>Second String: <input data-bind = "value: secondString" /></p>

      <p>First String: <strong data-bind = "text: firstString">Hi</strong></p>
      <p>Second String: <strong data-bind = "text: secondString">There</strong></p>

      <p>Derived String: <strong data-bind = "text: thirdString"></strong></p>

      <script>
         <!-- This is called "viewmodel". This javascript section defines the data and
            behavior of UI -->

         function AppViewModel() {
            this.firstString = ko.observable("Enter First String");
            this.secondString = ko.observable("Enter Second String");

            this.thirdString = ko.computed(function() {
               return this.firstString() + " " + this.secondString();
            }, this);
         }

         // Activates knockout.js
         ko.applyBindings(new AppViewModel());
      </script>

   </body>
</html>
The following line refers to KnockoutJS library.
<script src = "https://ajax.aspnetcdn.com/ajax/knockout/knockout-3.1.0.js"
   type = "text/javascript"> </script>
This line refers KnockoutJS library.
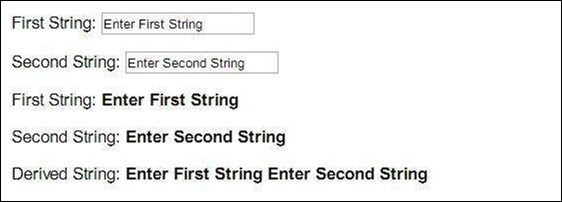
We have two input boxes: First String and Second String. These 2 variables are initialized with values Enter First String and Enter Second String respectively in ViewModel.
<p>First String: < input data-bind = "value: firstString" /> </p>
This is how we are binding values from ViewModel to HTML elements using 'data-bind' attribute in the body section.
Here, 'firstString' refers to ViewModel variable.
this.firstString = ko.observable("Enter First String");
ko.observable is a concept which keeps an eye on the value changes so that it can update the underlying ViewModel data.
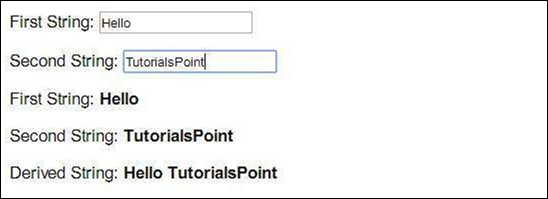
To understand this better, let's update the first input box to "Hello" and the second input box to "TutorialsPoint". You will see the values are updated simultaneously. We will study more about this concept in KnockoutJS - Observables chapter.
this.thirdString = ko.computed(function() {
   return this.firstString() + " " + this.secondString();
}, this);
Next, we have computed function in viewmodel. This function derives the third string based on 2 strings mentioned earlier. Thus, any updates made to these strings automatically get reflected in this derived string. There is no need of writing an extra code to accomplish this. This is just a simple example. We will study about this concept in KnockoutJS - Computed Observables chapter.
Output
Save the above code as my_first_knockoutjs_program.html. Open this file in your browser and you will see an output as the following.
Modify strings to "Hello" and "TutorialsPoint" and the output changes as follows.
KnockoutJS - Application
KnockoutJS is widely used for Single Page Applications - A website created with the ability to retrieve all necessary data dynamically with a single page load reducing server round trips.
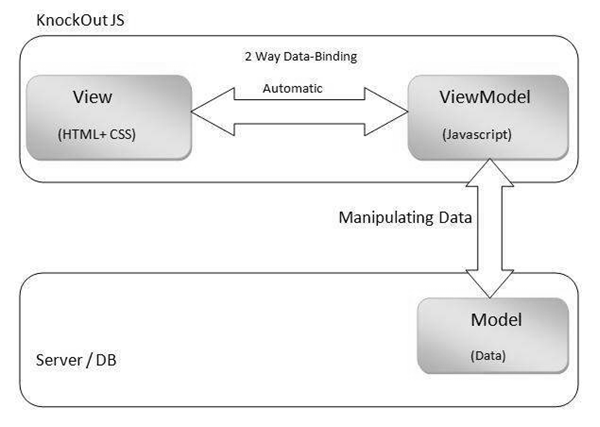
KnockoutJS is a client-side framework. This is a JavaScript library which makes it very easy to bind HTML to domain data. It implements a pattern called Model-View-ViewModel (MVVM). Observables is the magic ingredient of KnockoutJS. All data remains in sync because of Observable attribute.
Architecture
View
View is nothing but user interface created using HTML elements and CSS styling.
You can bind HTML DOM elements to data model using KnockoutJS. It provides 2-way data binding between View and ViewModel using 'data-bind' concept, which means any updates done in the UI are reflected in the data model and any changes done in the data model are reflected in the UI. One can create self-updating UI with the help of knockoutJS.
ViewModel
ViewModel is a JavaScript object, which contains necessary properties and functions to represent data. View and ViewModel are connected together with declarative data-bind concept used in HTML. This makes it easy to change HTML without changing ViewModel. KnockoutJS takes care of automatic data refresh between them through the use of Observables.
Synchronization of data is achieved through binding DOM elements to Data Model, first using data-bind and then refreshing these 2 components through the use of Observables. Dependency tracking is done automatically due to this synchronization of data. No extra coding is required to achieve it. KnockoutJS allows to create direct connection between the display and underlying data.
You can create your own bindings called as custom bindings for application specific behaviors. This way Knockout gives direct control of how you want to transform your data into HTML.
Model
Model is the domain data on the server and it gets manipulated as and when the request is sent/received from ViewModel.
The data could be stored in database, cookie, or other form of persistent storage. KnockoutJS does not worry about how it is stored. It is up to the programmer to communicate between the stored data and KnockoutJS.
Most of the times, data is saved and loaded via an Ajax call.
KnockoutJS - MVVM Framework
Model-View-ViewModel (MVVM) is an architectural design pattern for developing software applications. MVVM was developed by Microsoft Architect John Gossman in 2005. This pattern is derived from Model-View-Controller (MVC) pattern. The advantage of MVVM is that it separates the application layer's graphical user interface from business logic. MVVM is responsible for handling data from the underlying model in such a way that it is represented and managed very easily. ViewModel in MVVM represents an abstract version of View's state and actions.
The view classes do not know that Model and ViewModel classes exists, also Model and ViewModel does not know that View exists. Model is also unaware that ViewModel and View exists.
Architecture
View
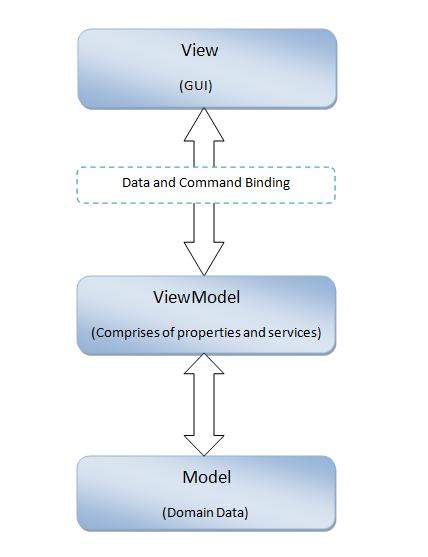
View is a Graphical User Interface created using markup language to represent data. View binds to properties of a ViewModel through data-bind concept, which indirectly connects to the model data. View need not be changed for any alteration done in ViewModel. Changes made to data in ViewModel is automatically propagated in View due to binding.
Model
Model is domain data or business object, which holds real-time data. Model does not carry behaviors. Behavior is mostly implemented in business logic.
ViewModel
ViewModel is the center place, where data from Model and View's display logic are bundled together. ViewModel holds the dynamic state of data. There is an implicit binder in between View and ViewModel to communicate with each other. This binding is inclusive of declarative data and command binding. Synchronization of View and ViewModel is achieved through this binding. Any change made in View is reflected in ViewModel, and similarly any change in ViewModel gets automatically reflected in View. Existence of this 2-way binding mechanism is a key aspect of this MVVM pattern.
KnockoutJS - Observables
KnockoutJS is build upon the following 3 important concepts.
Observables and dependency tracking between them - DOM elements are connected to ViewModel via 'data-bind'. They exchange information through Observables. This automatically takes care of dependency tracking.
Declarative Bindings between UI and ViewModel - DOM elements are connected to ViewModel via 'data-bind' concept.
Templating to create re-usable components - Templating provides a robust way to create complex web applications.
We will study Observables in this chapter.
As the name specifies, when you declare a ViewModel data/property as Observable, any data modification each time automatically gets reflected at all places the data is used. This also includes refreshing the related dependencies. KO takes care of these things and there is no need to write extra code to achieve this.
Using Observable, it becomes very easy to make UI and ViewModel communicate dynamically.
Syntax
You just need to declare ViewModel property with function ko.observable() to make it Observable.
this.property = ko.observable('value');
Example
Let's take a look at the following example which demonstrates the use of Observable.
<!DOCTYPE html>
   <head>
      <title>KnockoutJS Observable Example</title>
      <script src = "https://ajax.aspnetcdn.com/ajax/knockout/knockout-3.1.0.js"
         type = "text/javascript"></script>
   </head>

   <body>
      <!-- This is called "view" of HTML markup that defines the appearance of UI -->

      <p>Enter your name: <input data-bind = "value: yourName" /></p>
      <p>Hi <strong data-bind = "text: yourName"></strong> Good Morning!!!</p>

      <script>
         <!-- This is called "viewmodel". This javascript section defines the data and behavior of UI -->

         function AppViewModel() {
            this.yourName = ko.observable("");
         }

         // Activates knockout.js
         ko.applyBindings(new AppViewModel());
      </script>
   </body>
</html>
The following line is for the input box. As can be seen, we have used data-bind attribute to bind yourName value to ViewModel.
<p>Enter your name: <input data-bind = "value: yourName" /> <p>
The following line just prints the value of yourName. Note, that here data-bind type is the text as we are simply reading the value.
<p>Hi <strong data-bind = "text: yourName"></strong> Good Morning!!!</p>
In the following line, ko.observable keeps an eye on yourName variable for any modification in data. Once there is a modification, the corresponding places also get updated with the modified value. When you run the following code, an input box will appear. As and when you update that input box, the new value will get reflected or refreshed in places wherever it is used.
this.yourName = ko.observable("");
Output
Let's carry out the following steps to see how the above code works −
Save the above code in first_observable_pgm.htm file.
Open this HTML file in a browser.
Enter the name as Scott and observe that the name is reflected in the output.
Data modification can take place either from the UI or from ViewModel. Irrespective of from where the data is changed, the UI and ViewModel keeps synchronization among them. This makes it a two-way-binding mechanism. In the above example, when you change your name in the input box, ViewModel gets a new value. When you change yourName property from inside ViewModel, then the UI receives a new value.
Reading and Writing Observables
Following table lists the read and write operations which can be performed on Observables.
| Sr.No. | Read/Write Operation & Syntax |
|---|---|
| 1 | Read To read value just call Observable property without parameters like: AppViewModel.yourName(); |
| 2 | Write To write/update value in Observable property, just pass the desired value in parameter like: AppViewModel.yourName('Bob'); |
| 3 | Write multiple Multiple ViewModel properties can be updated in a single row with the help of chaining-syntax like: AppViewModel.yourName('Bob').yourAge(45); |
Observable Arrays
Observable declaration takes care of data modifications of a single object. ObservableArray works with the collection of objects. This is a very useful feature when you are dealing with complex applications containing multiple type of values and changing their status frequently based on the user actions.
Syntax
this.arrayName = ko.observableArray(); // It's an empty array
Observable array only tracks which objects in it are added or removed. It does not notify if the individual object's properties are modified.
Initialize It for the First Time
You can initialize your array and at the same time you can declare it as Observable by passing the initial values to the constructor as follows.
this.arrayName = ko.observableArray(['scott','jack']);
Reading from Observable Array
You can access Observable array elements as follows.
alert('The second element is ' + arrayName()[1]);
ObservableArray Functions
KnockoutJS has its own set of Observable array functions. They are convenient because −
These functions work on all browsers.
These functions will take care of dependency tracking automatically.
Syntax is easy to use. For example, to insert an element into an array, you just need to use arrayName.push('value') instead of arrayName().push('value').
Following is the list of various Observable Array methods.
| Sr.No. | Methods & Description |
|---|---|
| 1 | push('value')
Inserts a new item at the end of array. |
| 2 | pop()
Removes the last item from the array and returns it. |
| 3 | unshift('value')
Inserts a new value at the beginning of the array. |
| 4 | shift()
Removes the first item from the array and returns it. |
| 5 | reverse()
Reverses the order of the array. |
| 6 | sort()
Sorts array items in an ascending order. |
| 7 | splice(start-index,end-index)
Accepts 2 parameters - start-index and end-index - removes items starting from start to end index and returns them as an array. |
| 8 | indexOf('value')
This function returns the index of the first occurrence of parameter provided. |
| 9 | slice(start-index,end-index)
This method slices out a piece of an array. Returns the items from start-index up to end-index. |
| 10 | removeAll()
Removes all items and returns them as an array. |
| 11 | remove('value')
Removes items that match the parameter and returns as an array. |
| 12 | remove(function(item) { condition })
Removes items which are satisfying the condition and returns them as an array. |
| 13 | remove([set of values])
Removes items that match with a given set of values. |
| 14 | destroyAll() Marks all items in an array with property _destroy with value true. |
| 15 | destroy('value') Searches for an item equal to the parameter and mark it with a special property _destroy with value true. |
| 16 | destroy(function(item) { condition}) Finds all items which are satisfying the condition, marks them with property _destroy with true value. |
| 17 | destroy([set of values]) Finds the items that match with a given set of values, marks them as _destroy with true value. |
Note − Destroy and DestroyAll Functions from ObservableArrays are mostly for 'Ruby on Rails' developers only.
When you use destroy method, the corresponding items are not really deleted from array at that moment but are made hidden by marking them with property _destroy with true value so that they can't be read by UI. Items marked as _destroy equal to true are deleted later while dealing with JSON object graph.
KnockoutJS - Computed Observables
Computed Observable is a function which is dependent on one or more Observables and automatically updates whenever its underlying Observables (dependencies) change.
Computed Observables can be chained.
Syntax
this.varName = ko.computed(function(){
   ...
   ... //  function code
   ...
},this);
Example
Let us look at the following example which demonstrates the use of Computed Observables.
<!DOCTYPE html>
   <head >
      <title>KnockoutJS Computed Observables</title>
      <script src = "https://ajax.aspnetcdn.com/ajax/knockout/knockout-3.1.0.js"></script>
   </head>

   <body>
      <p>Enter first number: <input data-bind = "value: a" /></p>
      <p>Enter second number: <input data-bind = "value: b"/></p>
      <p>Average := <span data-bind="text: totalAvg"></span></p>

      <script>
         function MyViewModel() {
            this.a = ko.observable(10);
            this.b = ko.observable(40);

            this.totalAvg = ko.computed(function() {

               if(typeof(this.a()) !== "number" || typeof(this.b()) !== "number") {
                  this.a(Number(this.a()));   //convert string to Number
                  this.b(Number(this.b()));   //convert string to Number
               }

               total = (this.a() + this.b())/2 ;
               return total;
            },this);
         }

         ko.applyBindings(new MyViewModel());
      </script>

   </body>
</html>
In the following lines, first two are for accepting input values. Third line prints the average of these two numbers.
<p>Enter first number: <input data-bind = "value: a" /></p>
<p>Enter second number: <input data-bind = "value: b"/></p>
<p>Average := <span data-bind = "text: totalAvg"></span></p>
In the following lines, type of Observables a and b is number when they are initialized for the first time inside ViewModel. However, in KO every input accepted from UI is by default in the String format. So they need to be converted to Number so as to perform arithmetic operation on them.
this.totalAvg = ko.computed(function() {

   if(typeof(this.a()) !== "number" || typeof(this.b()) !== "number") {
      this.a(Number(this.a()));   //convert string to Number
      this.b(Number(this.b()));   //convert string to Number
   }

   total = (this.a() + this.b())/2 ;
   return total;
},this);
In the following line, the calculated average is displayed in the UI. Note that data-bind type of totalAvg is just text.
<p>Average := <span data-bind = "text: totalAvg"></span></p>
Output
Let's carry out the following steps to see how the above code works −
Save the above code in computed-observable.htm file.
Open this HTML file in a browser.
Enter any 2 numbers in the text boxes and observe that the average is calculated.
Managing 'This'
Note that in the above example, the second parameter is provided as this to Computed function. It is not possible to refer to Observables a() and b() without providing this.
To overcome this, self variable is used which holds the reference of this. Doing so, there is no need to track this throughout the code. Instead, self can be used.
Following ViewModel code is rewritten for the above example using self.
function MyViewModel(){
   self = this;
   self.a = ko.observable(10);
   self.b = ko.observable(40);

   this.totalAvg = ko.computed(function() {

      if(typeof(self.a()) !== "number" || typeof(self.b()) !== "number") {
         self.a(Number(self.a()));   //convert string to Number
         self.b(Number(self.b()));   //convert string to Number
      }

      total = (self.a() + self.b())/2 ;
      return total;
   });
}
Pure Computed Observables
A Computed Observable should be declared as Pure Computed Observable if that Observable is simply calculating and returning the value and not directly modifying the other objects or state. Pure Computed Observables helps Knockout to manage reevaluation and memory usage efficiently.
Notifying subscribers explicitly
When a Computed Observable is returning primitive data type value (String, Boolean, Null, and Number) then its subscribers are notified if and only if the actual value change takes place. It means if an Observable has received the value same as the previous value, then its subscribers are not notified.
You can make Computed Observables always explicitly notify the observers, even though the new value is the same as the old by using the notify syntax as follows.
myViewModel.property = ko.pureComputed(function() {
   return ...;    // code logic goes here
}).extend({ notify: 'always' });
Limiting Change Notifications
Too many expensive updates can result in performance issues. You can limit the number of notifications to be received from Observable using rateLimit attribute as follows.
// make sure there are updates no more than once per 100-millisecond period
myViewModel.property.extend({ rateLimit: 100 });
Finding Out If a Property is Computed Observable
In certain situations, it might be necessary to find out if a property is a Computed Observable. Following functions can be used to identify the types of Observables.
| Sr.No. | Function |
|---|---|
| 1 | ko.isComputed Returns true if the property is Computed Observable. |
| 2 | ko.isObservable Returns true if the property is Observable, Observable array, or Computed Observable. |
| 3 | ko.isWritableObservable Returns true if Observable, Observable array, or Writable Computed Observable. (This is also called as ko.isWriteableObservable) |
Writable Computed Observables
Computed Observable is derived from one or multiple other Observables, so it is read only. However, it is possible that one can make Computed Observable writable. For this you need to provide callback function that works on written values.
These writable Computed Observables work just like regular Observables. In addition, they require custom logic to be built for interfering read and write actions.
One can assign values to many Observables or Computed Observable properties using the chaining syntax as follows.
myViewModel.fullName('Tom Smith').age(45)
Example
Following example demonstrates the use of Writable Computable Observable.
<!DOCTYPE html>
   <head >
      <title>KnockoutJS Writable Computed Observable</title>
      <script src = "https://ajax.aspnetcdn.com/ajax/knockout/knockout-3.3.0.js"></script>
   </head>

   <body>
      <p>Enter your birth Date: <input type = "date" data-bind = "value: rawDate" ></p>
      <p><span data-bind = "text: yourAge"></span></p>

      <script>
         function MyViewModel() {
            this.yourAge = ko.observable();
            today = new Date();
            rawDate = ko.observable();

            this.rawDate = ko.pureComputed ({

               read: function() {
                  return this.yourAge;
               },

               write: function(value) {
                  var b = Date.parse(value);    // convert birth date into milliseconds
                  var t = Date.parse(today);    // convert todays date into milliseconds
                  diff = t - b;                 // take difference
                  var y = Math.floor(diff/31449600000);     // difference is converted
                                                            // into years. 31449600000
                                                            //milliseconds form a year.

                  var m = Math.floor((diff % 31449600000)/604800000/4.3);  // calculating
                                                                           // months.
                                                                           // 604800000
                                                                           // milliseconds
                                                                           // form a week.

                  this.yourAge("You are " + y + " year(s) " + m +" months old.");
               },
               owner: this
            });
         }

         ko.applyBindings(new MyViewModel());
      </script>

   </body>
</html>
In the above code, rawDate is pureComputed property accepted from UI. yourAge Observable is derived from rawDate.
Dates in JavaScript are manipulated in milliseconds. Hence, both the dates (today date and birth date) are converted into milliseconds and then the difference between them is converted back in years and months.
Output
Let's carry out the following steps to see how the above code works −
Save the above code in writable_computed_observable.htm file.
Open this HTML file in a browser.
Enter any birth date and observe that the age is calculated.
KnockoutJS - Declarative Bindings
Declarative binding in KnockoutJS provides a powerful way to connect data to UI.
It is important to understand the relationship between bindings and Observables. Technically, these two are different. You can use normal JavaScript object as ViewModel and KnockoutJS can process View's binding correctly.
Without Observable, the property from the UI will be processed only for the first time. In this case, it cannot update automatically based on the underlying data update. To achieve this, bindings must be referred to Observable properties.
Binding Syntax
The binding consists of 2 items, the binding name and value. Following is a simple example −
Today is : <span data-bind = "text: whatDay"></span>
Here, text is the binding name and whatDay is the binding value. You can have multiple bindings separated by comma, as shown in the following syntax.
Your name: <input data-bind = "value: yourName, valueUpdate: 'afterkeydown'" />
Here, value is updated after each key is pressed.
Binding Values
The binding value can be a single value, literal, a variable or can be a JavaScript expression. If the binding refers to some invalid expression or reference, then KO will produce an error and stop processing the binding.
Following are few examples of bindings.
<!-- simple text binding -->
<p>Enter employee name: <input   -bind = 'value: empName' /></p>

<!-- click binding, call a specific function -->
<button data-bind="click: sortEmpArray">Sort Array</button>

<!-- options binding -->
<select multiple = "true" size = "8" data-bind = "options: empArray ,
   selectedOptions: chosenItem"> </select>
Note the following points −
Whitespaces do not make any difference.
Starting from KO 3.0, you can skip the binding value which will give binding an undefined value.
Binding Context
The data that is being used in current bindings can be referenced by an object. This object is called binding context.
Context hierarchy is created and managed by KnockoutJS automatically. Following table lists the different types of binding contexts provided by KO.
| Sr.No. | Binding Context Types & Description |
|---|---|
| 1 | $root This always refers to top level ViewModel. This makes it possible to access top level methods for manipulating ViewModel. This is usually the object, which is passed to ko.applyBindings. |
| 2 | $data This property is lot like this keyword in Javascript object. $data property in a binding context refers to ViewModel object for the current context. |
| 3 | $index This property contains index of a current item of an array inside a foreach loop. The value of $index will change automatically as and when the underlying Observable array is updated. Obviously, this context is available only for foreach bindings. |
| 4 | $parent This property refers to parent ViewModel object. This is useful when you want to access outer ViewModel properties from inside of a nested loop. |
| 5 | $parentContext The context object which is bound at the parent level is called $parentContext. This is different from $parent. $parent refers to data. Whereas, $parentContext refers to binding context. E.g. you might need to access the index of outer foreach item from an inner context. |
| 6 | $rawdata This context holds raw ViewModel value in the current situation. This resembles $data but the difference is, if ViewModel is wrapped in Observable, then $data becomes just unwrapped. ViewModel and $rawdata becomes actual Observable data. |
| 7 | $component This context is used to refer to ViewModel of that component, when you are inside a particular component. E.g. you might want to access some property from ViewModel instead of current data in the template section of component. |
| 8 | $componentTemplateNodes This represents an array of DOM nodes passed to that particular component when you are within a specific component template. |
Following terms are also available in binding but are not actually binding context.
$context − This is nothing but existing binding context object.
$element − This object refers to an element in DOM in the current binding.
Working with Text and Appearances
Following is a list of binding types provided by KO to deal with text and visual appearances.
| Sr.No. | Binding Type & Usage |
|---|---|
| 1 | visible: <binding-condition>
To show or hide HTML DOM element depending on certain conditions. |
| 2 | text: <binding-value>
To set the content of an HTML DOM element. |
| 3 | html: <binding-value>
To set the HTML markup contents of a DOM element. |
| 4 | css: <binding-object>
To apply CSS classes to an element. |
| 5 | style: <binding-object>
To define the inline style attribute of an element. |
| 6 | attr: <binding-object>
To add attributes to an element dynamically. |
Working with Control Flow Bindings
Following is a list of Control Flow Binding types provided by KO.
| Sr.No. | Binding Type & Usage |
|---|---|
| 1 | foreach: <binding-array>
In this binding, each array item is referenced in HTML markup in a loop. |
| 2 | if: <binding-condition>
If the condition is true, then the given HTML markup will be processed. Else, it will be removed from DOM. |
| 3 | ifnot: <binding-condition>
Negation of If. If the condition is true, then the given HTML markup will be processed. Else, it will be removed from DOM. |
| 4 | with: <binding-object>
This binding is used to bind the child elements of an object in the specified object's context. |
| 5 | component: <component-name> OR component: <component-object>
This binding is used to insert a component into DOM elements and pass the parameters optionally. |
Working with Form Fields Bindings
Following is the list of Form Fields Binding types provided by KO.
| Sr.No. | Binding Type & Usage |
|---|---|
| 1 | click: <binding-function>
This binding is used to invoke a JavaScript function associated with a DOM element based on a click. |
| 2 | event: <DOM-event: handler-function>
This binding is used to listen to the specified DOM events and call associated handler functions based on them. |
| 3 | submit: <binding-function>
This binding is used to invoke a JavaScript function when the associated DOM element is submitted. |
| 4 | enable: <binding-value>
This binding is used to enable certain DOM elements based on a specified condition. |
| 5 | disable: <binding-value>
This binding disables the associated DOM element when the parameter evaluates to true. |
| 6 | value: <binding-value>
This binding is used to link respective DOM element's value into ViewModel property. |
| 7 | textInput: <binding-value>
This binding is used to create 2-way binding between text box or textarea and ViewModel property. |
| 8 | hasFocus: <binding-value>
This binding is used to manually set the focus of a HTML DOM element through a ViewModel property. |
| 9 | checked: <binding-value>
This binding is used to create a link between a checkable form element and ViewModel property. |
| 10 | options: <binding-array>
This binding is used to define the options for a select element. |
| 11 | selectedOptions: <binding-array>
This binding is used to work with elements which are selected currently in multi list select form control. |
| 12 | uniqueName: <binding-value>
This binding is used to generate a unique name for a DOM element. |
KnockoutJS - Dependency Tracking
KnockoutJs automatically tracks the dependencies when the values get updated. It has a single object called dependency tracker (ko.dependencyDetection) which acts as an intermediate between the two parties for subscribing the dependencies.
Following is the algorithm for dependency tracking.
Step 1 − Whenever you declare a computed observable, KO immediately invokes its evaluator function to get its initial value.
Step 2 − Subscription is set up to any observable that the evaluator reads. In an application, the old subscriptions which are no longer used are disposed.
Step 3 − KO finally notifies the updated computed observable.
Example
<!DOCTYPE html>
<html>
   <head>
      <title>KnockoutJS How Dependency Tracking Works</title>
      <!-- CDN's-->
      <script src = "https://ajax.aspnetcdn.com/ajax/knockout/knockout-3.1.0.js"
         type = "text/javascript"></script>
   </head>

   <body>
      <div>
         <form data-bind = "submit: addFruits">
            <b>Add Fruits:</b>
            <input data-bind = 'value: fruitToAdd, valueUpdate: "afterkeydown"'/>
            <button type = "submit" data-bind = "enable: fruitToAdd().length > 0">Add</button>
            <p><b>Your fruits list:</b></p>
            <select multiple = "multiple" width = "50" data-bind = "options: fruits"> </select>
         </form>
      </div>

      <script>
         var Addfruit = function(fruits) {
            this.fruits = ko.observableArray(fruits);
            this.fruitToAdd = ko.observable("");

            this.addFruits = function() {

               if (this.fruitToAdd() != "") {
                  this.fruits.push(this.fruitToAdd());   // Adds a fruit
                  this.fruitToAdd("");                   // Clears the text box
               }

            }.bind(this);                                // "this" is the view model
         };

         ko.applyBindings(new Addfruit(["Apple", "Orange", "Banana"]));
      </script>

   </body>
</html>
Output
Let's carry out the following steps to see how the above code works −
Save the above code in dependency_tracking.htm file.
Open this HTML file in a browser.
Enter any fruit name and click the Add button.
Controlling Dependencies Using Peek
The Computed Observable can be accessed without creating a dependency, by using the peek function. It controls the Observable by updating the computed property.
Example
<!DOCTYPE html>
<html>
   <head>
      <title>KnockoutJs Controlling Dependencies Using Peek</title>
      <!-- CDN's-->
      <script src = "https://ajax.aspnetcdn.com/ajax/knockout/knockout-3.1.0.js"
         type = "text/javascript"></script>
   </head>

   <body>
      <div class = "logblock">
         <h3>Computed Log</h3>
         <pre class = "log" data-bind = "html: computedLog"></pre>
      </div>

      <script>
         function AppData() {
            this.firstName = ko.observable('John');
            this.lastName = ko.observable('Burns');
            this.computedLog = ko.observable('Log: ');

            this.fullName = ko.computed(function () {
               var value = this.firstName() + " " + this.lastName();
               this.computedLog(this.computedLog.peek() + value + '; <br/>');
               return value;
            }, this);

            this.step = ko.observable(0);
            this.next = function () {
               this.step(this.step() === 2 ? 0 : this.step()+1);
            };
         };

         ko.applyBindings(new AppData());
      </script>

   </body>
</html>
Output
Let's carry out the following steps to see how the above code works −
Save the above code in dependency_tracking_peek.htm file.
Open this HTML file in a browser.
Observations
Ignoring Dependencies Within a Computed Dependency
The ko.ignoreDependencies function helps ignore those dependencies that you don't want to track within the computed dependencies. Following is its syntax.
ko.ignoreDependencies( callback, callbackTarget, callbackArgs );
Why Circular Dependencies Aren't Meaningful
If KO is evaluating a Computed Observable, then it will not restart an evaluation of the dependent Computed Observable. Hence, it doesn't make sense to include cycles in your dependency chains.
KnockoutJS - Templating
Template is a set of DOM elements which can be used repetitively. Templating makes it easy to build complex applications due to its property of minimizing duplication of DOM elements.
There are 2 ways of creating templates.
Native templating − This method supports the control flow bindings such as foreach, with, and if. These bindings capture HTML markup existing in the element and use it as template for random items. No external library is required for this templating.
String-based templating − KO connects to the third party engine to pass ViewModel values into it and injects the resulting markup into the document. For example, JQuery.tmpl and Underscore Engine.
Syntax
template: <parameter-value>

<script type = "text/html" id = "template-name">
   ...
   ...   // DOM elemets to be processed
   ...
</script>
Note that type is provided as text/html in the script block to notify KO that, it is not an executable block rather just a template block which needs to be rendered.
Parameters
Combination of the following properties can be sent as parameter-value to template.
name − This represents the name of the template.
nodes − This represents an array of DOM nodes to be used as the template. This parameter is ignored if the name parameter is passed.
data − This is nothing but data to be shown via the template.
if − Template will be served if the given condition results in true or true-like value.
foreach − To serve template in foreach format.
as − This is just to create an alias in foreach element.
afterAdd, afterRender, beforeRemove − These are all to represent callable functions to be executed depending on the operation performed.
Observations
Rendering a named Template
Templates are defined implicitly by HTML markup inside DOM when used with control flow bindings. However if you want to, you can factor out templates into a separate element and then reference them by name.
Example
<!DOCTYPE html>
   <head>
      <title>KnockoutJS Templating - Named Template</title>
      <script src = "https://ajax.aspnetcdn.com/ajax/knockout/knockout-3.3.0.js"
         type = "text/javascript"></script>
   </head>

   <body>
      <h2>Friends List</h2>
      Here are the Friends from your contact page:
      <div data-bind = "template: { name: 'friend-template', data: friend1 }"></div>
      <div data-bind = "template: { name: 'friend-template', data: friend2 }"></div>

      <script type = "text/html" id = "friend-template">
         <h3 data-bind = "text: name"></h3>
         <p>Contact Number: <span data-bind = "text: contactNumber"></span></p>
         <p>Email-id: <span data-bind = "text: email"></span></p>
      </script>

      <script type = "text/javascript">
         function MyViewModel() {
            this.friend1 = {
               name: 'Smith',
               contactNumber: 4556750345,
               email: 'smith123@gmail.com'
            };

            this.friend2 = {
               name: 'Jack',
               contactNumber: 6789358001,
               email: 'jack123@yahoo.com'
            };
         }

         var vm = new MyViewModel();
         ko.applyBindings(vm);
      </script>

   </body>
</html>
Output
Let's carry out the following steps to see how the above code works −
Save the above code in template-named.htm file.
Open this HTML file in a browser.
Here, friend-template is used 2 times.
Using "foreach" in Template
Following is an example of using foreach parameter along with the template name.
Example
<!DOCTYPE html>
   <head>
      <title>KnockoutJS Templating - foreach used with Template</title>
      <script src = "https://ajax.aspnetcdn.com/ajax/knockout/knockout-3.3.0.js"
         type = "text/javascript"></script>
   </head>

   <body>
      <h2>Friends List</h2>
      Here are the Friends from your contact page:
      <div data-bind = "template: { name: 'friend-template', foreach: friends }"></div>

      <script type = "text/html" id = "friend-template">
         <h3 data-bind = "text: name"></h3>
         <p>Contact Number: <span data-bind = "text: contactNumber"></span></p>
         <p>Email-id: <span data-bind = "text: email"></span></p>
      </script>

      <script type = "text/javascript">
         function MyViewModel() {
            this.friends = [
               { name: 'Smith', contactNumber: 4556750345, email: 'smith123@gmail.com' },
               { name: 'Jack', contactNumber: 6789358001, email: 'jack123@yahoo.com' },
               { name: 'Lisa', contactNumber: 4567893131, email: 'lisa343@yahoo.com' }
            ]
         }

         var vm = new MyViewModel();
         ko.applyBindings(vm);
      </script>

   </body>
</html>
Output
Let's carry out the following steps to see how the above code works −
Save the above code in template-foreach.htm file.
Open this HTML file in a browser.
Here, foreach control is used in template binding.
Creating alias Using as Keyword for foreach Items
Following is how an alias can be created for a foreach item −
<div data-bind = "template: {
   name: 'friend-template',
   foreach: friends,
   as: 'frnz'
}"></div>
It becomes easy to refer to parent objects from inside of foreach loops by creating alias. This feature is useful when the code is complex and nested at multiple levels.
Example
<!DOCTYPE html>
   <head>
      <title>KnockoutJS Templating - using alias in Template</title>
      <script src = "https://ajax.aspnetcdn.com/ajax/knockout/knockout-3.3.0.js"
         type = "text/javascript"></script>
   </head>

   <body>
      <h2>Friends List</h2>
      Here are the Friends from your contact page:
      <ul data-bind = "template: {
         name: 'friend-template',
         foreach: friends,
         as: 'frnz'
      }"></ul>

      <script type = "text/html" id = "friend-template">
         <li>
            <h3 data-bind = "text: name"></h3>
            <span>Contact Numbers</span>
            <ul data-bind = "template: {
               name : 'contacts-template',
               foreach:contactNumber,
               as: 'cont'
            } "></ul>
            <p>Email-id: <span data-bind = "text: email"></span></p>
         </li>
      </script>

      <script type = "text/html" id = "contacts-template">
         <li>
            <p><span data-bind = "text: cont"></span></p>
         </li>
      </script>

      <script type = "text/javascript">
         function MyViewModel() {
            this.friends = ko.observableArray ( [
               {
                  name: 'Smith',
                  contactNumber: [ 4556750345, 4356787934 ],
                  email: 'smith123@gmail.com'
               },

               {
                  name: 'Jack',
                  contactNumber: [ 6789358001, 3456895445 ],
                  email: 'jack123@yahoo.com'
               },

               {
                  name: 'Lisa',
                  contactNumber: [ 4567893131, 9876456783, 1349873445 ],
                  email: 'lisa343@yahoo.com'
               }
            ]);
         }

         var vm = new MyViewModel();
         ko.applyBindings(vm);
      </script>

   </body>
</html>
Output
Let's carry out the following steps to see how the above code works −
Save the above code in template-as-alias.htm file.
Open this HTML file in a browser.
Alias is used instead of full name of arrays.
Using afterAdd, beforeRemove, and afterRender
There are situations wherein extra custom logic needs to be run on DOM elements created by the template. In such case, following callbacks can be used. Consider that you are using foreach element then −
afterAdd − This function is invoked when a new item is added to the array mentioned in foreach.
beforeRemove − This function is invoked just before removing the item from an array mentioned in foreach.
afterRender − Function mentioned here is invoked every time foreach is rendered and new entries are added to the array.
Example
<!DOCTYPE html>
   <head>
      <title>KnockoutJS Templating - Use of afterRender Template</title>
      <script src = "https://ajax.aspnetcdn.com/ajax/knockout/knockout-3.3.0.js"
         type = "text/javascript"></script>
      <script src = "https://code.jquery.com/jquery-2.1.3.min.js"
         type = "text/javascript"></script>
   </head>

   <body>
      <h2>Friends List</h2>
      Here are the Friends from your contact page:
      <div data-bind = "template: {
         name: 'friend-template',
         foreach: friends ,
         afterRender: afterProcess
      }"></div>

      <script type = "text/html" id = "friend-template">
         <h3 data-bind = "text: name"></h3>
         <p>Contact Number: <span data-bind = "text: contactNumber"></span></p>
         <p>Email-id: <span data-bind = "text: email"></span></p>
         <button data-bind = "click: $root.removeContact">remove </button>
      </script>

      <script type = "text/javascript">
         function MyViewModel() {
            self = this;
            this.friends = ko.observableArray ([
               { name: 'Smith', contactNumber: 4556750345, email: 'smith123@gmail.com' },
               { name: 'Jack', contactNumber: 6789358001, email: 'jack123@yahoo.com' },
            ])

            this.afterProcess = function(elements, data){
               $(elements).css({color: 'magenta' });
            }

            self.removeContact = function() {
               self.friends.remove(this);
            }
         }

         var vm = new MyViewModel();
         ko.applyBindings(vm);
      </script>
   </body>
</html>
Output
Let's carry out the following steps to see how the above code works −
Save the above code in template-afterrender.htm file.
Open this HTML file in a browser.
Here, afterProcess function is executed every time foreach is rendered.
Choosing Template Dynamically
If there are multiple templates available, then one can be chosen dynamically by making the name as observable parameter. Hence, the template value will be re-evaluated as the name parameter changes and in turn data will be re-rendered.
Example
<!DOCTYPE html>
   <head>
      <title>KnockoutJS Templating - Dynamic Template</title>
      <script src = "https://ajax.aspnetcdn.com/ajax/knockout/knockout-3.3.0.js"
         type = "text/javascript"></script>
   </head>

   <body>
      <h2>Friends List</h2>
      Here are the Friends from your contact page:
      <div data-bind = "template: {
         name: whichTemplate,
         foreach: friends
      }"></div>

      <script type = "text/html" id = "only-phon">
         <h3 data-bind = "text: name"></h3>
         <p>Contact Number: <span data-bind = "text: contactNumber"></span></p>
      </script>

      <script type = "text/html" id = "only-email">
         <h3 data-bind = "text: name"></h3>
         <p>Email-id: <span data-bind = "text: email"></span></p>
      </script>

      <script type = "text/javascript">
         function MyViewModel() {

            this.friends = ko.observableArray ([
               {
                  name: 'Smith',
                  contactNumber: 4556750345,
                  email: 'smith123@gmail.com',
                  active: ko.observable(true)
               },

               {
                  name: 'Jack',
                  contactNumber: 6789358001,
                  email: 'jack123@yahoo.com',
                  active: ko.observable(false)
               },
            ]);

            this.whichTemplate = function(friends) {
               return friends.active() ? "only-phon" : "only-email";
            }
         }

         var vm = new MyViewModel();
         ko.applyBindings(vm);
      </script>

   </body>
</html>
Output
Let's carry out the following steps to see how the above code works −
Save the above code in template-dynamic.htm file.
Open this HTML file in a browser.
Template to be used is decided depending on the active flag value.
Using external string based engines
Native templating works perfectly with various control flow elements even with nested code blocks. KO also offers a way to integrate with external templating library such as Underscore templating Engine or JQuery.tmpl.
As mentioned on the official site JQuery.tmpl is no longer under active development since December 2011. Hence, KO's native templating is only recommended instead of JQuery.tmpl or any other string-based template engine.
Please refer to the official site for more details on this.
KnockoutJS - Components
Components are a huge way of organizing the UI code for structuring a large application and promoting code reusability.
It is inherited or nested from other component. For loading and configuration, it defines its own conventions or logic.
It is packaged to reuse throughout the application or the project. Represents the complete sections of application or small controls/widgets. It can be loaded or preloaded on demand.
Component Registration
Components can register using the ko.components.register() API. It helps to load and represent the components in KO. Component name with configuration is expected for registration. The configuration specifies how to determine the viewModel and template.
Syntax
Components can be registered as follows −
ko.components.register('component-name', {
   viewModel: {...},    //function code
   template: {....)	//function code
});
The component-name can be any nonempty string.
viewModel is optional, and can take any of the viewModel formats listed in the next sections.
template is required, and can take any of the template formats listed in the next sections.
Stating a ViewModel
Following table lists the viewModel formats that can be used to register the components.
| Sr.No. | viewModel Forms & Description |
|---|---|
| 1 | constructor function It creates a separate viewModel object for each component. The object or function is used to bind in components view.
function SomeComponentViewModel(params) {
   this.someProperty = params.something;
}
ko.components.register('component name', {
   viewModel: SomeComponentViewModel,
   template: ...
});
|
| 2 | shared object instance The viewModel object instance is shared. The instance property is passed to use the object directly.
var sharedViewModelInstance = { ... };

ko.components.register('component name', {
   viewModel: { instance: sharedViewModelInstance },
   template: ...
});
|
| 3 | createViewModel It calls a function which acts as a factory and can be used as view model that can return an object. ko.components.register('component name', {
viewModel: {
createViewModel: function (params, componentInfo) {
... //function code
...
}
},
template: ....
});
|
| 4 | AMD module It is a module format for defining modules where module and dependencies both are loaded asynchronously. ko.components.register('component name', {
viewModel: { require: 'some/module/name' },
template: ...
});
define(['knockout'], function(ko) {
function MyViewModel() {
// ...
}
return MyViewModel;
});
|
Stating a Template
Following table lists the template formats that can be used to register the components.
| Sr.No. | Template Forms |
|---|---|
| 1 | element ID ko.components.register('component name', {
template: { element: 'component-template' },
viewModel: ...
});
|
| 2 | element instance
var elemInstance = document.getElementById('component-template');

ko.components.register('component name', {
   template: { element: elemInstance },
   viewModel: ...
});
|
| 3 | string of markup ko.components.register('component name', {
template: '<input data-bind = "value: yourName" />\
<button data-bind = "click: addEmp">Add Emp </button>',
viewModel: ...
});
|
| 4 | DOM nodes var emp = [
document.getElementById('node 1'),
document.getElementById('node 2'),
];
ko.components.register('component name', {
template: emp,
viewModel: ...
});
|
| 5 | document fragement ko.components.register('component name', {
template: someDocumentFragmentInstance,
viewModel: ...
});
|
| 6 | AMD module ko.components.register('component name', {
template: { require: 'some/template' },
viewModel: ...
});
|
Components Registered as a Single AMD Module
The AMD module can register a component by itself without using viewModel/template pair.
ko.components.register('component name',{ require: 'some/module'});
Component Binding
There are two ways of component binding.
Full syntax − It passes the parameter and object to the component. It can pass using the following properties.
name − It adds the component name.
params − It can pass multiple parameters in object on the component.
<div data-bind='component: {
   name: "tutorials point",
   params: { mode: "detailed-list", items: productsList }
}'>
</div>
Shorthand syntax − It passes the string as a component name and it does not include parameter in it.
<div data-bind = 'component: "component name"'></div>
Template-only components − Components can only define template without specifing the viewModel.
ko.components.register('component name', {
   template:'<input data-bind = "value: someName" />,
});
Using Component without a container element − Components can be used without using extra container element. This can be done using containerless flow control which is similar as the comment tag.
<!--ko.component: ""-->
<!--/ko-->
Custom Element
Custom element is a way for rendering a component. Here, you can directly write a selfdescriptive markup element name instead of defining a placeholder, where the components are binded through it.
<products-list params = "name: userName, type: userType"></products-list>
Passing Parameter
params attribute is used to pass the parameter to component viewModel. It is similar to data-bind attribute. The contents of the params attribute are interpreted like a JavaScript object literal (just like a data-bind attribute), so you can pass arbitrary values of any type. It can pass the parameter in following ways −
Communication between parent and child components − The component is not instantiated by itself so the viewmodel properties are referred from outside of the component and thus would be received by child component viewmodel. For example, you can see in the following syntax that ModelValue is the parent viewmodel, which is received by child viewModel constructor ModelProperty.
Passing observable expressions − It has three values in params parameter.
simpleExpression − It is a numeric value. It does not involve any observables.
simpleObservable − It is an instance that is defined on parent viewModel. The parent viewModel will automatically get the changes on observable done by child viewModel.
observableExpression − Expression reads the observable when the expression is evaluated by itself. When the observable value changes, then the result of expression can also changs over time.
We can pass the parameters as follows −
<some-component
   params = 'simpleExpression: 1 + 1,
      simpleObservable: myObservable,
      observableExpression: myObservable() + 1'>
</some-component>
We can pass the parameters in viewModel as follows −
<some-component
   params = 'objectValue:{a: 3, b: 2},
      dateValue: new date(),
      stringValue: "Hi",
      numericValue:123,
      boolValue: true/false,
      ModelProperty: ModelValue'>
</some-component>
Passing Markup into Components
The received markup is used to create a component and is selected as a part of the output. Following nodes are passed as part of the output in the component template.
template: { nodes: $componentTemplateNodes }
Controlling custom element tag names
The names which you register in the components using ko.components.register, the same name corresponds to the custom element tag names. We can change the custom element tag names by overriding it to control using getComponentNameForNode.
ko.components.getComponentNameForNode = function(node) {
   ...
   ...   //function code
   ...
}
Registering Custom Elements
The custom elements can be made available immediately, if the default component loader is used and hence the component is registered using ko.components.register. If we are not using the ko.components.register and implementing the custom component loader, then the custom element can be used by defining any element name of choice. There is no need to specify configuration when you are using ko.components.register as the custom component loader does not use it anymore.
ko.components.register('custom-element', { ......... });
Example
<!DOCTYPE html>
   <head>
      <title>KnockoutJS Components</title>
      <script src = "https://ajax.googleapis.com/ajax/libs/jquery/1.11.1/jquery.min.js"></script>
      <script src = "https://cdnjs.cloudflare.com/ajax/libs/knockout/3.2.0/knockout-min.js"></script>
   </head>

   <body>
      <!--params attribute is used to pass the parameter to component viewModel.-->
      <click params = "a: a, b: b"></click>

      <!--template is used for a component by specifying its ID -->
      <template id = "click-l">
         <div data-bind = "text: a"></div>

         <!--Use data-bind attribute to bind click:function() to ViewModel. -->
         <button data-bind = "click:function(){callback(1)}">Increase</button>
         <button data-bind = "click:function(){callback(-1)}">Decrease</button>
      </template>

      <script>
         //Here components are registered
         ko.components.register('click', {

            viewModel: function(params) {
               self = this;
               this.a = params.a;
               this.b = params.b;

               this.callback = function(num) {
                  self.b(parseInt(num));
                  self.a( self.a() + parseInt(num) );
               };
            },
            template: { element: 'click-l' }
         });

         //keeps an eye on variable for any modification in data
         function viewModel() {
            this.a = ko.observable(2);
            this.b = ko.observable(0);
         }

         ko.applyBindings(new viewModel() );
      </script>

   </body>
</html>
Output
Let's carry out the following steps to see how the above code works −
Save the above code in component_register.htm file.
Open this HTML file in a browser.
Component Loaders
Component loaders are used to pass the template/viewModel pair asynchronously for the given component name.
The default component loader
The default component loader depends on the explicitly registered configuration. Each component is registered before using the component.
ko.components.defaultLoader
Component Loader Utility Functions
The default component loader can read and write using the following functions.
| Sr.No. | Utility functions & Description |
|---|---|
| 1 | ko.components.register(name, configuration) Component is registered. |
| 2 | ko.components.isRegistered(name) If the particular component name is already registered, then it returns as true else false. |
| 3 | ko.components.unregister(name) The component name is removed from the registry. |
| 4 | ko.components.get(name, callback) This function goes turn by turn to each registered loader to find who has passed the viewModel/template definition for component name as first. Then it returns viewModel/template declaration by invoking callback. If the registered loader could not find anything about the component, then it invokes callback(null). |
| 5 | ko.components.clearCachedDefinition(name) This function can be called when we want to clear the given component cache entry. If the component is needed next time, again the loaders will be consulted. |
Implementing a custom component loader
The custom component loader can be implemented in the following ways −
getConfig(name, callback) − Depending on the names, we can pass configurations programatically. We can call callback(componentConfig) to pass the configurations, where the object componentConfig can be used by the loadComponent or any other loader.
loadComponent(name, componentConfig, callback) − This function resolves the viewModel and the template portion of config depending upon the way it is configured. We can call callback(result) to pass the viewmodel/template pair, where the object result is defined by the following properties.
template − Required. Return array of DOM nodes.
createViewModel(params, componentInfo) − Optional. Returns the viewModel Object depending on how the viewModel property was configured.
loadTemplate(name, templateConfig, callback) − DOM nodes is passed in a template using custom logic. The object templateConfig is a property of the template from an object componentConfig. callback(domNodeArray) is called to pass an array of DOM nodes.
loadViewModel(name, templateConfig, callback) − viewModel factory is passed in a viewModel configuration using custom logic.
