- jOOQ - Home Page
- jOOQ - Environment Setup
- jOOQ - DSL API
- jOOQ - DSLContext API
- jOOQ - DML Statements
- jOOQ - DDL Statements
- jOOQ - Transactional Statements
- jOOQ - Comparing JDBC and jOOQ
- jOOQ - Comparing JPA and jOOQ
- jOOQ - jOOQ Tools
- Dialogflow Useful Resources
- Dialogflow - Useful Resources
- Dialogflow - Discussion
jOOQ - Environment Setup
Like any other technology, we need to set up an environment to use jOOQ. This tutorial will guide you in the whole process of configuring and running jOOQ on your local machine. But, before going further, you need a few things ready on your machine, which are −
You can find the process of installing them on the Tutorials Point website. For your convenience, we have provided links to the tutorials explaining the process. After installing, follow the step-by-step instructions given in this tutorial.
Setting up Spring Boot project
Let's start by setting up the Spring Boot project first because jOOQ is used with Spring Boot in place of JPA and Hibernate.
Step 1
Search spring initializr on your favorite browser. Click on the first link that appears. Or, click on the following link: https://start.spring.io/ to navigate.
Step 2
Please refer to the snapshot below to choose the options for your spring project. If you want to change the project metadata, it's completely your wish.
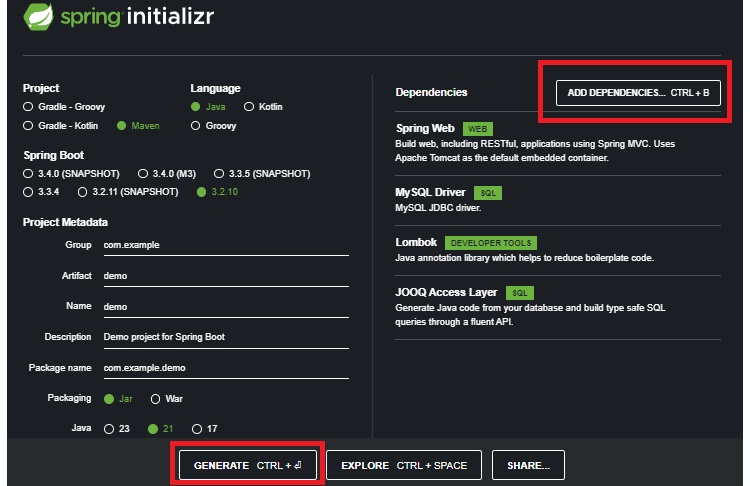
Step 3
Add the following dependencies by clicking on the add dependencies button −
- Spring Web
- JOOQ Access Layer
- MySQL Driver
- Lombok
You need to search for the name of the dependencies. Once you've added them, click the generate button to download Spring Boot Initializr for your project in a zip file. For a better understanding, see the above snapshot.
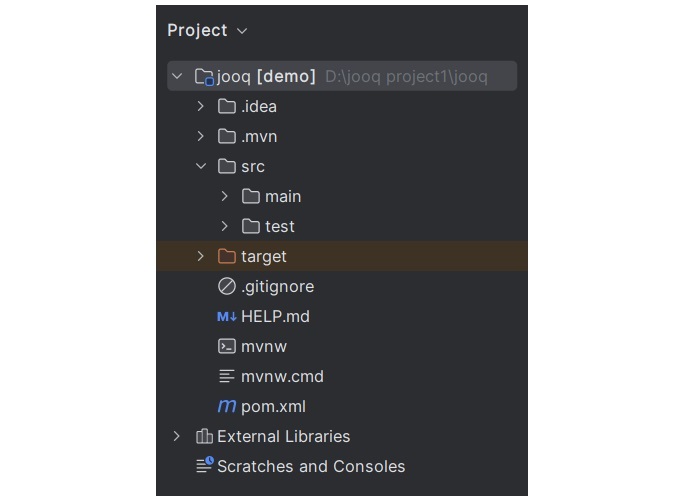
Step 4
Now, unzip the initializr file and open it in Intellij Idea IDE. Your project structure should look like this −
Create a Database Schema
Next, we need a database to work with. For that, follow the steps given below −
Step 1
Open the mysql command line client in your machine. Enter your root password so that you can create a database.

Step 2
Create a database with the name mydatabase. You can use any name. Use the following command for this purpose −
create database mydatabase;
To use this database, type the following command −
use mydatabase;
Step 3
Create an employee table within the database using the following command −
CREATE TABLE employee(
    id INT(10),
    name VARCHAR(255),
    job_title VARCHAR(255)
    );
Step 4
After creating employee table, add some information to it with the help of INSERT command as shown below −
INSERT INTO employee (id, name, job_title) VALUES (1, 'Aman', 'Technical Writer');
Similarly, add some more values to the table.
Configure jOOQ in Intellij Idea IDE
To configure jOOQ in Intellij Idea IDE, the following steps need to be followed −
Step 1
Open pom.xml file and add the jOOQ dependency in the dependencies section −
<dependency>
	<groupId>org.jooq</groupId>
	<artifactId>jooq</artifactId>
</dependency>
And, following plugin in the plugins section
<plugin>
	<groupId>org.jooq</groupId>
	<artifactId>jooq-codegen-maven</artifactId>
	<executions>
		<execution>
			<id>jooq-codegen</id>
			<phase>generate-sources</phase>
			<goals>
				<goal>generate</goal>
			</goals>
			<configuration>
				<!--Insert your DB configuration-->
				<jdbc>
					<driver>com.mysql.cj.jdbc.Driver</driver>
					<url>jdbc:mysql://localhost:3306/mydatabase</url>
					<user>root</user>
					<password>Root@-#123</password>
				</jdbc>
				<generator>
					<database>
						<name>org.jooq.meta.mysql.MySQLDatabase</name>
						<includes>.*</includes>
						<excludes></excludes>
						<inputSchema>mydatabase</inputSchema>
					</database>
					<generate>
						<pojos>true</pojos>
						<pojosEqualsAndHashCode>
							true
						</pojosEqualsAndHashCode>
						<javaTimeTypes>true</javaTimeTypes>
						<fluentSetters>true</fluentSetters>
					</generate>
					<target>
						<packageName>
							com.tej.JooQDemo.jooq.sample.model
						</packageName>
						<directory>
							target/generated-sources/jooq
						</directory>
					</target>
				</generator>
			</configuration>
		</execution>
	</executions>
</plugin>
Step 2
Navigate to src -> main -> resources -> application.properties. Add the following code block to the application.properties file −
spring.datasource.driver-class-name=com.mysql.cj.jdbc.Driver
spring.datasource.url = jdbc:mysql://localhost:3306/mydatabase
spring.datasource.username = root
spring.datasource.password = Root@-#123
server.port=9191
NOTE: Password may be different as per your MySQL setup.
Step 3
That's it, now use the command given below to compile the project −
mvn clean compile
Now, follow this path in your project structure to see the generated pojos:
target -> generated-sources -> jooq -> tables -> pojos
